How to create a Facebook Event? (3 Easy Methods)
Choose Your Language:
Creating a Facebook event is an effective way to organize and promote gatherings ranging from intimate birthday celebrations to public meetings. In an era where digital platforms are increasingly becoming central to our social lives, Facebook events offer a convenient way to manage invitations, communicate event details, and engage with attendees.
Whether your goal is to host a memorable movie night, a private get-together, or a large-scale public event, understanding how to create an event on Facebook is essential. This guide aims to provide you with a straightforward, professional walkthrough on using Facebook to ensure your next event’s success.
How to Target Rich Audience on Facebook (8 Winning Targeting)
Types of Facebook Events
Facebook events streamline the process of organizing and publicizing any gathering by providing tools to include comprehensive event details. These tools allow potential attendees to express interest, stay informed with all relevant updates, and confirm their attendance.
When initiating an event on Facebook, it’s critical to understand the distinct privacy settings available during the event creation phase.
Here we’ll briefly explore these settings before we proceed to the detailed steps of creating an event.
Private Events: Only visible to individuals directly invited by the event organizer. Such events keep the guest list and event specifics accessible only to those who have confirmed their participation. Organizers have the discretion to allow or prevent guests from extending invites to others.
Public Events: Accessible to the broad Facebook community, these events do not restrict visibility based on a user’s connection to the organizer. Information about the event, including who will be attending or showing interest, is openly available for RSVPs from any Facebook user.
Friends-Only Events: This setting restricts event visibility to the organizer’s Facebook friends, combining elements of both private and public events but within a more confined network.
Group-Specific Events: Tailored for specific Facebook groups, this option limits the event’s reach to members of a group you belong to, making it ideal for targeted gatherings among group members.
How to create a Private Event?
Creating a private event on Facebook is a straightforward procedure that allows you to organize intimate gatherings with your invite-only guest list.
This tutorial will guide you through each step of creating a private Facebook event, ensuring privacy while promoting an inviting atmosphere for your upcoming occasion.
Step 1: Accessing the Create Event Feature
Open the Facebook app on your device or visit facebook.com on mobile browsers.
Tap or click on the “+” icon (calendar shaped option) at the top of your news feed page or in the left hand sidebar to access the event creation tools.
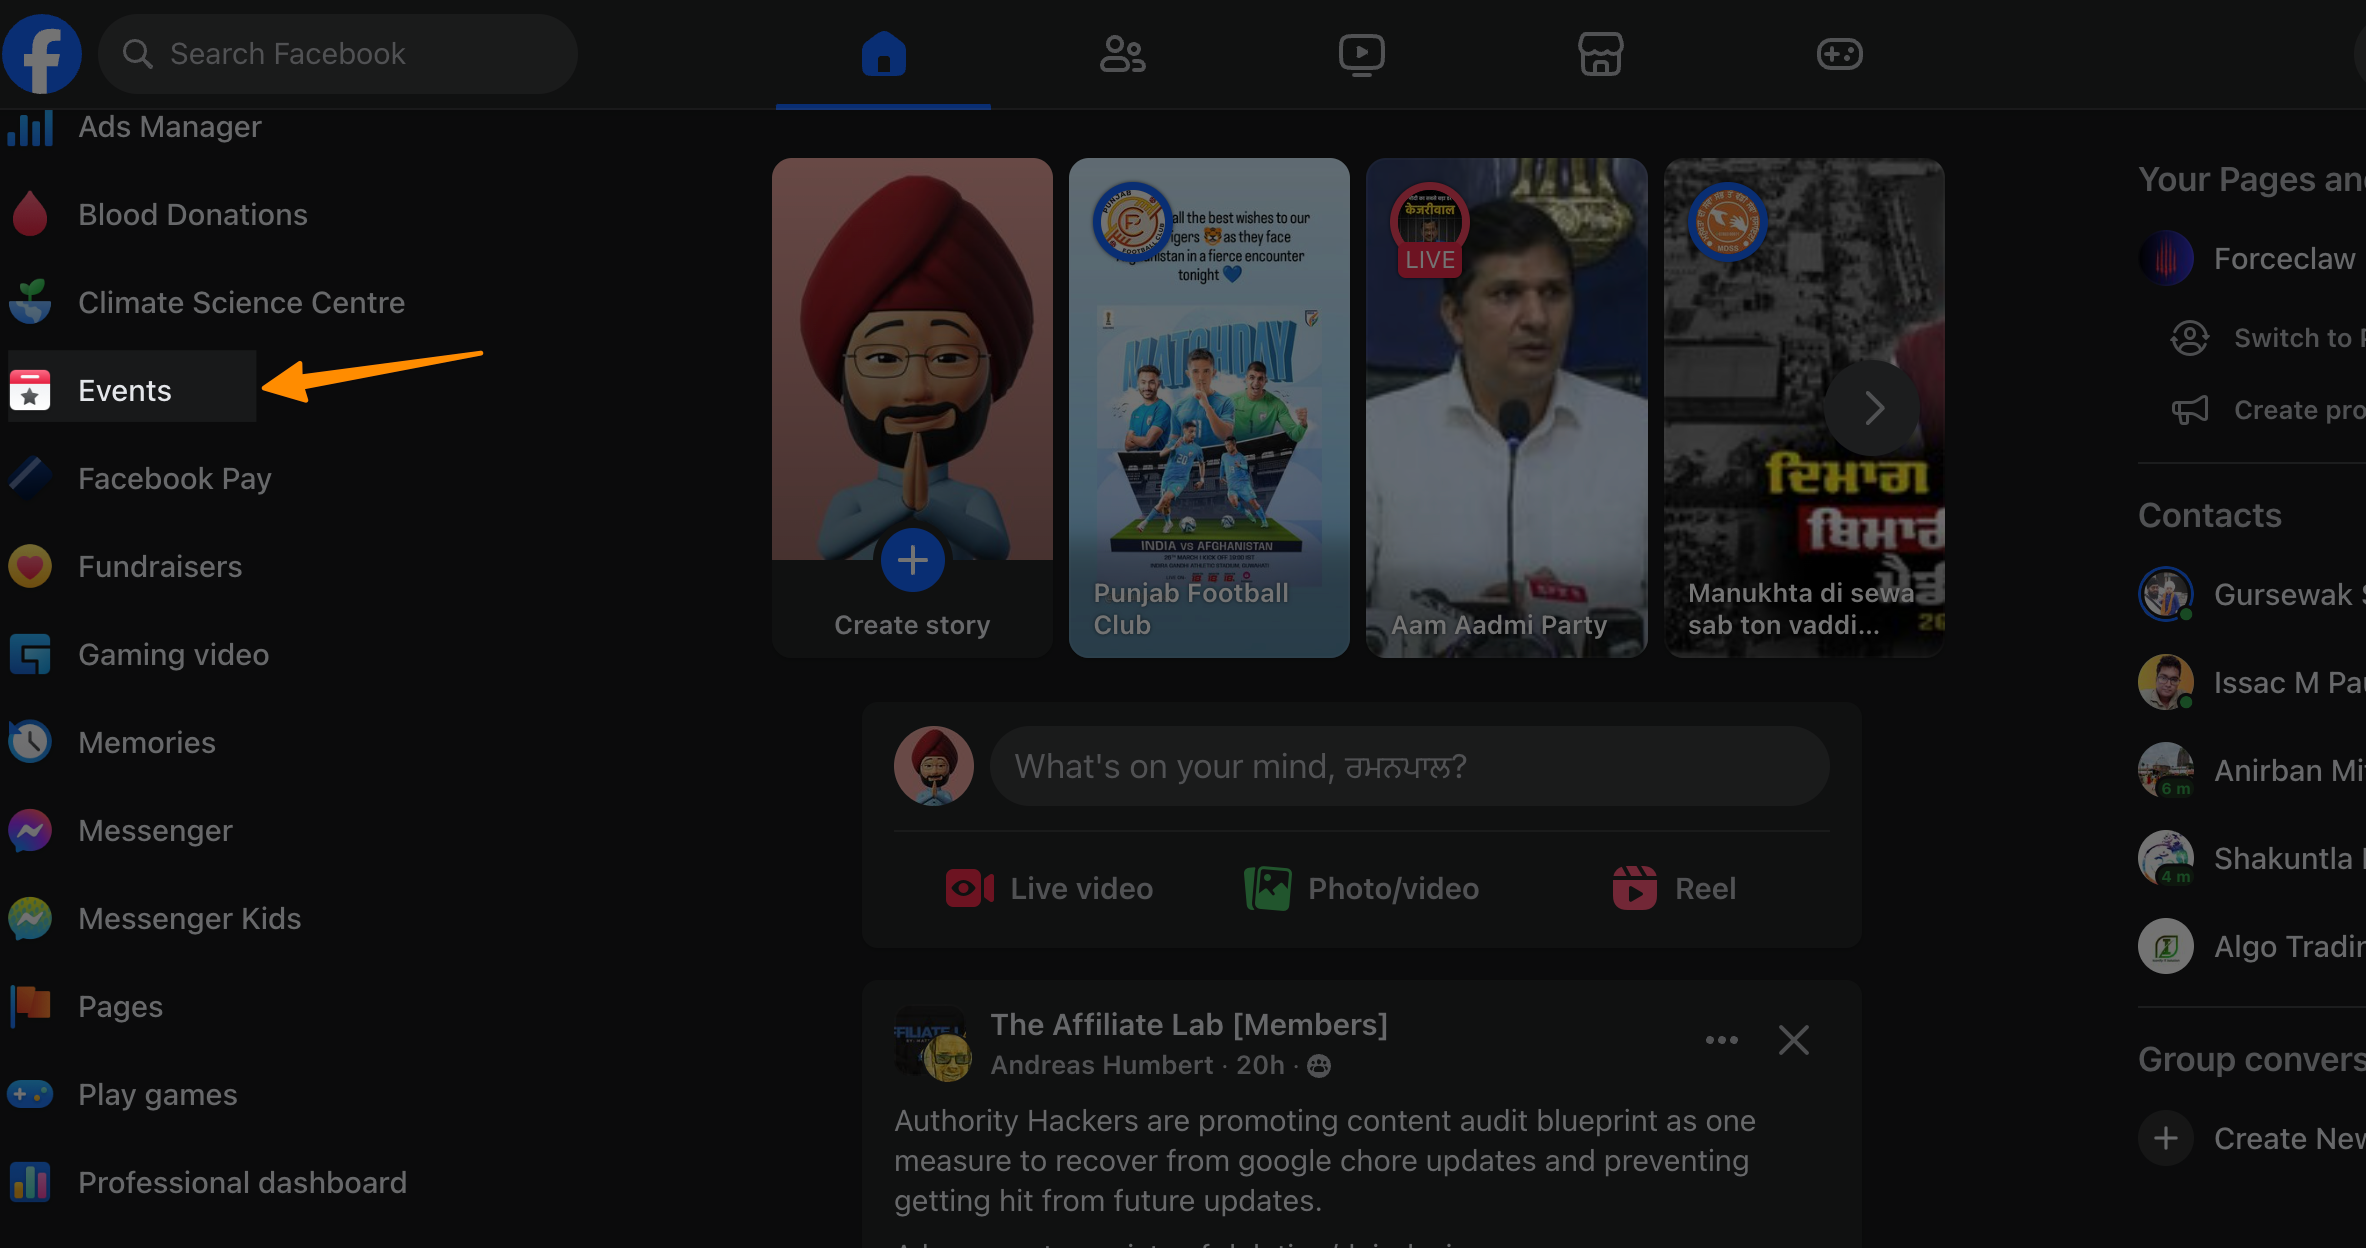
Step 2: Setting Up Your Private Event
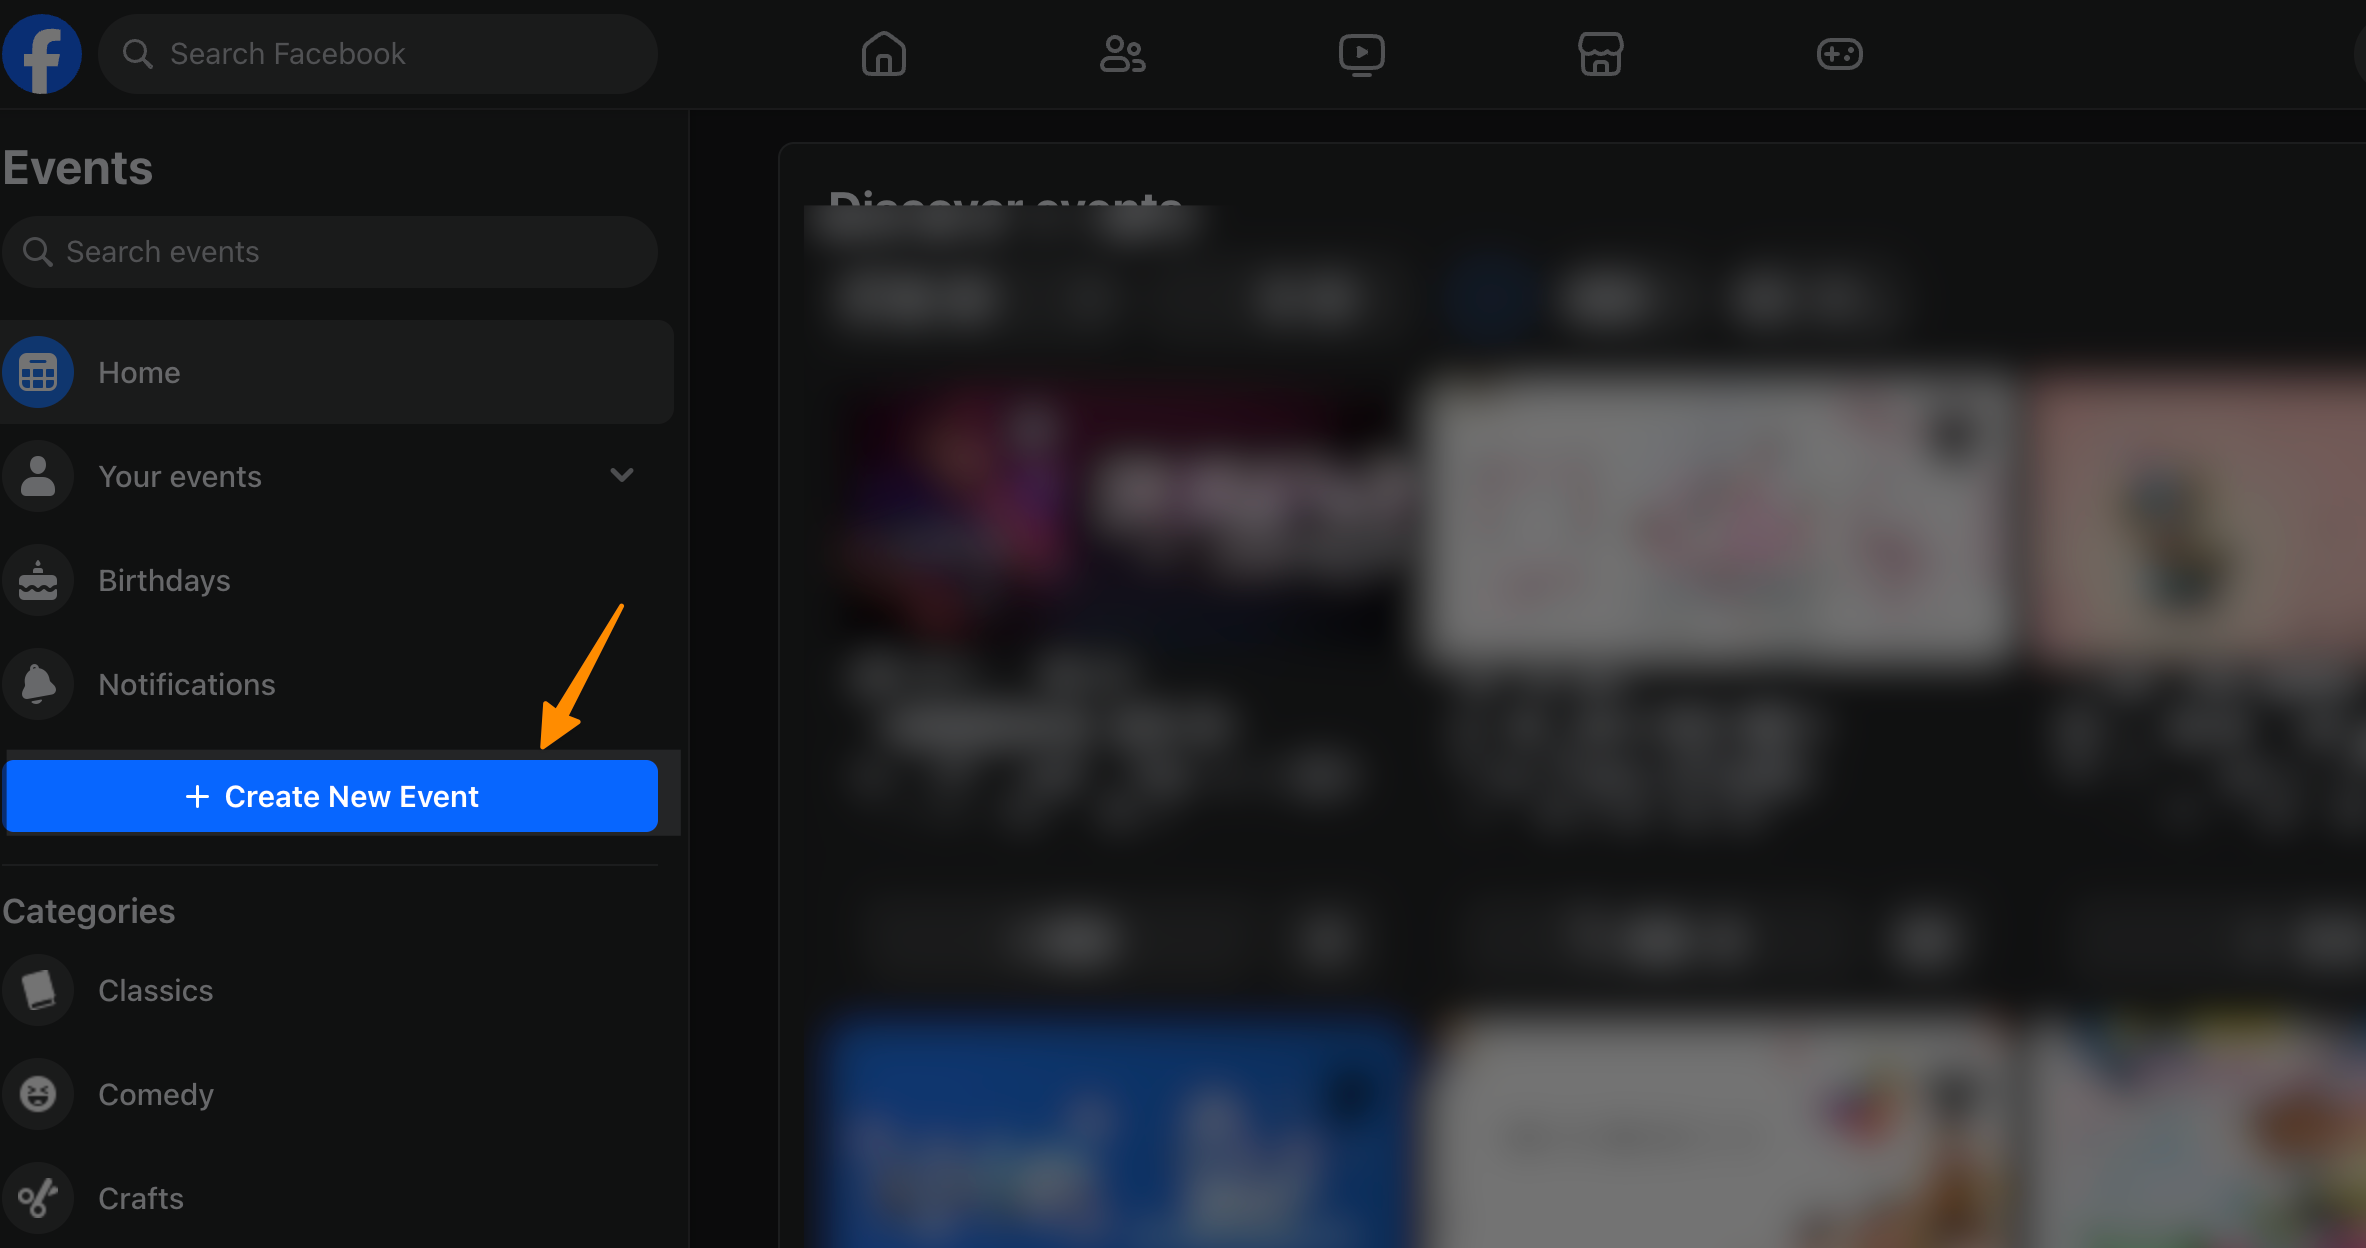
Within the event creation menu, tap “Events” followed by the “+ Create New Event”.
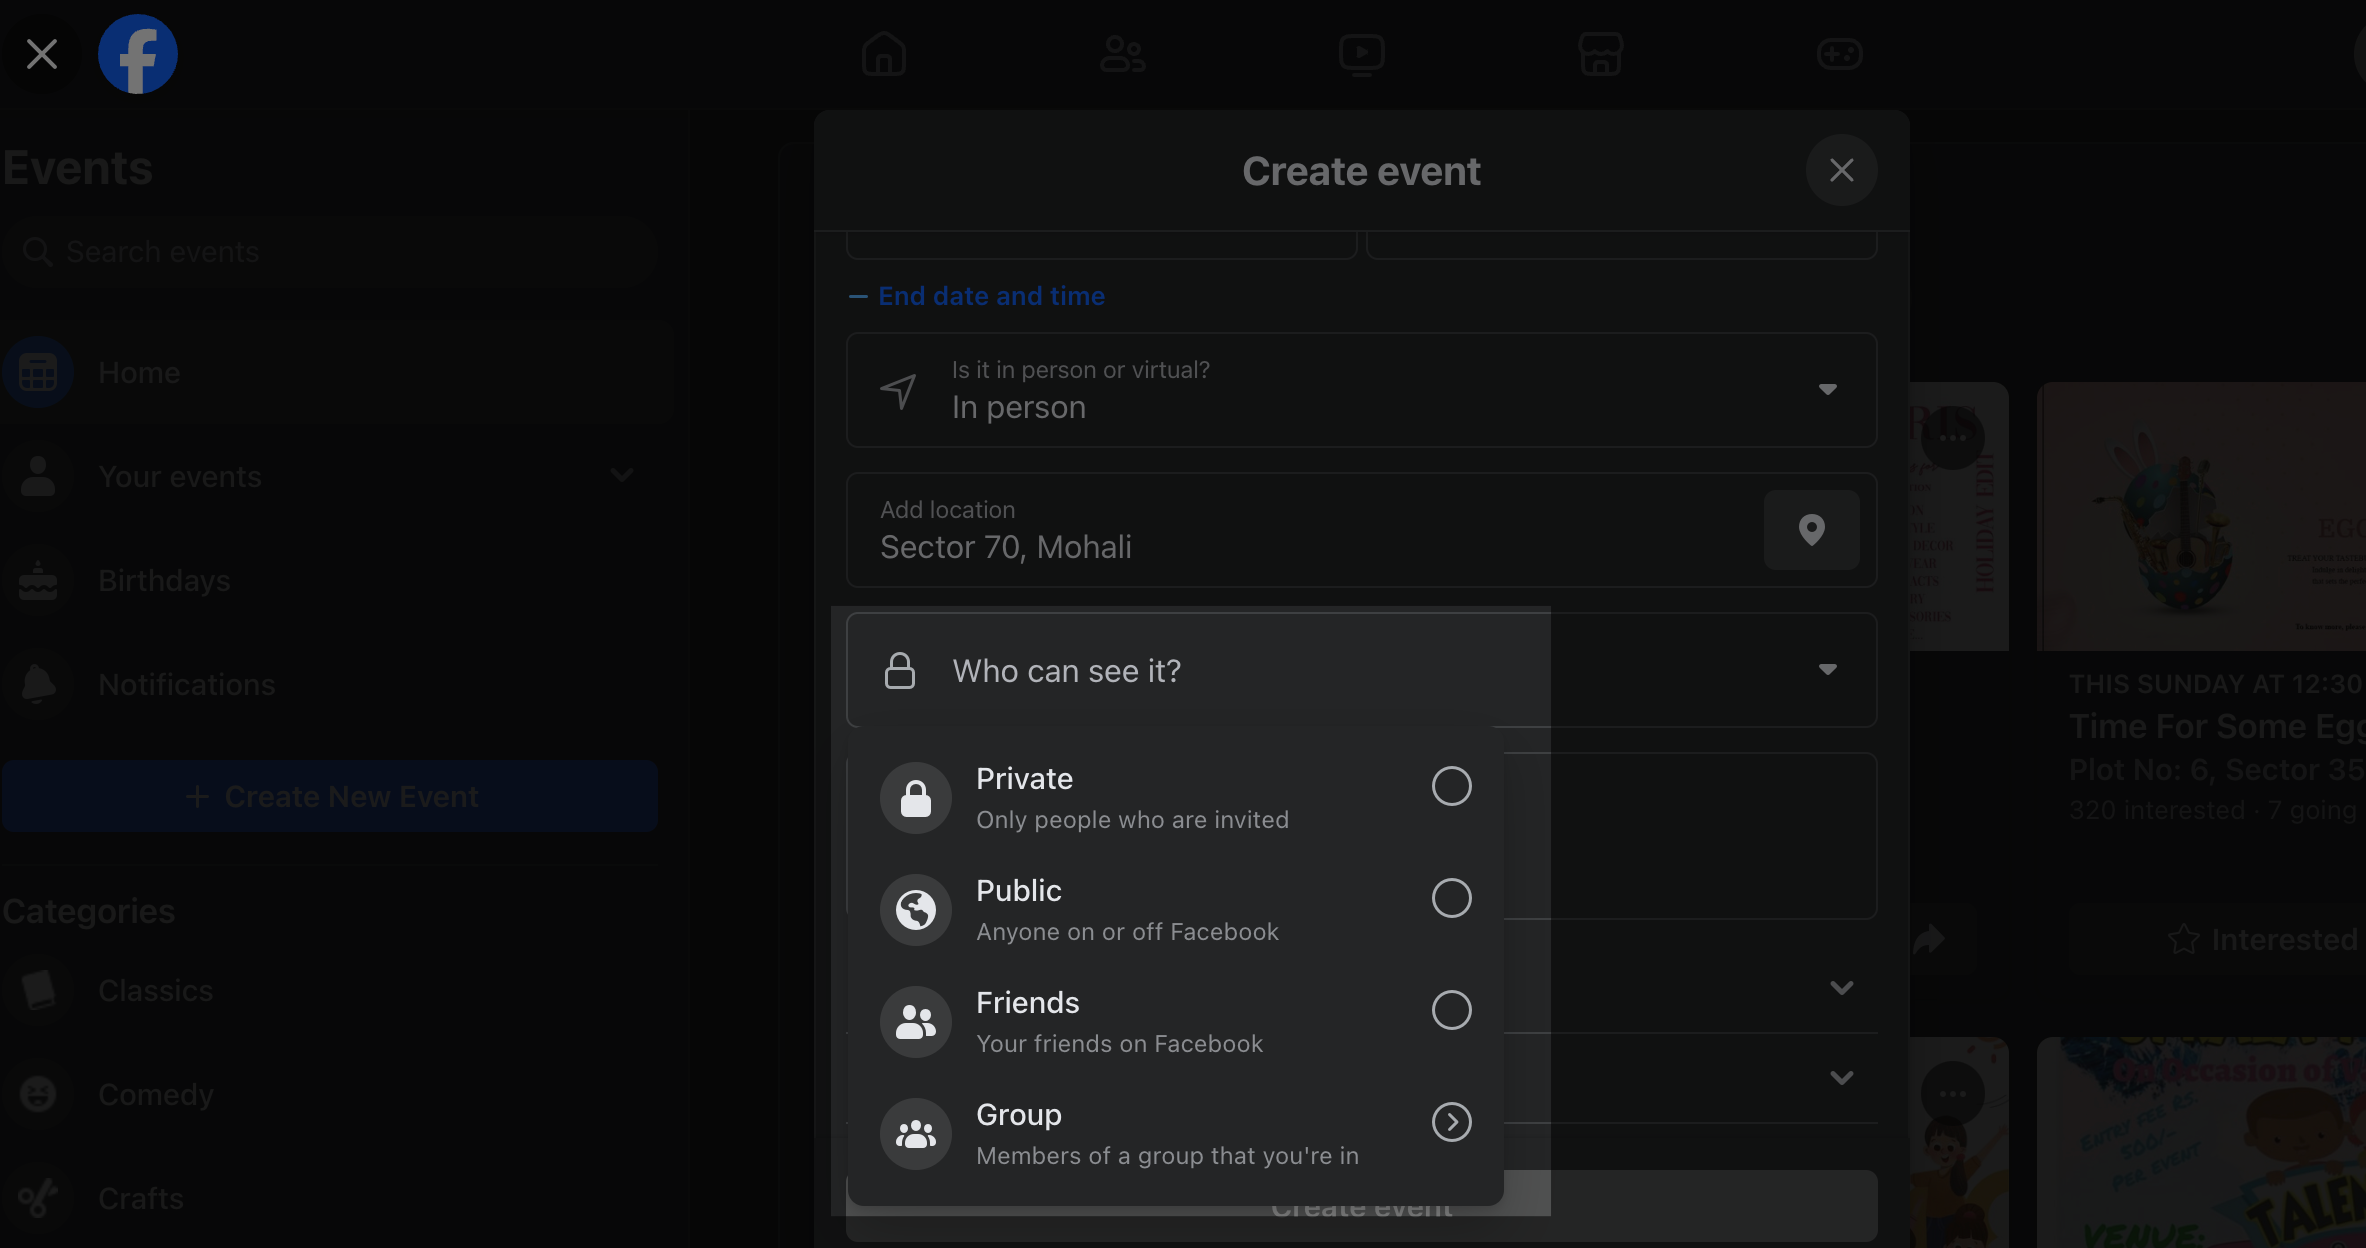
Tap or click on “Privacy” to set the event’s visibility. Here, select “Private” to ensure that only invited guests can view the event details. It’s important to remember that this setting cannot be changed once the event is created.
If you wish, toggle the option next to “Guests can invite friends” to enable or disable this feature. Disabling it ensures a more controlled guest list.
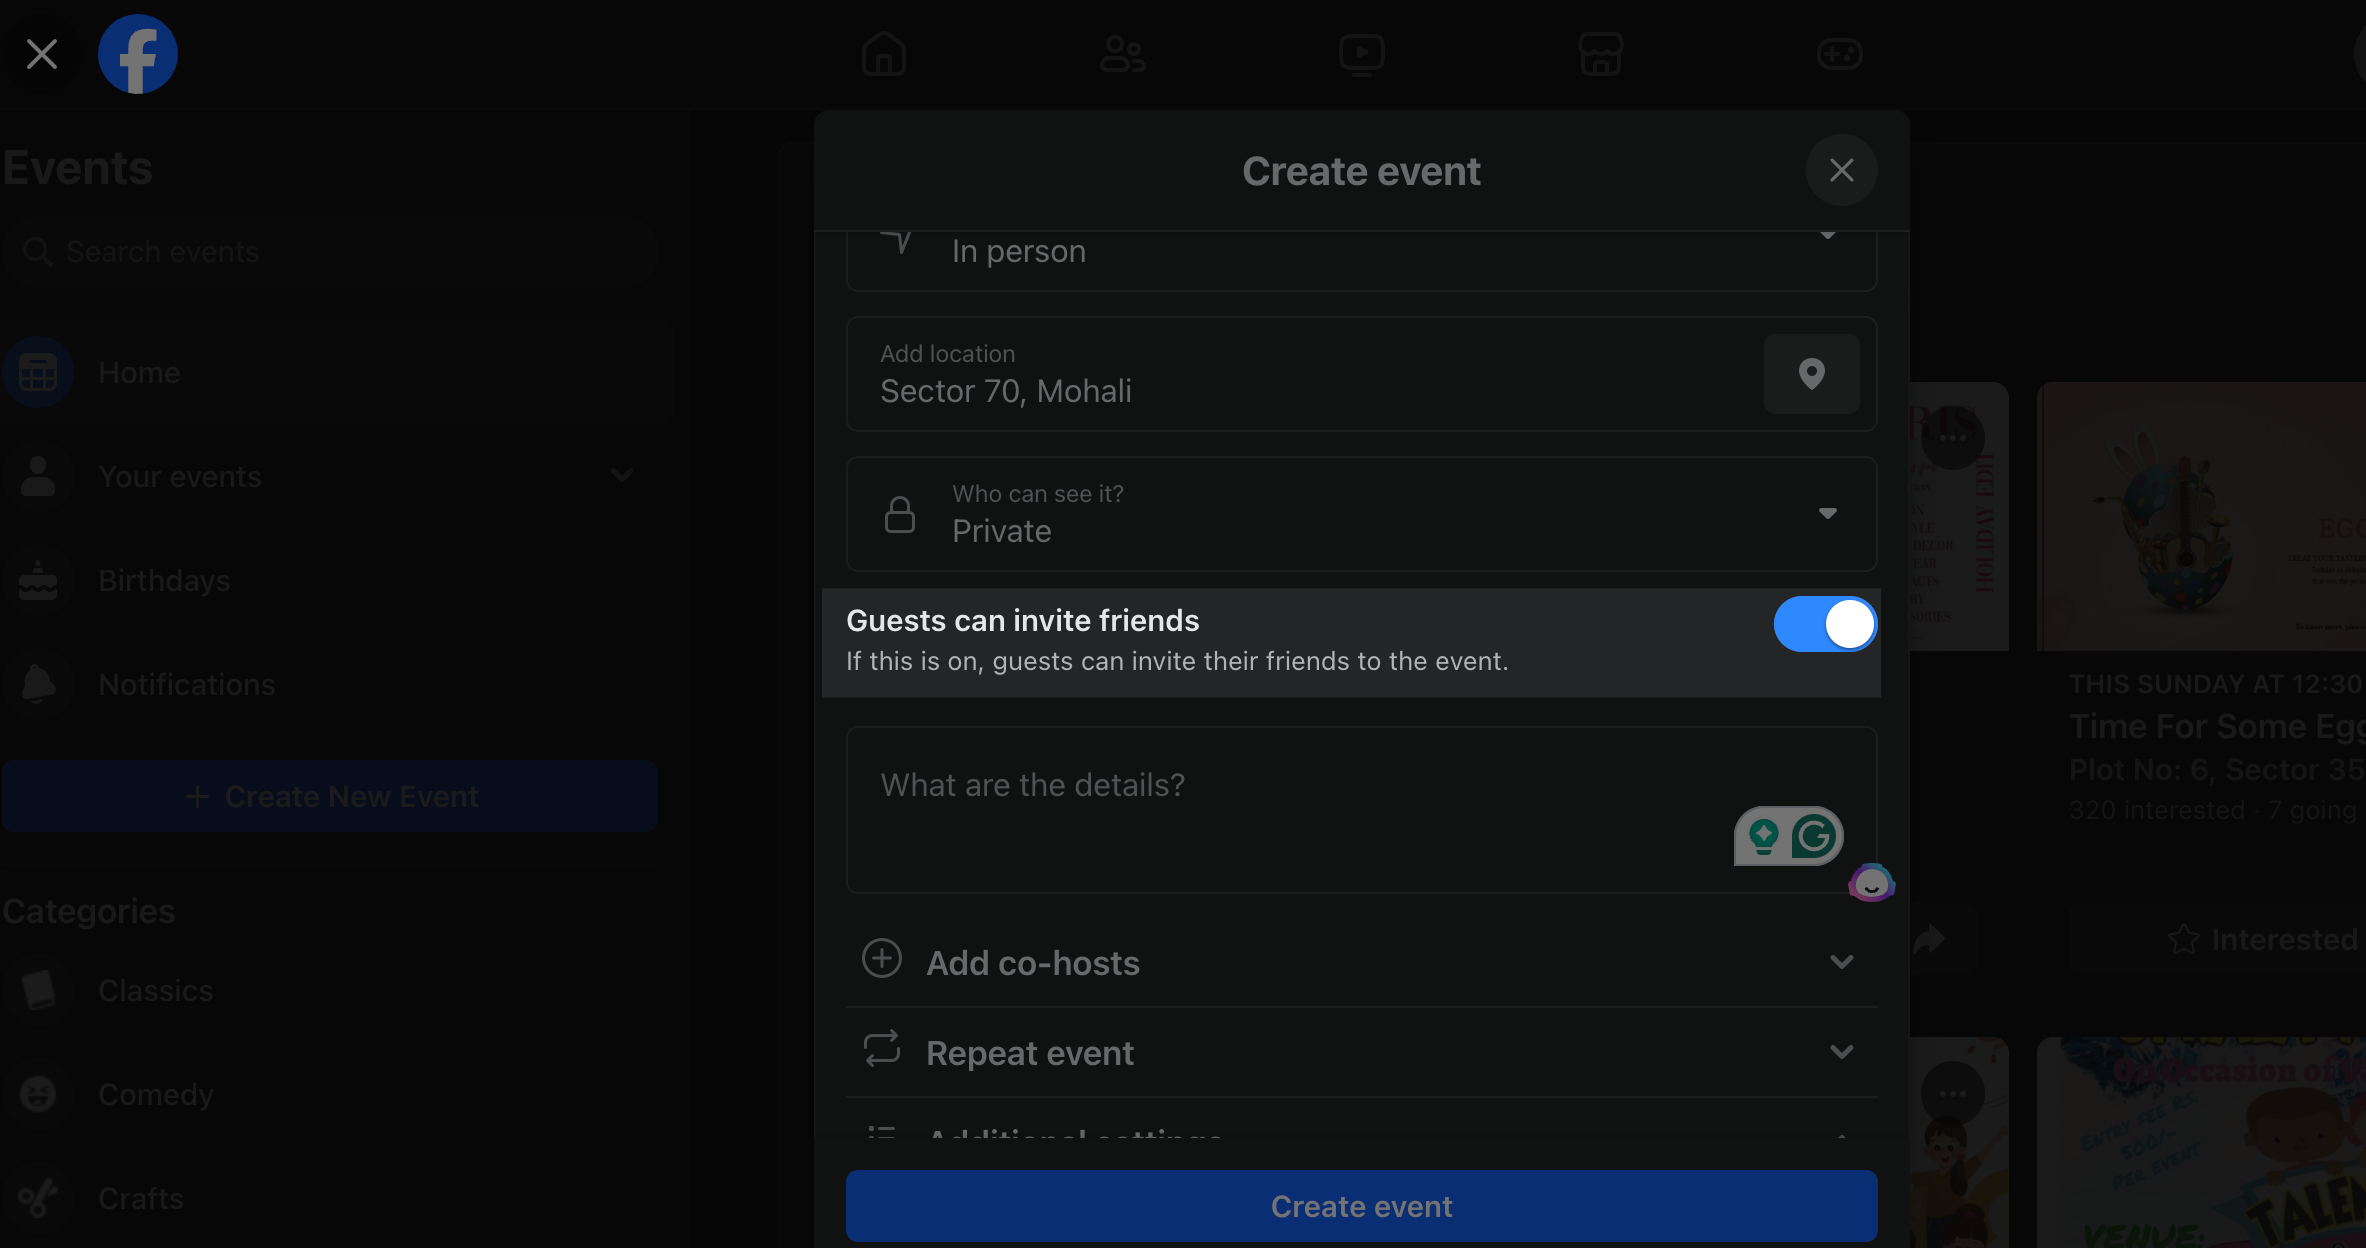
Step 3: Adding Event Details
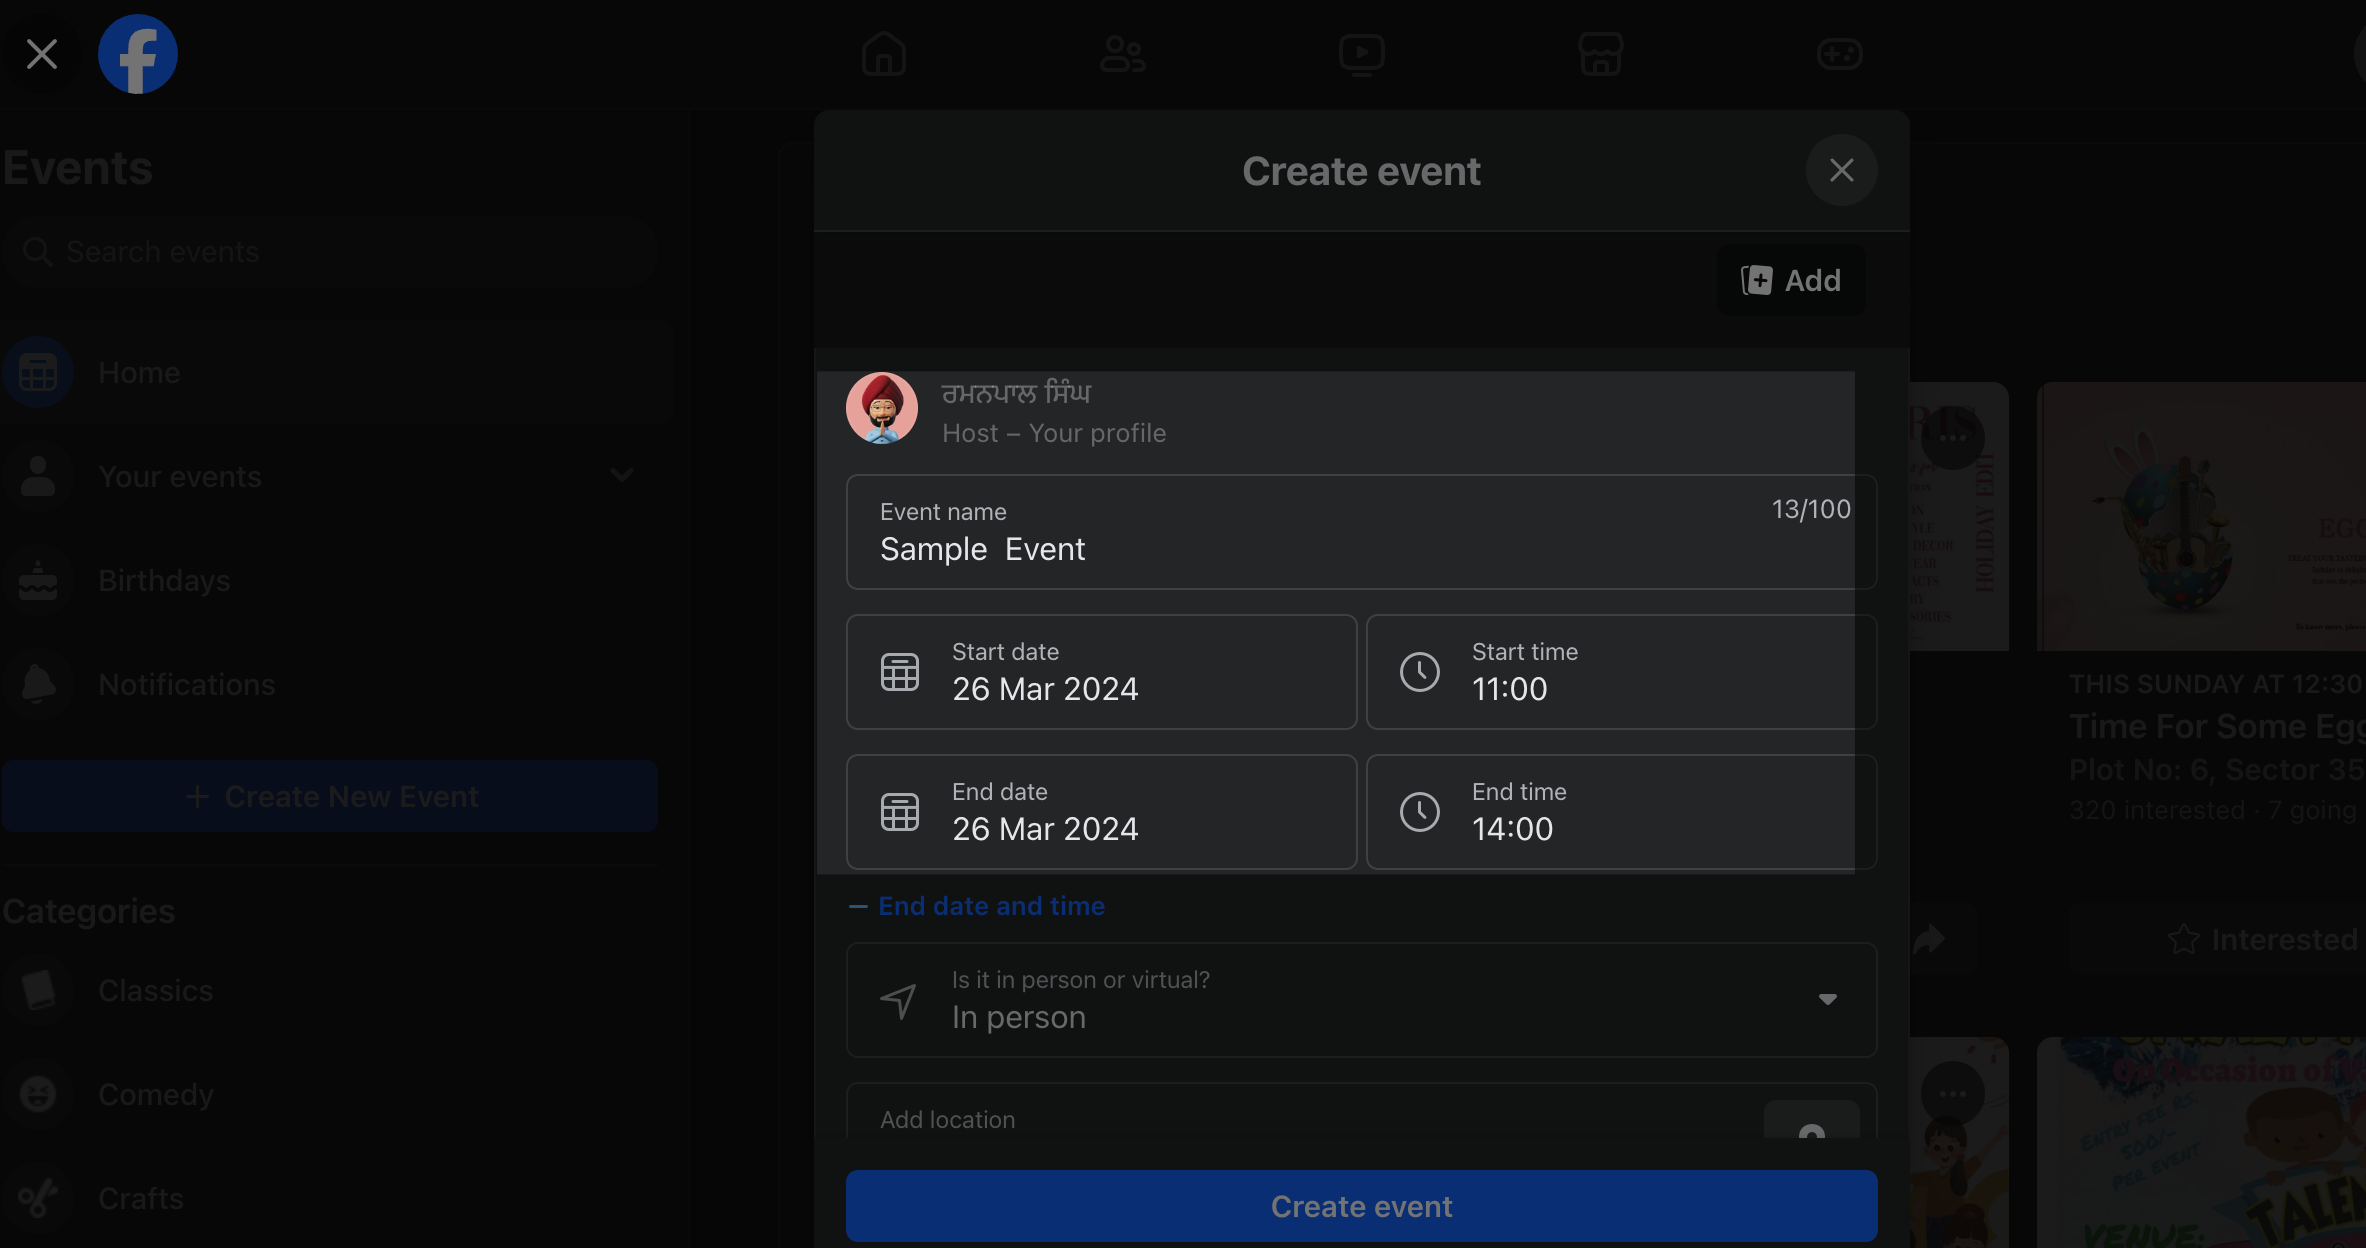
Proceed to fill in essential information about the event such as the event name, location, date, time, and any relevant details that would inform and engage invited guests.
Customize your event page further by adding a captivating cover photo that reflects the theme or essence of your gathering.
Include any additional information or house rules for the event in the description box to ensure all guests are well informed.
Step 4: Finalizing and Creating the Event
After ensuring all the necessary details have been entered and are accurate, tap “Create” button located at the bottom of the event creation page.
Your private event is now created and ready for you to invite guests.
To invite friends or specific individuals to your private event:
Go to your newly created event page, found under “Events” in the left menu or in the top right corner of Facebook.
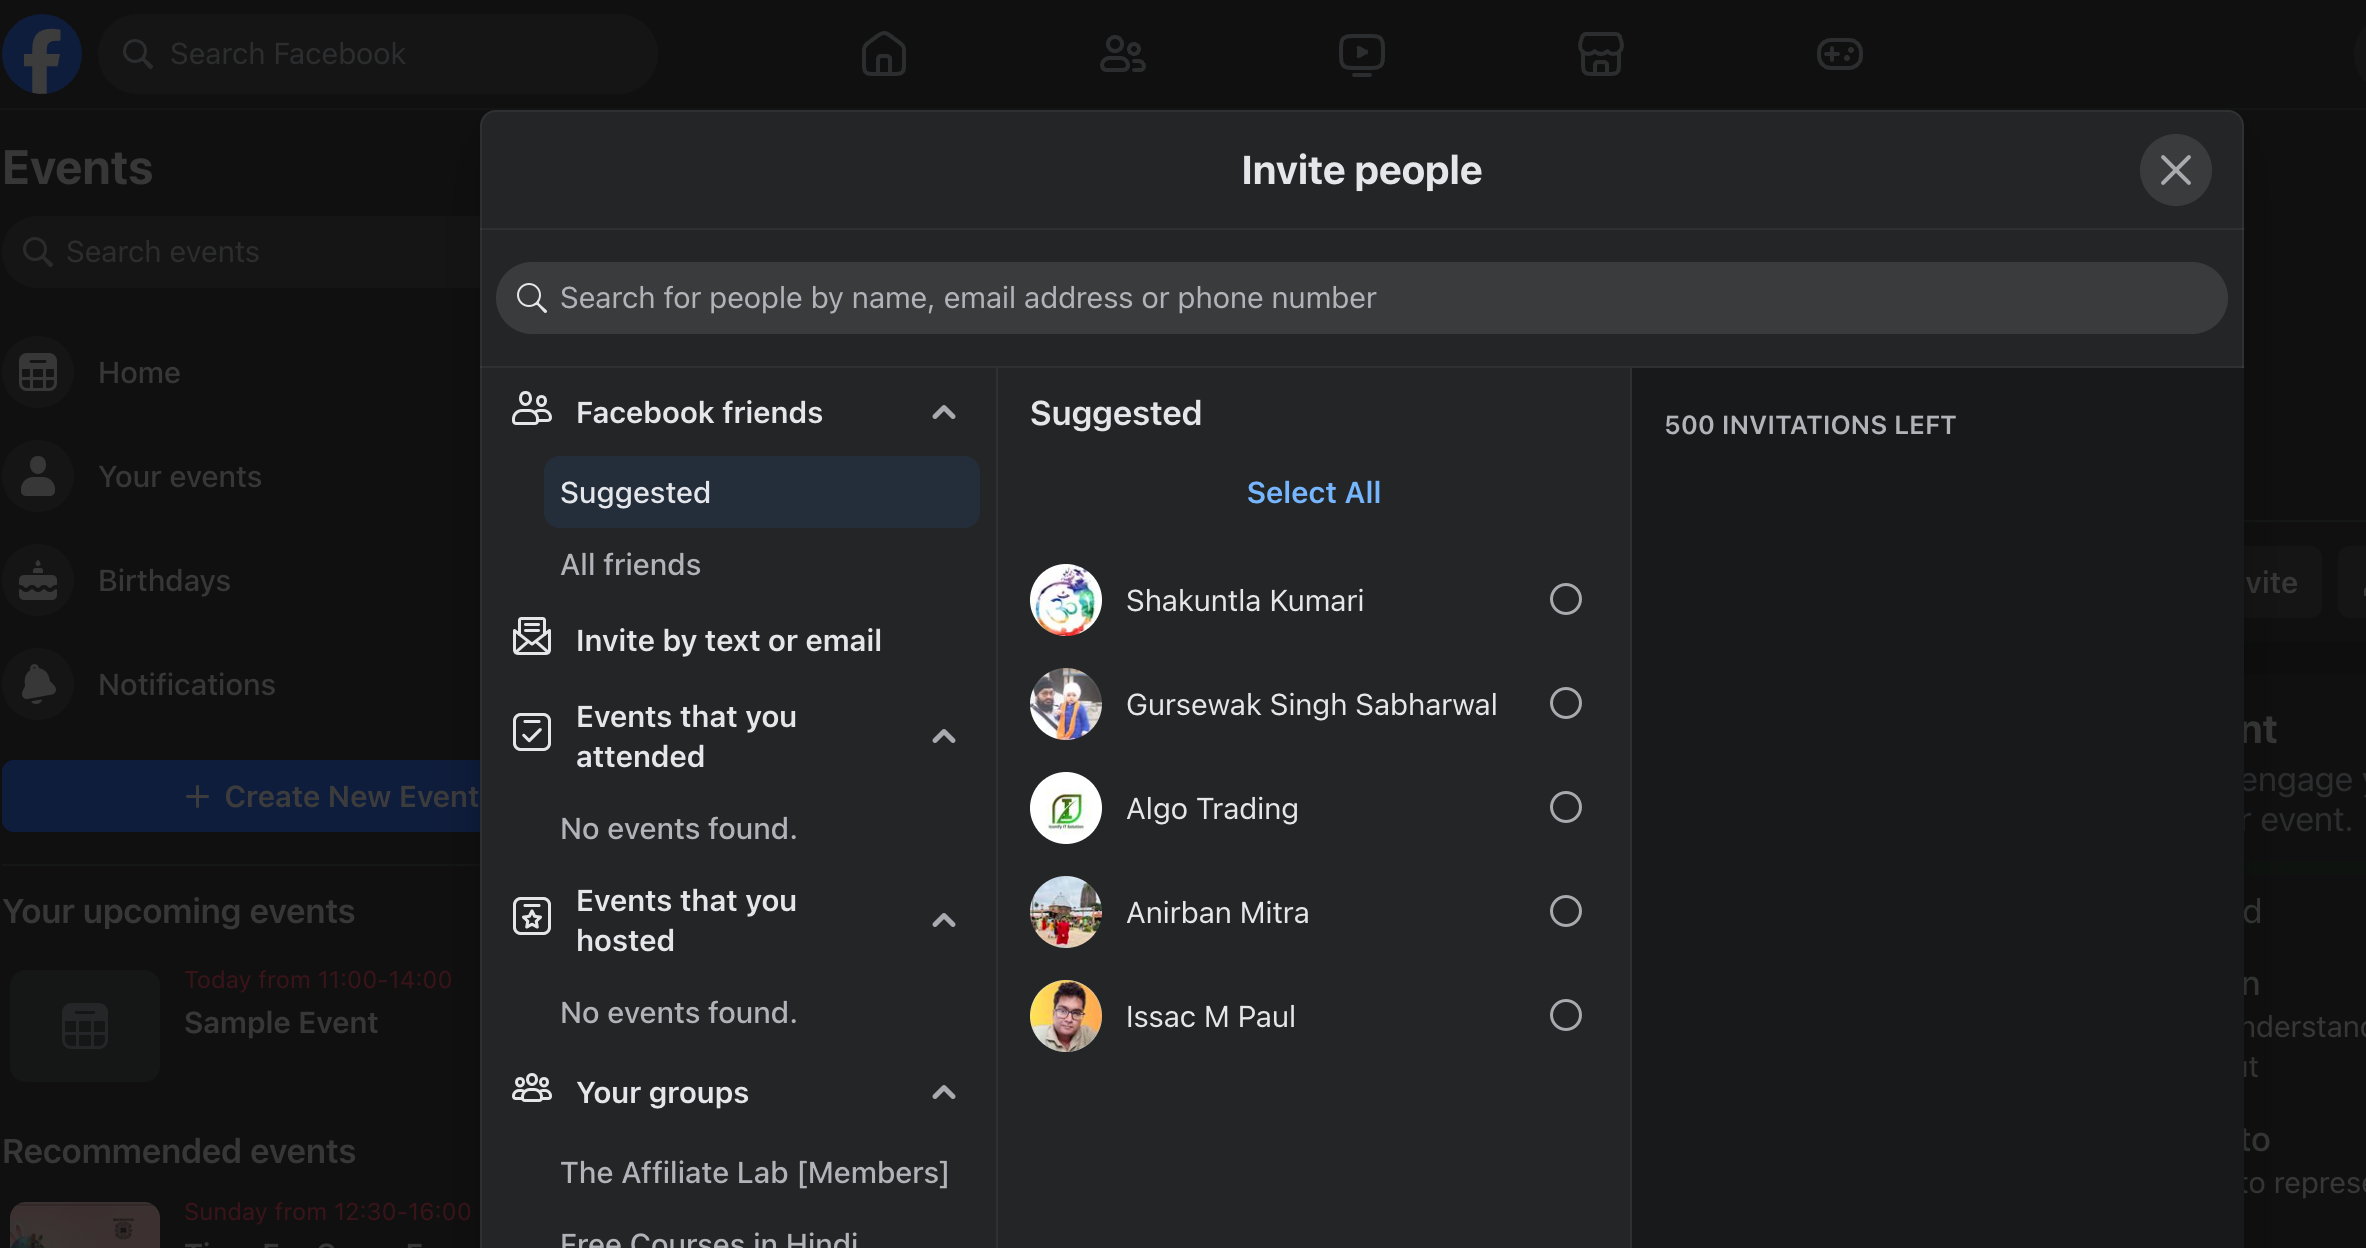
Select “Invite” and then “Choose Friends” from the dropdown menu to access your friends list.
Carefully select the people you wish to invite, and then confirm by clicking the “Send Invitations” button in the bottom right corner.
Creating a private Facebook event is an efficient way to manage an invite-only gathering, allowing for intimate engagement and interaction among attendees. Keep in mind that detailed and clear event information, inviting cover photos, and regular updates through the event discussion features can enhance the overall experience for your guests.
How to create an In-person event?
Creating an in-person even ton your facebook page is quite easy. Invited people will be able to visit you in person and meet you on the event date. This is not restricted to only people who are invited if you select the “guests can invite friends”
Step 1: Initiating the Creation of an In-person Event
Begin by opening the Facebook app on your device or navigating to facebook.com using a mobile browser. Locate and tap the “+” icon in the top right of Facebook. This icon is often positioned in the top right corner of your news feed page or in the left-hand sidebar, depending on your device.
From the dropdown menu that appears, select “Events” or “calendar icon” to proceed. Then tap on the “+ Create”
Step 2: Deciding the Event’s Privacy Settings
At the top of the event creation page, tap on “Privacy.” This is a crucial step as it determines who can discover, see, and join your event. Remember, once you’ve selected a privacy setting and created the event, you cannot alter this choice.
Choose between the options to make your event public, private, or visible only to friends, depending on the nature and intended audience of your gathering.
Step 3: Inputting Your Event Details
With the privacy setting in place, proceed to add the essential details of your event. This includes the event name, which should be catchy and descriptive, and the event location, which is critical for in-person gatherings.
If you are the event host, you can also add a co-host.
Add a cover photo that best represents the theme or ambience of your event. This visual element is key in attracting attention and conveying the event’s essence at a glance.
Utilize the description box to include any additional information, house rules, or links related to your event. This might also be a good place to mention if the event will be a recurring Facebook event, to keep your audience informed of future editions.
Step 4: Launching Your Event
After double-checking that all the provided information is accurate and complete, tap the “Create” button, typically located at the bottom of the event creation form.
Congratulations, your in-person event is now live on Facebook!
To invite people to your event:
Navigate to your event page, accessible under “Events” in the left menu of Facebook or in the top right corner of the platform.
Click on “Invite” to reveal options, then select “Choose Friends” from the dropdown menu. This will open your friends list.
Handpick the individuals you wish to invite, and upon confirming your selection, click the “Send Invitations” button located in the bottom right corner to finalize the process.
Creating an in-person event on Facebook enables you to organize gatherings effortlessly, from casual meetups to large-scale events, empowering you to reach and engage with your intended audience seamlessly. Remember, effective and regular communication through your event page, especially via event discussion, can significantly enhance participant anticipation and engagement, making your event a memorable experience.
How to create an online event?
If you wish to create a facebook only event, here’s your ultimate guide.
On Android/ iPhone
Step 1: Initiating the Online Event Creation
Open the Facebook app or visit facebook.com on mobile browsers. Tap on the hamburger icon, then tap “events”. you may need to tap “see more” first.
Tap + then tap “Online” to specify the nature of your event as a virtual gathering.
Step 2: Setting Up Your Event’s Privacy and Details
Immediately after selecting the event type, decide on the privacy setting for your event. Remember, the decision between a public Facebook event and a private Facebook event is irreversible after this point.
Step 3: Choosing Your Online Platform
Select the type of virtual event you’re hosting. Use Facebook Live for events anticipated to have more than 50 guests, which allows for a dynamic and interactive audience experience.
If your event is hosted on an external platform, choose “Add your own link” and provide the URL in the designated field. Ensure this link is accessible and functional for all invited guests.
Step 4: Finalizing Your Online Event
After adding all necessary details and ensuring the accuracy of the information, tap “Next” to proceed. Follow any additional prompts to include more specific details about your event, such as co-host or the event’s itinerary.
Tap the “Create” button, typically located at the bottom of the event creation form, to finalize and launch your online event.
By following these steps, you can efficiently create an engaging and well-organized online event on Facebook, whether it’s a large webinar via Facebook Live, a private workshop, or an interactive public event. Utilize the event page for continuous updates and to foster event discussion, ensuring your attendees are well informed and excited about the upcoming online gathering.
On Desktop
Step 1: Initiating Event Creation on Desktop
From your Facebook homepage, locate and click on “Events” in the left menu. You may need to select “See more” to find this option.
Click on the “your Event” button then “hosting”.
Step 2: Entering Your Event Details
Provide the event name, making sure it’s descriptive and catchy. This is the first detail guests will notice.
Set the start date and time for your event. It’s crucial that this information is accurate to avoid any confusion.
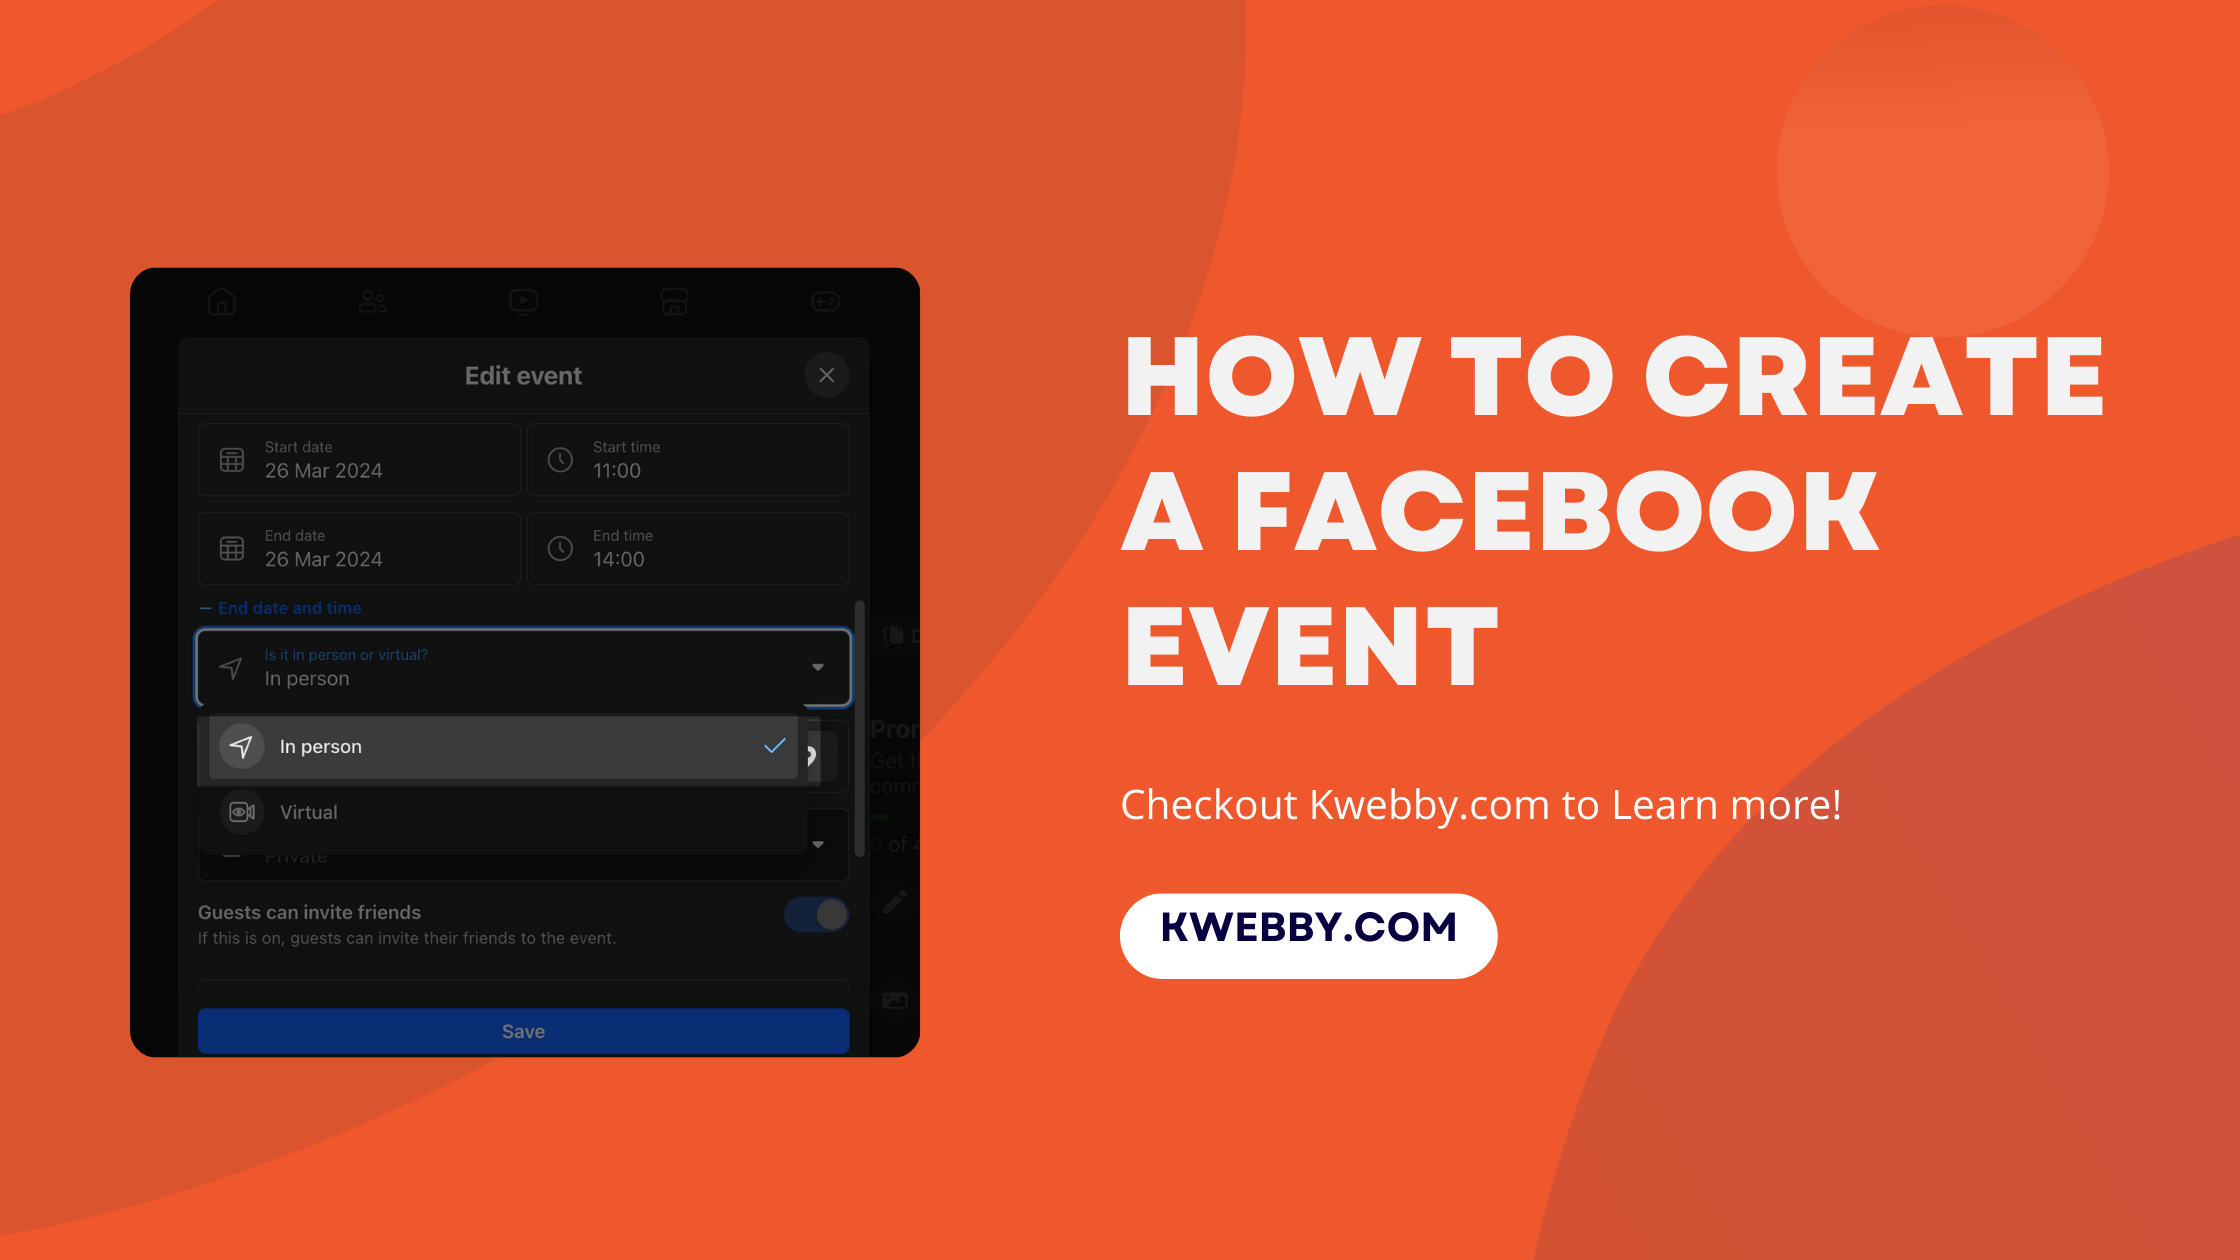
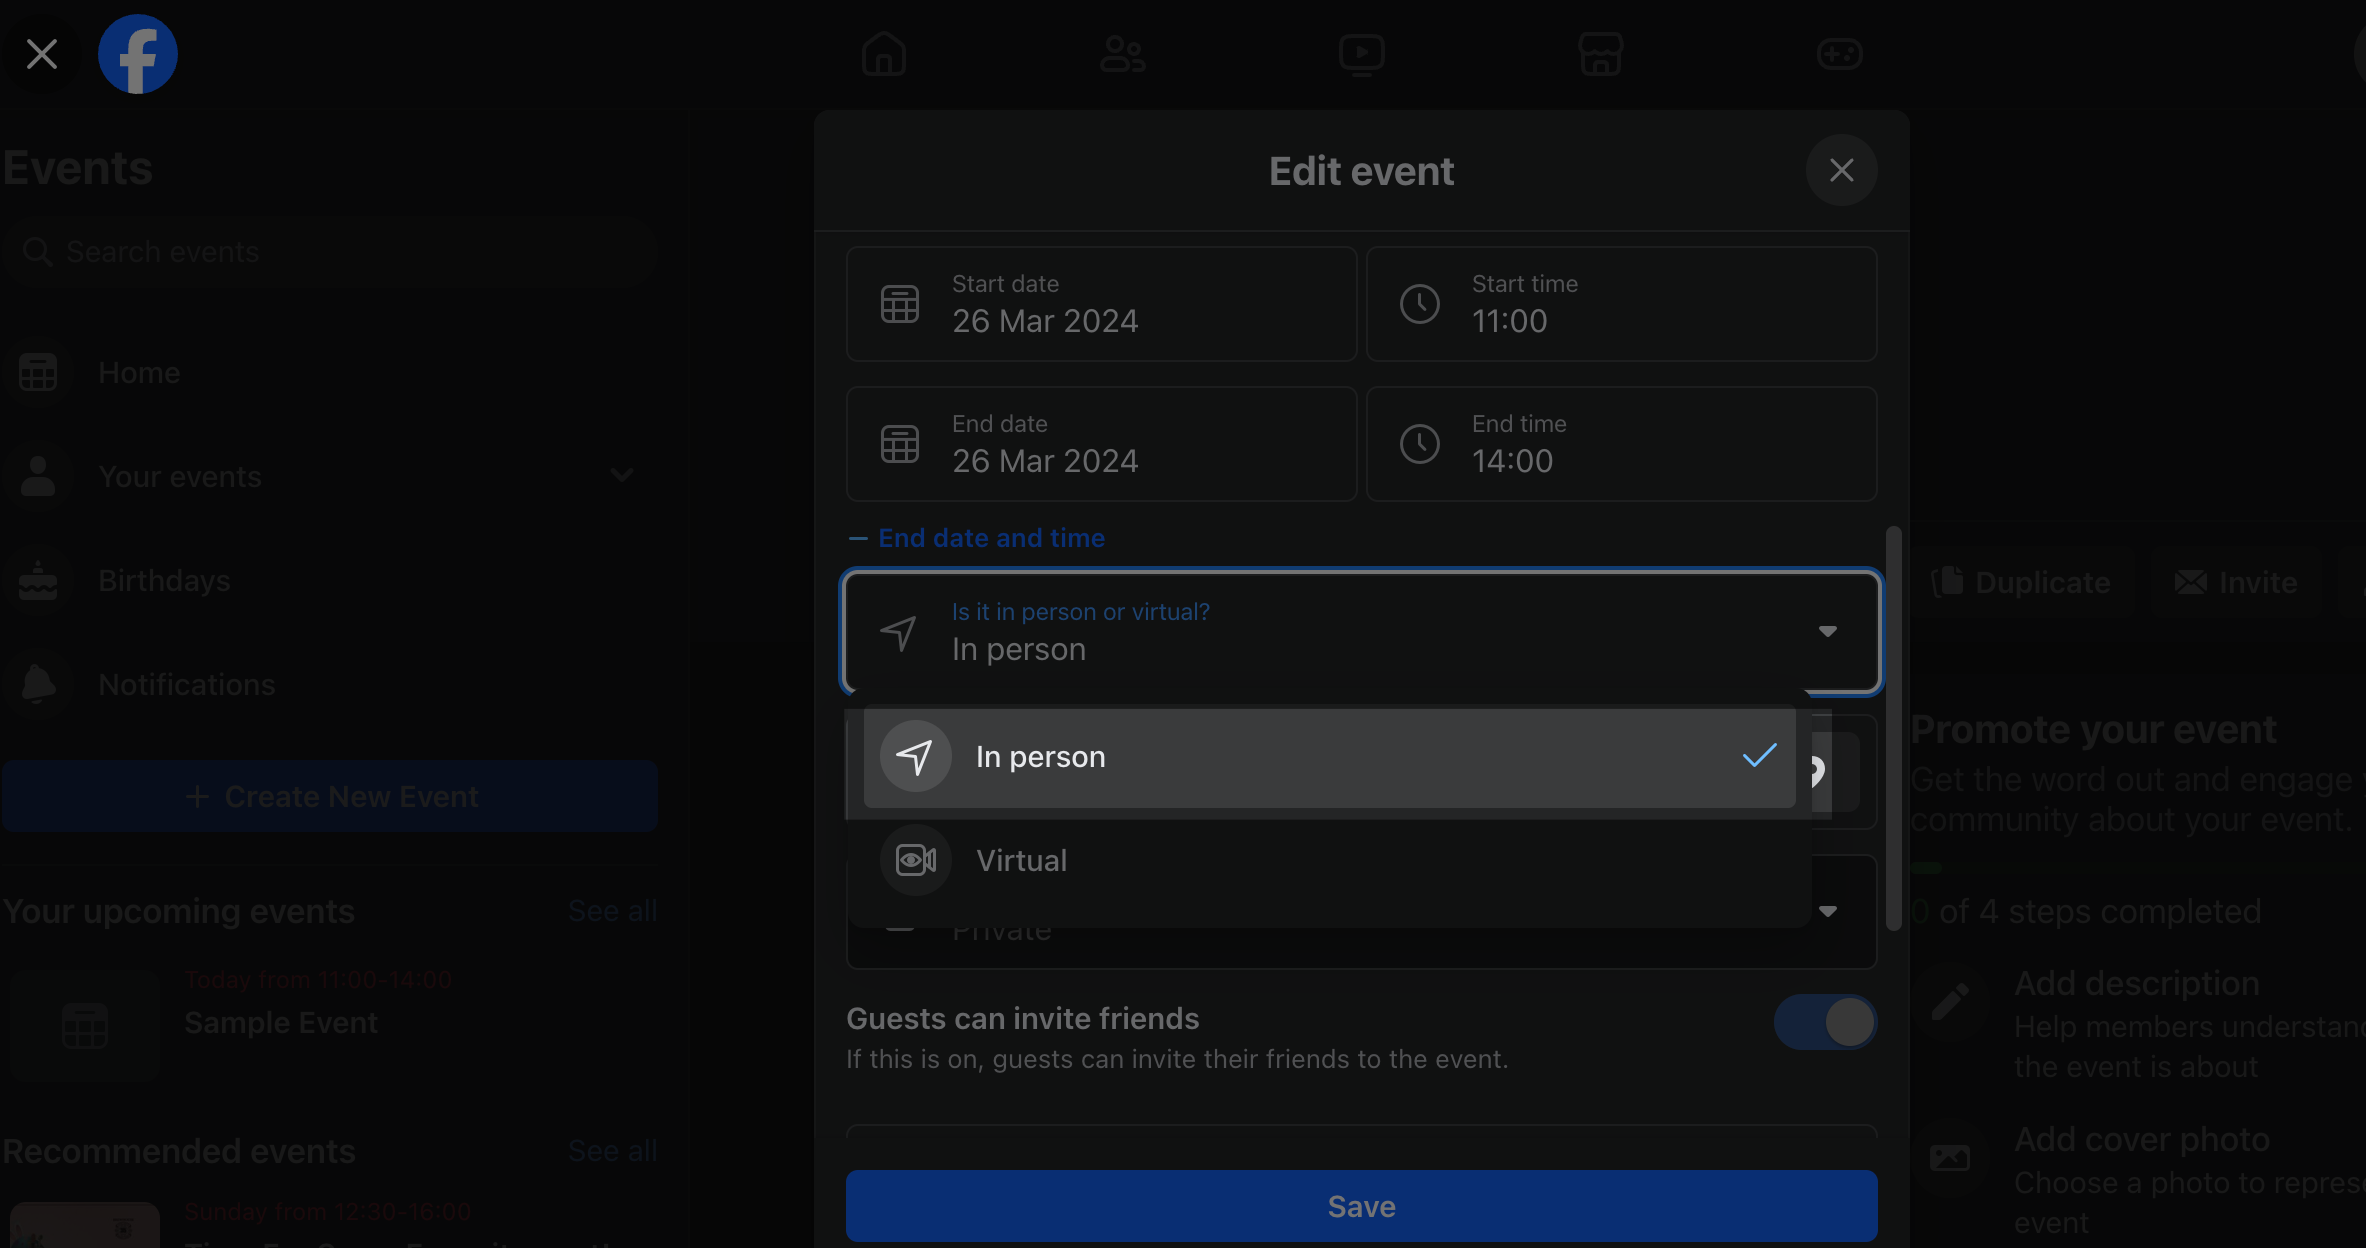
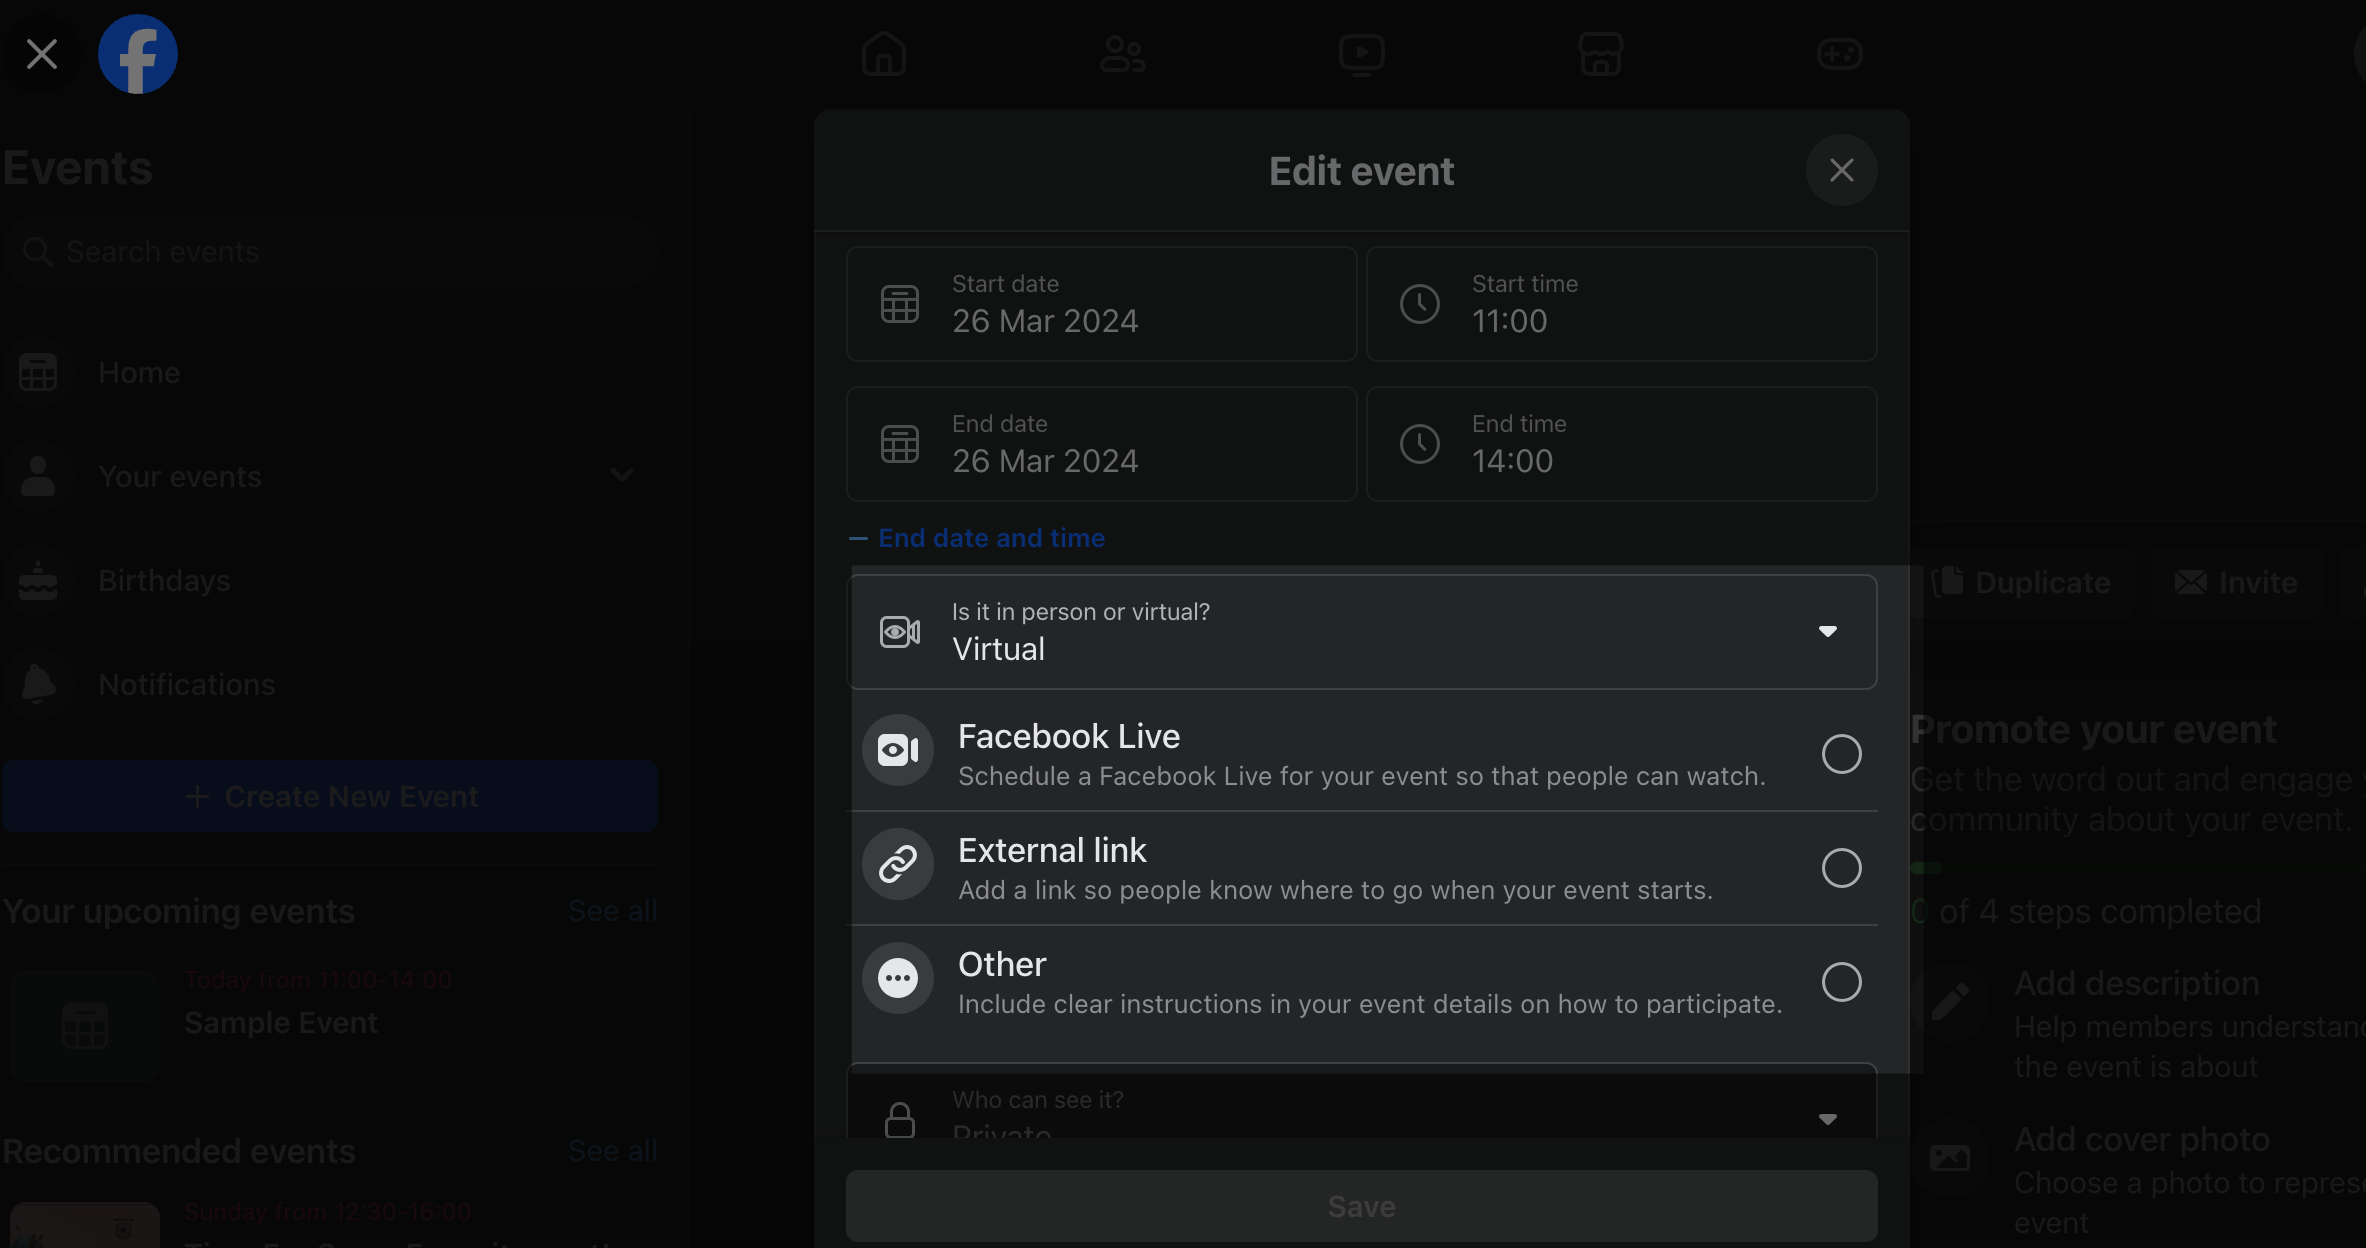
Choose “Is it in person or virtual?” and select “Virtual” to indicate the online nature of your event.
Step 3: Selecting the Type of Virtual Event
For larger events with more than 50 guests, opt for “Facebook Live” to enable a dynamic interaction with your audience.
If hosting the event outside of Facebook, select “External link” and input the URL in the provided field. Ensure this link is active and easily accessible for your participants.
For other types of virtual events, it’s important to include clear instructions on how participants can join and be part of your event. This ensures everyone knows how to engage effectively.
Step 4: Setting the Privacy and Additional Details
Click “Who can see it?” to choose your privacy setting. Remember, the privacy setting (public event, private event, or invite-only) cannot be changed after the event is created.
Add more details about your event, such as co-host and any special event settings. This helps in managing the event more efficiently.
Step 5: Finalizing and Creating Your Event
After entering all necessary information and ensuring everything is accurate, click the “Create event” button. This action will publish your event and make it visible based on the privacy settings you’ve selected.
More Facebook Resources
- How to Target Dentists on Facebook (in 6 Steps)
- How to Remove Someone’s Like on Facebook Photo (3 Methods)
- How to Get Facebook AI Stickers in 2 clicks
- How to Change Location on Facebook Marketplace on iPhone
- How to Unmatch on Facebook Dating (The Easy Way)
- How to List Commercial Property for Rent on Facebook Marketplace
- How to Use the Everyone Tag on Facebook (Do & Don’ts)
- How to Know If Someone is Using Facebook Dating (4 Methods)
- How to Tell If Someone Is Chatting on Facebook Messenger (3 Methods)
- How To Remove Facebook Friends in 1 Click (100% Working)
Conclusion
In conclusion, creating a Facebook event is a streamlined and effective way to invite guests, foster community engagement, and ensure your event’s success, whether it’s a private event, public event, or a more specialized online event.
Navigating through the Facebook app or desktop version, by tapping “Create” or clicking through the intuitive dropdown menus, enables hosts to personalize their event settings from the event’s name to its intricate details like the event’s itinerary and co-hosts.
It’s essential to pay attention to crafting a compelling event description and selecting a captivating cover photo, as these elements significantly contribute to attracting more attendees and promoting your event on Facebook pages and in the news feed.
Remember, whether you are aiming for a recurring Facebook event or a one-time gathering, the power of Facebook events lies in their ability to connect people, inform your friends list, and create memorable experiences. By following these clear, step-by-step instructions, event hosts can efficiently create, edit, and manage any event type, making every Facebook event a noteworthy occurrence.
Test your knowledge
Take a quick 5-question quiz based on this page.


