
How to Redirect URL in WordPress: A Comprehensive Guide (4 Methods)
There are a lot of reasons why you might want to redirect URL in WordPress site. Maybe you’ve changed the permalink structure of your posts and pages and you need to update the old URLs to reflect the new ones. Or maybe you have some old content that you want to delete, but don’t want visitors to be met with a 404 error page when they try to access it.
In any case, URL redirections can be very useful, and in this article, we’ll show you how to set them up in WordPress.
Also Read: How to Add Your WordPress Sitemap to Search Engines: A Step-by-Step Guide
We’ll cover four different methods for URL redirection: manual redirects using .htaccess, automatic redirects using plugins, and two methods for redirecting specific posts and pages.
What is a URL Redirection?
URL redirection is a method of forwarding a target URL from your source URL. In other words, when someone tries to access the old URL, they will be automatically redirected to the new one.
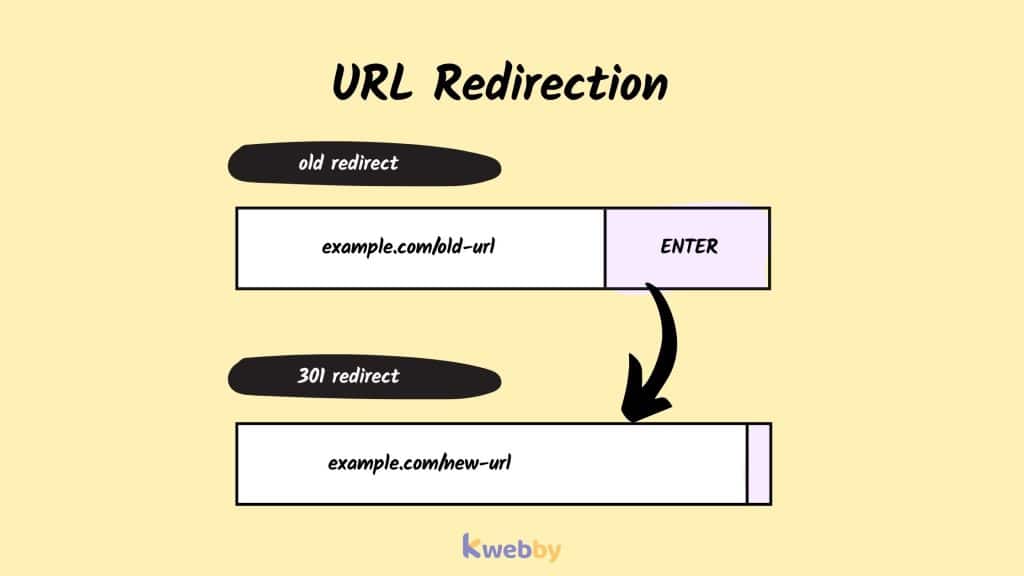
For example, if you have a post with the URL www.example.com/post-title, but you change the permalink structure of your posts so that the post’s URL is now www.example.com/2017/01/post-title, you would need to create a URL redirection so that visitors who try to access the old URL are automatically taken to the new one.
Why Would You Need to Redirect URL in WordPress?
There are a few reasons why you might want or need to set up a URL redirection:
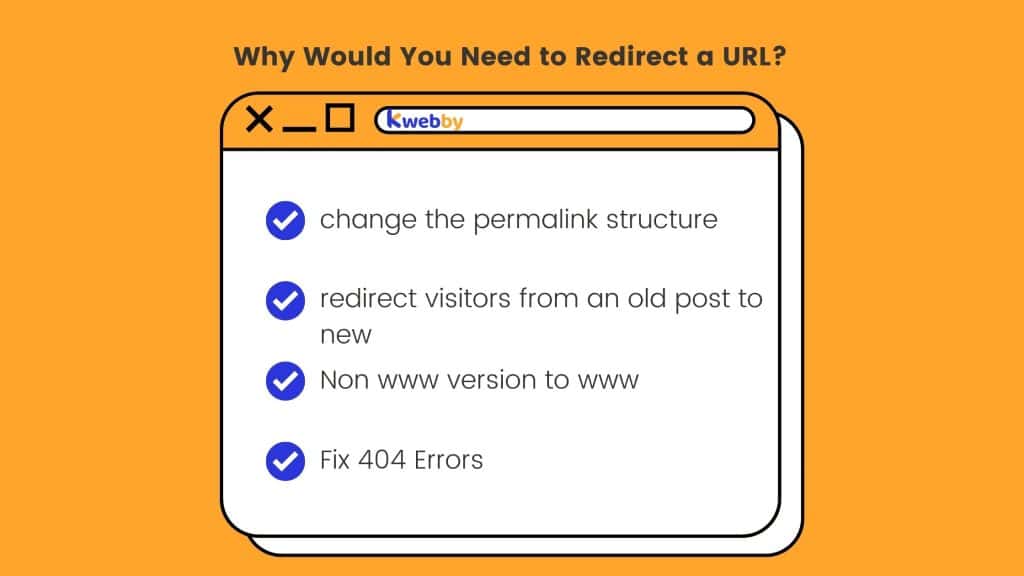
- To change the permalink structure of your posts and pages without losing traffic from existing links.
- To redirect visitors from an old post or page to a new one.
- To redirect visitors from a non-www version of your site to the www version (or vice versa).
- To fix 404 errors on your WordPress site.
- To cloak URLs of your Affiliate Links.
Types of Redirects
There are two main types of URL redirections:
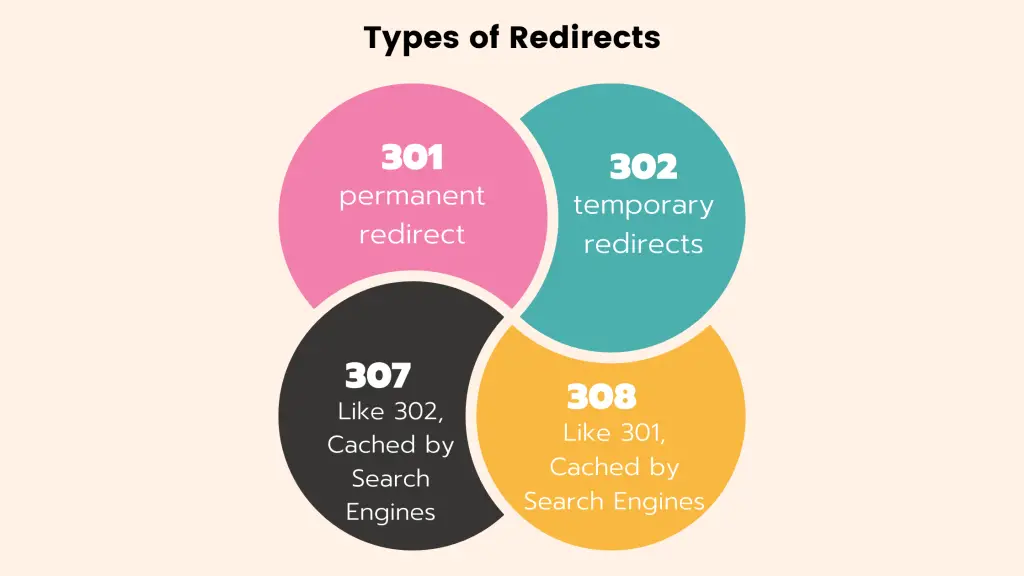
301 redirects: permanent redirects from an old URL to a new one.
302 redirects: temporary redirects, usually used while a website or webpage is under construction.
307 redirects: similar to 302 redirects, but it instructs search engines not to cache the redirected page.
308 redirects: permanent redirect similar to 301 redirect, but it instructs search engines not to cache the redirected page.
In general, you’ll want to use 301 redirects for most cases where you need to redirect a URL. They’re the most reliable and they tell search engines that the redirect is permanent, so they’ll update their records accordingly.
Create a URL Redirect in WordPress Using .htaccess
If you’re comfortable working with code, you can create a URL redirect in WordPress by editing your .htaccess file. The .htaccess file is a configuration file for the Apache Web Server, and it’s located in the root directory of your WordPress site.
Find .htaccess File
To edit your .htaccess file, you’ll need to connect to your WordPress site using an FTP client. Once you’re connected, navigate to the /public_html/ folder. In most cases, this is the root directory of your WordPress site, but it could be different depending on how your WordPress site is configured.
Once you’re in the /public_html/ folder, look for the .htaccess file. If you don’t see it, make sure that you have set your FTP client to show hidden files.
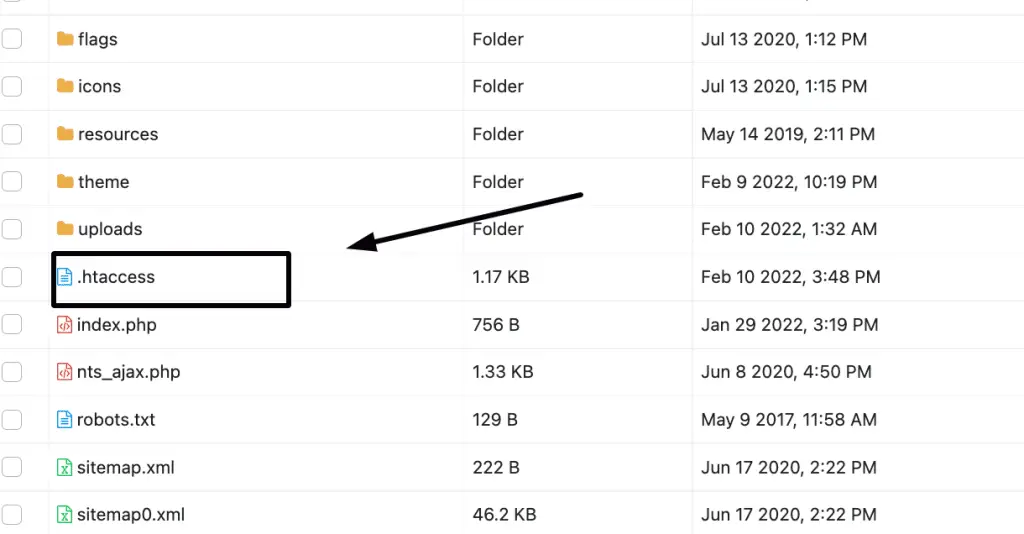
Once you find the .htaccess file, right-click on it and select View/Edit. This will open the file in a text editor so you can edit it.
Backup .htaccess File
Before you make any changes to your .htaccess file, it’s always a good idea to create a backup. To do that, right-click on the .htaccess file and select Download.
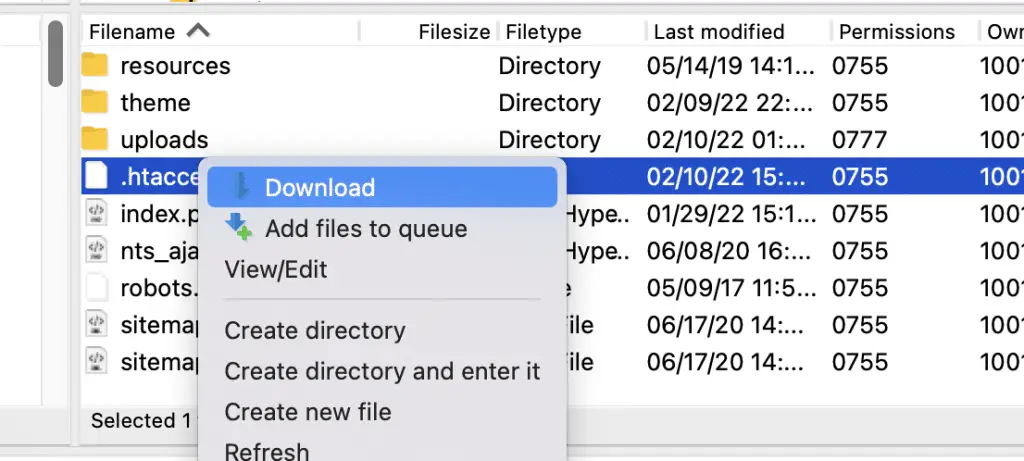
This will download a copy of the file to your computer so you can restore it if something goes wrong.
Add Redirects
Before you make any changes to your .htaccess file, it’s always a good idea to back it up. That way, if something goes wrong, you can restore the original file and start over.
To create a URL redirect, you’ll need to add some code to your .htaccess file. The code will look something like this:
Redirect 301 /old-url/ http://example.com/new-url/
Replace “old-url” with the URL you want to redirect, and replace “new-url” with the URL you want to redirect it to.
For example, if you wanted to redirect www.example.com/about to www.example.com/about-us, the code would look like this:
Redirect 301 /about/ http://example.com/about-us/
Once you add the code, save your changes to the .htaccess file and upload it back to your server. That’s all there is to it!
Create a URL Redirect in WordPress On NGINX Server
If your WordPress site is running on an NGINX server, then you’ll need a different method to create a URL redirect. Fortunately, it’s still pretty easy to do.
Edit NGINX Config File
The first thing you need to do is connect to your WordPress site using an FTP client. Once you’re connected, navigate to the /etc/nginx/ folder. This is where the NGINX configuration file is located.
Or on some servers it may be located on root director / www/server/nginx/conf
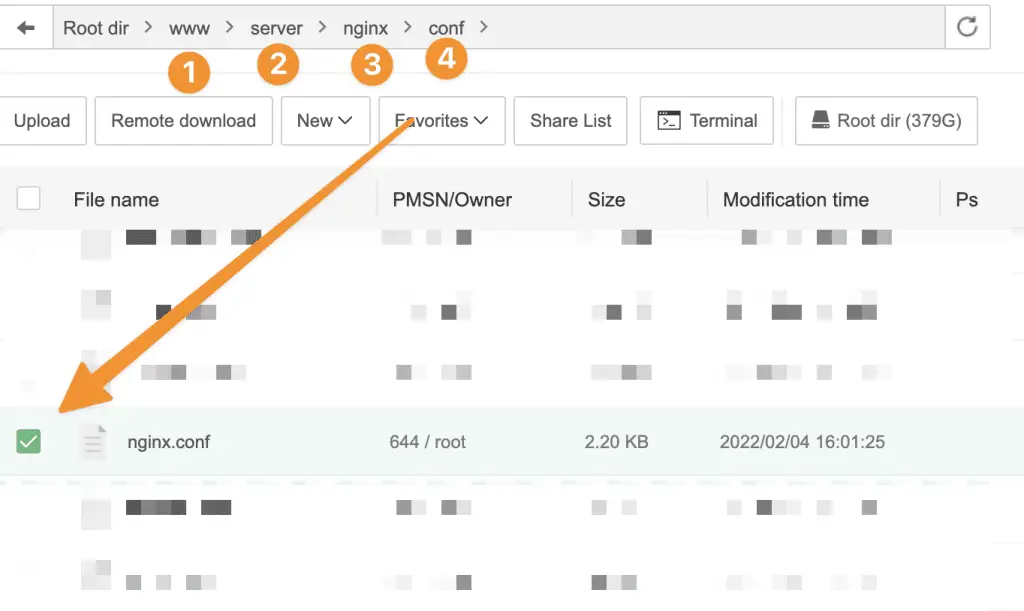
Once you’re in the /etc/nginx/ folder, look for the nginx.conf file and open it in a text editor.
Backup NGINX Config File
Before you make any changes to the NGINX configuration file, it’s always a good idea to create a backup. To do that, right-click on the nginx.conf file and select Download.
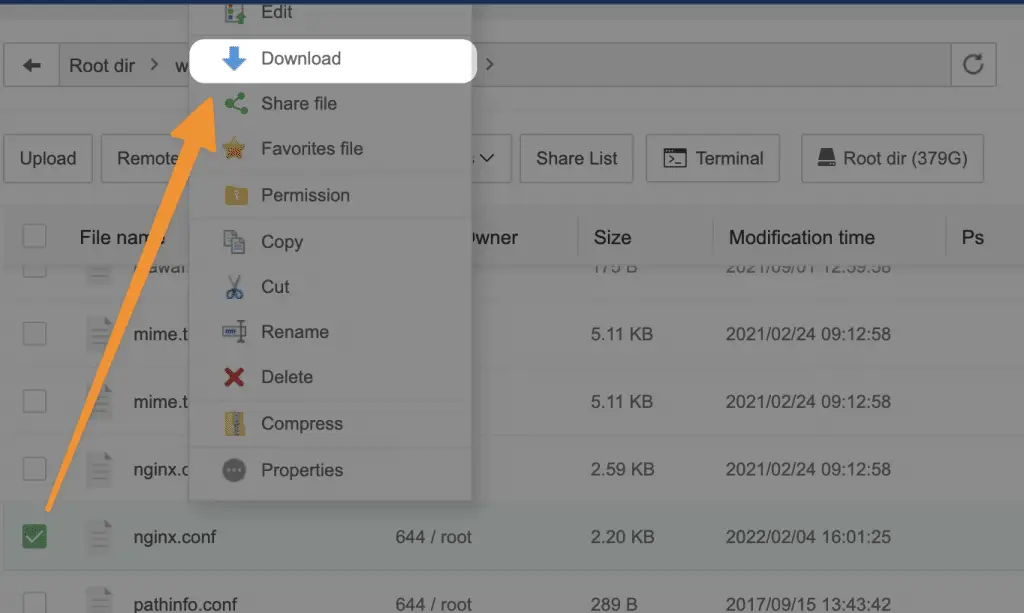
This will download a copy of the file to your computer so you can restore it if something goes wrong.
Add Redirects
Once you have a backup of the NGINX configuration file, you can start adding your redirects. The code for an NGINX redirect looks like this:
rewrite ^/page/2/$ https://newurl.com/page/2/ permanent;
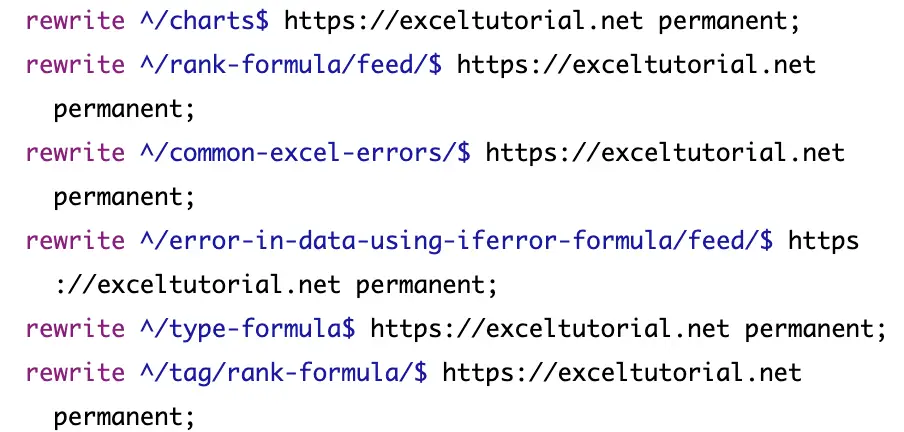
Replace “old-url” with the URL you want to redirect, and replace “new-url” with the URL you want to redirect it to.
For example, if you wanted to redirect www.example.com/about to www.example.com/about-us, the code would look like this:
rewrite ^/about/$ https://example.com/about-us/ permanent;
Save your changes to the NGINX configuration file and upload it back to your server. That’s all there is to it!
As you can see, redirecting a URL in WordPress is pretty easy to do. Whether you’re using an Apache or NGINX server, you can easily add redirects using the .htaccess or NGINX configuration file.
If you want more control over your redirects, or if you need to redirect a large number of URLs, then you may want to consider using a WordPress plugin. We’ll talk more about that in the next section.
Redirect Using RANKMATH Plugin
If you want more control over your redirects, or if you need to redirect a large number of URLs, then you may want to consider using a WordPress plugin.
There are quite a few WordPress plugins that can help you with URL redirects. In this section, we’ll show you how to use the RANK MATH plugin to set up a URL redirect.
RANK MATH is a popular SEO plugin that includes a feature for setting up redirects. It’s free to use, and it’s pretty easy to set up.
Add Redirect URLs
To get started, install and activate the RANK MATH plugin. For more information, see our step by step guide on how to install a WordPress plugin.
Once the plugin is activated, click on the Redirections tab in the left-hand sidebar. Then click on the Add Redirection button.
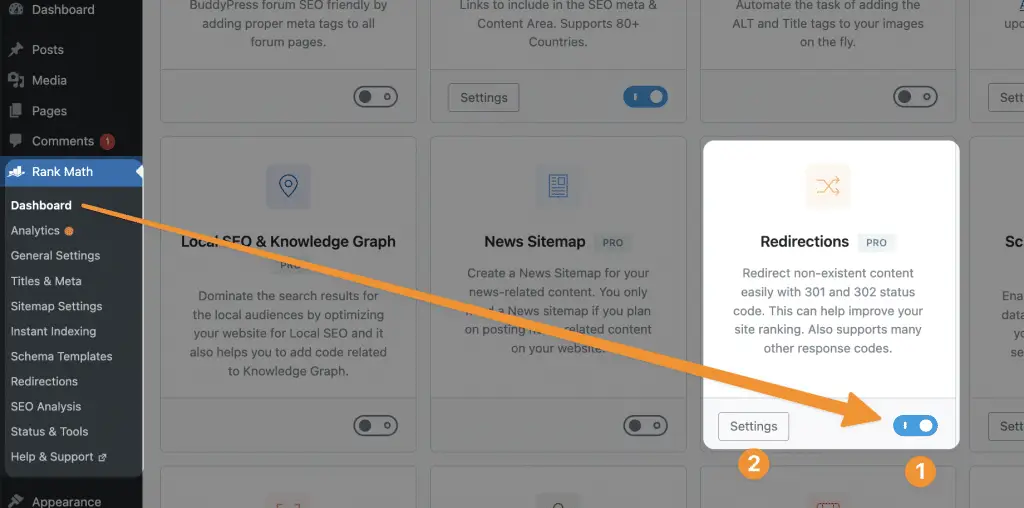
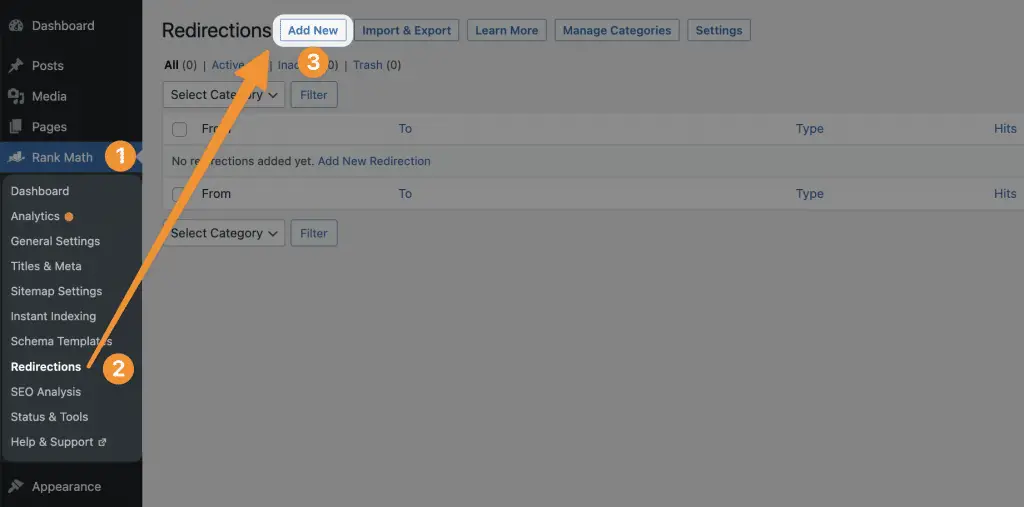
Now, After enabling redirections module of rankmath, it’s time to add 301 redirection rule in the plugin itself, all you need to click rankmath option on the left and click redirection option in the list and then click “add new”;
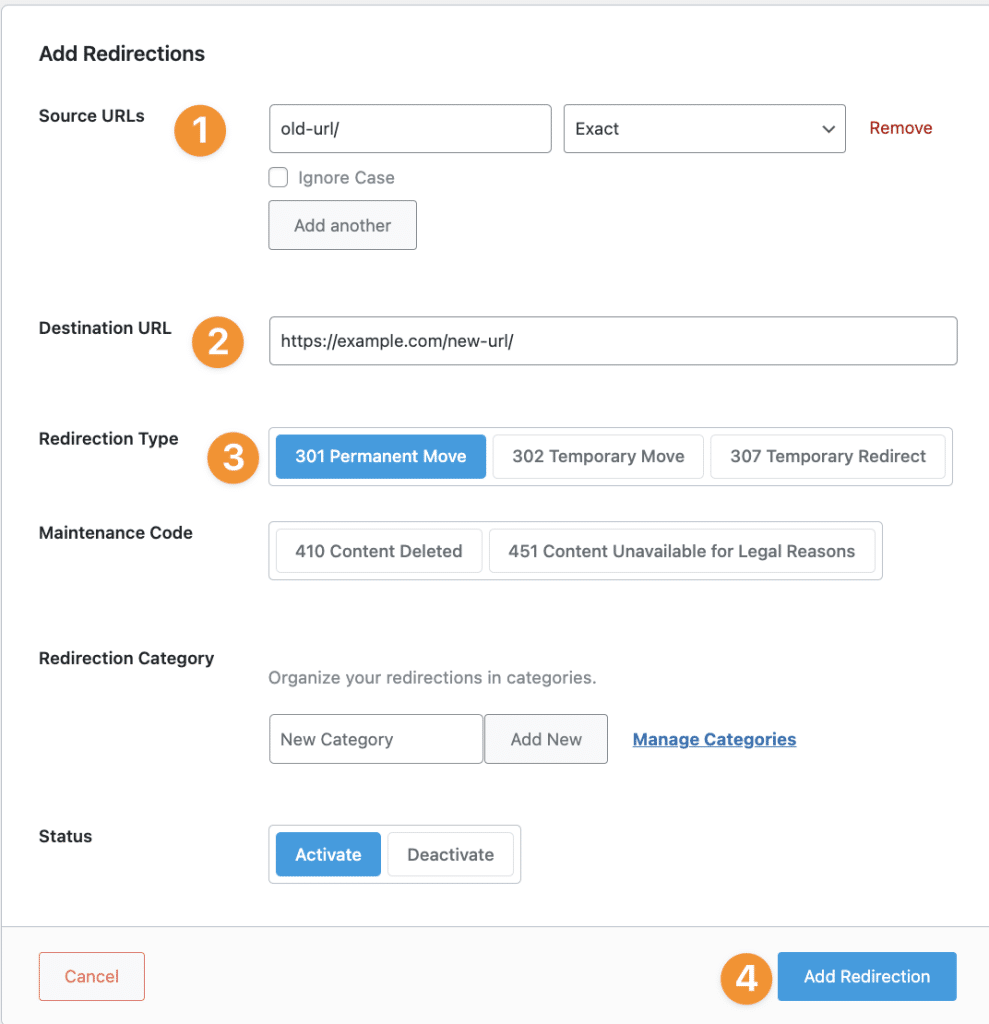
Once you’ve entered the old and new URLs, scroll down and click on the “Add Redirections” button.
That’s all there is to it! The plugin will handle the rest.
Manage Redirected URLs in RANKMATH
If you want to view or edit your redirected URLs, click on the Redirections tab in the left-hand sidebar.
On the Redirections page, you’ll see a list of all the URLs you’ve redirected. You can edit or delete any of the redirects by hovering over them and clicking on the appropriate link.

Redirection by John Goodley WordPress plugin
Redirection is a popular WordPress plugin that can help you with URL redirects. It’s free to use, and it’s pretty easy to set up.
To get started, install and activate the Redirection plugin. For more information, see our step by step guide on how to install a WordPress plugin.
Once the plugin is activated, click on the Redirections tab in the left-hand sidebar. Then click on the Add Redirection button.
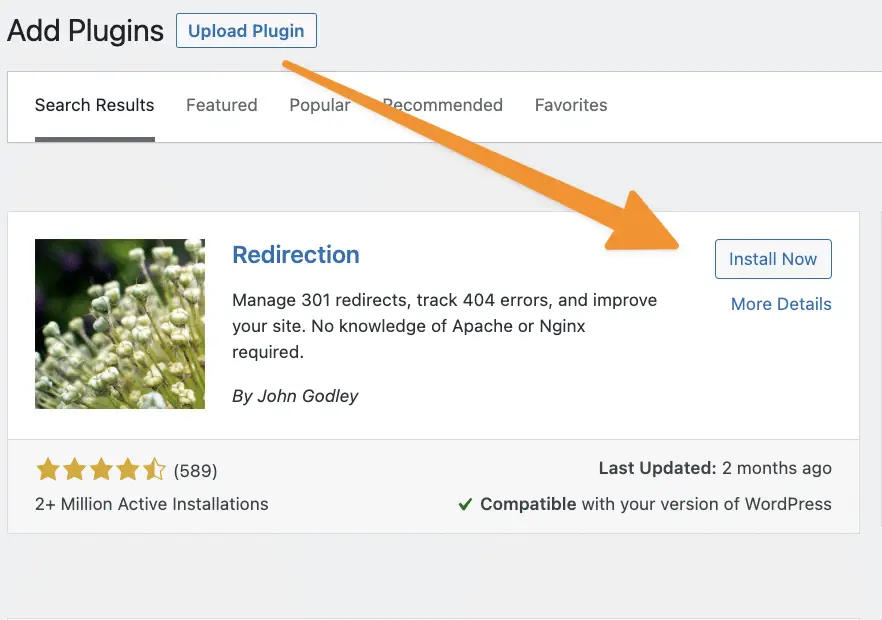
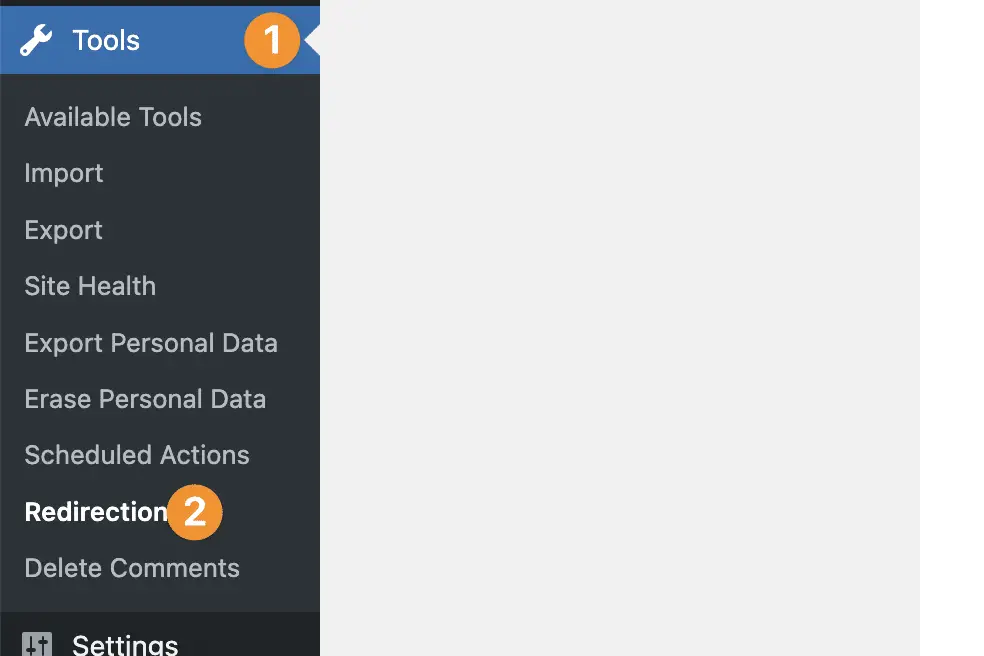
After activation, navigate to the tools section of your WordPress and select the “redirection” option from it;
On the next page, you’ll need to enter the old URL and the new URL. You can also choose whether you want to redirect the URL permanently (301) or temporarily (302);
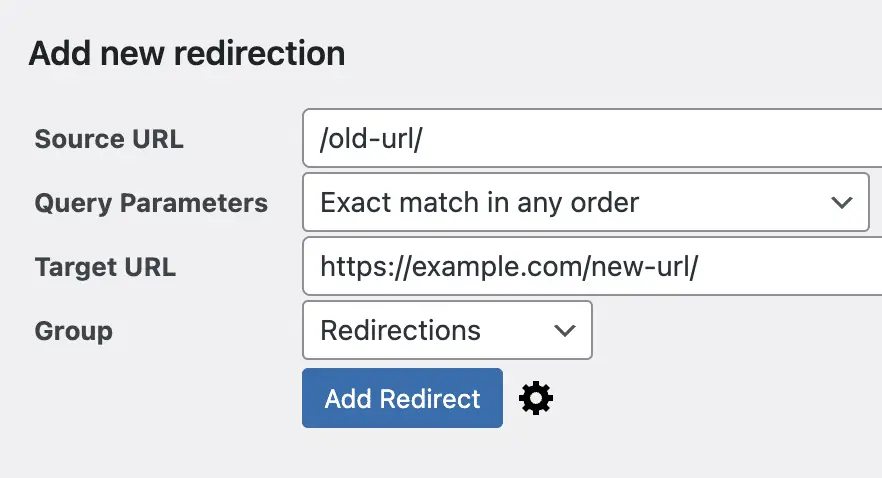
Once you’ve entered the old and new URLs, scroll down and click on the Save Changes button.
Edit Your WordPress functions.php File to Create a Redirect
If you want to redirect a URL without using a plugin, then you can edit your WordPress functions.php file to create a redirect.
To get started, connect to your WordPress site using an FTP client. Once connected, go to the /wp-content/themes/your-theme-folder/ folder.
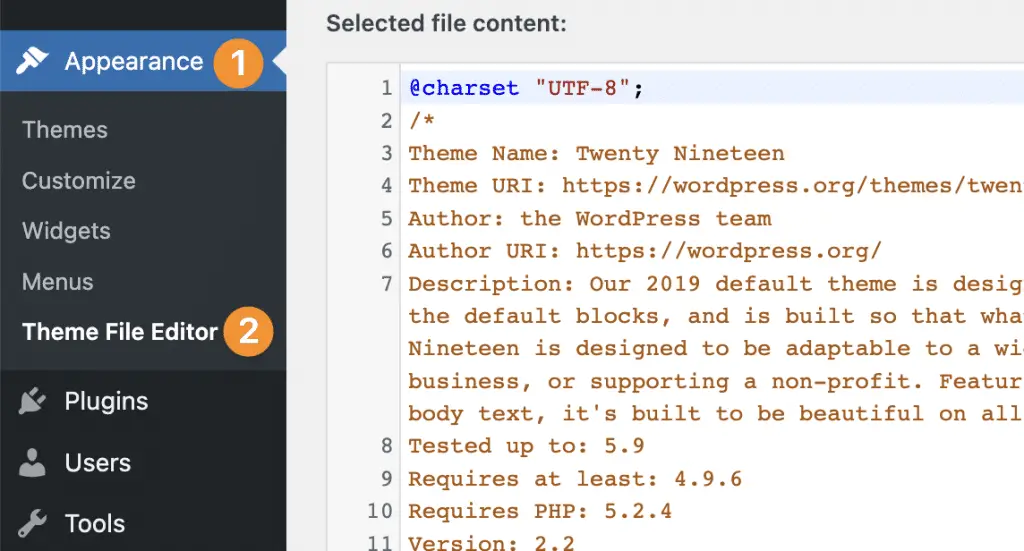
Alternatively, You can access functions.php file inside your WordPress dashboard from Appearance option > Theme File editor;
Next, Select your theme first as described below on step 1 and then select the functions.php file;
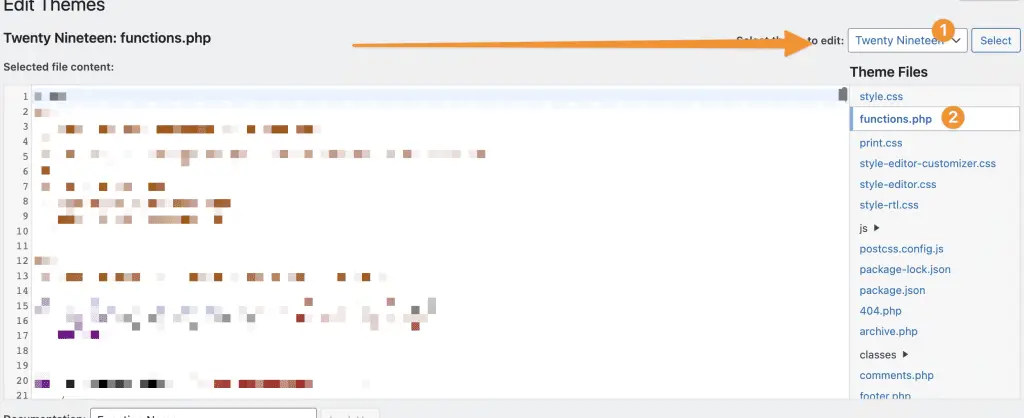
Next, You need to create a backup file by downloading the same from WordPress theme file editor panel or from FTP.
From FTP, Inside above folder, you need to find the functions.php file and download it to your computer.
Once the file is downloaded, open it using a text editor like Notepad or TextEdit.
Redirect the Entire Site to a New Domain
If you want to redirect your entire WordPress site to a new domain, then you need to add this code to the functions.php file:
wp_redirect( ‘http://www.example.com/’, 301 );
exit;
Replace example.com with your new domain name.
Redirect an Individual Page or Post to a New URL
If you want to redirect an individual page or post, then you need to add this code to the functions.php file:
You’ll then need to add the following code at the bottom of the file:
add_action( ‘template_redirect’, ‘redirect_to_blog_page’ );
function redirect_to_blog_page() {
if ( is_page(‘YOUR-SLUG‘) && ! is_user_logged_in() ) {
wp_redirect( ‘http://www.newurl.com/newslug/‘, 301 );
exit;
}
}
Replace YOUR-SLUG with the slug of your URL for which you want to be redirected.
Replace http://www.newurl.com/newslug/ with the URL of the page you want to redirect to.
Save the file and upload it back to your server, overwriting the existing file.
That’s all there is to it! The next time someone visits that URL, they will be redirected to the new URL you specified.
Also learn: NGINX vs Apache Web Server: Which is best for WordPress in 2022?
Issues With Redirections
If you are planning to change the URL of your WordPress site, then it’s a good idea to set up redirects from your old URLs to your new URLs. That way, anyone who visits your old URL will be automatically redirected to your new URL.
However, there are a few things you need to be aware of before you set up redirects:
1. Redirections can cause your site to load slowly. This is because each time someone visits a URL on your site, the server has to look up the redirect and then load the new URL.
2. Redirections can also cause issues with search engines. If you set up a redirect from one URL to another, and someone visits the first URL, they will be redirected to the second URL. However, the search engine will still see the first URL.
3. Redirections can also cause issues with your analytics data. If you set up a redirect from one URL to another, and someone visits the first URL, they will be redirected to the second URL. However, your analytics data will show that the visitor visited the first URL, not the second URL.
SEO Issues With Redirections
There are a few SEO issues that you need to be aware of when you set up redirects:
Temporary Redirects
If you set up a temporary redirect (302 redirects), then search engines will still index the original URL. However, they will also index the new URL. This can cause duplicate content issues.
To avoid this, you can use a plugin like Yoast SEO to set up a 301 redirect. A 301 redirect is a permanent redirect, which tells search engines that the original URL has been permanently redirected to the new URL.
Redirection Can Cause Broken internal links
If you set up a redirect from one URL to another, and someone visits the first URL, they will be redirected to the second URL. However, if there are any internal links pointing to the first URL, they will now be broken.
To avoid this, you can use a plugin like Redirection to set up redirects. This plugin will automatically redirect any broken internal links to the new URL.
Redirection Can Cause Page Not Found Errors (404)
If you set up a redirect from one URL to another, and someone visits the first URL, they will be redirected to the second URL. However, if the second URL does not exist, they will see a 404 page not found error.
To avoid this, you can use a plugin like Redirection to set up redirects. This plugin will automatically redirect any 404 errors to the new URL.
Which Plugins are the best for URL Redirection in WordPress?
There are a few plugins that you can use to set up redirects in WordPress:
1. RankMath – It’s one of the best all in one SEO plugins which has so many inbuilt functionalities to make your pages search engine optimized.
2. Yoast SEO – Yoast is one of the oldest and most popular WordPress plugins which has the functionality of redirection where you can manage it using their intuitive interface.
3. Simple 301 Redirects – Free is good right? Simple 301 Redirects is the Free Plugin available in WordPress repository from where you can create and manage all your 301 redirects.
4. Safe Redirect Manager – Another plugin that is available for free in WordPress Plugin Library to manage all your 3xx’s redirects in one place. Safe Redirect Manager gets updated regularly to keep your WordPress vulnerability free.
5. WP redirection – WP Redirection is another option for redirects lovers as it is also available for free at your disposal, You can perform similar tasks as other to create and manage redirects.
6. Redirection – The plugin is quite popular among bloggers because of its simple functionality and it’s also lightweight which won’t make your WordPress Site bloat.
These are just a few of the plugins that you can use to set up redirects in WordPress. There are many more plugins available, both free and premium.
How to find out if my server runs on APACHE or NGINX?
To find out if your server runs on Apache or Nginx, you can use the following steps:
1. Open your hosting account’s cPanel interface and look for the Websites section.
2. Under the Websites heading, click on the Domains icon.
3. In the new page that opens up, scroll down to the bottom and look for the Server Information section.
4. The web server type will be listed under this section. If it says Apache, then your server runs on Apache. If it says Nginx, then your server runs on Nginx.
URL Redirections With or Without Plugin, What do I recommend?
There are two ways that you can go about URL redirection in WordPress. You can either use a plugin, or you can do it without a plugin. I personally recommend doing it without a plugin, because it is much simpler and easier for one or 2 URL Redirects.
However, If you want to use URL Redirection for marketing purposes or there will be dozens of redirections then I recommend you to use a WordPress Plugin like RANKMATH to create and manage your URL Redirection.
Conclusion
In this article, we have looked at how to redirect URL in WordPress. We have also looked at the benefits and drawbacks of using a plugin for URL redirection. Lastly, we have looked at how to find out if your server runs on Apache or Nginx.
I hope you found this article helpful. If you have any questions, please feel free to leave a comment below.


