How to Set Your Preferred Domain in WordPress (3 Easy Way)
Setting a preferred domain for your website is crucial in optimizing your digital presence. A preferred domain, “www” or “non-www”, is the version of your website’s URL that you want search engines to index.
This decision has significant implications for your site’s SEO, as it helps to prevent duplicate content issues, improves site’s indexing, and contributes to a more streamlined user experience.
The choice between “www” (like www.example.com) and “non-www” (like example.com) domains often hinges on technical and aesthetic considerations. From a technical standpoint, “www” domains have certain advantages.
They can support DNS flexibility when configuring sub-domains and allow for restricting or granting cookies. On the aesthetic front, some prefer the cleaner, more minimalist look of “non-www” domains.
However, it’s important to note that from an SEO perspective, both versions are treated equally by search engines, as long as you consistently use your preferred format.
What is a Preferred Domain?
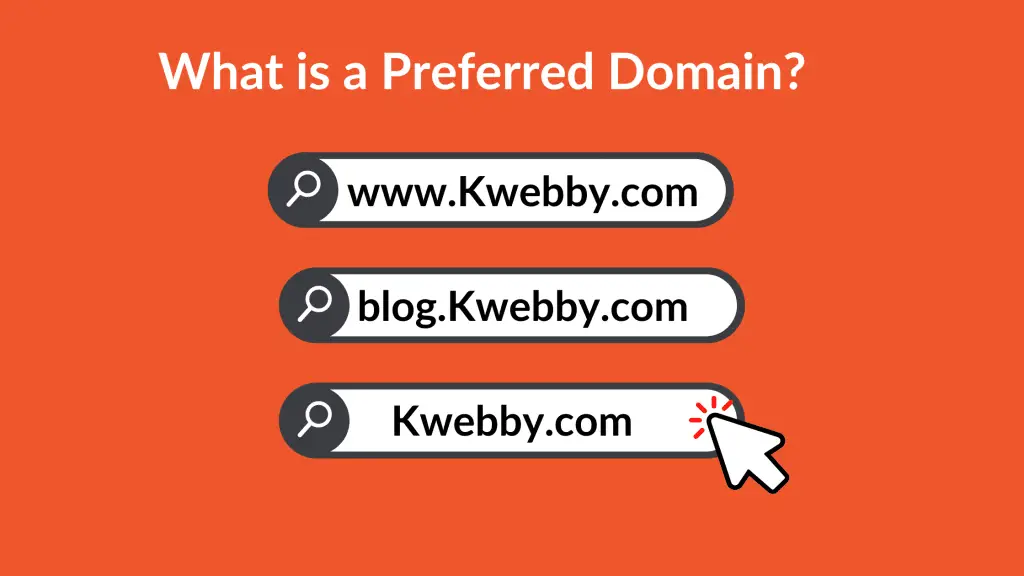
A preferred domain, also known as a canonical domain, is the version of a website’s URL that a site owner selects for indexing by search engines. This could be the domain’s www (www.example.com) or non-www (example.com) version.
The choice of a preferred domain is significant in Search Engine Optimization (SEO), as it helps prevent duplicate content issues. When search engines recognize both domain versions as separate entities, it could negatively impact the site’s SEO ranking.
Consequently, setting a preferred domain ensures that all links and traffic are directed to one unified website version, bolstering its SEO performance.
www vs. non-www: The Technical Difference

To illustrate, consider two versions of a hypothetical website’s URL: `www.example.com` and `example.com`. The former includes the ‘www‘ prefix, denoting it as a hostname, while the latter does not, making it a ‘naked’ or ‘bare’ domain.
Naked domains, like `example.com`, are those that do not have a subdomain prefix (such as ‘www’). They are concise and user-friendly, often preferred for their neat appearance. However, they do have a technical shortcoming. Naked domains cannot handle DNS CNAME records, which are commonly used for scalability and redundancy purposes in large networks.
On the other hand, hostnames like `www.example.com` involve a subdomain (‘www’ in this case) attached to the bare domain. The ‘www’ is a convention from the early days of the Internet, indicating that the domain is part of the World Wide Web. One advantage of using a hostname is its compatibility with CNAME records, making it a more flexible choice for larger, more complex websites.
In essence, the choice between a www and non-www domain comes down to technical requirements, personal preference, and the potential impact on SEO. Regardless of your choice, it’s crucial to set your preferred domain to maintain consistency and optimize search engine performance.
Debunking Myths: SEO Advantages of www vs. non-www
A common misconception in the SEO world is that one form of domain has inherent advantages over the other. In reality, search engines like Google treat both www and non-www domains equally in terms of ranking.
What actually matters to search engines is the consistency of usage. If you choose to use www, ensure all your site’s internal links, as well as external backlinks, use the www version.
Conversely, if you opt for the non-www version, apply it consistently across all your links.
Importance of Consistency in Domain Choice
Consistent use of your chosen domain is vital not just for SEO, but also for providing a seamless user experience. Inconsistencies in domain usage can confuse visitors and potentially lead to lost traffic.
Furthermore, it can cause search engines to index your website’s www and non-www versions as separate sites, diluting your SEO efforts.
Therefore, once you’ve chosen a domain preference, it’s crucial to stick with it and apply it uniformly across your entire web presence.
Setting Your Preferred Domain in WordPress
To set your preferred domain in WordPress, you will need to navigate through the WordPress Dashboard. Here are the steps to guide you:
Log into your WordPress account and go to the ‘Dashboard’. This is typically found on the left-hand side of the screen.
In the Dashboard, look for the ‘Settings’ option and click on it. This will open a dropdown menu.
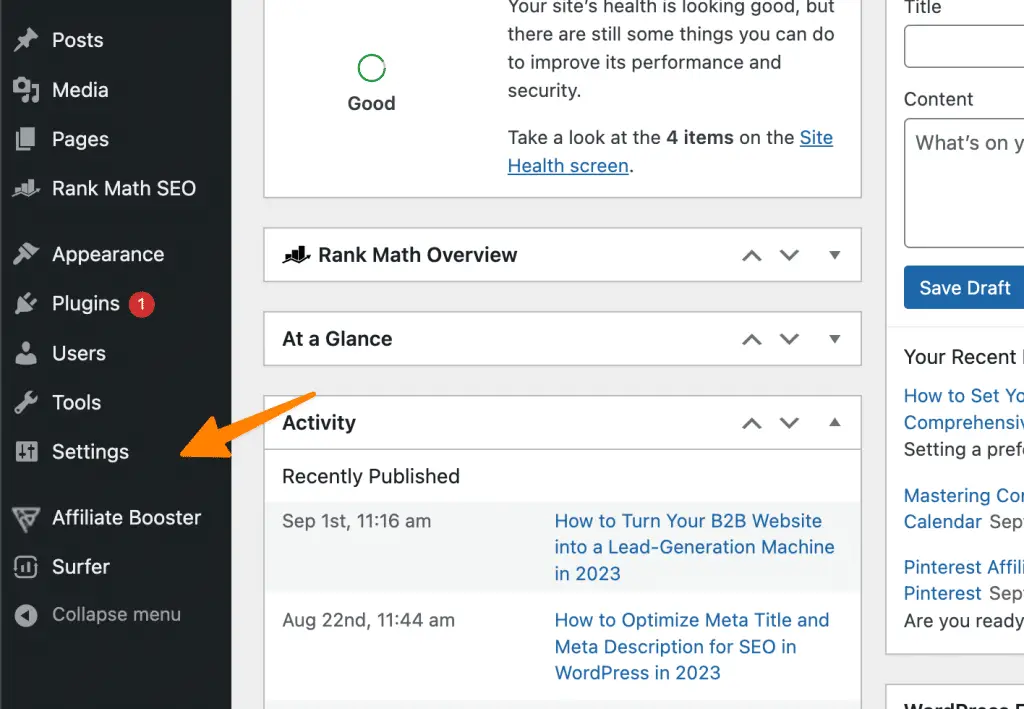
From the dropdown menu, select ‘General’. In the General Settings page, you will find two fields labeled ‘WordPress Address (URL)’ and ‘Site Address (URL)’.
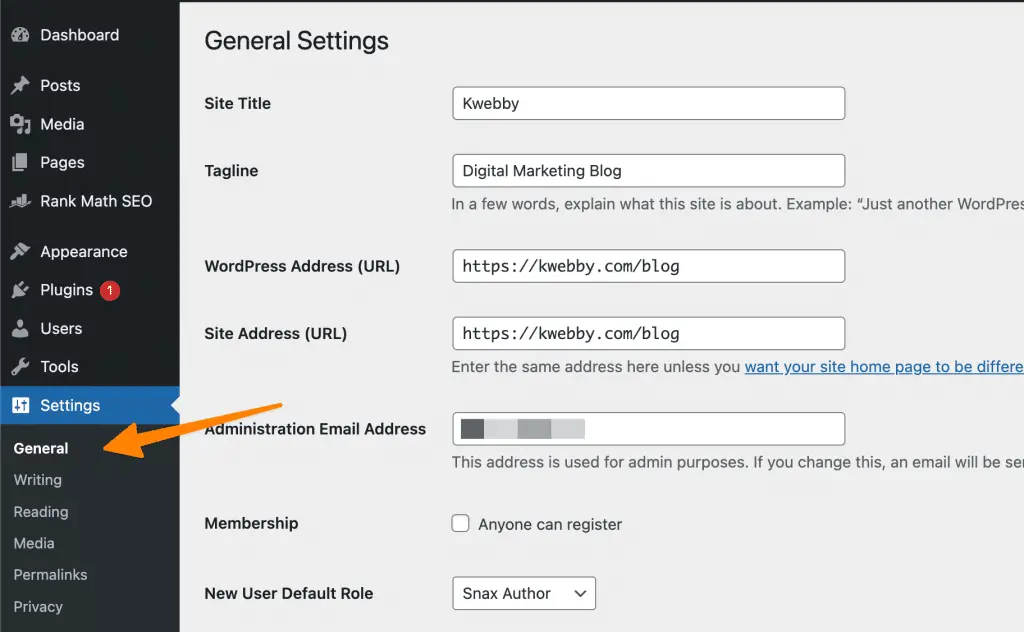
Input your preferred domain (either www or non-www) into both the ‘WordPress Address (URL)’ and ‘Site Address (URL)’ fields. Make sure that the URL in both fields is identical to maintain consistency.

Once you have input your preferred domain, scroll down to the bottom of the page and click on ‘Save Changes‘.
By following these steps, you can ensure that your preferred domain is set correctly in WordPress, thereby optimizing your site for search engine performance and delivering a consistent user experience.
Verifying Your Domain with Google With Your Preferred Domain
Verifying your domain with Google is a crucial step in optimizing your website’s search engine performance. It provides proof to Google that you are the legitimate owner of your website, allowing you to access detailed analytics about your site’s performance, submit sitemaps for better indexing, and set a preferred domain.
You can’t add Preferred Domain in the new Google Search Console as Google bid Farewell to Preferred domain settings as Google understands that It’s very common for websites to have the same content on multiple domain variations, therefore, To make it simpler, when Google’s systems recognize that there are multiple URLs pointing to the same content, we will designate one URL as the “canonical” URL, which will be used for search engine indexing.
You have several options for telling us your preference for consolidating duplicate URLs. In Google’s Consolidate duplicate URLs help center article, you can find detailed explanations of each option. Here are the options available to you:
- Use a rel=”canonical” link tag on HTML pages to tell us which URL should be prioritized.
- Use a rel=”canonical” HTTP header to specify the preferred version of a URL from multiple versions.

- Include all relevant URLs in a sitemap file so that we can read it and determine which one should be indexed.
- Use 301 redirects for retired URLs to show that they have been permanently moved and the new location should be indexed instead of the old one.
To verify and set a preferred domain in Google Search Console, follow the steps outlined below:
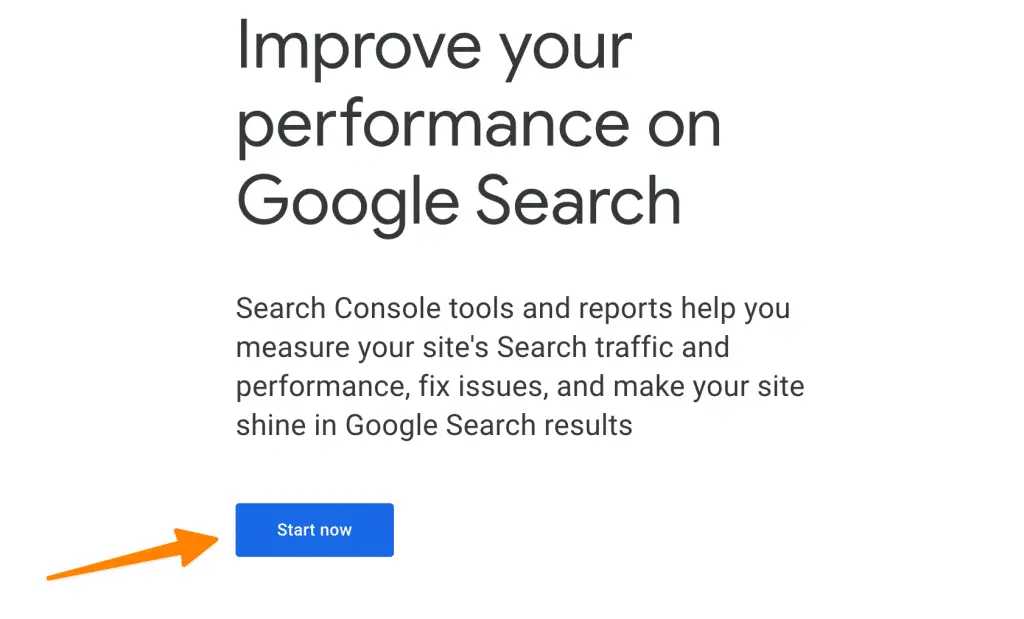
Create a Google Search Console Account: If you have not already done so, create an account with Google Search Console. You can do this by visiting the Google Search Console website and clicking on ‘Start Now’.
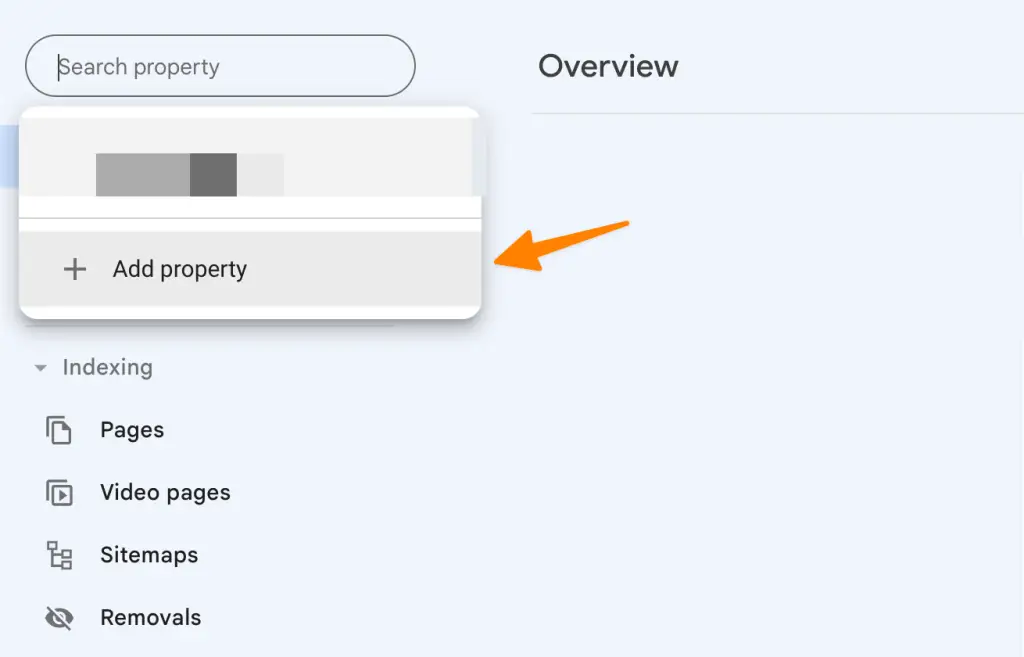
Add a Property: Click on ‘Add a Property’ at the top of your Search Console dashboard. Enter your website URL in the text box that appears and click on ‘Continue’.
Enter your website URL in the text box that appears and click on ‘Continue‘.
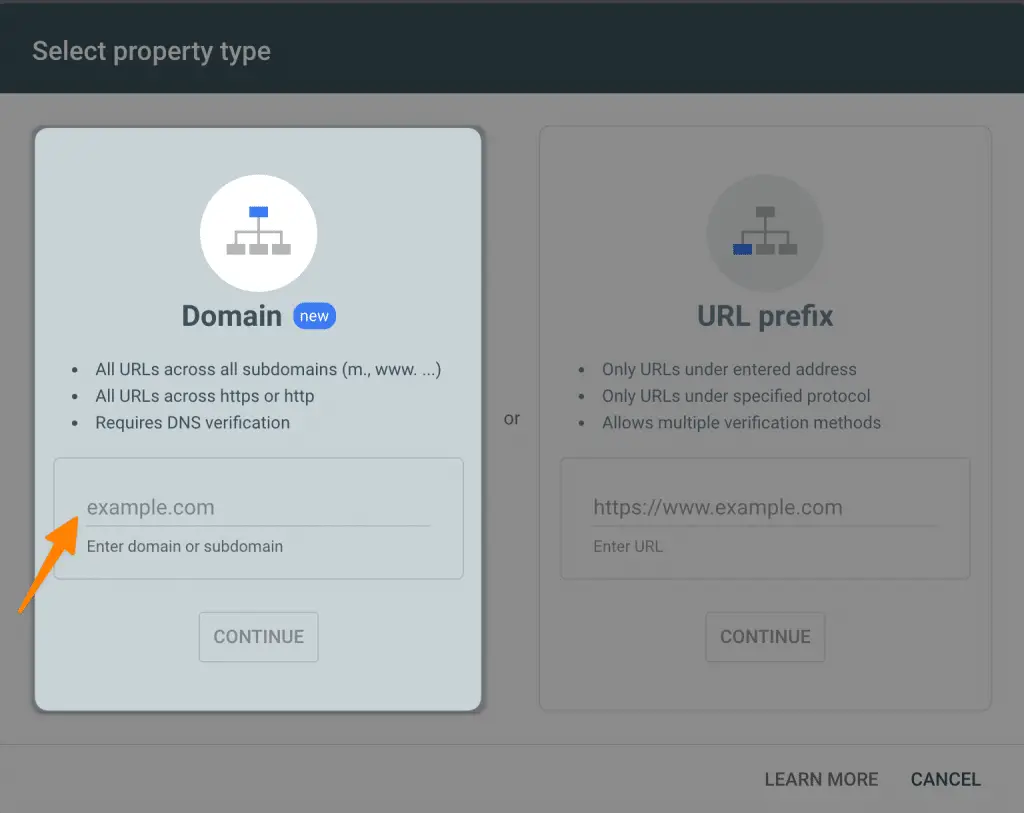
Verify Ownership: You will then be prompted to verify your domain. There are several methods to do this, but one of the most common is to download the HTML verification file and upload it to your website’s root directory. Alternatively, if you’re using WordPress, you can use the ‘HTML tag’ method and add the meta tag to your WordPress SEO plugin.
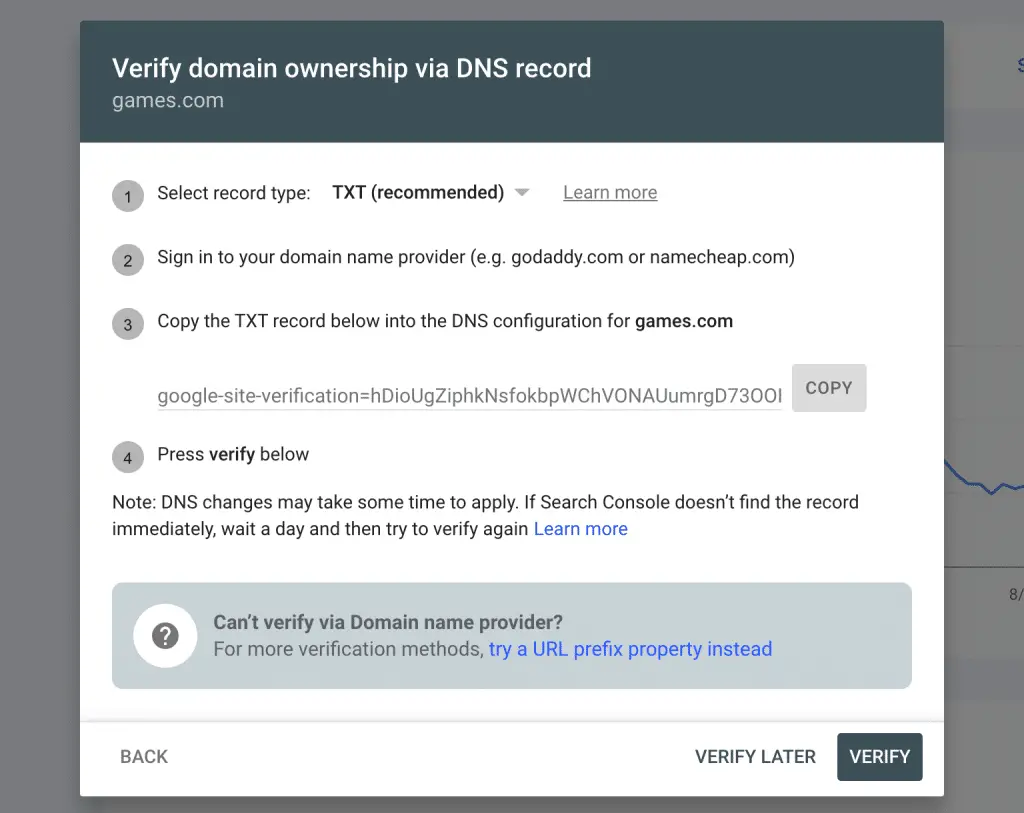
Remember, consistency is key. Whichever version you choose, ensure it matches the one you’ve set in your WordPress settings. This step is vital for ensuring a cohesive and effective SEO strategy.
Implementing 301 Redirects
Redirects are crucial in maintaining the integrity of your website’s SEO efforts, especially when it comes to handling www and non-www versions of your domain. A 301 redirect, also known as a permanent redirect, is particularly useful in such situations. This type of redirect automatically sends your site’s visitors and search engines to a different URL than the one they originally requested. In the context of www and non-www domains, a 301 redirect can ensure that regardless of how a user types your site’s URL, they will be directed to your preferred domain.
Redirections in Apache Server (.htaccess)
Now, let’s look at how to set up a 301 redirect to handle www vs. non-www versions of your domain using `.htaccess`:
Redirect from www to non-www
Access Your `.htaccess` File: This file is normally found in the root directory of your website. Using a FTP client, navigate to the root directory and locate the `.htaccess` file.
Backup Your `.htaccess` File: Before making any changes, ensure you make a copy of your existing `.htaccess` file. This is important in case anything goes wrong – you can simply restore the backup.
Implement the Redirect: Open the `.htaccess` file using a text editor. To redirect from www to non-www, add the following lines of code:
RewriteEngine On

RewriteCond %{HTTP_HOST} ^www.example.com$ [NC]

RewriteRule ^(.*)$ http://example.com/$1 [L,R=301]
Replace `example.com` with your domain.
Redirect non-www to www redirect
RewriteEngine On

RewriteCond %{HTTP_HOST} ^example.com$ [NC]

RewriteRule ^(.*)$ http://www.example.com/$1 [L,R=301]
Save and Upload: Save your changes and upload the modified `.htaccess` file back to the root directory of your website.
By implementing these steps, you can ensure consistency in your website’s domain usage, improving your site’s SEO performance and enhancing user experience.
Redirections in Nginx Server (nginx.conf)
Redirections in the Nginx Server (nginx.conf) are used to redirect a website’s www version to its non-www version, or vice versa. This is done by including a server block in the configuration file which will handle the redirection and provide an appropriate redirect code.
Redirect www to non-www
For example, to redirect all requests coming to the www version of a website to its non-www version, the following code can be used:
server {
listen 80;
server_name www.example.com;

return 301 $scheme://example.com$request_uri;
}
In this example, when a user requests the www version of example.com, it will be redirected to the non-www version with a status code 301 (Moved Permanently).
Redirect non-www to www redirect
The same can be done for redirecting from a non-www version back to its www counterpart using a similar code.
server {
listen 80;
server_name example.com;

return 301 $scheme://www.example.com$request_uri;
}
Save your file and check your website in action if it does or not.
NGINX vs Apache Web Server: Which is best for WordPress in 2023?
Advanced Considerations
Canonical URLs
A canonical URL is a concept in search engine optimization (SEO) that specifies the “preferred” version of a webpage. Similar to the way a 301 redirect can point to one website over another, a canonical URL tells search engines which version of a URL to index when multiple versions exist. It’s an effective solution to issues related to duplicate content, as it helps search engines understand which page they should rank in their results.
The importance of canonical URLs in SEO cannot be overstated. By indicating your preferred URL, you guide search engine crawlers to the most relevant and valuable version of your content. This not only prevents the negative effects of duplicate content but also ensures that all link equity is directed to one page, thereby improving its search engine ranking.
Checking and Setting Canonical URLs in WordPress Using Rankmath Plugin
In WordPress, you can check and set canonical URLs using an SEO plugin like Yoast. Here’s how:
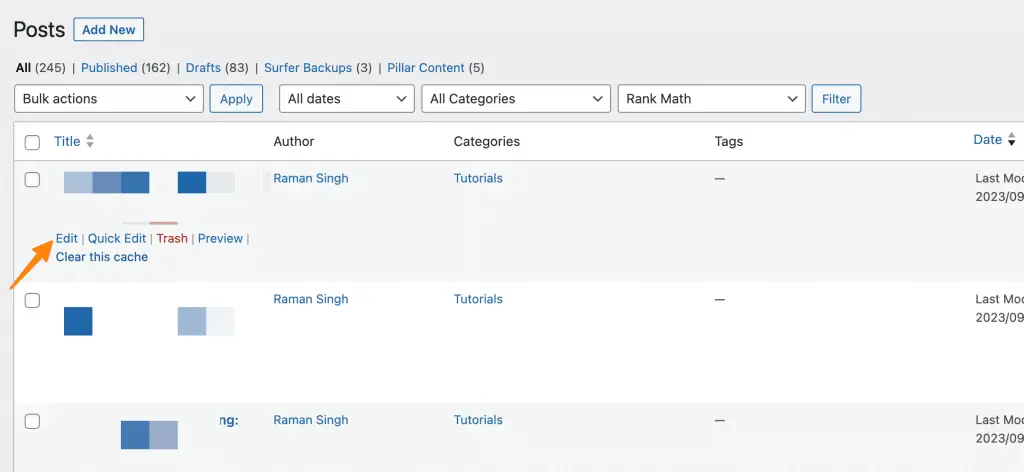
Install and activate the Rankmath SEO plugin here.
Navigate to the post or page you want to set the canonical URL for.
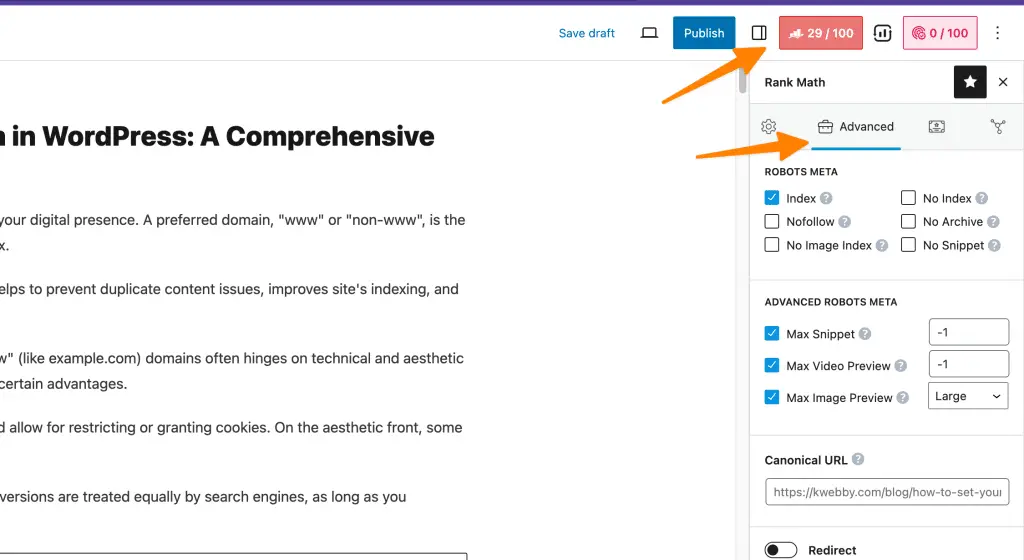
In the Rankmath SEO’s Meta Box on the sidebar of the Gutenberg editor, click on the ‘Advanced’ tab.
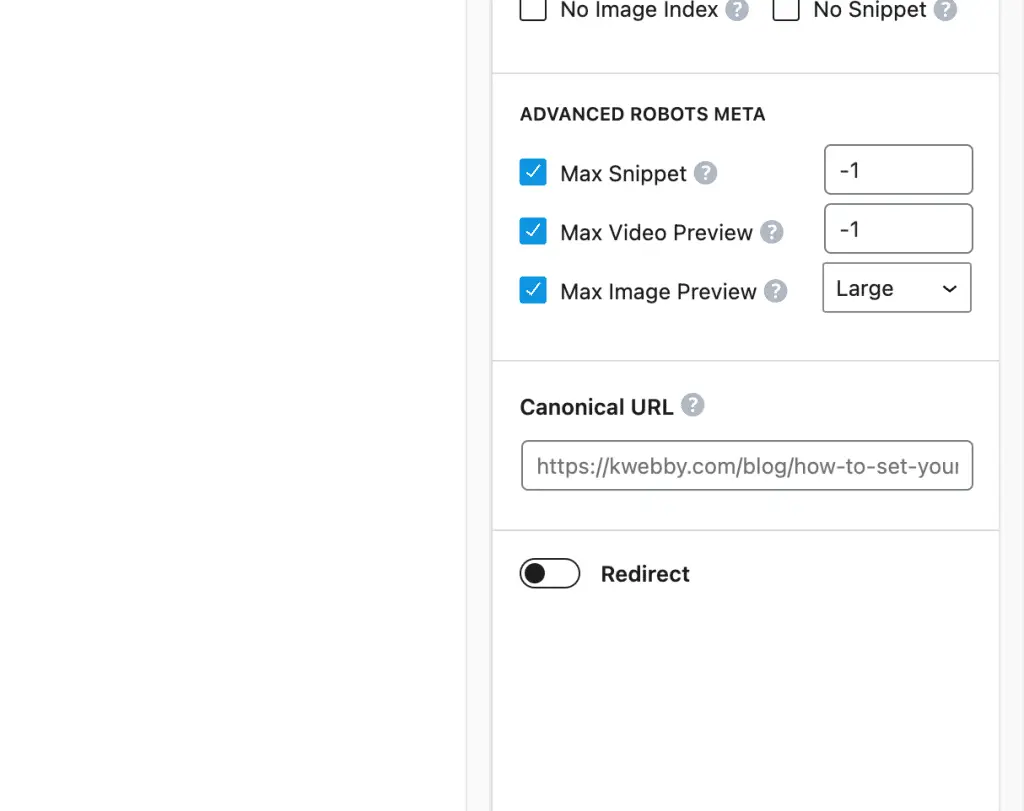
In the ‘Canonical URL’ field, enter your preferred URL.
Save your post or page.
By properly setting your canonical URLs, you can enhance the SEO of your WordPress site, ensuring that search engines correctly index your pages and direct traffic to the most authoritative versions of your content.
Changing Preferred Domain for Established Websites
Changing your preferred domain for an established website involves potential risks but can be executed smoothly with careful planning.
Risks and Recommendations
Switching the preferred domain can lead to temporary drops in organic traffic as search engines adapt to the change. It may also affect your website’s link equity if not handled correctly. However, these risks can be mitigated with proper redirection and canonicalization strategies. It is recommended to monitor your site’s performance closely during the transition.
Steps for a Smooth Transition
- Preparation: Backup your website and prepare a detailed plan. Identify all areas where your old domain is used, such as website content, ads, and social media profiles.
- Redirection: Implement a 301 redirect from your old to your new domain. This will direct both users and search engines to your new domain.
- Google Search Console: Add and verify your new domain. Set the preferred domain and submit a change of address.
- Update Content: Replace all occurrences of the old domain in your website content. Don’t forget your SEO settings, meta tags, and sitemaps.
- Monitor: Keep a close eye on your site’s performance and rankings for any unusual activity.
Making such a transition requires a comprehensive strategy, but with caution and due diligence, the process can be seamless and beneficial in the long run.
Migration from HTTP to HTTPS
Migrating from HTTP to HTTPS is a significant step in enhancing the security of your website. However, it’s essential to maintain the consistency of your domain format during this process. Preserving the www or non-www version of your domain during migration helps in avoiding potential SEO issues related to duplicate content and split ranking signals.
To ensure correct domain settings post-migration, follow these steps:
- Update Your Site’s URLs: After acquiring an SSL certificate and installing it on your server, update all internal and external links to use the HTTPS version of your URLs.
- Set Up 301 Redirects: Implement a 301 redirect in your `.htaccess` file to automatically direct all HTTP traffic to your HTTPS domain.
- Update Google Analytics and Search Console: Adjust the settings in your Google Analytics and Search Console accounts to track the HTTPS version of your site. Submit your updated sitemap with the new HTTPS URLs.
- Check Canonical Tags: Verify that all canonical tags point to the HTTPS version of your pages to help search engines index your site correctly.
By following these steps, you can ensure a smooth transition to HTTPS while maintaining your SEO efforts.
Common Challenges & Solutions
Based on discussions from WordPress forums, users often encounter several common challenges when managing their domain preferences and migrating to HTTPS, including:
1. Loss of SEO Rankings:
This is a common concern when implementing 301 redirects or changing the preferred domain. Solution: To mitigate this, ensure that you have correctly implemented 301 redirects and canonical tags. Monitor your website’s performance closely after making changes and adjust your strategies as necessary.
2. Downtime during Migration:
An incorrectly implemented migration can lead to downtime, severely impacting user experience and potentially damaging your SEO rankings. Solution: Thorough planning and careful execution of the migration steps can help prevent this. Ensure you have a reliable backup and consider using a staging environment to test the changes before implementing them on your live site.
3. Mixed Content Warnings:
After migrating to HTTPS, you might encounter mixed content warnings if some elements on your website are still using HTTP. Solution: Use an SSL checker tool to identify and fix any mixed content issues. Update all internal and external links to use HTTPS, and ensure your CDN also supports HTTPS.
4. Redirect Loops:
Incorrectly configured redirects can create a loop, causing a webpage to continuously reload. Solution: Use a redirection plugin or tool to check for and resolve any redirection issues. A clean `.htaccess` file with correctly configured 301 redirects can help prevent this problem.
By understanding these challenges and their solutions, you can better navigate the process of changing your preferred domain or migrating from HTTP to HTTPS, ultimately improving your website’s SEO performance and security.
WordPress SEO Resources
How to Optimize Meta Title and Meta Description for SEO in WordPress in 2023
How to Make My WordPress Site Visible on Google Search in 7 Proven Ways
How To Add Internal Links In WordPress Automatically in 1 Click
How to Noindex Low-Value Content in WordPress in 2 Simple Steps
How to Optimize Images for SEO In WordPress in 2023 (Only Guide You Need!)
How To Mark Up Your Posts/Pages With Schema In WordPress To Skyrocket SEO (2 Easy Way)
How To Enable Seo-Friendly Permalinks In WordPress in 2023
How To Show ‘Last Updated’ Dates In WordPress (3 Easy Methods)
Conclusion
In closing, it’s crucial to reiterate the importance of properly setting your preferred domain. This seemingly simple task has profound implications for your website’s SEO performance, affecting how search engines index your pages and how user traffic is directed.
Consistency is key, whether choosing between the www or non-www version of your domain or migrating from HTTP to HTTPS. By maintaining a uniform domain format and implementing correct redirections and canonical tags, you can avoid SEO issues related to duplicate content and split ranking signals.
So, keep the course steady, and you’ll be on the path to achieving optimal SEO results for your website.
Frequently Asked Questions
How do I change a domain in WordPress?
To change your domain in WordPress, you first need to update the `siteurl` and `home` options in your site’s database (using phpMyAdmin or another MySQL client).
Next, update all internal links on your website with the new domain name. Finally, set up a 301 redirect from your old domain to the new one.
What are the SEO benefits of www vs. non-www?
As far as SEO is concerned, there’s no major difference between using www or non-www for your domain. In fact, you can use either version and still achieve the same results, so the choice ultimately depends on personal preference.
However, it’s important to maintain consistency by consistently using one format or the other to avoid potential duplicate content issues.
How do I set a primary address in WordPress?
To set a primary address in WordPress, you’ll need to configure the settings for your preferred domain. This can be done by navigating to `Settings > General` in your WordPress dashboard and selecting either the www or non-www version of your domain name in the “WordPress Address (URL)” and “Site Address (URL)” fields.
Save your changes and you’re done! Finally, implement a 301 redirect from the non-preferred domain to ensure users are always directed to the correct version of your website.
How do I change my domain name on WordPress?
To change your domain name on WordPress, you’ll need to update the `siteurl` and `home` options in your site’s database.
Next, update all internal links with the new domain name. If necessary, export a copy of your content from the old domain so it can be imported into the new one. Finally, set up a 301 redirect from your old domain to the new one.
What is the significance of a canonical URL in domain settings?
A canonical URL is a preferred version of your web page that you want search engines to index. It’s important to set this correctly, as it helps ensure that duplicate content issues don’t affect your SEO rankings.
When setting up your domain preferences and migrating from HTTP to HTTPS, make sure you update all canonical tags with the correct URLs. This will notify search engines of the preferred version, allowing them to properly index your website.
How do I connect a domain to WordPress?
To connect a domain to WordPress, you’ll need to point the DNS settings to your hosting server. You can do this by modifying the nameservers with your domain registrar or updating the A and CNAME records.
Then, make sure you configure the `siteurl` and `home` options in your site’s database so that they match the new domain name. Finally, update all internal links with the new domain name and set up a 301 redirect from the old domain to ensure users are always directed to the correct version of your website.
What should I consider when migrating from HTTP to HTTPS?
When migrating from HTTP to HTTPS, there are a few important things to consider. Firstly, make sure you update all internal and external links with the new URL. You should also update your canonical tags and implement an SSL certificate on your web server.
Finally, be sure to monitor your website’s performance closely after making changes and adjust your strategies as necessary.


