In times of grief, sharing the news of a loved one’s passing on social media can provide solace and support from friends and family worldwide. Facebook offers a compassionate way to post an obituary, ensuring that the memory of the deceased person is honored and shared appropriately.
Utilizing tools like Canva to design a dignified and respectful obituary or death notice post can enhance this experience. ‘
In this guide, we will walk you through creating an obituary post using Canva and provide you with step-by-step instructions to share it on your Facebook page.
You can also leverage Facebook Live for death announcements and share obituary-related details from funeral homes for funeral arrangement details.
By following these simple steps, you can craft a meaningful tribute to the departed and offer a space for others to share their condolences and memories.
Whether working with a funeral director or managing the process independently, this resource will help you navigate it seamlessly. Understanding how Facebook’s memorialized profiles and memorialization settings work can also help you respectfully maintain the deceased person’s social media account.
Join us as we explore how to handle death notices, funeral arrangements, and the various features of the social media platform to honor your loved ones.
Step 1: Design Your Obituary Post
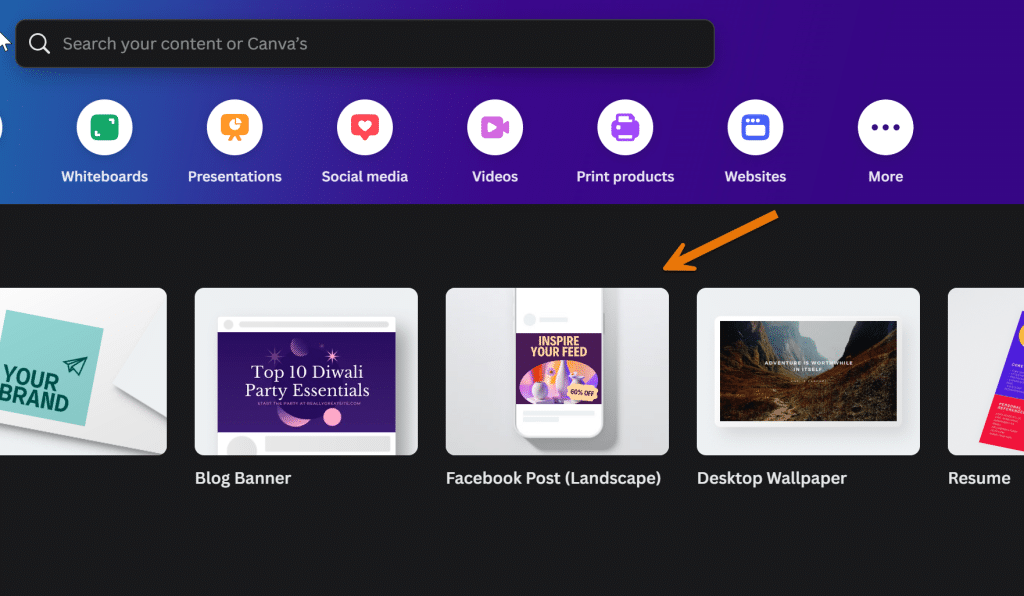
Go to Canva: Begin by visiting the Canva website or opening the Canva app on your device. In the search bar at the top, type “Facebook post” to find suitable dimensions for your obituary post.
Select a Blank Template: Click on the blank template option to open the editor. This gives you a blank canvas to start from scratch.

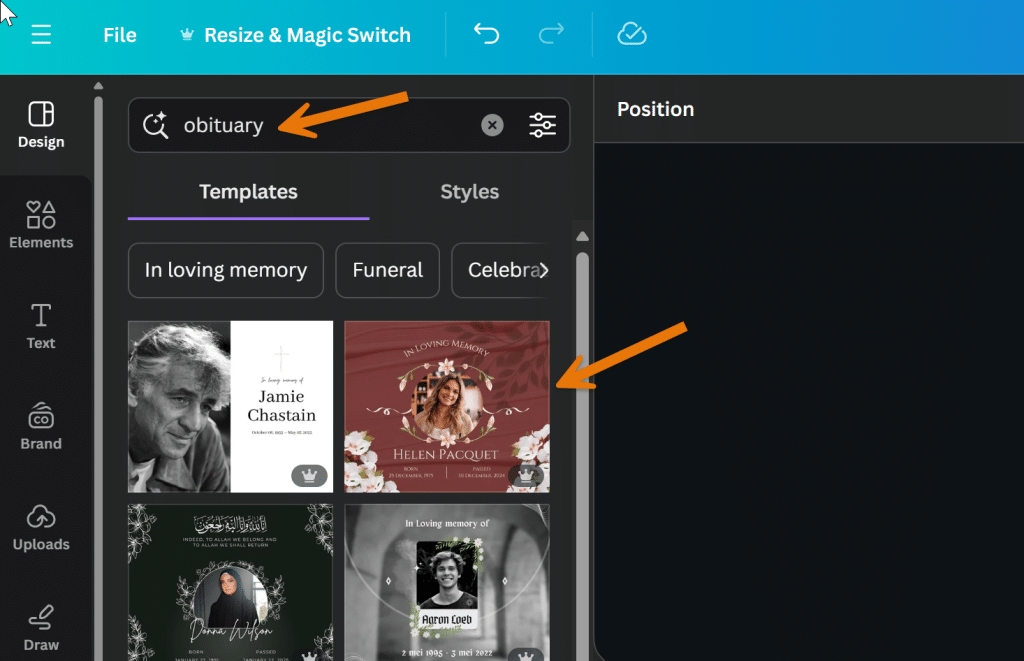
Search for Obituary Templates: In Canva’s left sidebar, use the search function to find templates related to obituaries. This will present you with various pre-designed templates that can be customized to suit your needs.
Choose a Template: Browse through the available templates and select the one that best matches your desired aesthetic and layout for the obituary post.

Edit the Details: Customize the template with the relevant details about the deceased person. This may include their name, dates of birth and death, a short biography, and any other meaningful tributes or messages.

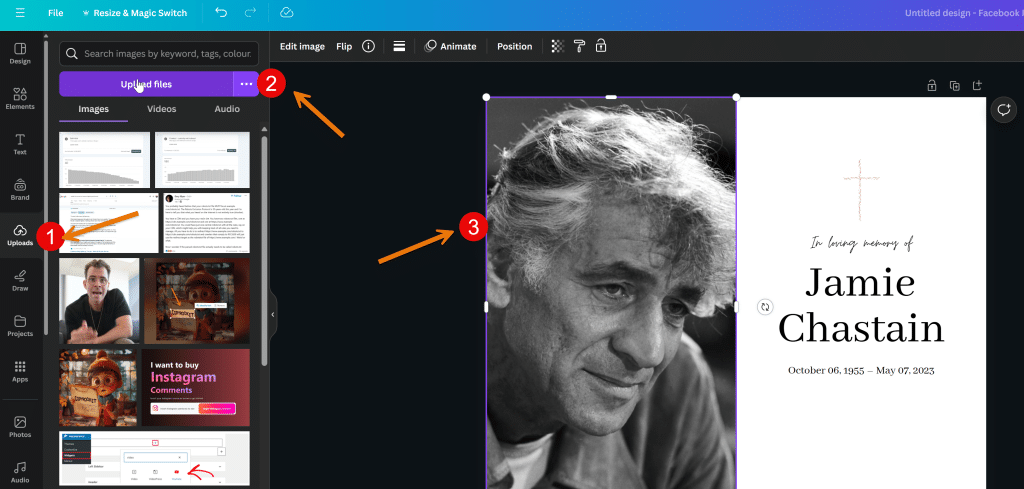
Replace the Image: To personalize the post, replace the placeholder image in the template with a photo of your loved one. Click on “Uploads” in the left sidebar or drag and drop your chosen image onto the canvas. Then, drag the image over the placeholder image, and it will automatically replace it.

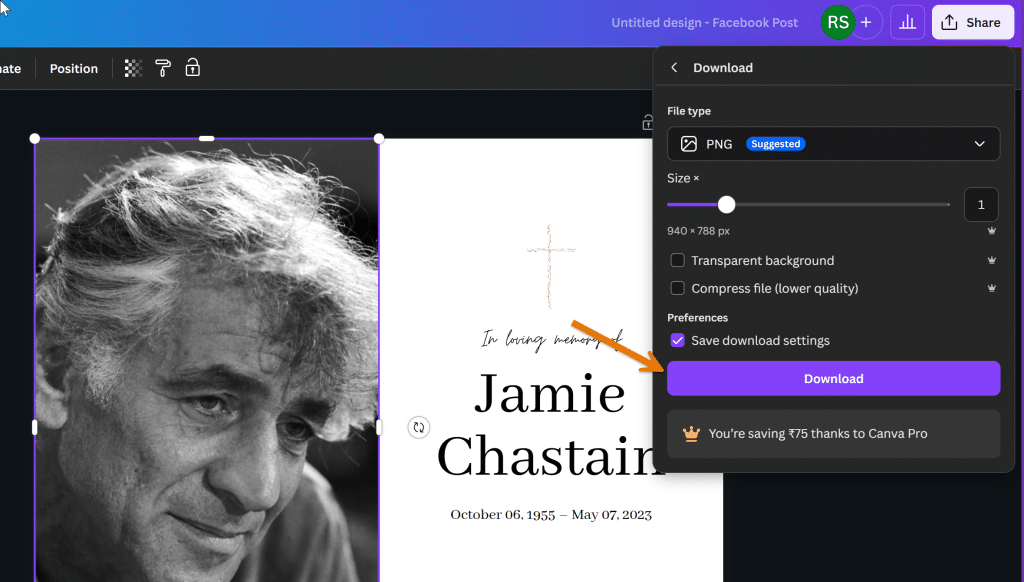
Download Your Design: Once you are satisfied with the design, click on the “Share” button in the top right corner and select “Download.” Click “Download” again, and the image will be saved to your desktop, ready to be shared on your Facebook page.

By following these steps, you can create a respectful and personalized obituary post to honor the deceased person’s memory. This approach also allows for a meaningful funeral announcement, inviting friends to share their condolences and memories on social media.
Step 2: Post Obituary Post on Facebook
Log in to Your Facebook Account: Open Facebook on your computer or mobile device and log in to your account.
Navigate to Your Timeline or Page: Go to your timeline or the Facebook page where you wish to post the obituary.
Create a New Post: Click on the “What’s on your mind” section at the top of your timeline or page. This will open a new post editor.

Upload the Obituary Image: Click on the “Photo/Video” option and upload the obituary image you created and downloaded from Canva.

Write a Caption: Accompany the image with a heartfelt caption. This can be a brief message about the deceased person, a favorite memory, or a simple statement like “In loving memory of [loved one].”
Tag Friends and Family: To ensure that important people see the post, tag friends and family members by typing “@” followed by their names in the caption or comments. This notifies them of the post and encourages them to share their condolences.

Add a Location (Optional): If you wish, you can add the location of the funeral service or the deceased person’s hometown to the post.
Share the Post: Once you are satisfied with the content, click the “Post” button to share the obituary on your timeline or page.
Enable Comments (Optional): Consider enabling comments to allow friends and family to share their thoughts, memories, and condolences.
By following these steps, you can share a respectful obituary post on Facebook, inviting your social media community to join you in honoring your loved one’s memory.
50 Obituary Captions to Write for Your Loved Ones
- “In loving memory of [loved one].”
- “Forever in our hearts, [loved one].”
- “Remembering the life of [loved one].”
- “Rest in peace, [loved one].”
- “Celebrating the wonderful life of [loved one].”
- “Our beloved [loved one] has passed away.”
- “Gone but not forgotten, [loved one].”
- “With heavy hearts, we announce the passing of [loved one].”
- “Cherishing the beautiful memories of [loved one].”
- “In memory of [loved one], forever missed.”
- “Honoring the legacy of [loved one].”
- “Saying goodbye to our dear [loved one].”
- “In remembrance of [loved one].”
- “Our hearts mourn for [loved one].”
- “May [loved one] rest in eternal peace.”
- “Farewell, [loved one], you will be sorely missed.”
- “Honoring the life and memory of [loved one].”
- “Celebrating the life of [loved one] with love and joy.”
- “May we find comfort in the memories of [loved one].”
- “In honor of [loved one]’s journey on earth.”
- “We remember [loved one] with love and gratitude.”
- “In sacred memory of [loved one].”
- “The world was brighter with [loved one], now dimmer without.”
- “Thank you for the memories, [loved one].”
- “With love, we remember [loved one].”
- “Reflecting on the life of [loved one].”
- “In loving tribute to [loved one].”
- “Grateful for the moments shared with [loved one].”
- “With heartfelt sadness, remembering [loved one].”
- “Honoring [loved one]’s beautiful soul.”
- “[loved one], your memory lives on.”
- “Paying homage to [loved one].”
- “Love and light for [loved one].”
- “[loved one] has left a lasting legacy.”
- “With deep sorrow, honoring [loved one].”
- “In celebration of [loved one]’s life and love.”
- “Remembering [loved one]’s impact on our lives.”
- “Cherished memories of [loved one].”
- “In deep remembrance of [loved one].”
- “[loved one] will always be in our hearts.”
- “Sharing the loss of [loved one].”
- “Eternal rest for [loved one].”
- “Honoring a life well-lived by [loved one].”
- “Resting peacefully, [loved one].”
- “In true memory of [loved one].”
- “[loved one], you will always be remembered.”
- “A life to celebrate, [loved one].”
- “With tenderness, we remember [loved one].”
- “Reflecting on the legacy of [loved one].”
- “In profound memory of [loved one].”
Conclusion
In conclusion, creating and sharing a personalized obituary on Facebook is a heartfelt way to honor your loved one’s memory and invite your social media community to join you in remembering their life.
By following the steps outlined above, you can ensure that your obituary post is respectful, thoughtful, and reaches a broad audience.
Whether you are sharing through your Facebook page, memorialized profiles, or other social media platforms, tools like Canva make designing an obituary image simple and intuitive.
Additionally, using this approach allows the deceased person’s family and friends to share their condolences and cherished memories, fostering a sense of collective grief support.
Posting obituaries on social media accounts provides a meaningful outlet for expressing grief and celebrating the life of the person who has passed away.
This modern method complements traditional practices, such as newspaper obituaries and funeral services, and can be a valuable tool for those managing funeral arrangements or seeking to maintain a social media presence for memorialized accounts after a person’s death.
Test your knowledge
Take a quick 5-question quiz based on this page.


