How to Migrate WordPress Site to New Host or Server: A Step-by-Step Guide
Migrating your WordPress site to a new host or server can be a daunting task. There are so many things to think about and take into consideration to migrate WordPress.
What if you mess something up?
What if you forget something important?
What if your site goes down and you lose all of your traffic?
Luckily, we are here to help. In this step-by-step guide, we will show you exactly what to do and what not to do when migrating your WordPress site.
We will also provide tips and tricks for making the process as smooth as possible. So whether you are moving your website to a new host or server, or simply upgrading your current hosting plan, follow these steps for a successful migration!
Also, Read and Learn How to backup the WordPress site (5 Methods) – The Ultimate Guide If you haven’t already as it is a vital part of the migration process.
Manual vs Automatic WordPress Migration
There are two ways to migrate a WordPress site:
– Manual Migration
– Automatic Migration
We will discuss both methods in detail further in this post. But before that, let’s take a look at the pros and cons of each method.
Manual WordPress Migration Pros:
– You have complete control over the process.
– You can migrate your site without any plugins.
– Manual migration is generally faster and easier than automatic migration.
Manual WordPress Migration Cons:
– There is a higher chance of something going wrong.
– It is more time-consuming than automatic migration.
Automatic WordPress Migration Pros:
– Automated migration is often more reliable than manual migration.
– Automated migration can be done with the help of a plugin.
– Automated migration is usually faster than manual migration.
Automatic WordPress Migration Cons:
– You have less control over the process.
– You need to use a plugin for automated migration.
– Automated migration can be more expensive than manual migration.
Now that you know the pros and cons of each method, let’s take a look at how to migrate the WordPress site manually.
How to migrate a WordPress site manually
There are two parts to manual WordPress migration:
- Moving the WordPress files
- Moving the database
We will go over each part in detail. But before we begin, there are a few things you need to do:
- Back up your WordPress site. This is very important! If something goes wrong during the migration process, you will be glad you have a backup.
- Make sure your WordPress site is running the latest version. Outdated WordPress sites are more vulnerable to security threats.
- Deactivate all plugins on your WordPress site. You can reactivate them after the migration is complete.
- Change your DNS settings. This will point your domain name to the new server.
New WordPress Hosting
You will need to sign up for new WordPress hosting. We recommend using Hostgator for starters (Low Traffic Websites) and Digitalocean for dedicated or virtual servers (High Traffic Websites). They are one of the best WordPress hosting providers and they offer free migration services.
Once you have signed up for your new hosting account, it’s time to move the WordPress files.
Moving the WordPress Files
There are two ways to move the WordPress files:
– via FTP
– via cPanel
We recommend using FTP because it is the easiest method. However, if you are not comfortable with using FTP, you can use cPanel.
Moving Files using FTP
To migrate the WordPress site via FTP, you will need to connect to your WordPress site using an FTP client. We recommend using Filezilla. Once you are connected, you will need to download the WordPress files to your computer.

The WordPress files are located in the public_html folder. Simply select all of the files and download them to your computer.

It will take time to download all files so you can just stay put, make sure you have downloaded all files and there’s no error displayed on your FTP client.
If an Error is displayed, please resolve the same otherwise your website will break when you transfer or migrate your WordPress site.
Once the files have been downloaded, you will need to upload them to your new server. To do this, simply connect to your new server using FTP and upload the files to the public_html folder.
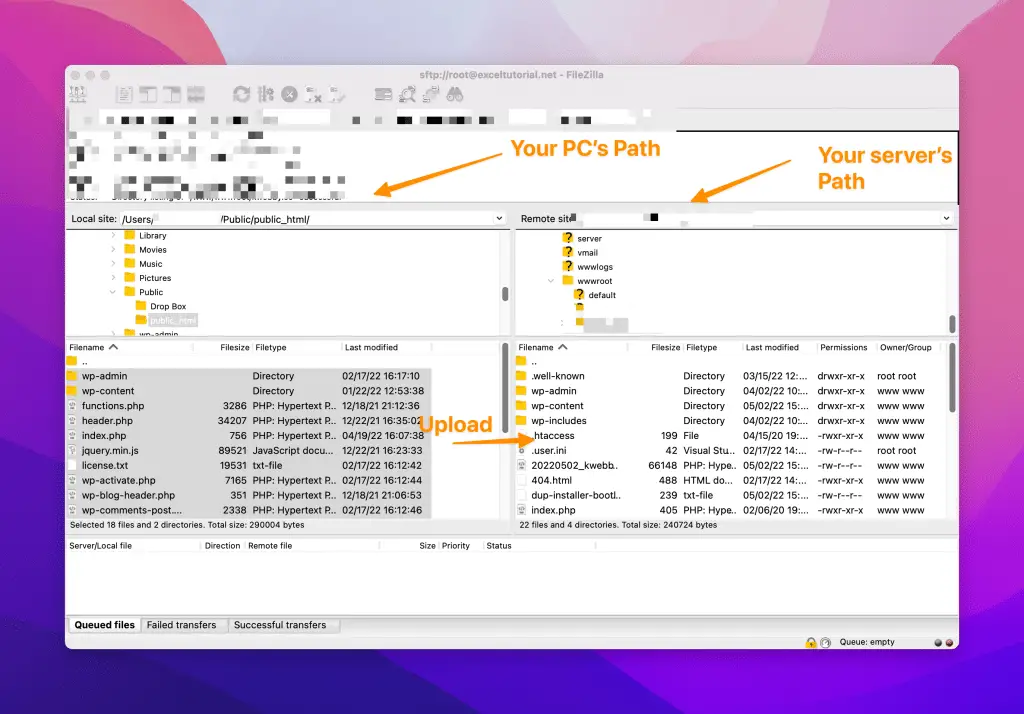
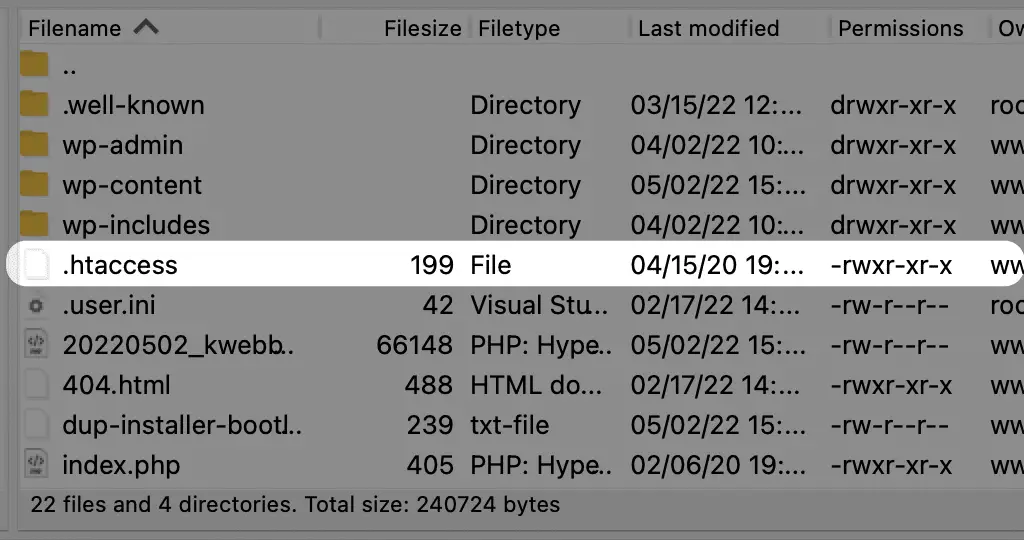
Make sure Web server Apache’s .htaccess file is also uploaded as it handles all your URL rewrites because on some occasions, this file is hidden as default, Therefore you have to check and verify if it gets transferred, please do ignore if you use NGINX server.
Moving Files using cPanel
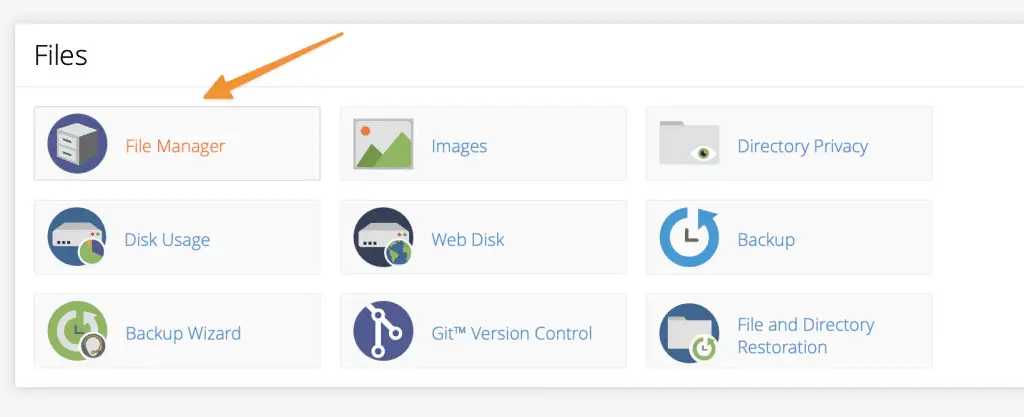
If you want to migrate a WordPress site using cPanel, you will need to log in into your cPanel account. Once you are logged in, scroll down to the “Files” section and click on the “File Manager” icon.
A new window will pop up and you will need to select the “Web Root (public_html/)” option and click on the “Go” button.
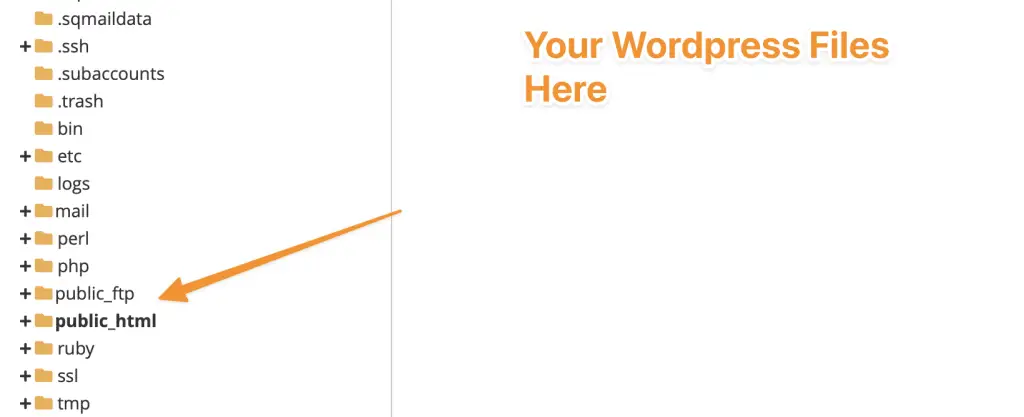
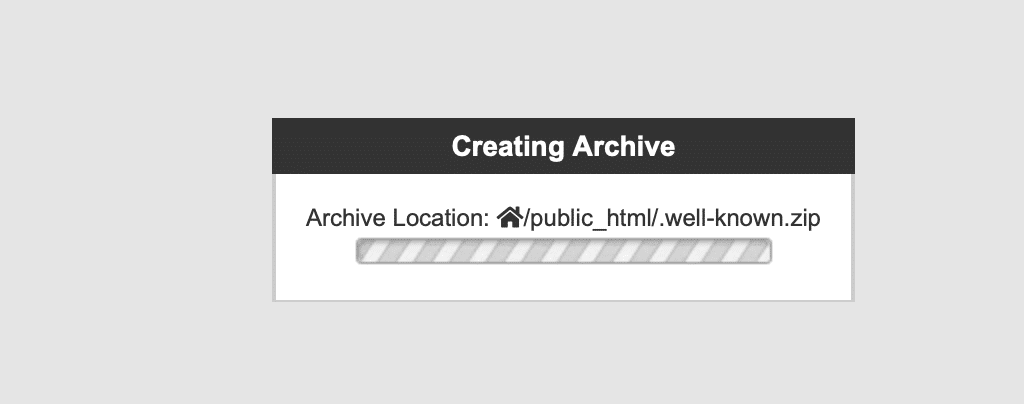
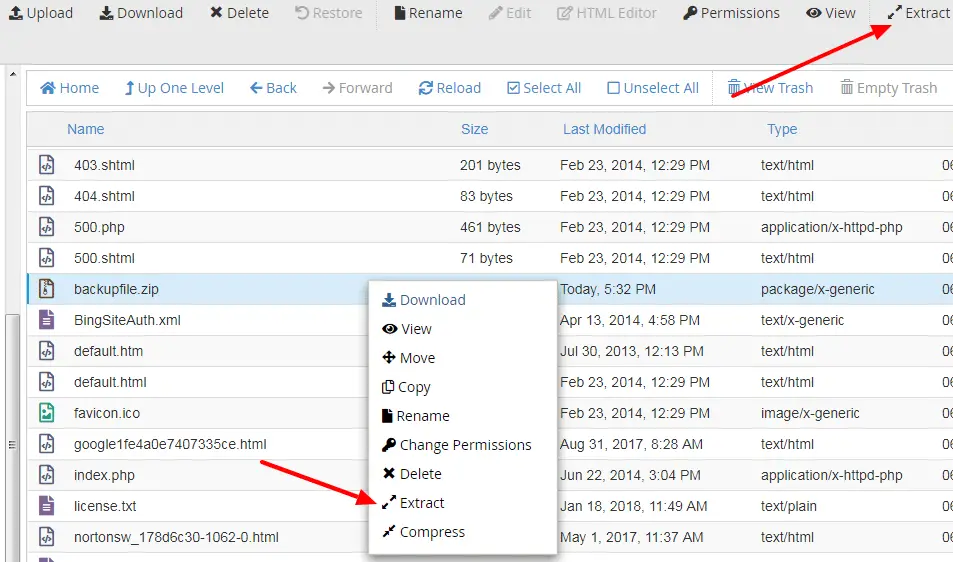
Now, you will see all of the WordPress files in the public_html folder. Simply select all of the files and compress them into a ZIP file.

Once the files have been compressed, you will need to download the ZIP file to your computer.
The next step is to upload the ZIP file to your new server. To do this, simply log in to your cPanel account and scroll down to the “Files” section. Click on the “File Manager” icon and select the “Upload Files” option.
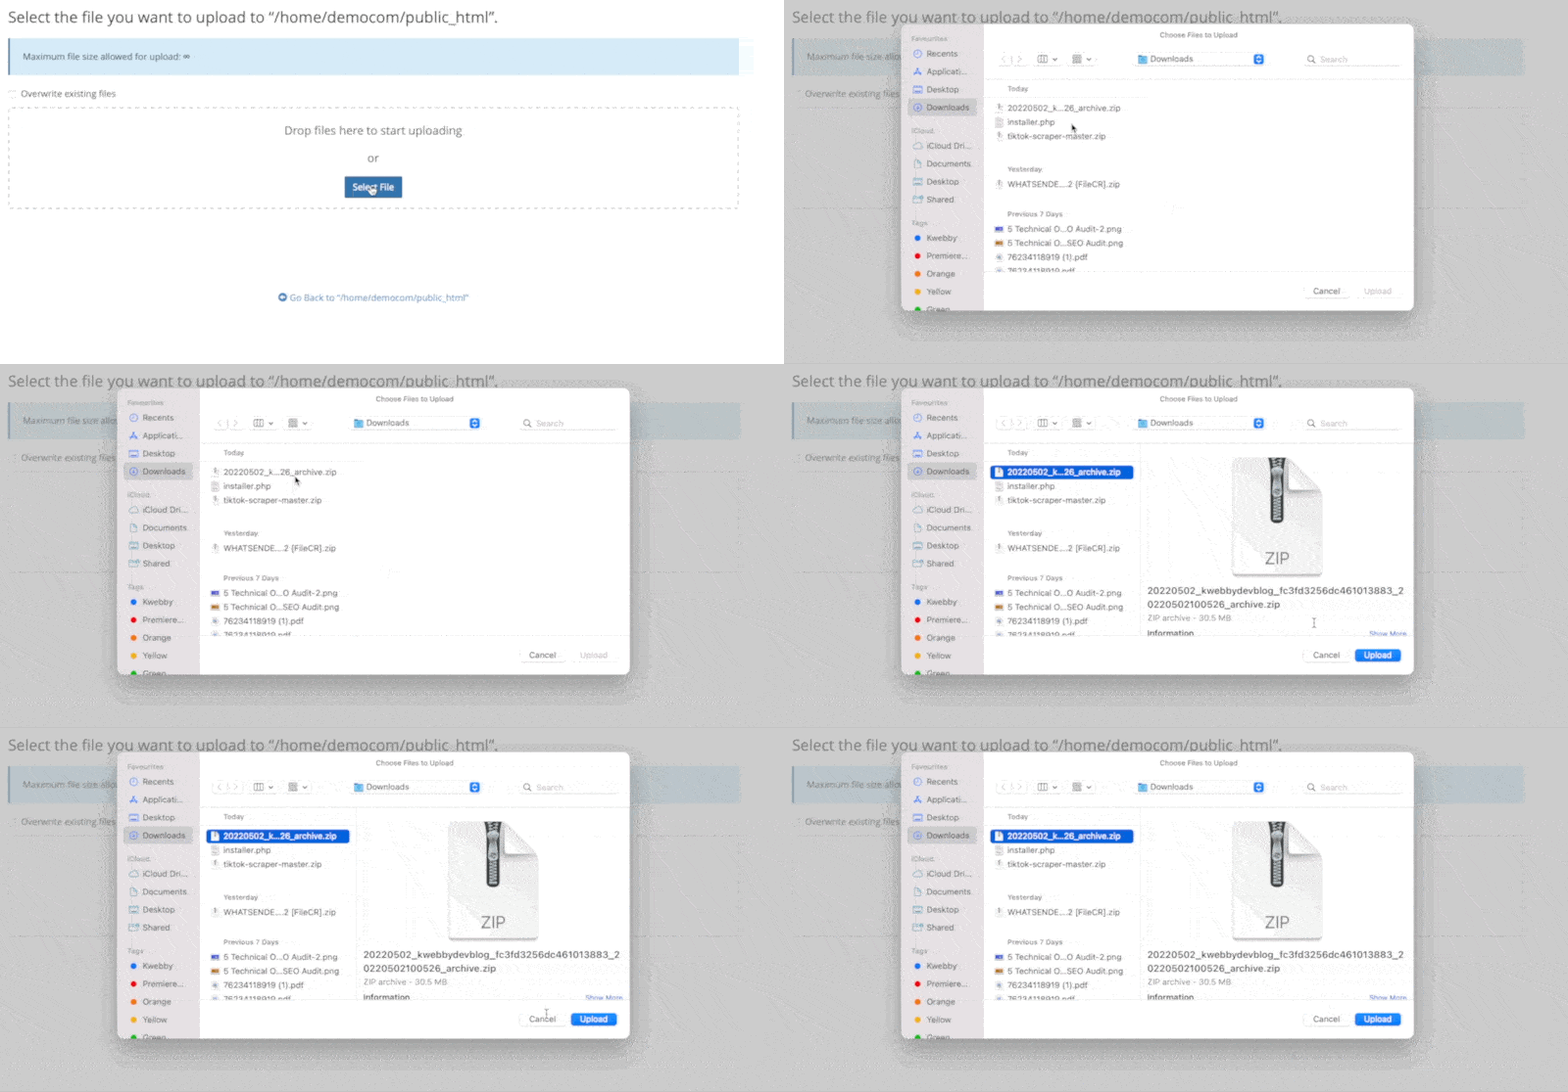
A new window will pop up and you will need to select the ZIP file that you downloaded to your computer. Once the file has been uploaded, you will need to extract it.
To do this, simply click on the “Extract Files” button and all of the WordPress files will be extracted to the public_html folder.
Congratulations! You have successfully migrated your WordPress site’s files to a new server.
Note: If you don’t have cPanel on your new server or hosting, then you can use FTP to upload your archives, first you need to extract the ZIP file you have downloaded to some folder using WINRAR or a similar extractor and upload all files in the folder to new hosting or server’s “public_html” folder.
Again, Double check your files and folders before deleting files on the previous server.
Move your Database
The next step is to migrate your WordPress database. To do this, you will need to log in into your cPanel account and scroll down to the “Databases” section. Click on the “PHPmyadmin” icon.

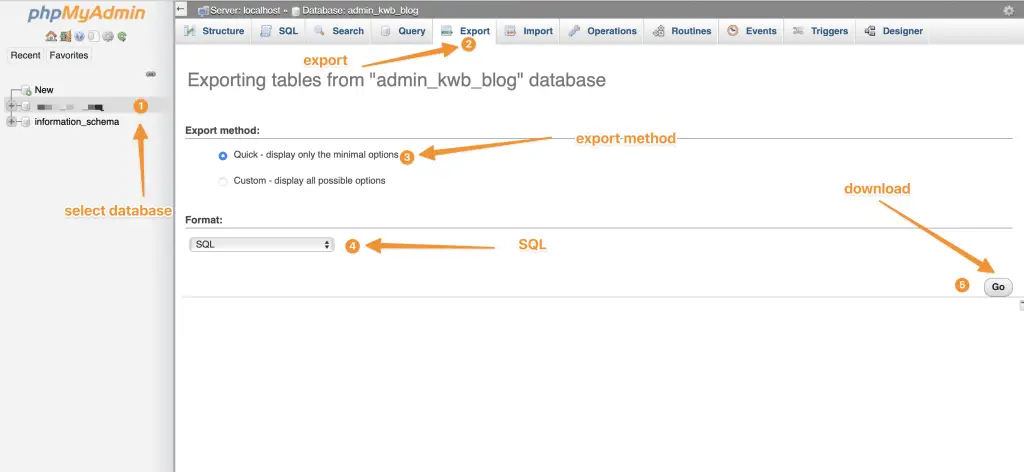
A new window will pop up and you will need to export your existing database SQL File.
Note: If you Don’t use cPanel then you may need to enter your database user and password manually like below;
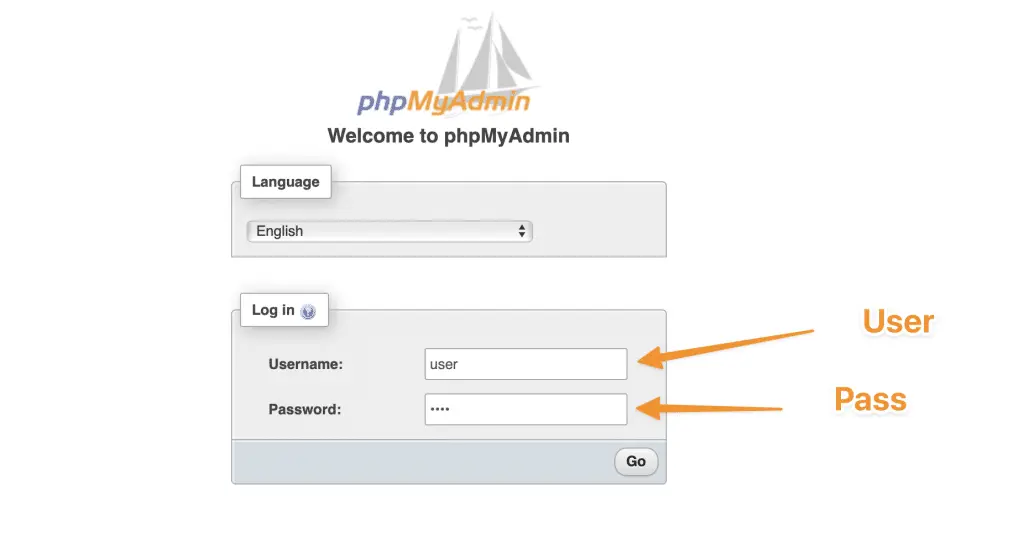
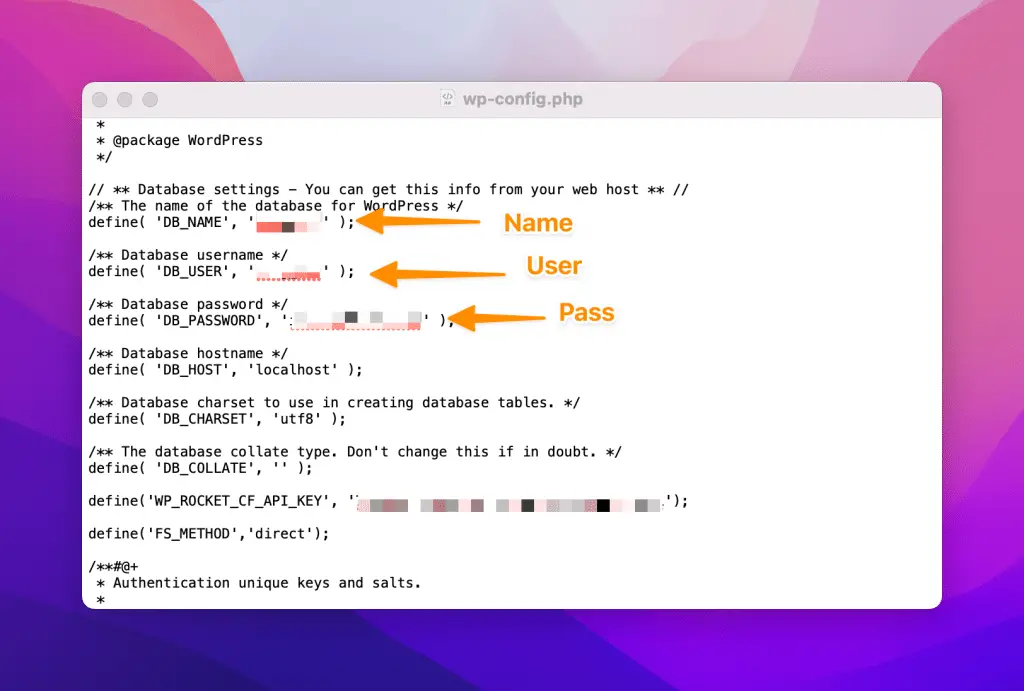
To do this, Select the database of your existing WordPress website, if you don’t have the name then please check your wp-config file where the database name, user, and password are written.
Then click on “export” at the top bar and choose quick export, then select “SQL” From the dropdown format section.
Now you have downloaded your database from the old server, It’s time to import it to your new WordPress hosting or server.
Do the same method above if you have cPanel access, In case you don’t then ask your hosting provider to provide PHPmyadmin access, Start creating a database using the MYSQL Database Wizard option in cPanel.

First create the database name, Then the user and password as you move ahead.
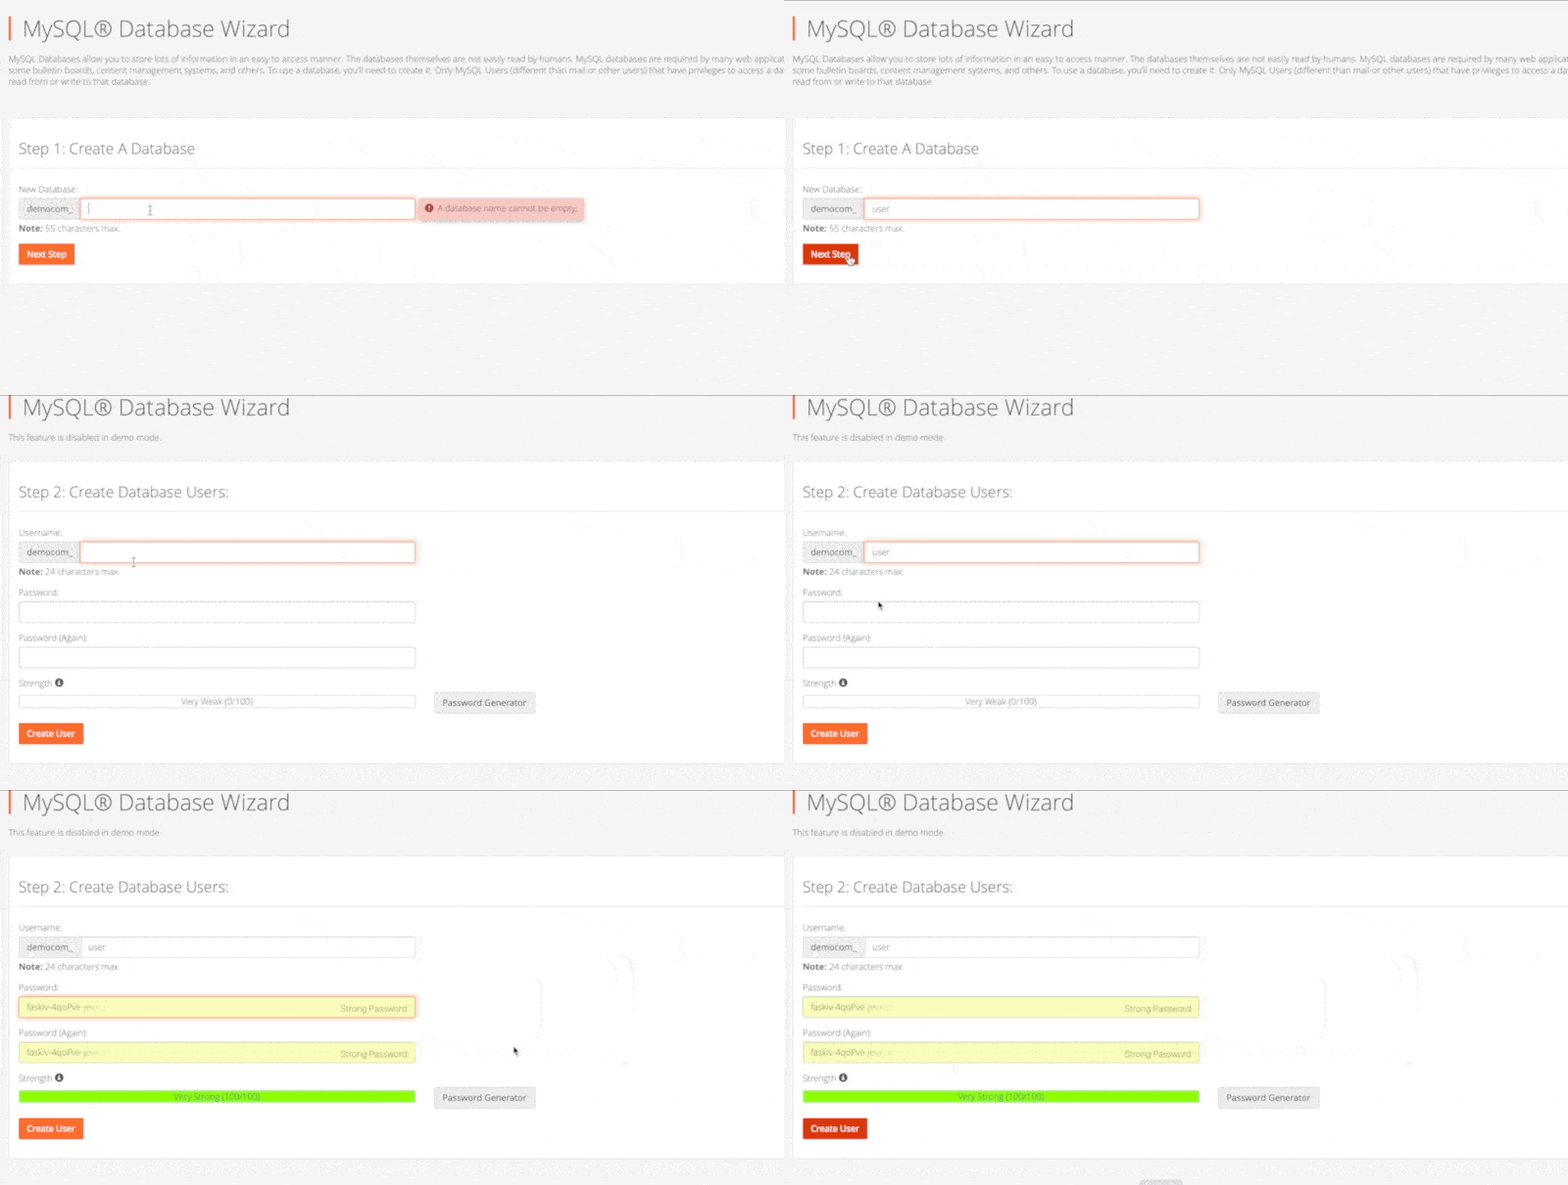
Now Start importing your exported SQL file using the same PHPMYADMIN option as above as it will open the PHPmyadmin area, log in with your newly created database user and password as above.
Now Go to the Import section.
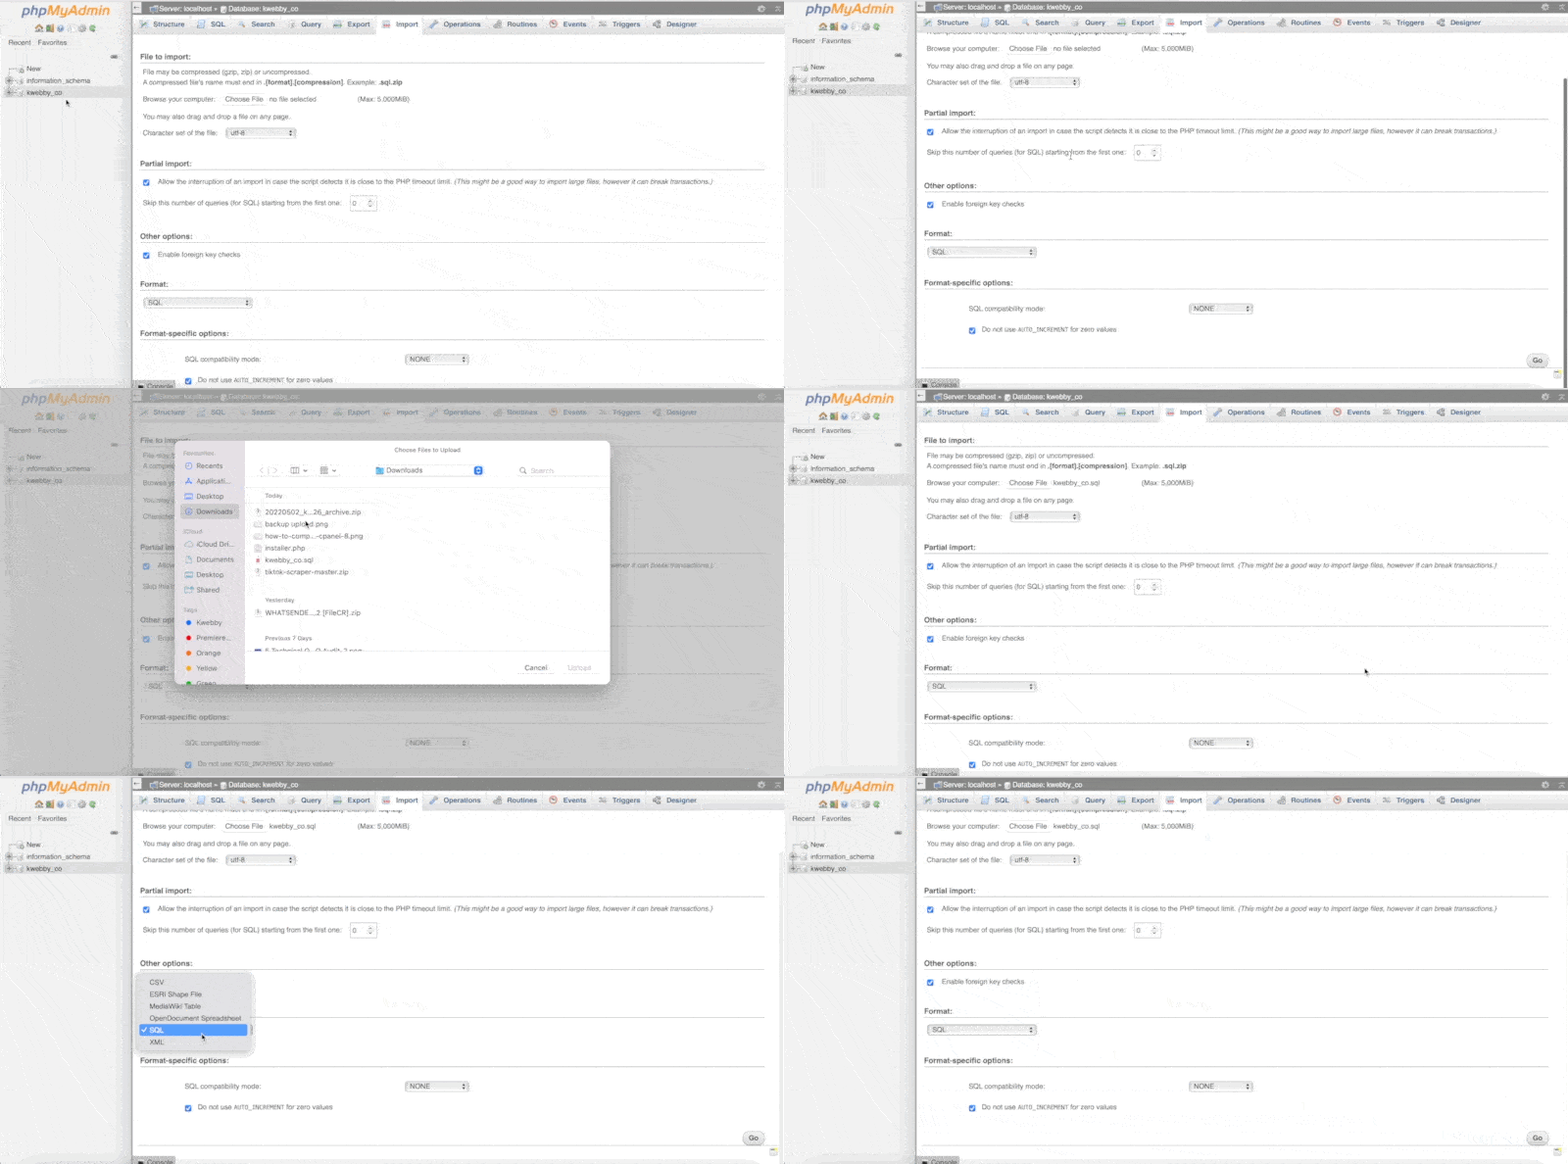
Choose a file using the button and click on the “Go” button and it will start importing your database.
Wpconfig.php Configuration
After your database is imported successfully, you need to update a few things in the wp-config.php file as it was pointing to the old database name, user, and password.
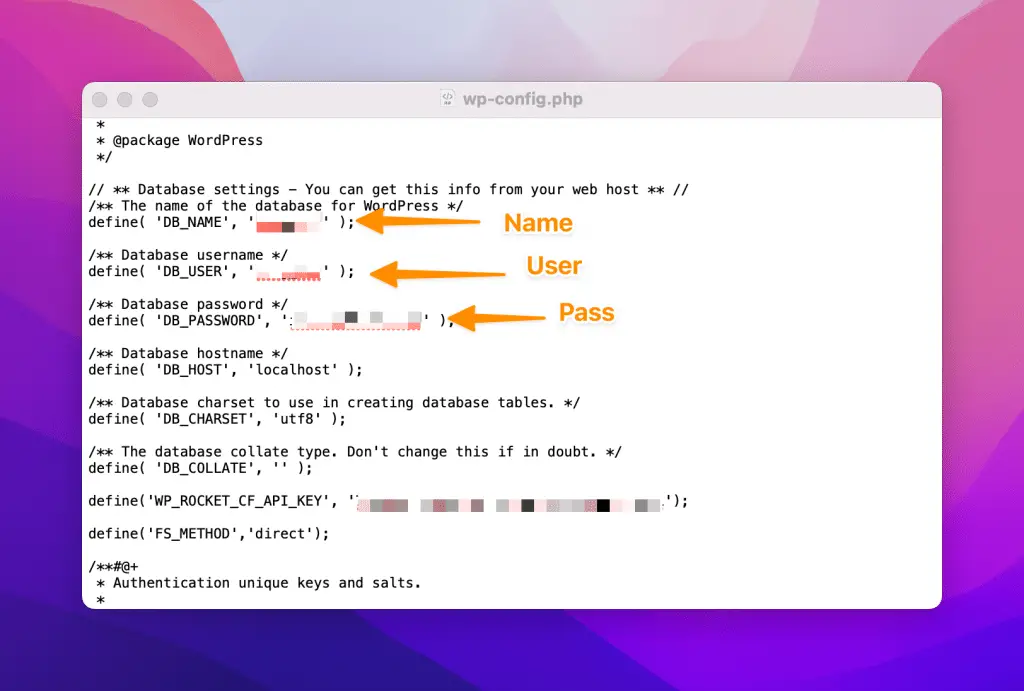
Open this file using text editor like Notepad++ or similar and find these lines:
define(‘DB_NAME’, ‘database_name’);
define(‘DB_USER’, ‘database_user’);
define(‘DB_PASSWORD’, ‘database_password’);
Now replace the database name, user, and password with your newly created database on the new server.
After updating these lines, Save the file and upload it to your WordPress root directory which is the public_html folder generally.
You have successfully migrated your WordPress Website to a new Host or Server.
Update Your Domain Name Server (DNS) Settings
The last step is to update your domain name server (DNS) settings. This will point your domain name to the new server.
To do this, you will need to log in into your domain name registrar’s account and update the DNS settings.
Most Probably, the New hosting provider wants you to change nameservers to them or you can point to the new hosting or server’s IP address using A records.
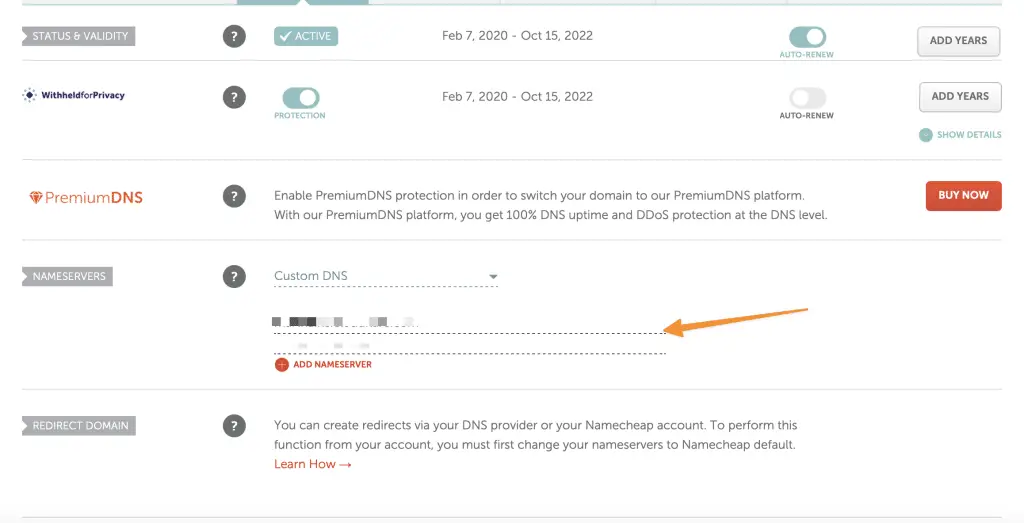
Please contact your domain registrar support if you don’t know how to do this action as the different registrar has different UI which makes it difficult to explain in this tutorial.
Once you have updated the DNS settings, it will take up to 24 hours (Normally 1-2 hours) for the changes to take effect. After that, your WordPress site will be migrated to the new server!
You can also check your DNS Propogation at real time here.
Double Check & Test
Last but not the least, before deleting your WordPress website from your previous hosting account and DNS. You need to check a few things:
- Check if your WordPress Site is working fine on a new server or host by visiting your website URL.
- If it’s working then try to access the wp-admin area of your WordPress site. If it’s working too then that means everything is good so far.
- You can also check things like an email subscriptions, contact forms, and other plugins which were earlier installed on your WordPress website.
- Activate your Plugins that you have deactivated earlier and test if all are working fine.
- If everything is working fine then you can delete your old WordPress site from your previous hosting account and DNS.
That’s it! You have successfully migrated your WordPress website to a new host or server manually using FILEZILLA or cPanel..
Now in the next section, we will cover how to migrate your WordPress Site using two different plugins.
How to Migrate Your WordPress Site With a Plugin:
If the above-mentioned method is too technical for you, then there is another way to migrate your WordPress site i.e. by using a plugin.
There are many WordPress migration plugins available but we recommend two of them: All-in-One WP Migration and Duplicator WordPress Migration Plugin.
Both of these plugins are available for free and have a good number of installs with overall good user ratings.
So, without further ado, let’s see how to migrate your WordPress site using All-in-One WordPress Migration Plugin:
All-in-One WP Migration Plugin
All-in-One WP Migration is one of the most popular WordPress migration plugins with over 4 Millions+ installs. It allows you to migrate your WordPress site to a new host or server with just a few clicks.

The plugin comes in both free and premium versions. The free version has some limitations like it can migrate only sites of size less than 512 MB.
If your WordPress site is larger than that, then you will need to purchase the premium version which starts at $69.
The plugin is available as a standalone plugin as well as an add-on for other popular plugins like BackupBuddy, UpdraftPlus, VaultPress, etc.
Let’s see how to migrate your WordPress site using All-in-One WP Migration Plugin:
First, you need to install and activate the plugin. For more details, see our step-by-step guide on how to install a WordPress plugin.
Upon activation, the plugin will add a new menu item labeled ‘All-in-One WP Migration’ in your WordPress admin bar. Clicking on it will take you to the plugin’s main page.

On the plugin’s main page, you need to click on the ‘Export’ button.

This will launch a popup window where you need to select the files and database you want to migrate. By default, the plugin will migrate all your WordPress files and database.
If you want, then you can also exclude files and databases from migration. Once done, click on the ‘Proceed’ button to continue.
The plugin will now start exporting your WordPress site to a compressed file which it will save on your local computer.
Once the export process is complete, you need to click on the ‘Download’ button to download the compressed file to your local computer.
Now, it’s time to migrate your WordPress site to a new host or server.
For that, you need to first install WordPress on your new host or server.
Once WordPress is installed, you need to activate and install the All-in-One WP Migration plugin there too.
Upon activation, the plugin will add a new menu item labeled ‘All-in-One WP Migration’ in your WordPress admin bar. Clicking on it will take you to the plugin’s main page.
On the plugin’s main page, you need to click on the ‘Import’ button.
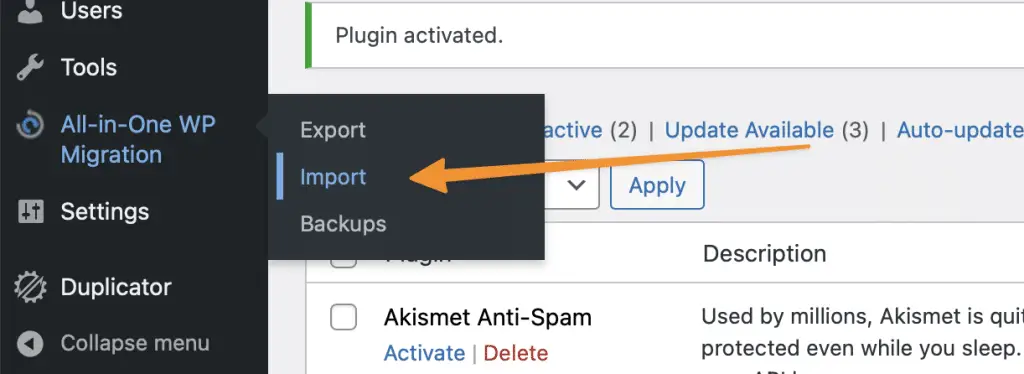
This will launch a popup window where you need to select the compressed file you exported earlier using the plugin.
Once done, click on the ‘Proceed’ button to continue.
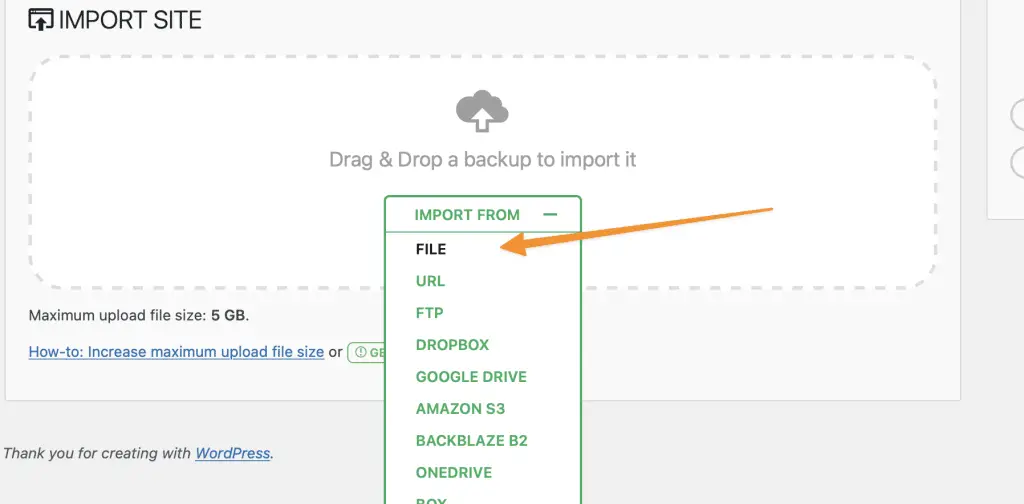
The plugin will now start importing your WordPress site from the compressed (.wpress) file.
The exported file will be in .wpress file extension that means it can only be imported or compatible with this plugin only. You can also view files which are included in .wpress using traktor tool by servmask.
Once done, you will see a success message saying ‘Your import is complete’.
You can now visit your WordPress site to see if everything is working properly.
If you face any issues, then you need to contact your new host or server support and ask them to increase the PHP memory limit.
Migrate WordPress Site Using Duplicator Plugin
Duplicator is another popular WordPress migration plugin with over 1 Million+ installs. It allows you to migrate your WordPress site to a new host or server in two steps:
After activation, click on the Duplicator icon on the left and select packages.
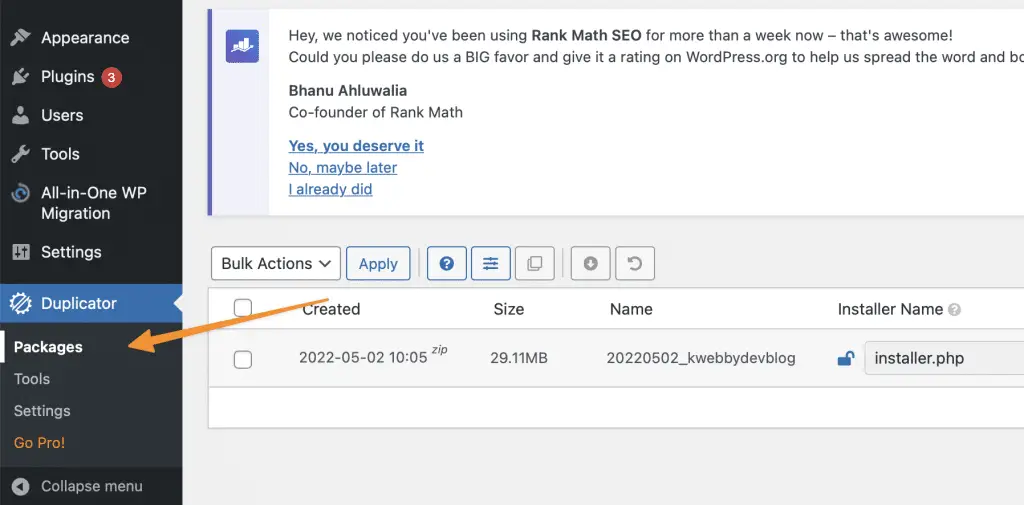
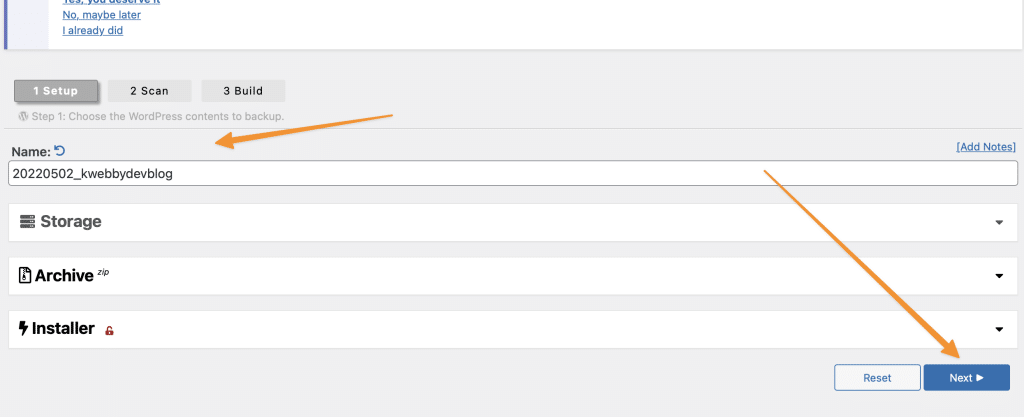
Now we need to create new archives using the “create new” button, therefore click on create new and rename your backup.
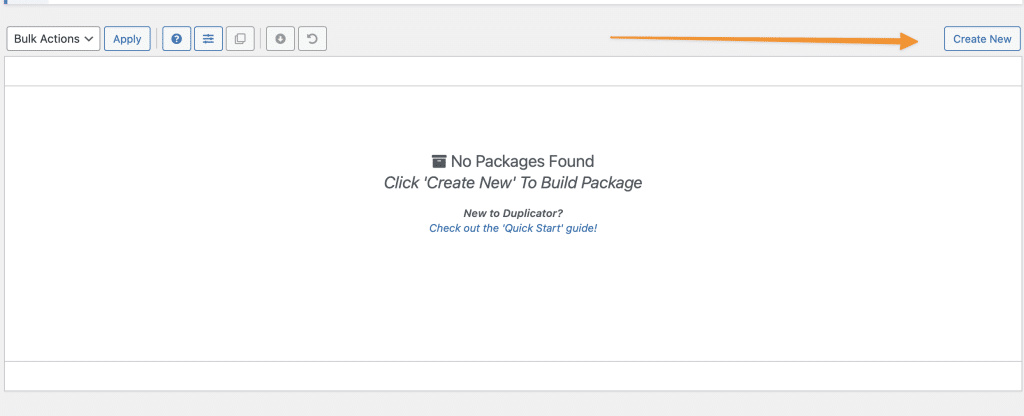
Don’t need to select or unselect anything, just click on next it will start scanning your website.
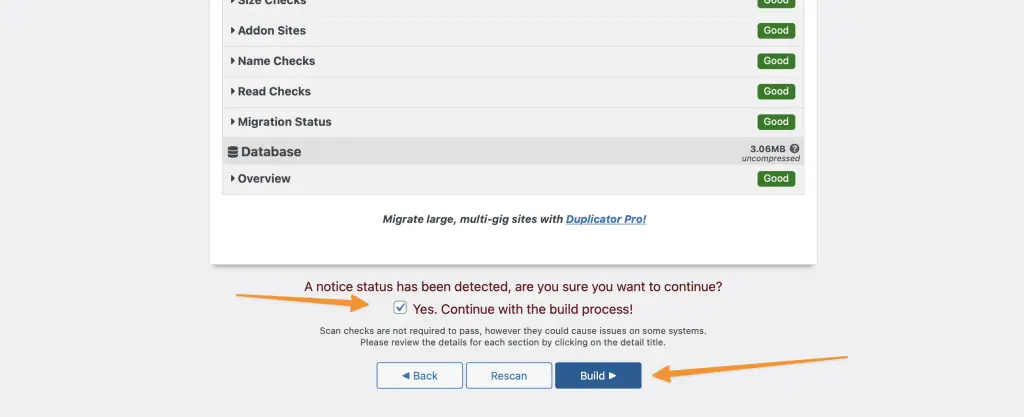
Then click on the “Yes. Continue with the build process!” option and click on “build”
It will start building your backup file.
Once the backup is completed, you will see two files: Installer (installer.php) and Archive (xxxxxx_database.zip).
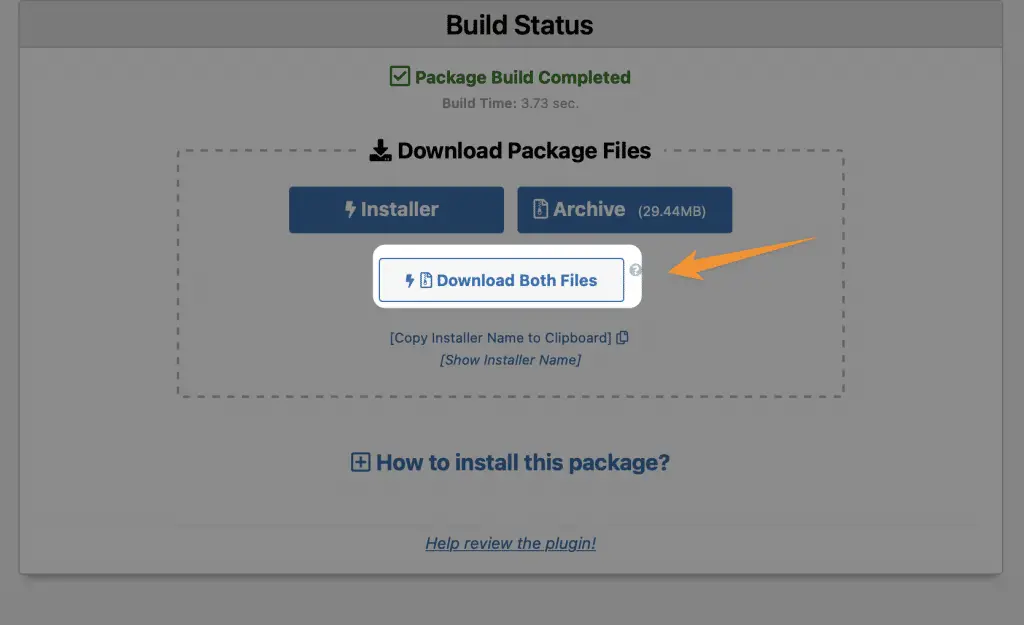
Now you need to migrate these two files to your new host or server using an FTP client like FileZilla.
First Upload installer.php file into your WordPress Root folder.

After that, you need to open the Installer file in your web browser (yourdomain.com/installer.php) and follow the on-screen instructions to migrate your WordPress site.
Now you need to place your downloaded zip file to the extraction path as mentioned on the installer page.
normally its /~hosting-path/domain/public_html/
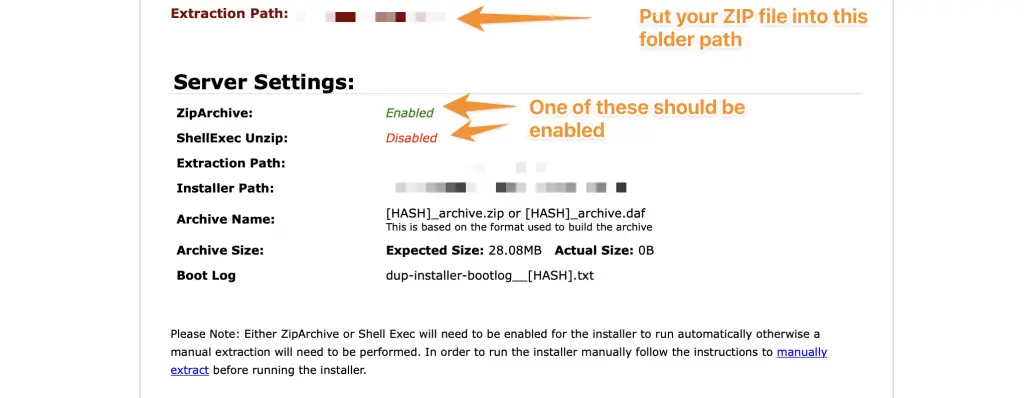
Upload the file using FTP and reload the page.
The plugin will start importing your old site’s data and easily migrate your WordPress site.
For more details, see our step-by-step guide on how to migrate a WordPress site using the Duplicator plugin.
Other WordPress Migration Plugins
In addition to Duplicator and All-in-One Migration Plugins, there are other WordPress plugins you can use to migrate your site.
Some of the other popular WordPress migration plugins are:
Migrating a WordPress site can be a daunting task, but with the right tools and plugins, it can be easily done.
I hope this article helped you migrate your WordPress site to a new host or server.
how to migrate from wordpress.com to wordpress.org
If you want to move your WordPress.com site to a self-hosted WordPress.org site, then the first thing you need to do is export your content from WordPress.com.
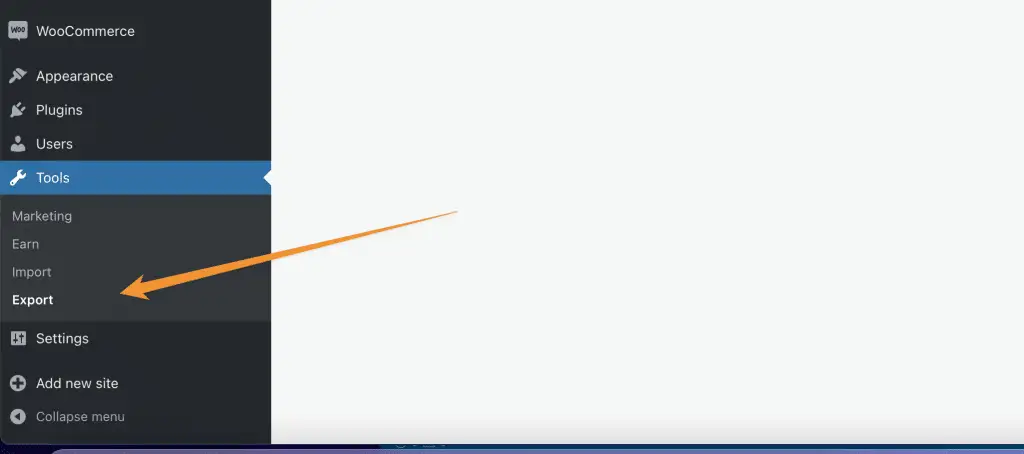
For that, you need to go to Tools » Export on your WordPress.com site and click on the ‘Export All’ button.
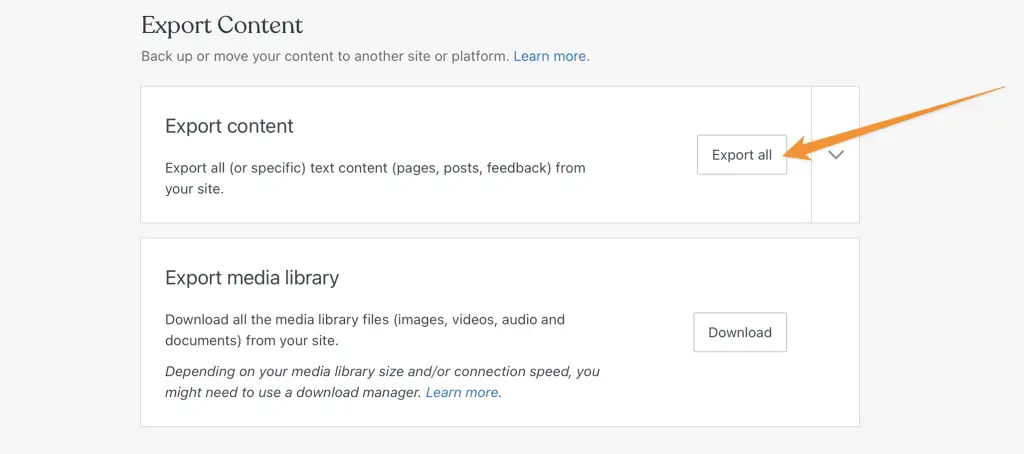
This will export all your content to an XML file which you need to save on your computer.
Now you need to create a new WordPress.org site and install a theme and plugins of your choice.
Once done, you need to go to Tools » Import in your WordPress.org site and click on the ‘Install Now’ button next to the WordPress importer.
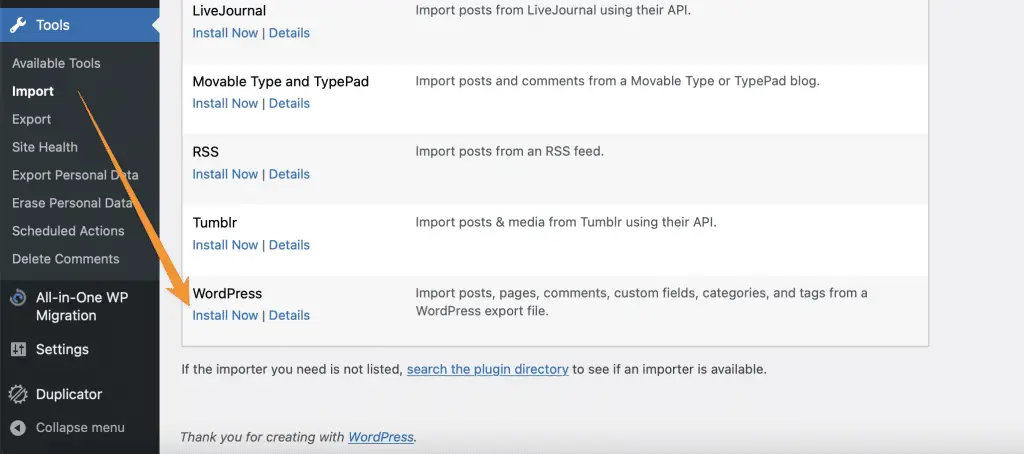
After installation, you need to click on the ‘Run Importer’ link.
On the next page, you need to choose the XML file you exported earlier and click on the ‘Upload file and import button.
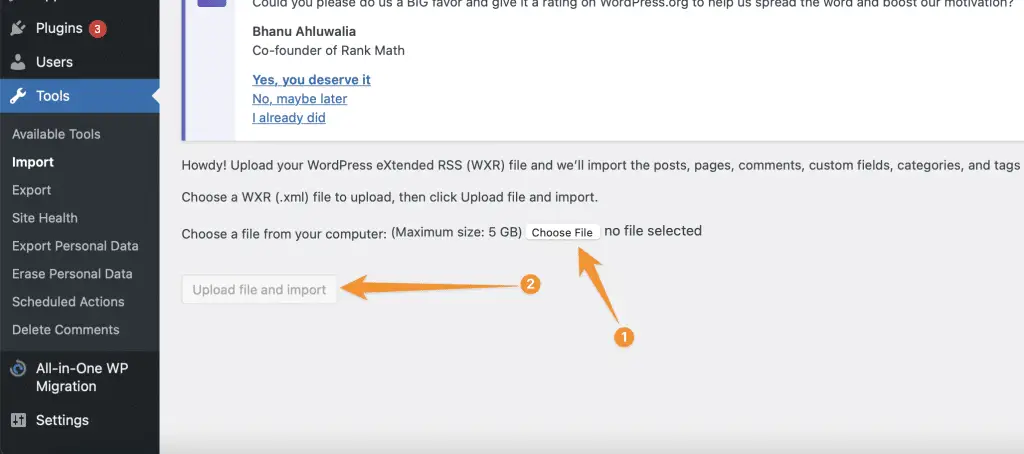
You will be asked to map the authors from your WordPress.com site to users on your WordPress.org site.
Once done, you need to click on the ‘Submit’ button and your WordPress.com content will be imported to your WordPress.org site.
How to migrate WordPress blog posts Only to a new WordPress Site
If you only want to migrate your WordPress blog posts and not the entire site, then you can do that by exporting your content from the old WordPress site.
For that, you need to go to Tools » Export in your old WordPress site and click on the ‘Posts’ Option and click on ‘Download Export File’ button.
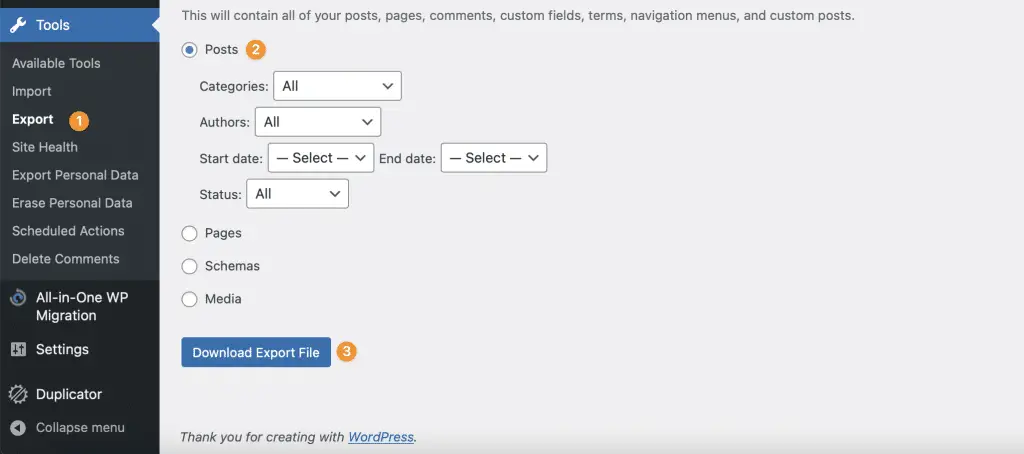
This will export all your content to an XML file which you need to save on your computer.
Now you need to create a new WordPress site and install a theme and plugins of your choice.
Once done, you need to go to Tools » Import in your new WordPress site and click on the ‘Install Now’ button next to the WordPress importer.
After installation, you need to click on the ‘Run Importer’ link.

On the next page, you need to choose the XML file you exported earlier and click on the ‘Upload file and import button.
You will be asked to map the authors from your old WordPress site to users on your new WordPress site.
Once done, you need to click on the ‘Submit’ button and your WordPress blog posts will be imported to your new WordPress site.
Can’t login to WordPress after migration?
If you are unable to log in to your WordPress site after migration, then the first thing you need to do is check if cookies are enabled in your browser.
If cookies are enabled and you still can’t log in, then the next thing you need to do is reset your password from phpMyAdmin.
For that, you need to go to your cPanel and click on the phpMyAdmin icon.
In phpMyAdmin, you need to select your WordPress database from the left sidebar.
After that, you need to click on the wp_users table and then click on the ‘Edit’ link next to the user you want to reset the password for.
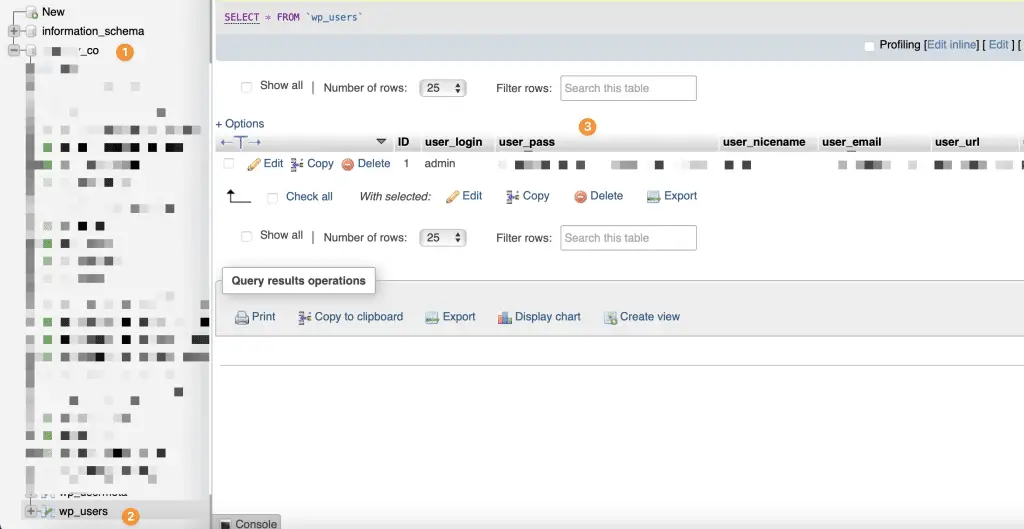
In the ‘user_pass’ field, you need to enter your new password and then click on the ‘Go’ button.
Your password will be reset and you will be able to log in to your WordPress site.
Conclusion
It’s not always easy to migrate a WordPress website, but with the proper tools and plugins, it can be a simple process. I hope this article helped you migrate your WordPress site to a new host or server. If you have any questions, please feel free to leave a comment below. Thanks for reading!
More WordPress Resources;
- How to Redirect URL in WordPress: A Comprehensive Guide (4 Methods)
- How to Disable Comments in WordPress: Protect Your Blog from Spammers
- How to Add Your WordPress Sitemap to Search Engines: A Step-by-Step Guide
- 27 Must-Have WordPress Plugins (All are Free!)
- 8 eCommerce Plugins for WordPress for Your Next Big Store
- What is WordPress used for? Here are 8 Examples to get started
- What WordPress theme is that? 3 Mind-blowing methods
- 18 AWESOME Contact Form Plugins for WordPress in 2020


