Are you getting tired of seeing the “You’re All Caught Up” error on Facebook? Do you want to disable it so that you can see all your posts and updates at once? If so, then this guide is for you. Here we will show you how to quickly turn off the “You’re All Caught Up” notification on Facebook in just a few simple steps.
Many users have noticed this issue and find it frustrating. By following these instructions, you can ensure that all your friends’ posts are visible in one place without having to scroll through multiple pages or wait for notifications. So let’s get started!
Also read, How to crosspost to a Facebook Page with Instagram in 3 Simple Steps
What is the “You’re All Caught Up” Bug?

The “You’re All Caught Up” error is a bug on Facebook that displays a notification stating that you have seen all the posts in your news feed since your last login. This bug can be really annoying and prevent you from seeing any new posts or updates, as it will always display the same message regardless of what has been posted since your last login. Users are unable to respond to new posts due to this bug.
This bug can happen unexpectedly and disrupt the user experience.
Fortunately, there is an easy way to get rid of this bug and see all of your posts again!
Understanding the Algorithm
Facebook’s algorithm determines when to display the “You’re All Caught Up” notification based on several factors, including your feed preferences and internet connection. The algorithm evaluates posts uploaded in the last 48 hours and your interactions with them, such as likes, comments, and shares.
It also considers your friend list and the activity of your friends. The goal is to show you the most relevant and engaging content in your news feed. However, the algorithm can sometimes get stuck, leading to the “Something went wrong” notification. If this happens, you can try clearing the cache and data on your mobile device or Chrome browser to fix the issue.
Disable “You’re All Caught Up” Using a Web browser
To disable “You’re All Caught Up” using a web browser, we will apply two steps, i.e. clear plugin/cookies/cache data of Facebook and delete any saved password of Facebook. Logging out and logging back in can also help resolve the issue.
Users may need to tap the options button to access certain settings.
We will cover Safari and Chrome in this section to disable the error you’re facing.
Safari
If you use Safari, First you need to do is go to the private window of your Safari and lets test if it’s working for you it, is because Private browsing does not cache any data of yours, therefore, the moment you close your browser, all data will be cleared. Therefore, you must do it using File > New Private Window as below;

Now login to your account and if you can load newer posts then do the following steps.
It’s time to clear your cookies, cache and other data. To do the same, go to the safari icon and click on “settings” from the drop-down menu. You can find the settings in the top right corner of the Safari window.

Then move to the “Security” tab and click on “Manage Website Data”;

A New window will popup Now search for “Facebook” from the search bar as below;

Now click on “Remove All” to start afresh as below;

Now try login again and see if you can see the latest posts or stories from your family or friends or not. iPad users may experience similar issues and should follow the same steps.
Chrome
In the Chrome browser, you can disable this error by clearing your cache and cookies. Ensuring all elements are properly loaded can help resolve the issue. First, go to “Settings” in the Chrome menu;

Now in the searchbar, type “cookie” as below;

Click on the first option i.e. Clear Browsing Data as below;

In the next popup window, check all three options below and click on “Clear Data”;

In case if you want to clear the cache and cookie data of facebook.com only, then you can go to facebook.com on Chrome and click on the site’s data as below;
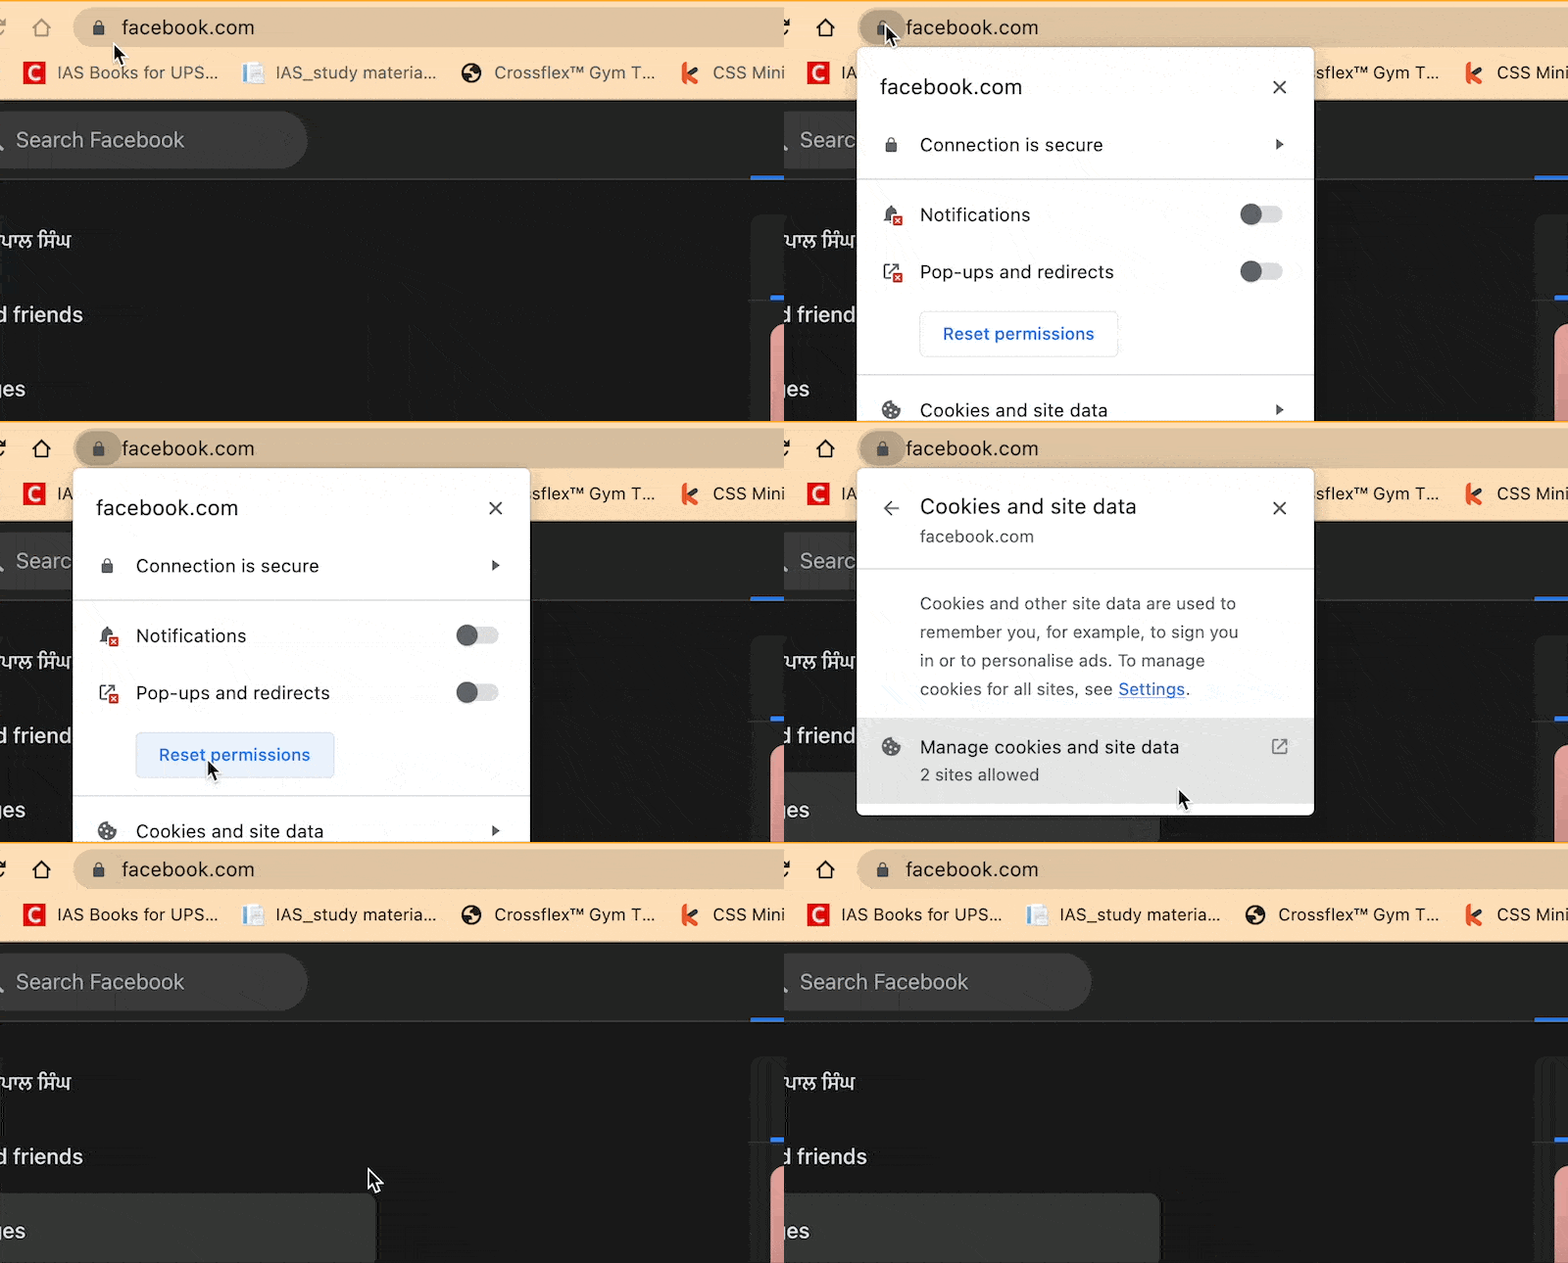
Now, a new popup will open, click on “delete” icon and delete both as below;

Clearing cache and cookies can improve loading performance and ensure that all elements are properly loaded. Close Chrome and check again if it’s working or not.
Disable “You’re All Caught Up” Using Mobile
In order to disable the “You’re All Caught Up” notification on mobile devices, we will cover using Android as well as iOS below. Ensure that your preferences are correctly set to influence the content you see in your news feed.
If you are experiencing slow processing and loading issues, consider using the Facebook Lite app as an alternative.
Android
If you are using Android, the first step is to make sure that you have the latest version of the Facebook app. To do this, go to the Google Play Store and search for “Facebook”. If there is an update available, then select “Update” and let it install. It is important to adjust your settings to ensure you see all posts from friends or selected pages.
Certain settings may have been fixed to default, requiring users to adjust them.

Once this is done, we need to clear the app data. To do this, go and navigate to your facebook app icon and long press on icon and tap on “App Info”;

Once the app info settings open click on “storage” as below;

click on “clear data” as below;

After you clear the data, all you need to do is to restart the phone as you normally do.
Then, after your phone gets restarted, do open your facebook app, login with your credentials and see if the error goes away or not.
IOS
The process in IOS is pretty simple and straightforward. First we will try to update the facebook app, to do the same go to app store and search facebook and check if there’s an update available for facebook or not; make sure to check your messages for any updates from Facebook about changes in the app.

You may hear about similar issues from others, so follow the same steps.
After you updated the app successfully, go to iPhone settings and search for storage and select the storage (general) option from the list below;

Now scroll down and search for facebook app and click on it;

Now we need to offload our app to delete all cache and documents from it using offload button as below;

Now restart your iPhone or iOS Device and see if everything is working properly or not.
Note: If offload app does not work, then try to delete app from the same steps above and try it again.
How to Check If Someone Has a Secret Facebook Account? (7 Methods)
That’s it! We’ve shown you how to disable the “You’re All Caught Up” notification on both web browsers and mobile devices. If this guide was helpful, then be sure to share it with your friends and family who are having the same issue. Thanks for reading! Have a great day ahead! 🤗
Troubleshooting Common Issues
If you’re having trouble with the “You’re All Caught Up” feature, such as being unable to scroll past the notification or encountering the “Something went wrong” message, there are several steps you can take to resolve these issues. First, check your internet connection to ensure it’s stable. If you’re using a mobile device, try switching between Wi-Fi and cellular data. Clearing the cache and data on your Facebook app or Chrome browser can also help.
Make sure you’re using the latest version of the Facebook app or browser, as outdated versions can cause problems. If the issue persists, try logging out and back into your Facebook account.
Additionally, adjusting your feed preferences to see more posts from friends or pages you follow can improve your experience. By following these troubleshooting steps, you should be able to fix any issues with the “You’re All Caught Up” feature and enjoy a smoother browsing experience on your Facebook news feed.
Test your knowledge
Take a quick 5-question quiz based on this page.

