Optimizing your website to minimize main-thread work is pivotal for achieving a smooth and responsive user experience. Main-thread tasks encompass the critical operations that your browser must complete to render a page, such as parsing HTML, executing JavaScript, and laying out the page.
When these tasks take too long, it can significantly degrade user interaction by increasing input delay and causing cumulative layout shifts. According to PageSpeed Insights, main-thread work is a crucial component of Core Web Vitals, impacting metrics such as Total Blocking Time (TBT) and Speed Index.
By employing strategies like lazy load, defer JS and minifying CSS; you can effectively reduce the unnecessary strain on the main thread and improve your page speed.
Leveraging web workers and code splitting can further enhance performance by offloading tasks from the main thread.
Adopting these best practices, supported by tools like Chrome DevTools, not only boosts your Pagespeed score but also significantly enhances your site’s overall user experience.
Checkout – What is Google Core Web Vitals? Step-by-step Guide to Improve it
What is Main-Thread Work and How it Fails
The browser’s renderer process is what turns your code into a web page that your users can interact with.
By default, the main thread of the renderer process typically handles most code: it parses the HTML and builds the DOM, parses the CSS and applies the specified styles, and parses, evaluates and executes the JavaScript.
The main thread also processes user events.
So, any time the main thread is busy doing something else, your web page may not respond to user interactions, leading to a bad experience.
How it Fails
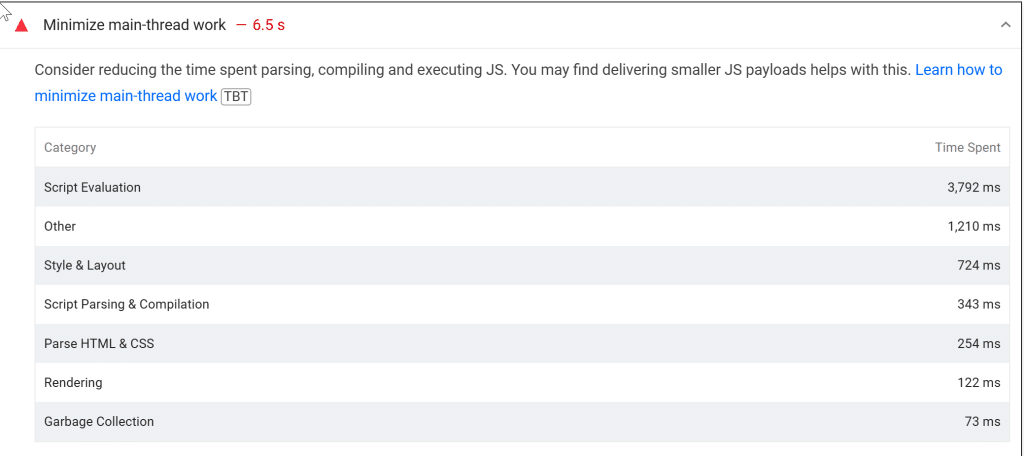
Lighthouse flags pages that keep the main thread busy for longer than 4 seconds during load. When the main thread is overburdened, tasks take longer, causing lag in input delay and shifts in layout, ultimately degrading the user experience.
To help identify the sources of main thread load, Lighthouse provides a breakdown of where CPU time is spent while the browser loads your page.
Navigating the maze of main-thread tasks can be simplified by employing strategies such as lazy loading, code splitting, and deferring non-critical scripts.
Pagespeed Insights helps highlight areas where you can minimize main thread work, improving crucial web metrics like Total Blocking Time (TBT) and Speed Index. Utilizing web workers can offload certain tasks, thereby optimizing user interaction and website performance.
By integrating best practices like minifying CSS and JavaScript or delaying the loading of third-party scripts, you can significantly enhance your site’s Pagespeed score.
Chrome DevTools also offers invaluable insights to aid your speed optimization efforts, ensuring that your page presents a smooth, responsive experience for your users.
How to Minimize Main-thread Work
Optimizing your website to minimize main-thread work is essential for enhancing both your page speed and overall user experience. By focusing on best practices, you can significantly improve your site’s performance and core web vitals.
#1 – Load Third Party Javascript Files Via Zaraz
Incorporating third-party JavaScript files efficiently is crucial for minimizing main-thread work and enhancing your website’s performance. Serving these integrations via cloud services like Cloudflare’s Zaraz can significantly reduce loading times, benefiting both WordPress and non-WordPress users.
Follow these steps to streamline the process:
Sign Up for Cloudflare: Begin by signing up for Cloudflare and setting up your website with their services. This will provide you with access to a multitude of performance-optimizing tools.
Navigate to Zaraz: Once your site is set up, click on Zaraz from the left bottom sidebar menu in your Cloudflare dashboard.
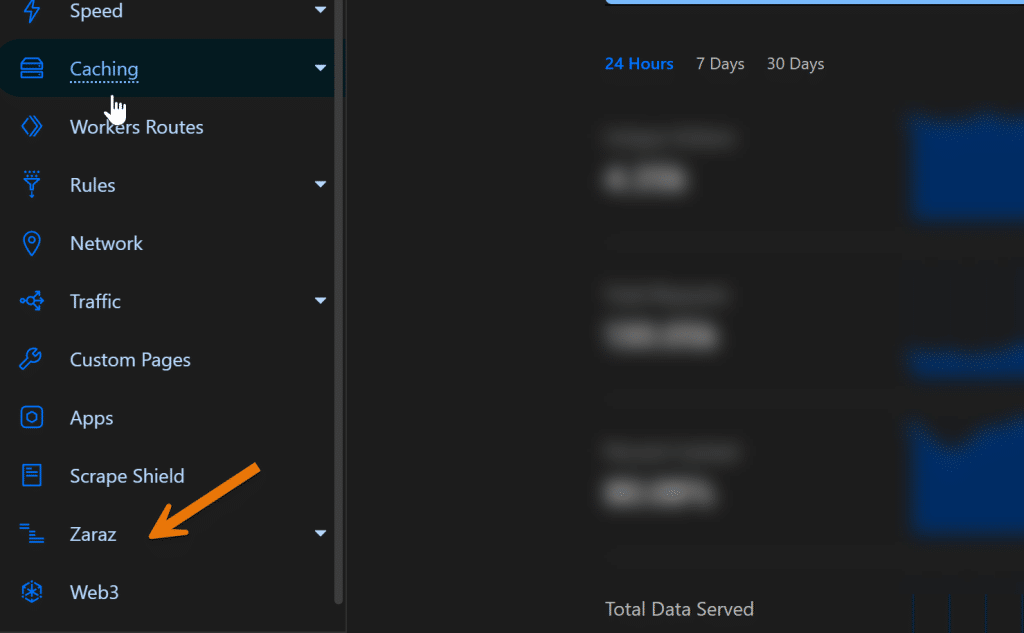
Add Pre-Integrated Tools: Click on “Add Tool” and choose from a variety of pre-integrated tools like Adsense, Analytics, Facebook Pixel, and more for faster loads.
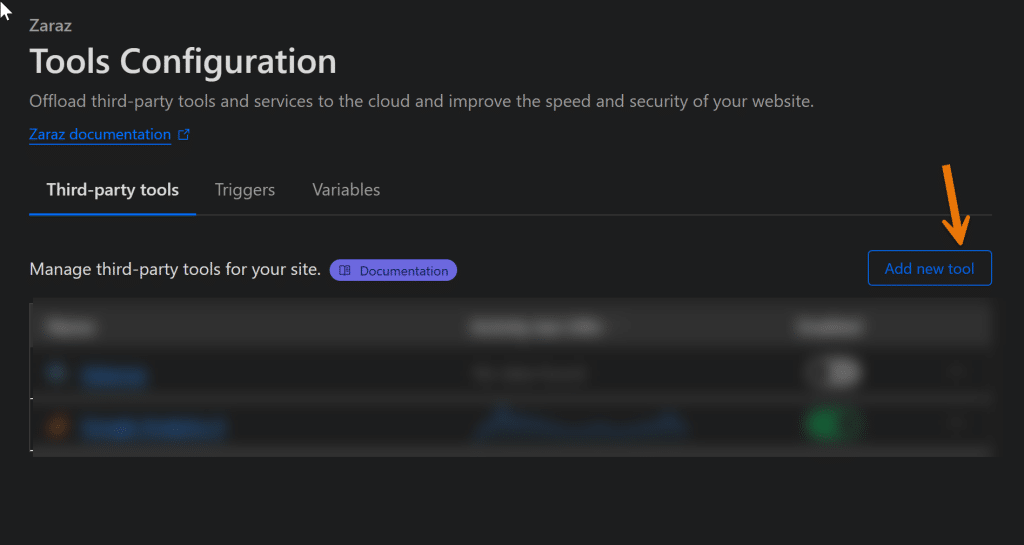
Add Custom Tools: If a tool isn’t available in the pre-integrated list, you can easily add your own by clicking on “Add new tool.”
Custom HTML Integration: Select “Custom HTML” and follow the on-screen instructions to integrate your third-party JavaScript.
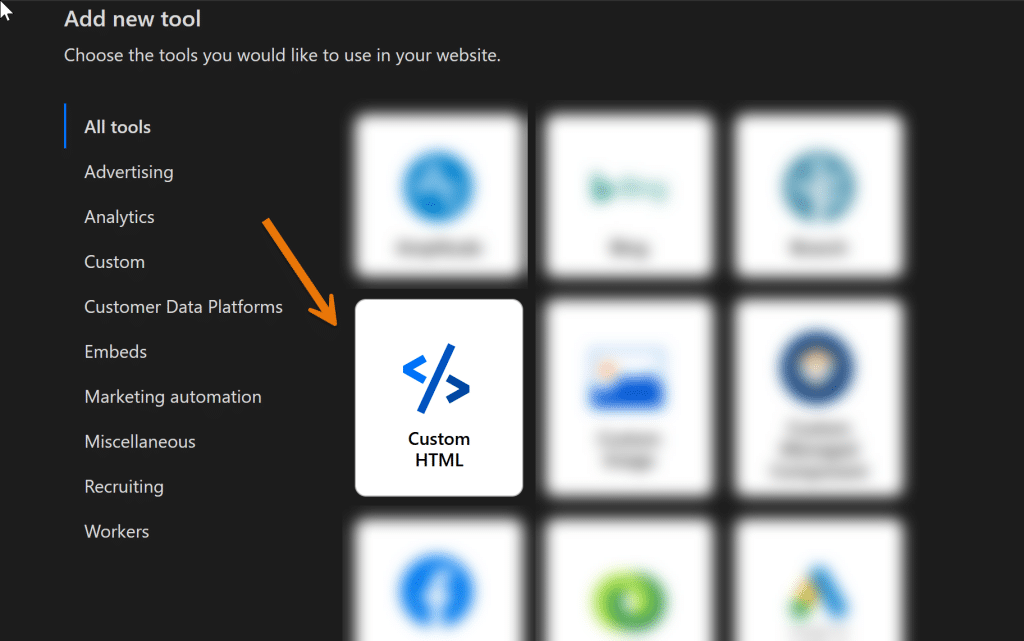
Create Action: Finally, click on “Create Action,” give your action a name, and set the firing trigger to “pageview.” Paste your third-party integration code here.
By following these steps, you can efficiently add all your third-party integrations, thereby significantly reducing main-thread work and improving your website’s performance.
Pagespeed Insights metrics like Total Blocking Time and Speed Index will reflect these improvements, leading to a smoother user experience and a higher Pagespeed score.
Employing these best practices will also minimize cumulative layout shift, input delay, and large main-thread tasks, ultimately optimizing your page speed and overall user interaction.
#2 – Minify CSS and JS Files
Minifying your CSS and JavaScript files is a crucial step in improving your website performance and boosting your PageSpeed score. By reducing file sizes, you can considerably enhance your page speed, minimize main-thread work, and achieve better Core Web Vitals.
Optimizing your load time ensures that users experience quick, uninterrupted interaction when they visit your site. Below, you’ll find a step-by-step guide for both WordPress and non-WordPress users on how to effectively minify CSS and JS files.
Instructions for WordPress Users
Download and Install FlyingPress Plugin: FlyingPress is a powerful WordPress plugin designed to make your site faster and improve core web vitals.
Select the CSS Tab:After a successful installation, navigate to the FlyingPress tab in your WordPress dashboard. Click on the CSS tab.
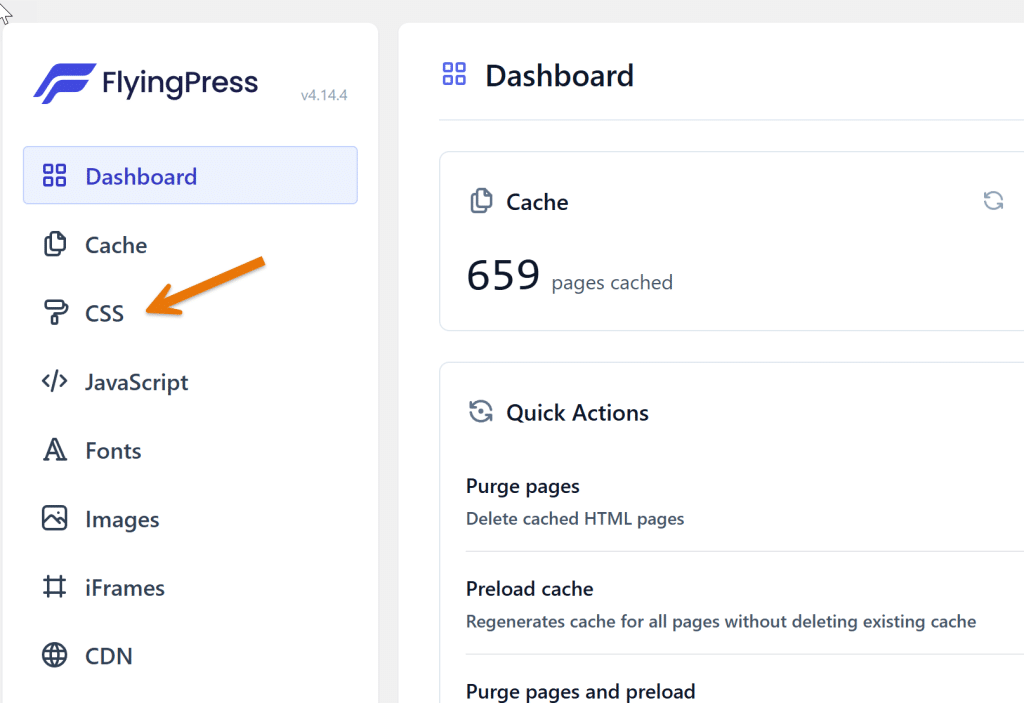
Minify CSS: Within the CSS tab, enable the “Minify CSS” option to reduce your CSS file sizes and improve load time.

Select the JavaScript Tab: Now, go to the JavaScript tab from the dashboard menu on the left side.
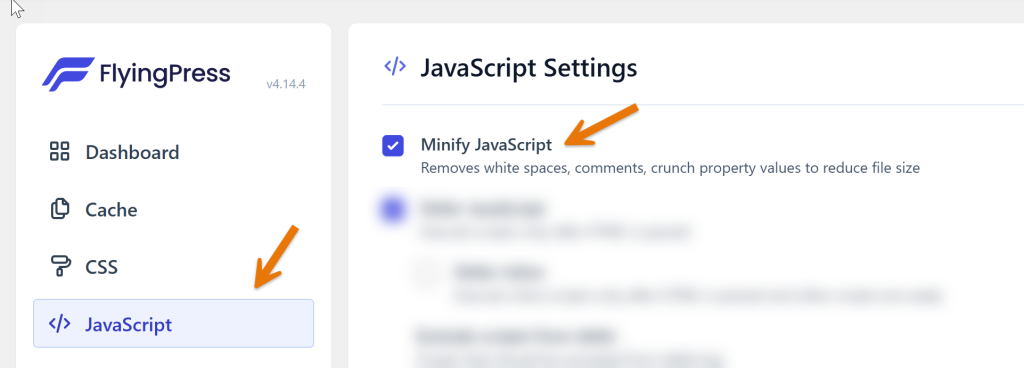
Minify JavaScript: Enable the “Minify JavaScript” option to compact your JS files and optimize JavaScript execution.
After following these steps, your website will load faster, reducing long main thread tasks and enhancing overall user experience.
Instructions for Non-WordPress Users
ify your CSS files. Reupload the minified CSS files back to your web server.
- Minify CSS: Download all your CSS files from your web server. Use Kwebby CSS Minifier to min
- Minify JavaScript: Download all your JavaScript files from your web server.Use Kwebby JS Minifier to minify your JS files.Reupload the minified JavaScript files back to your web server.
- Check Your Website: Verify that your website functions correctly after minifying and reuploading your CSS and JS files.
By implementing these steps, both WordPress and non-WordPress users can effectively minimize main-thread work, leading to better PageSpeed Insights scores, reduced total blocking time, and a smoother user interaction.
Additionally, adopting these best practices aligns with SEO strategies, improves your site’s core web vitals, and elevates the overall user experience.
#3 – Remove Unused Javascript
Removing unused JavaScript from your website is a powerful strategy to speed up your website and minimize main-thread work. While essential, this process can be tricky and should be approached with caution, as improper handling might lead to functionality issues on your site. By effectively removing unused JavaScript, you will see significant improvements in your PageSpeed Insights scores, reduced total blocking time, and enhanced core web vitals.
Instructions for WordPress Users
Download and Install FlyingPress Plugin: FlyingPress is a robust plugin designed to enhance website performance. Start by downloading and installing it in your WordPress dashboard.
Select the JavaScript Tab: After a successful installation, navigate to the FlyingPress tab in your WordPress dashboard menu on the left sidebar.
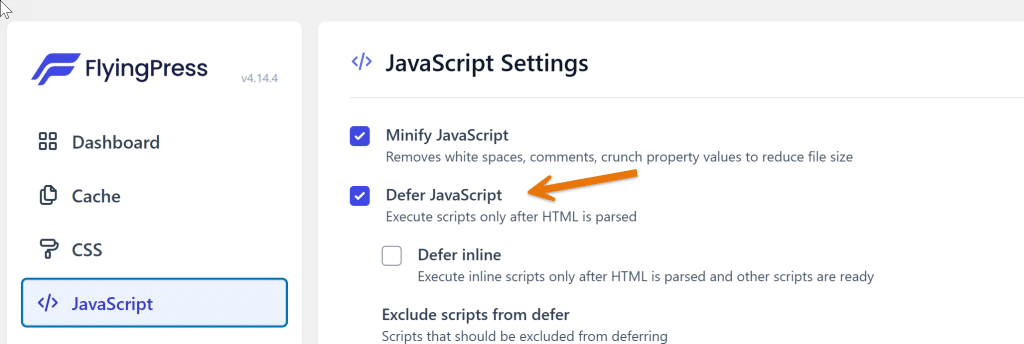
Defer JavaScript: Enable the “Defer JavaScript” option. This is a safer method than outright removing unused JavaScript, as it defers the execution of non-critical JavaScript until after the main content has loaded, preventing potential breaks in website functionality.
Instructions for Non-WordPress Users
- Audit JavaScript Usage: Begin by auditing your pages to identify JavaScript files that are linked but not used on specific pages. This can be done effectively using tools like Lighthouse to analyze your site’s performance.
- Add the Async Attribute: After identifying the unnecessary JavaScript, you can add the `async` attribute to your script tags. This ensures that JavaScript files are loaded asynchronously, thereby improving page speed and minimizing main-thread work.
By following these steps, both WordPress and non-WordPress users can effectively remove or defer unused JavaScript, resulting in faster load times, better user experience, and higher PageSpeed Insights scores.
These practices not only improve core web vitals but also boost SEO performance and overall website health. Implementing lazy load techniques, optimizing JavaScript execution, and managing third-party scripts correctly will further enhance your site’s performance and user interaction.
#4 – Avoid Large or Complex Layouts
Avoiding large or complex layouts is essential for enhancing your website’s performance and minimizing interaction latency.
The browser calculates size and location information for elements during the layout process, which can be resource-intensive, especially if the DOM is large or complex.
Follow these steps to streamline layout work and optimize your website for better user experience.
You can find the detailed article here.
Instructions for Reducing Layout Complexity
Step 1: Audit Your Existing Layout
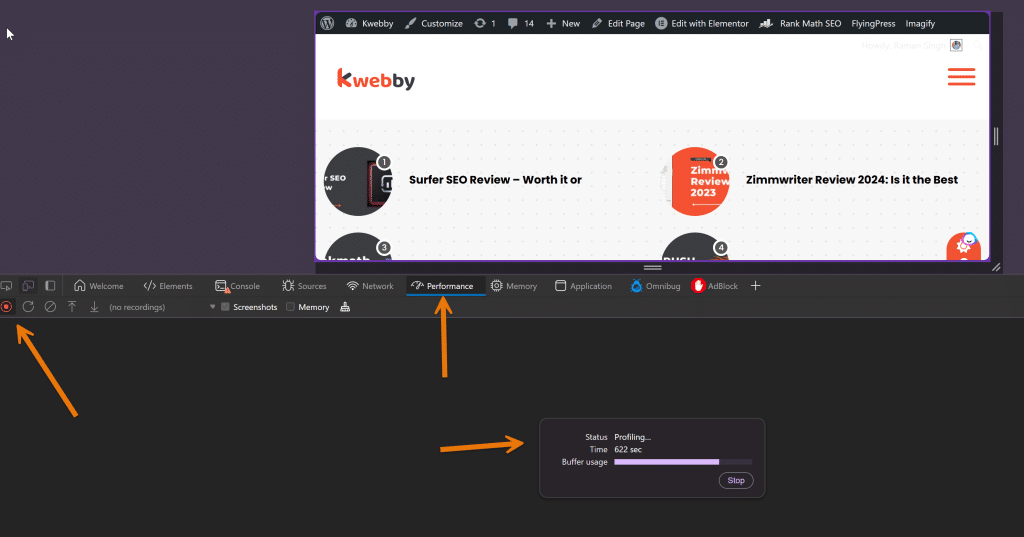
Begin by using Chrome DevTools to audit your current layout. Open DevTools, go to the “Performance” tab, and record a session while interacting with your site. Analyze the layout times to identify bottlenecks and areas needing optimization.
Step 2: Simplify the DOM
Aim to reduce the DOM size by removing unnecessary HTML elements. Simplifying the DOM will significantly cut down the time required for layout calculations. This step is crucial for avoiding long main-thread tasks and improving overall website performance.
Step 3: Optimize CSS
Use streamlined CSS rules to avoid triggering expensive layout calculations. For instance, avoid using complex selectors and deeply nested rules that can increase layout costs. Combining and condensing CSS files can also help reduce the amount of style calculations needed.
Step 4: Use Efficient Layout Techniques
Adopt efficient layout techniques like Flexbox and CSS Grid where appropriate. These modern layout methods are designed to be performance-friendly and can help reduce the number of layout calculations needed by the browser.
Step 5: Minimize Layout Thrashing
Batch your style changes to avoid layout thrashing. This occurs when reading and writing layout properties in a loop, which forces the browser to perform repeated, unnecessary layouts. Instead, separate read and write operations to make the process more efficient.
Step 6: Defer Non-Critical JavaScript
Defer non-critical JavaScript to ensure it doesn’t block the initial rendering of the page. This allows the browser to complete layout calculations faster and present the next frame more quickly, reducing interaction delay and improving user experience.
Step 7: Lazy Load Offscreen Content
Implement lazy loading for images and other offscreen content. By loading content only when it becomes visible, you can reduce initial layout calculations and improve page speed, especially on mobile devices.
Step 8: Enable Layout Optimization Tools
Use tools like FastDOM to automatically batch read and write operations, thereby preventing forced synchronous layouts or layout thrashing. This step helps in maintaining smooth interaction and reducing cumulative layout shift.
By following these steps, you can minimize main-thread work and optimize the layout process, leading to a faster, more responsive website. These practices not only improve core web vitals and Pagespeed Insights scores but also enhance overall user interaction and experience.
#5 – Remove Unused CSS
Removing unused CSS is crucial for improving your website’s performance and speeding up page load times. This step will help reduce the amount of CSS that the browser needs to process, leading to a more streamlined and efficient layout process.
By eliminating unnecessary styles, you can significantly optimize your site’s speed and overall user experience. However, this process can be tricky and should be approached with caution to avoid breaking any functionalities on your site.
Instructions for WordPress Users
Download and Install FlyingPress Plugin: FlyingPress is a powerful plugin designed to make your website faster. Begin by downloading and installing it through your WordPress dashboard.
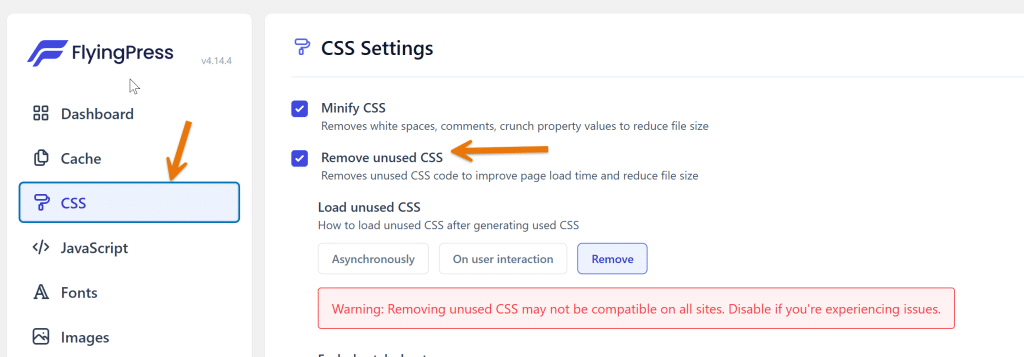
Select the CSS Tab: After a successful installation, navigate to the FlyingPress tab found in the WordPress dashboard menu on the left sidebar.
Remove Unused CSS: Click on the “Remove Unused CSS” option. This feature will analyze your site and strip away any CSS that is not being used. Once you have enabled this option, click on “Save”.
Clear Your Cache: Clear your website cache to apply the changes and check if everything works perfectly.
Load Unused CSS Asynchronously: If you encounter issues after removing unused CSS, you can load the unused CSS asynchronously using the option provided below the “Remove Unused CSS” setting. This will ensure non-critical styles are loaded separately without affecting the initial rendering.
Instructions for Non-WordPress Users
Go to PurifyCSS Online: Visit PurifyCSS Online to start the process of cleaning up your CSS.
Enter Your Webpage: Input your webpage URL in the designated field and click on the “Clean Up CSS” button to analyze and remove unused styles.
Download Purified CSS: Once the analysis is complete, click on the “Download Combined, Purified, and Minified CSS” button. This will give you a clean version of your CSS.
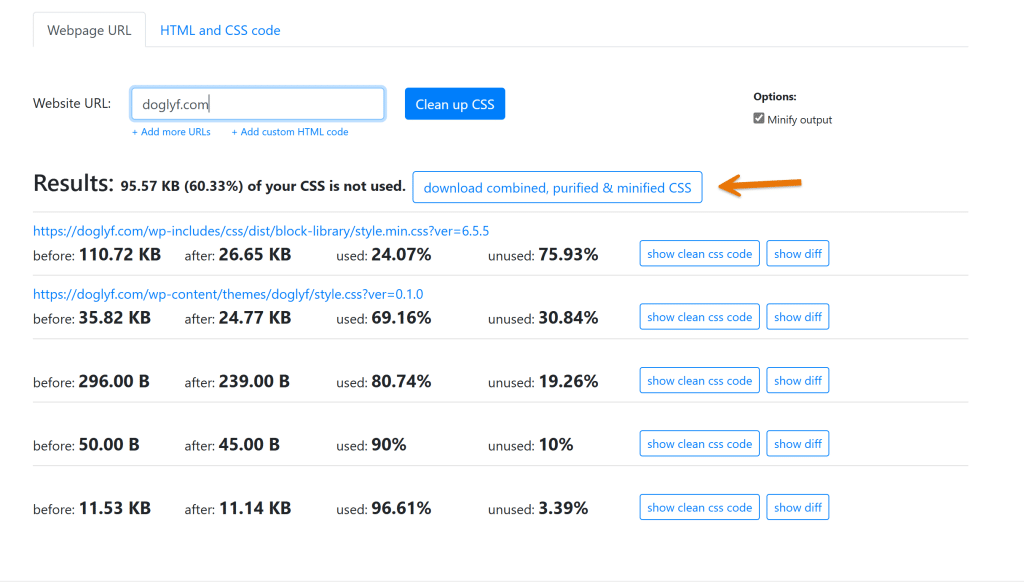
Implement the Purified CSS: Replace your existing CSS with the purified version and load any remaining styles asynchronously. This can be done by using the `async` attribute in your script tags to improve page speed and optimize performance.
By carefully following these instructions, you can effectively remove unused CSS, thereby minimizing main-thread work, enhancing website performance, and improving your Google PageSpeed Insights scores.
Additionally, these practices will help optimize your core web vitals such as total blocking time, input delay, and cumulative layout shift.
Engaging in speed optimization techniques like minifying CSS, deferring non-critical CSS, and lazy loading offscreen content will further enhance your site’s user experience and performance.
By reducing long main-thread tasks and optimizing JavaScript execution, you’ll achieve better PageSpeed Insights results and provide a smoother interaction for your users.
#6 – Code Split Your JS Files
Nobody likes waiting.
Over 50% of users abandon a website if it takes longer than 3 seconds to load. Sending large JavaScript payloads impacts the speed of your site significantly.
Instead of shipping all the JavaScript to your user as soon as the first page of your application is loaded, split your bundle into multiple pieces and only send what’s necessary at the very beginning.
Code splitting minimizes startup time, freeing up the main thread and enabling your application to become interactive faster. This technique is crucial for improving your PageSpeed Insights scores, as it reduces load time and enhances user experience.
For Websites Using Webpack, Parcel, or Rollup
- Identify Critical Code: Determine the JavaScript needed for the initial page load. Everything else should be split into smaller, lazy-loaded chunks.
- Use Dynamic Imports: Replace static imports with dynamic imports for non-critical code. For example:
form.addEventListener("submit", e => {

e.preventDefault();

import('library.moduleA')

.then(module => module.default) // using the default export

.then(() => someFunction())

.catch(handleError());

});

const someFunction = () => {

// uses moduleA

}- Create Separate Vendor Bundles: Separate third-party dependencies into a vendor bundle. This can be cached by the browser since it changes less frequently.
- Configure SplitChunksPlugin (Webpack): Use the SplitChunksPlugin to automate code splitting:
optimization: {

splitChunks: {

chunks: 'all',

},

}
For Client-Side Framework Applications
- Lazy Load Components: Adjust your client-side framework configurations to lazy load different parts of your application. Many frameworks like React and Vue.js provide built-in methods to handle lazy loading efficiently.
- Split by Route or Component Level: Implement lazy loading on a route or component level. This approach reduces the initial JavaScript payload, improving load times and minimizing main thread work.
- Preload Critical Chunks: Preload the most critical chunks to ensure they are fetched as soon as possible. This technique prioritizes and fetches crucial elements sooner, enhancing performance.
By following these steps, you can effectively minimize the main-thread work required at startup.
Implementing code splitting helps to reduce JavaScript parse, compile, and execution times, thereby improving Interaction to Next Paint (INP) and Largest Contentful Paint (LCP) times.
Embracing these best practices will significantly enhance your website’s performance, leading to a better overall user experience and improved Core Web Vitals.
#7 – Lazy Load Non-Critical Resources
Lazy loading non-critical resources is an effective way to minimize main-thread work and improve your website’s performance.
By deferring the loading of offscreen images, videos, and iframes until they are needed, you can significantly reduce initial load times and enhance user experience.
This technique helps optimize core web vitals such as total blocking time, cumulative layout shift, and input delay.
The following steps will guide you through the process of lazy loading non-critical resources for both WordPress and non-WordPress users.
Checkout Detailed tutorial here – How to Lazyload Images, Videos and Iframes
Instructions for WordPress Users
- Download and Install FlyingPress WordPress Plugin: Visit the WordPress plugin repository and download the FlyingPress plugin. This plugin is designed to optimize your site’s speed and performance by implementing best practices such as lazy loading.
- Defer JavaScript: After successfully installing the plugin, navigate to the JavaScript tab found in the sidebar. Select the “Defer JavaScript” option to postpone the loading of non-critical JavaScript files until they are required.
- Optimize Google Fonts: From the sidebar, select the Font tab. Enable the “Optimize Google Fonts” option to ensure that Google Fonts are loaded efficiently, reducing render-blocking resources.
- Lazy Load Images: Choose the Image tab from the sidebar and enable lazy loading for non-critical images. Exclude above-the-fold images to make sure they load immediately and improve the speed index.
- Lazy Load Iframes: In the Iframes section, enable the options for “Lazy Load Iframes” and “Use Placeholder Images for YouTube Videos” to ensure embedded videos do not impact initial load times. This method uses placeholder images until the user interacts with the video.
After making these changes, remember to save your settings. These optimizations will contribute to improved Google PageSpeed Insights scores and overall website performance.
Instructions for Non-WordPress Users
- Defer JavaScript Files: Add the `async` or `defer` attribute to non-critical JavaScript tags in your HTML. This approach ensures that the scripts do not block the rendering of the page. For example:
<script src="example.js" defer></script>- Replace YouTube Videos with Thumbnails: Display a thumbnail image instead of directly embedding a YouTube video. Use the direct link to the video, which can be triggered onclick. Example code:
<img src="thumbnail.jpg" alt="Video Thumbnail">

<a href="https://www.youtube.com/watch?v=exampleid" target="_blank">Watch Video</a>- Optimize Fonts: Download the required fonts to your local server and link them directly or use a reliable CDN. This reduces the dependency on third-party scripts.
- Lazy Load Remaining Assets: Implement lazy loading for additional assets by following detailed instructions available in this blog.
By adopting these lazy loading techniques, you will minimize long main-thread tasks and optimize JavaScript execution.
This ensures better load times and enhances the user’s interaction with your site. Implementing these best practices will also improve your Core Web Vitals, leading to better performance in load testing and higher PageSpeed Insights scores.
#8 – Choose Lightweight Themes and Use Less Plugins
Choosing a lightweight theme and using fewer plugins is a practical approach to minimize main-thread work and enhance your website’s performance. Lightweight themes are designed with efficiency in mind, reducing bloat and ensuring faster load times. A streamlined theme will have less JavaScript and CSS, which means fewer tasks for the browser’s main thread to handle, significantly cutting down the total blocking time.
- Opt for Minimalist Themes: Select themes that prioritize simplicity and speed without unnecessary features. Look for themes that have been optimized for PageSpeed Insights to achieve a better score.
- Limit Plugin Use: Each plugin adds its own scripts and styles, increasing the likelihood of encountering long main-thread tasks. Evaluate your current plugins and deactivate or remove those that are non-essential to your site’s core functionality. This reduces the load on the main thread and helps optimize the overall page speed.
- Minimize CSS and JavaScript: For remaining plugins, make sure to minify CSS and JavaScript files. This process removes unnecessary characters and spaces, making the files smaller and faster to load. Additionally, defer non-critical CSS and JavaScript to prevent render-blocking resources, improving the user’s experience and decreasing input delay.
- Monitor Performance with Chrome DevTools: Use Chrome DevTools to identify any leftover long main-thread tasks, redundant scripts, and styles. This tool provides a detailed analysis, helping you determine what needs to be optimized further for better performance and web vitals.
- Optimize with Google PageSpeed Insights: Continuously monitor your website’s performance using Google PageSpeed Insights. This tool will provide feedback on areas to improve, such as unused CSS and JavaScript, helping you to achieve the desired PageSpeed score.
- Implement Best Practices for Speed Optimization: Adopt speed optimization best practices such as code splitting, lazy loading, and deferred JS. By deferring non-critical resources, you ensure that the main-thread is reserved for important tasks, improving core web vitals significantly.
By selecting the right themes and limiting plugin usage, you can achieve faster load times, improved user interaction, and a better overall user experience. These measures will not only enhance performance but also boost your web vitals and PageSpeed Insights scores, ensuring your website functions smoothly and efficiently.
Frequently Asked Questions (FAQs)
How can I minimize main-thread work to improve my website’s performance?
To minimize main-thread work, consider choosing lightweight themes, reducing the number of plugins, and deferring non-critical JavaScript and CSS. Use tools like Chrome DevTools to identify and eliminate long main-thread tasks, and optimize fonts and images for quicker load times. Consistently monitor your site with Google PageSpeed Insights to track improvements.
What is the impact of lazy loading on a website’s speed index and user experience?
Lazy loading helps improve a website’s speed index by postponing the loading of non-critical images, iframes, and other assets until they are needed. This reduces the initial load time and improves user experience, as the primary content loads faster and becomes interactable sooner. Implementing lazy loading significantly enhances performance and user interaction, particularly for users on mobile devices.
How do I effectively use Chrome DevTools for speed optimization?
Chrome DevTools provides comprehensive insights into your website’s performance. You can use it to identify long main-thread tasks, optimize JavaScript execution, and locate unused CSS and JS files. By analyzing this data, you can minimize total blocking time and cumulative layout shift, ultimately improving core web vitals and achieving a higher PageSpeed score. Consistent use of DevTools helps ensure your site is running efficiently.
Conclusion
In conclusion, optimizing your website’s performance involves a series of deliberate actions aimed at minimizing main-thread work, thereby ensuring a seamless user experience.
By carefully choosing lightweight themes and limiting the use of plugins, you can significantly reduce the strain on the main thread and improve overall page speed. Implementing techniques such as lazy loading, deferring JS and non-critical CSS, and using Chrome DevTools for continuous monitoring are essential strategies.
These best practices help reduce the total blocking time, enhance core web vital metrics like the speed index and cumulative layout shift, and ultimately boost your Google PageSpeed Insights scores.
Moreover, considering the impact on current users, this approach leads to faster loading times, better interaction, and a more efficient website. Consistent speed optimization, including the minification of CSS and JavaScript, code splitting, and removal of unused JS and CSS, ensures your site runs efficiently across both desktop and mobile platforms.
As you continue to implement these strategies, you’ll find your website’s performance and user satisfaction reaching new heights.
Test your knowledge
Take a quick 5-question quiz based on this page.

