In today’s digital landscape, image optimization is a vital aspect of Search Engine Optimization (SEO) that often goes unnoticed. The strategic use of images can not only enhance your website’s appeal but also amplify its SEO performance.
This blog will guide you through the nuances of image optimization for SEO, illuminating how properly optimized images can contribute to your site’s visibility, improve page loading times, and ultimately, bolster your digital presence.
Also read Google Images SEO in 2023: Best Practices.
We’ll begin by looking at the importance of adding optimized images to your WordPress site. We’ll then explain how to optimize your website’s images for SEO using three tools: ALT tags, compression, and image file renaming. Finally, we’ll explore some tips and tricks to make sure you squeeze the most out of your efforts when optimizing images for SEO.
Importance of optimizing images for WordPress
Optimizing images for SEO can be a fantastic way to gain more visibility and attract potential customers. It’s essential to ensure that all of the images uploaded to your WordPress site are properly optimized, as it will make them easier for search engines like Google to find.
Not only that but optimizing images also helps reduce page loading times, which can drastically improve user experience and increase the amount of time visitors spend on your website.
It’s also important to note that having optimized images can help you build credibility with search engines such as Google, which will improve your chances of ranking higher in organic searches.
- Improved User Experience: Optimized images load faster, effectively improving your site’s performance and user experience. Visitors are less likely to abandon your site due to slow loading times, increasing overall user engagement.
- Increased SEO Rankings: Search engines prioritize sites with optimized images, contributing to higher SEO rankings. This visibility can lead to more organic traffic to your site.
- Reduced Bandwidth and Storage Usage: Compressed images consume less storage space on your server and use less bandwidth when loaded, leading to cost savings in web hosting.
- Better Accessibility: Using ALT tags for your images improves your site’s accessibility, making it more user-friendly for people using screen readers.
- Enhanced Social Media Sharing: Optimized images provide better previews when your content is shared on social media, potentially increasing click-through rates.
- Increased Conversion Rates: Faster page loads and a better user experience can lead to higher conversion rates, directly impacting your business’s bottom line.
- Increase Webpage Speed: Images can often take up a large portion of a webpage’s total size, so optimizing these images will drastically reduce loading times. This is especially important for mobile users, as page speed on mobile devices is even more critical.
- Save Disk Space: Compressing images can significantly reduce their file size, saving valuable disk space on your web server.
Methods to Optimize Images for SEO In WordPress
There are different methods to optimize images for SEO in WordPress which you can find below;
Compress Your WordPress Images and Use WEBP
One of the most effective ways to optimize your images for SEO is to reduce their file size without compromising on the quality. A practical and efficient method to achieve this is by using the WEBP format for your images. WEBP is an image format that provides superior lossless and lossy compression for images on the web.
WEBP is considered to be next generation image format that is rapidly gaining in popularity. It offers a number of advantages over traditional image formats like JPEG and PNG.
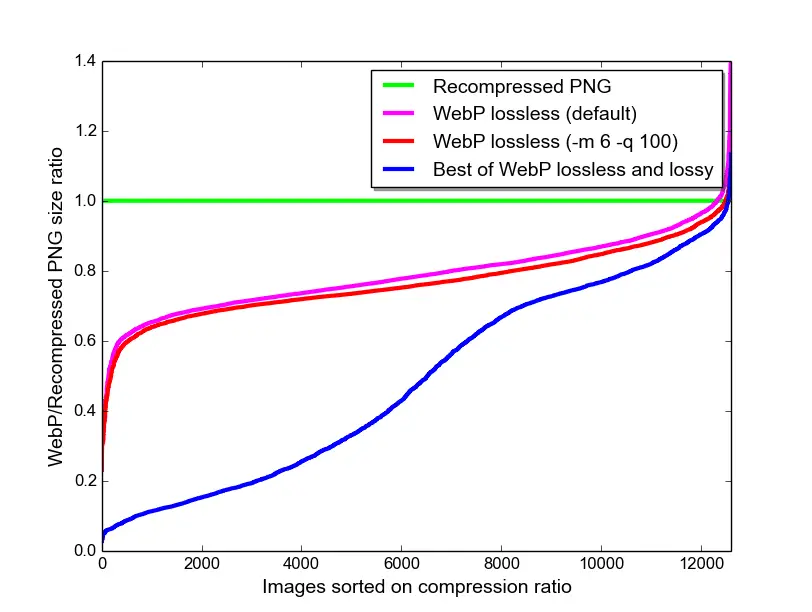
For example, WEBP files are typically 25-35% smaller than their equivalent JPEG or PNG counterparts, which means they take up less space when stored on disk and also require less bandwidth for downloading.
Furthermore, since the file size is much smaller, WEBP images load faster than their JPEG and PNG counterparts, making them ideal for web development.
Finally, since the file size is smaller, WEBP also provides superior image quality when compared to JPEG or PNG images. This makes it a great choice for displaying detailed photos or graphics on a website.
How to Use Imagify to Compress and Convert to WEBP Automatically?
With WordPress, you can easily convert your images to WEBP format using a plugin like Imagify.
Once installed, Imagify automatically optimizes new images upon upload and can also bulk-optimize older images on your site, But there are some settings you need to consider.
Step1: Go to settings > Imagify and select the following settings;
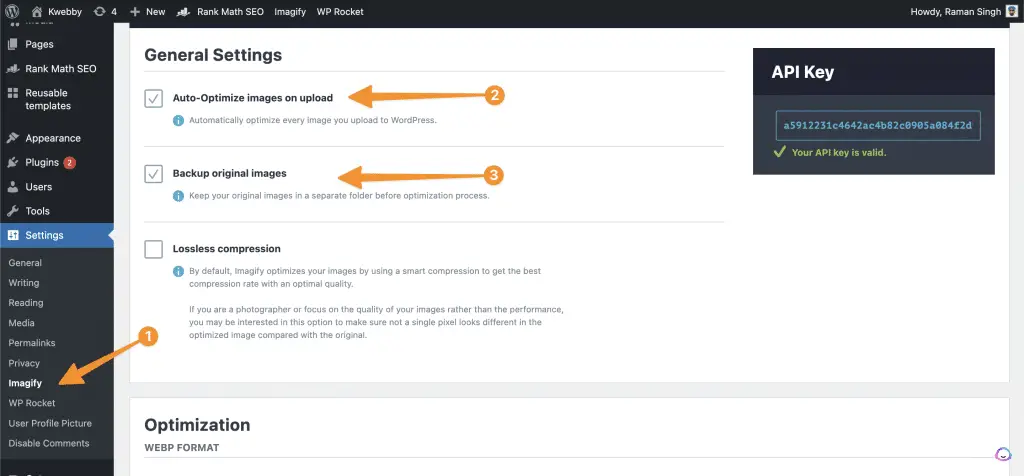
Step2: Then scroll down to “Optimization” section and select the following;
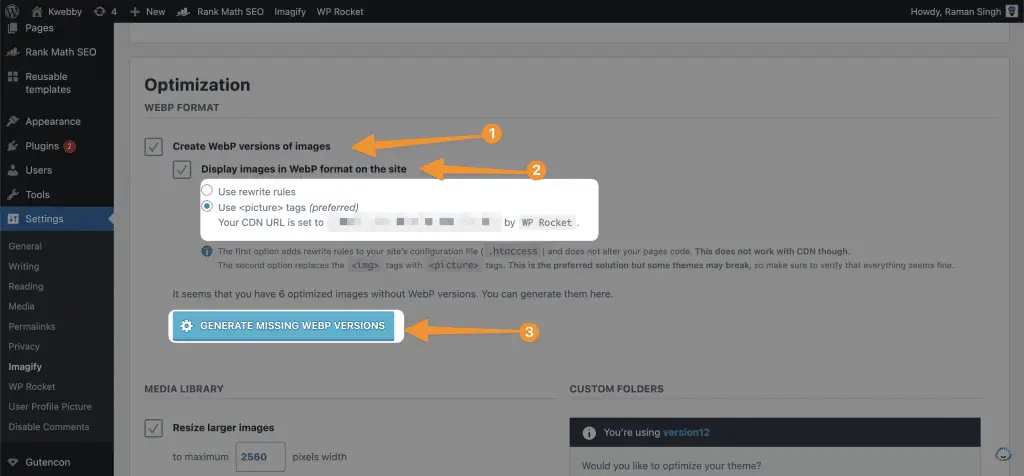
Here you have two option i.e. Use rewrite rules or use CDN by RocketCDN. If you want to skyrocket your page speed then you should select and buy a cdn plan from rocketcdn here or you can choose rewrite rules to display optimized WEBP image on your WordPress website.
After you’ve done configuring click on “Generate Missing WEBP Versions” to start generating and converting your images to WEBP Format.
By using WEBP format, you can reduce the file size of your images significantly, which not only improves page load times but also enhances user experience, thereby contributing positively to your SEO efforts.
Moreover, WEBP images are supported by all major browsers, making it a reliable choice for image optimization on your WordPress site. Remember, a faster site not only makes your visitors happy but is also favoured by search engines. So, by using Imagify to convert your images to WEBP format, you’re taking a significant step towards optimizing your WordPress site for SEO.
Resize Images to Fit Your Content Layout
Another key aspect of image optimization is resizing. An image’s dimensions should be tailored to fit your website’s content layout. Images that are too large can slow down page load times, negatively affecting your SEO ranking and user experience. On the contrary, images that are too small may appear pixelated or blurry, compromising the overall aesthetic of your site.
To resize your images effectively, you must first understand your site’s maximum content width. For instance, if the maximum width of your content layout is 800 pixels, there would be no benefit in uploading an image wider than this.
In WordPress, you can use plugins such as Imsanity which automatically resize your images upon upload, saving you time and ensuring consistency across your site.
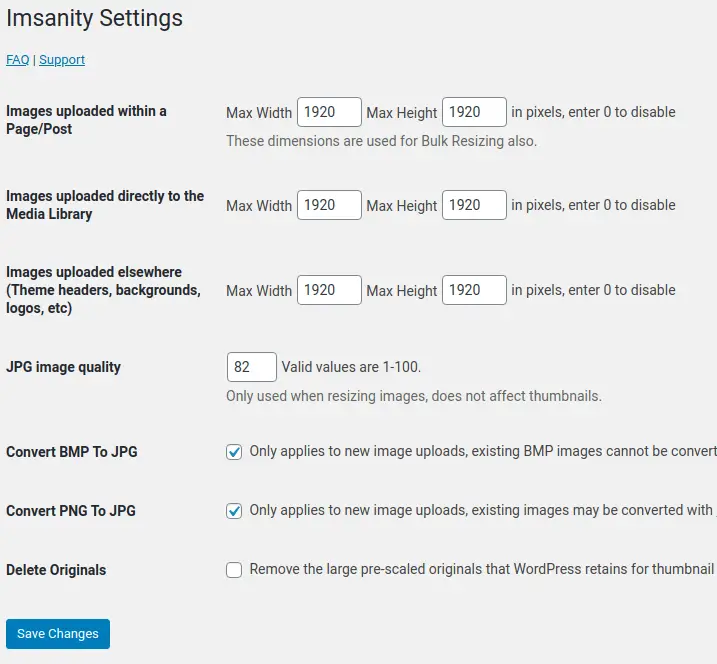
Alternatively, Imagify has inbuilt option to resize larger images, To do this, scroll down to “Media Library” section and select the “Resize Larger Images” option;
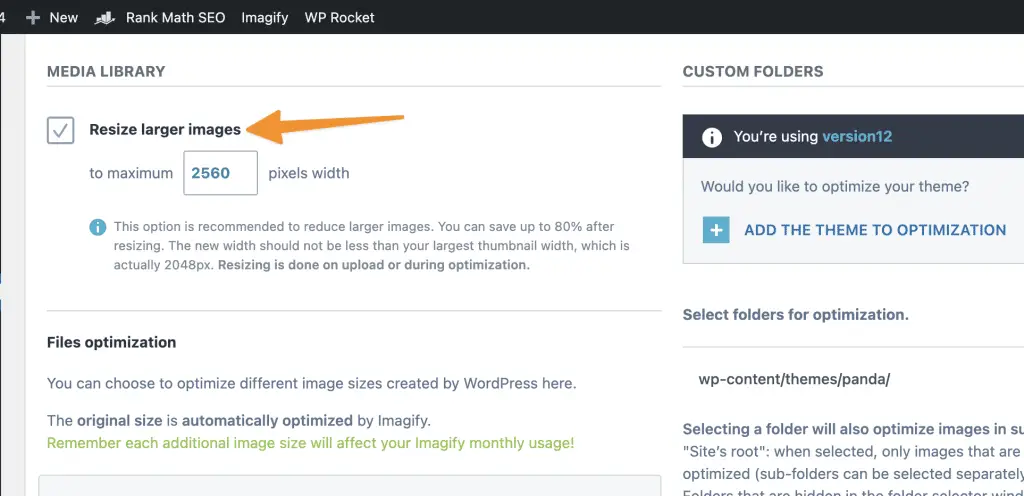
Remember, when resizing images, the goal is to find the perfect balance between the lowest file size and acceptable quality.
Adapting the dimensions of your images to fit your content layout is a simple yet impactful step towards image optimization for SEO in WordPress. Always keep in mind that the ultimate aim is to enhance your website’s performance without compromising the visual appeal.
Using a Content Delivery Network to Serve Images Faster
A Content Delivery Network (CDN) can significantly enhance the speed at which your images are delivered to users worldwide, positively influencing your site’s SEO ranking.
A CDN works by caching your website content across a network of servers located around the globe. When a user visits your site, the CDN delivers the content from the server nearest to them, reducing the latency and improving the page load speed.
Serving images through a CDN is particularly beneficial for websites with a global user base. It ensures that your images load just as quickly for a user in a distant location as they would for a user closer to your primary server. This consistent performance across all geographical locations can drastically enhance user experience.
Several WordPress plugins, such as WPRocket, can help you integrate a CDN with your WordPress site. These plugins also provide additional features, including image optimization and lazy loading, which further enhance your site’s performance.
How to Integrate RocketCDN With WPRocket?
First, You need to download WPRocket Plugin here and install on your website.
Then You need to have active RocketCDN Plan here and then you need to update your CDN URL into your WPRocket settings by going to Settings > WPRocket > CDN as follows;
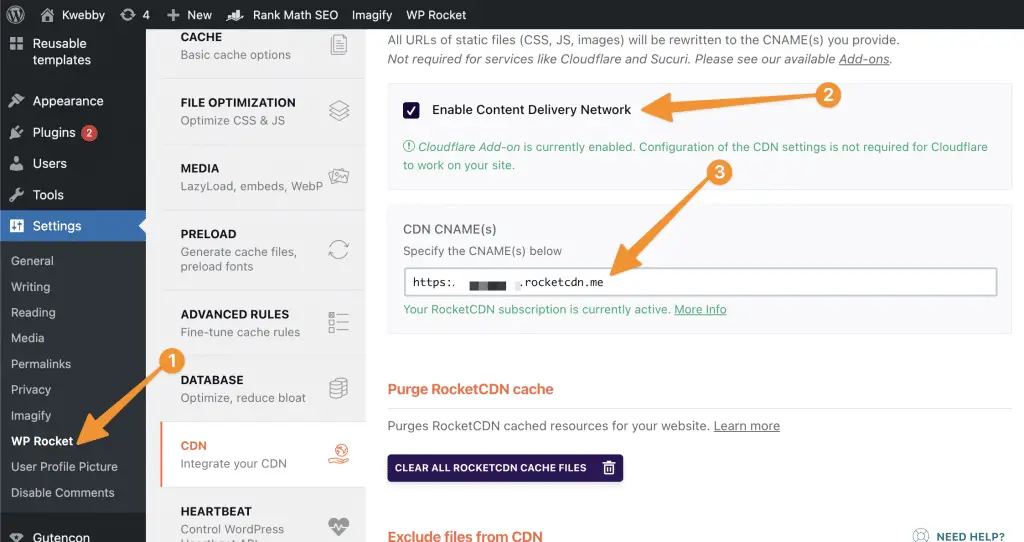
Now, use this CDN URL to configure directly with Imagify by going to Settings > Imagify > Optimization;

This will automate your task of converting, compressing and delivering your Images faster with CDN.
In conclusion, using a CDN to serve your images is a powerful method to speed up your WordPress site and improve your SEO ranking.
It ensures your images are delivered swiftly and efficiently to users, no matter where they are, enhancing user experience and engagement on your website. By utilizing a CDN, you make another stride in optimizing your WordPress site for SEO.
Clean Up Your WordPress Media Library
Regularly removing unused images from your WordPress media library is another crucial part of your image optimization strategy for SEO. Over time, as you update your site or replace old images, you might end up with a ton of unused images that unnecessarily take up storage space and potentially slow down your website.
WordPress does not automatically delete images that are not in use, so it’s up to you to regularly clean up your media library.
Fortunately, several WordPress plugins, such as Media Cleaner, can help you identify and delete these unused images with ease. By doing so, you not only free up storage space but also improve the overall performance and speed of your website.
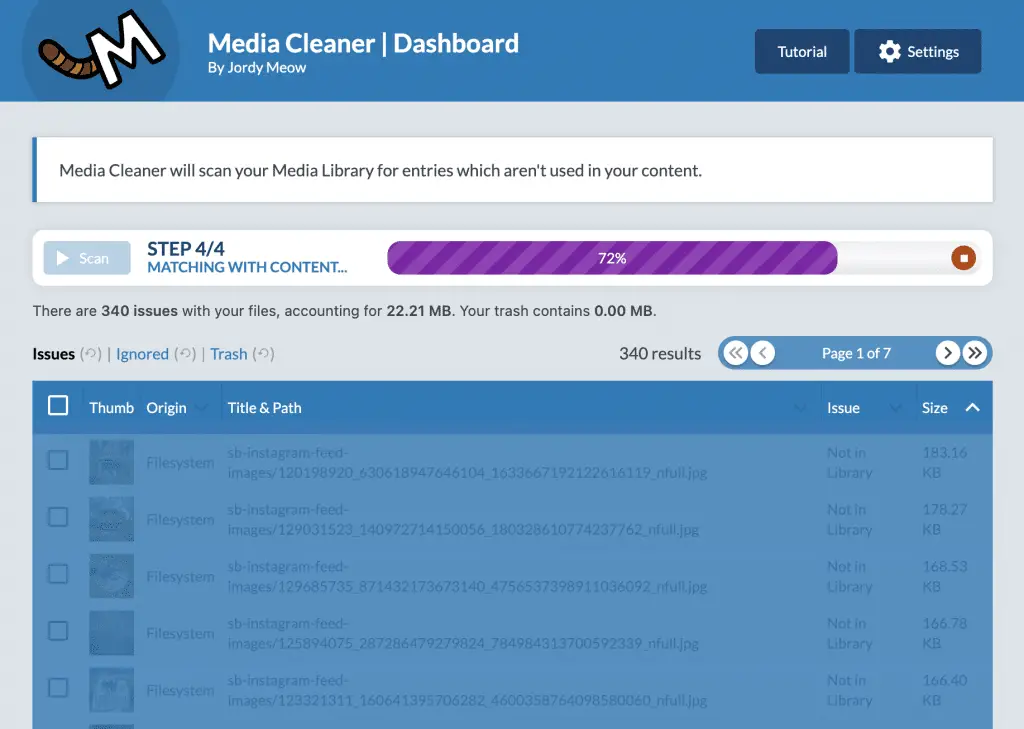
You can review each images which aren’t used in your content and delete as follows;
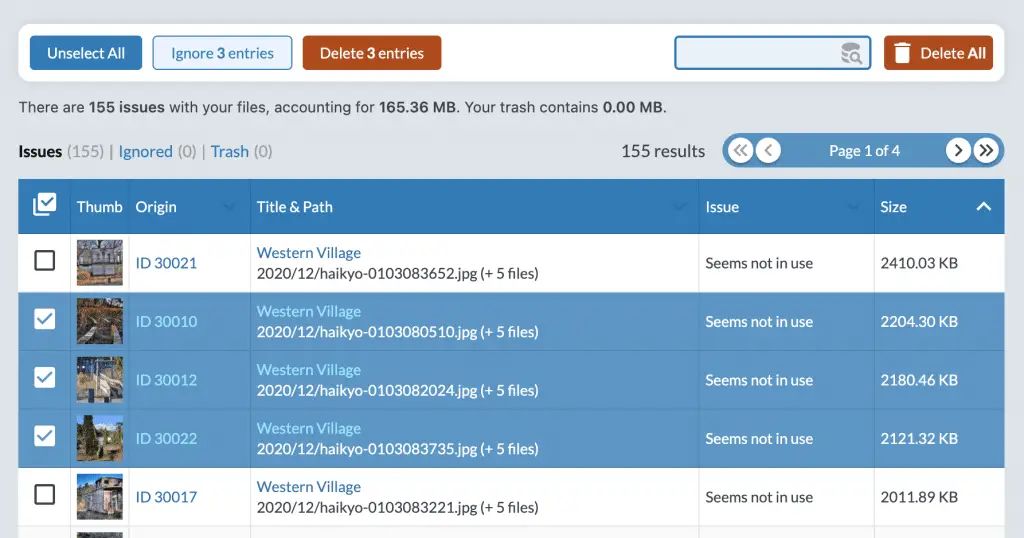
To prevent the accumulation of unused images, it is advisable to adopt a routine cleanup of your WordPress media library.
This practice will ensure your site remains clutter-free, operates at peak performance, and continues to rank well in search engine results. Remember, every little bit counts when it comes to optimizing your website for SEO and maintaining a clean and efficient media library is no exception.
Use optimized file names for images
Utilizing SEO-friendly names for your images is an often overlooked yet vital aspect of image optimization. Search engines not only crawl the text on your webpage, but they also search for keywords within your image file names.
Therefore, it’s important to choose descriptive, keyword-rich file names that accurately reflect the content of your image.
For instance, instead of uploading an image with a default file name like “IMG1234.jpg,” rename the file to something relevant to your content, like “fresh-organic-apples.jpg” if the image is about organic apples.
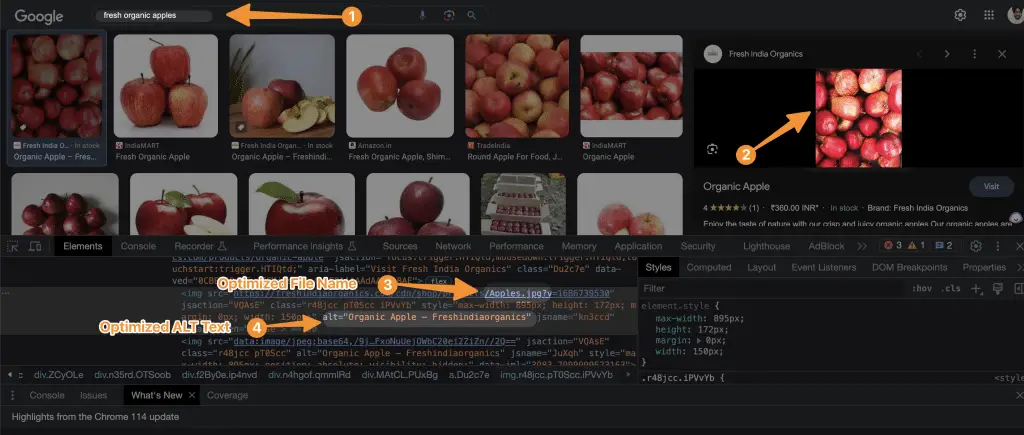
This descriptive name provides search engines with valuable information about the image content, thereby aiding in your SEO efforts.
In WordPress, you can rename your images during the upload process or later by editing the file name in your media library. Remember, consistency is key, so it’s best to create a clear, informative naming convention for all your images. By doing so, you not only make your images more accessible and user-friendly but also boost your visibility in search engine results, further optimizing your WordPress site for SEO.
Write SEO-friendly alt text
Alt text, also known as “alt attributes” or “alt descriptions,” is a brief description of an image that is displayed when the image cannot be loaded on a webpage. It is also utilized by screen-reading software to describe images to visually impaired users. Additionally, search engines use alt text to understand what an image is about, making it a critical element in image SEO.
When writing SEO-friendly alt text, it’s important to accurately describe the content of the image, incorporate relevant keywords, and keep the description under 125 characters. Avoid keyword stuffing, as this can lead to a negative user experience and potentially harm your SEO ranking.
For instance, if you have an image of a chocolate chip cookie on a blog post about a cookie recipe, a good alt text could be “freshly baked chocolate chip cookie on a cooling rack.”
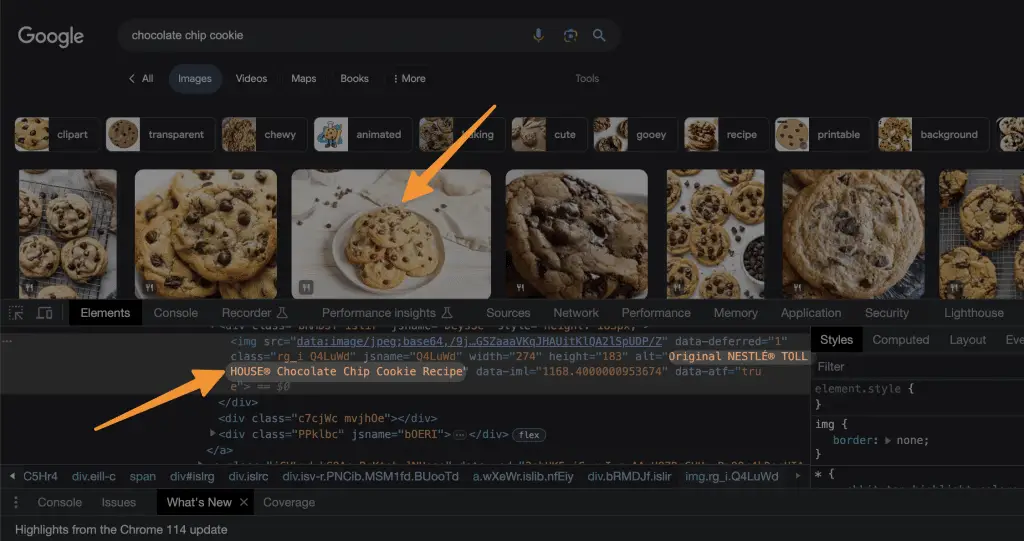
As you can see Above, This description accurately portrays what’s in the image, includes keywords like “chocolate chip cookie,” and enhances the overall accessibility of your webpage.

Similarly, if you search for “Cute Puppy” pics online, search engine usually scans your image’s ALT text to provide results to the users.
In WordPress, you can add alt text to images during the upload process or later by editing the image details in your media library. Always remember that writing descriptive, SEO-friendly alt text can significantly contribute to your website’s accessibility and search engine ranking, helping you to optimize your WordPress site for SEO.
Install a cache plugin for faster image loading
Installing a cache plugin for faster image loading is an effective way to enhance your website’s performance and user experience, leading to better SEO results. Caching essentially stores a version of your website in the visitor’s browser, which means upon subsequent visits, the browser does not have to reload the entire page content, including images. This significantly reduces the page load time, leading to a faster, more fluid user experience.
There are various caching plugins available for WordPress, but the best one is WProcket because of its capability to handle everything at one place. These plugins generate static HTML files from your dynamic WordPress blog and serve those HTML files instead of processing the heavier, more expensive WordPress PHP scripts. They also offer features such as CDN support, gzip compression, and browser caching that further enhance your website’s speed and performance.
You can easily install a cache plugin from your WordPress dashboard. Once installed and activated, you can access the settings to configure the plugin based on your website’s needs. Remember to regularly update the plugin and clear the cache to ensure its optimal performance.
By leveraging the power of a cache plugin, you can not only speed up image loading time but also improve overall site performance, which contributes to a better user experience and higher SEO ranking. Indeed, the installation of a cache plugin is another essential step towards optimizing your WordPress site for SEO.
Lazy Load Your Images
Lazy loading is a strategy that delays the loading of non-critical or non-visible content until the point of need. When applied to images, it means that an image will only load when it is about to scroll into the viewport. This technique significantly speeds up the initial load time of your webpage, improves the user experience, and can contribute positively to your SEO as search engines prefer websites with faster loading times.
In WordPress, you can enable lazy loading using plugins like Lazy Load by WP Rocket. These plugins are easy to use and often come with options for customization to suit your specific needs.
Step1: Download WPRocket, Install and Activate it, Then go to Settings > WPRocket > Media as below;
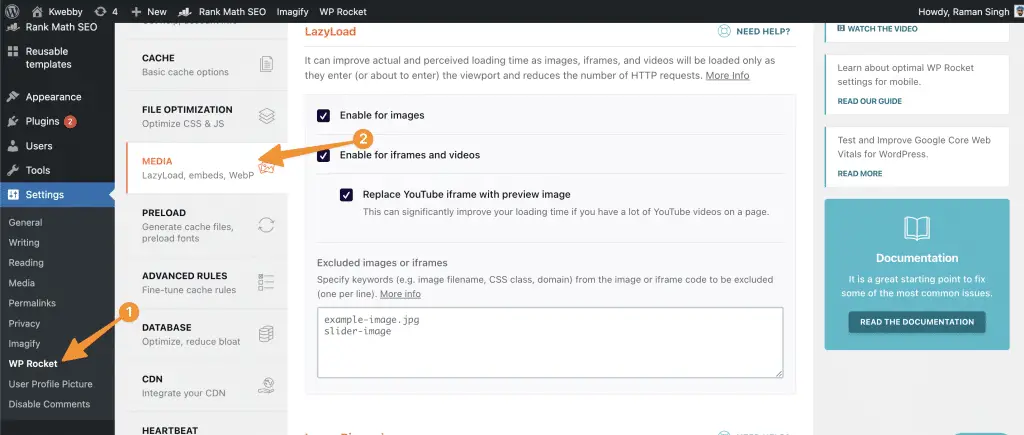
Step2: Enable Lazyload by checking the following sections as below;
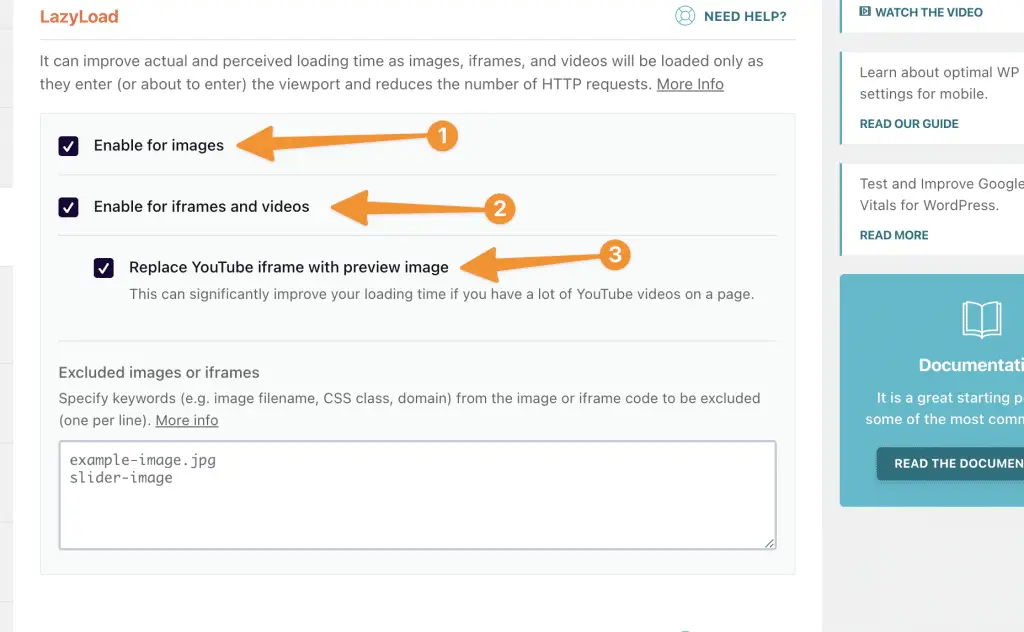
It will not only add Lazyload to Images but also to Youtube iframe with preview image which helps to load your page faster.
Also Read, How to Lazyload Images, Videos and Iframes in 2023
Remember, speeding up your website can significantly impact your search engine ranking, user engagement, and conversion rates. Therefore, lazy loading your images is an effective strategy to optimize your WordPress site for SEO.
Disable attachment pages for images
By default, WordPress creates an attachment page for every image uploaded to your site. These pages contain nothing more than the image itself, making them thin content pages, which can negatively impact your SEO ranking. Therefore, it is advisable to disable these attachment pages as part of your image optimization strategy for SEO.
To disable attachment pages, you can use a WordPress SEO plugin, such as Yoast SEO. With Yoast, you can easily redirect attachment URLs to the URL of the media file itself or to the post the media is attached to. This means that if someone lands on the attachment URL, they are automatically redirected to a more valuable page, thereby preventing the generation of thin content pages and improving your SEO.
In essence, disabling attachment pages for images helps to avoid creating unnecessary content, streamlines your website, and contributes positively to your overall SEO efforts, making it an important step in optimizing your WordPress site for SEO.
Use image captions when needed
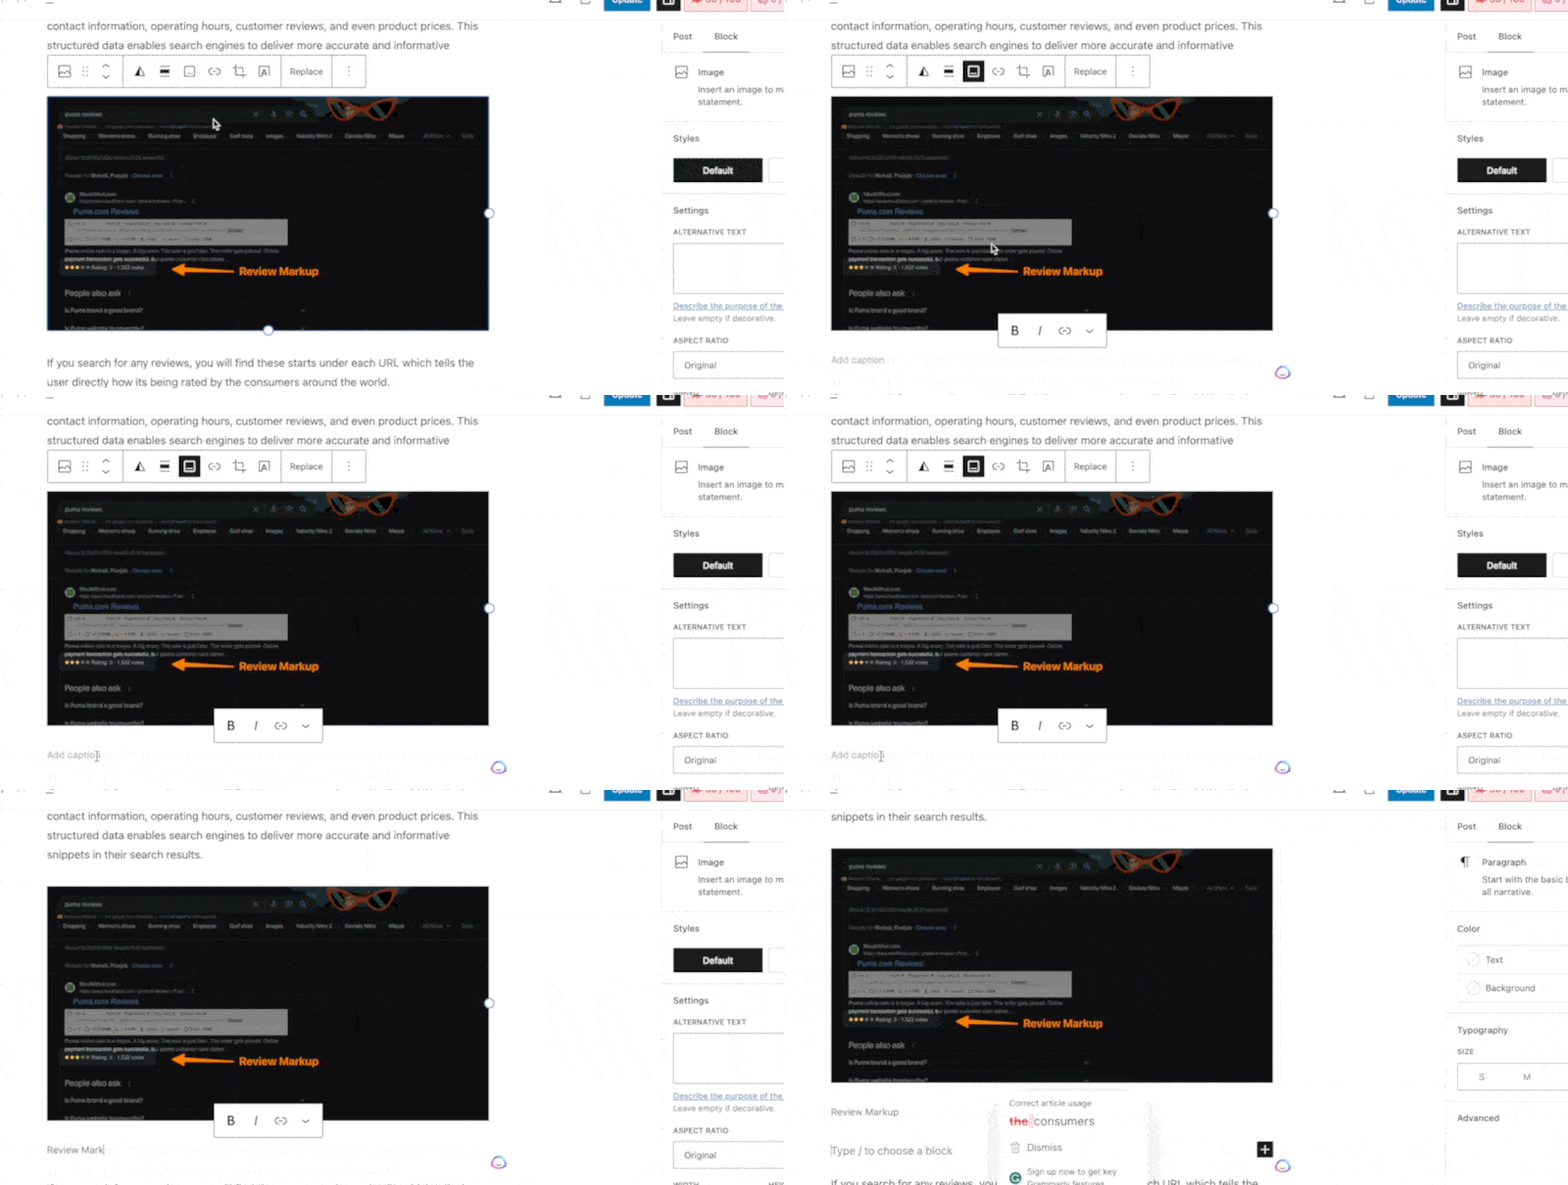
Image captions, while not a direct ranking factor for SEO, can still contribute to user engagement and time spent on your website. Captions appear below your images, providing users with additional context or information. When users understand an image’s relevance, they are more likely to stick around, reducing your site’s bounce rate—a factor that can impact your SEO.
If you have an image that may not be entirely self-explanatory, adding a caption can be incredibly helpful. For instance, if your post includes a chart or infographic, a caption can help clarify its meaning or importance. When inserting captions, make sure they’re concise, descriptive, and include relevant keywords whenever possible. Also, ensure that they add value for your readers and aren’t just there for the sake of SEO.
On WordPress, adding captions is fairly straightforward. During the image upload process, you’ll see a field labeled “Caption.” You can enter your caption here, and it will appear beneath your image when it’s published.
How to Automatically Add Captions with RANKMATH?
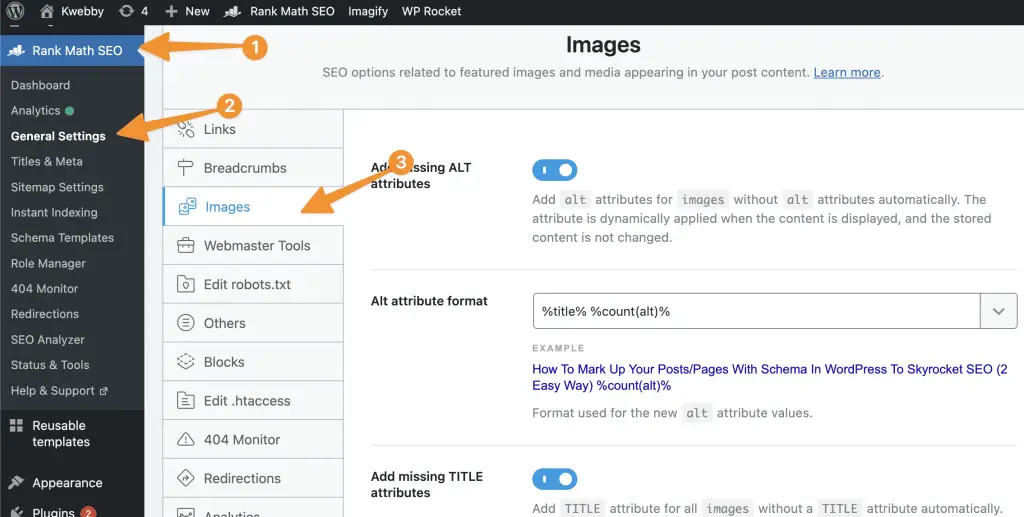
Yes, You red it right, you can create captions automatically with RANKMATH SEO Plugin. Download and install RANKMATH SEO Plugin if you haven’t already and go to Rankmath > General Settings > Images;
Then, scroll down to the option “Add Missing Image Caption” to create captions automatically as below;
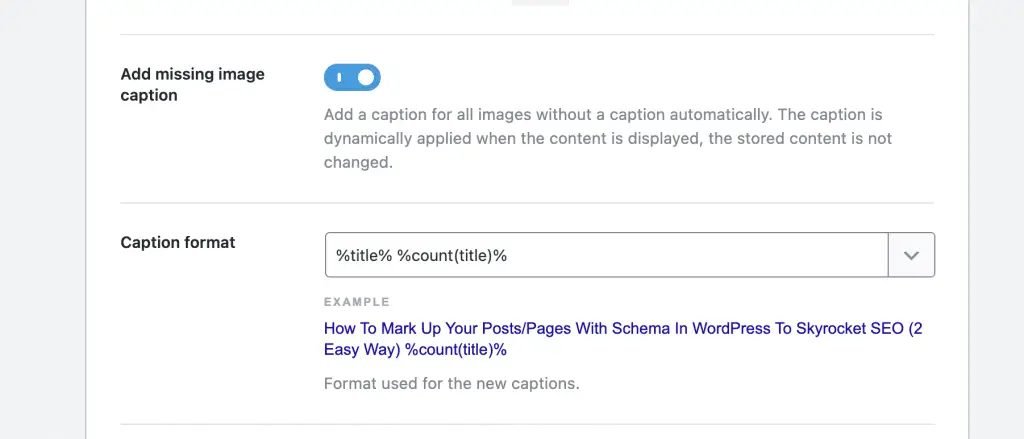
Overall, while image captions might not directly boost your SEO, they enhance user experience, which is a critical aspect of SEO optimization. Therefore, remember to use image captions when necessary as part of your strategy in optimizing your WordPress site for SEO.
Use image-structured data for rich snippets
Image structured data is a type of code that you can add to your webpage to provide more information about the content of your images to search engines. This enhanced understanding can lead to your images being displayed as rich results or in image search features, potentially increasing your visibility and click-through rates.
Also Read, How To Mark Up Your Posts/Pages With Schema In WordPress To Skyrocket SEO (2 Easy Way)
When incorporating structured data, it’s crucial to ensure that it is relevant to the main content of the page and enhances the user’s experience. The image you’re tagging should be about the main content and provide valuable information that benefits the understanding of the page.
For instance, if you have a cooking blog and are posting a recipe, the primary image could be a structured data image showing the final dish. The structured data could include attributes such as the dish’s name, a description, and the preparation time. This would provide search engines with more context about the image, potentially leading to rich snippet displays in search results, which can significantly improve your SEO.
By utilizing image structured data, you’re giving search engines a deeper understanding of your images, allowing them to provide richer search results that can drive more traffic to your site. This is a valuable technique in optimizing your WordPress site for SEO.
Prepare for Google Lens Visual Search
As we move towards a more visual era of search, preparing your images for Google Lens Visual Search becomes increasingly important. Google Lens allows users to search for what they see, providing results based on image recognition. This means that your images could be found in a whole new way, potentially driving more traffic to your site.
To optimize your images for Google Lens, you should focus on high-quality, clear, and relevant images. Make sure your product images are easy to identify and represent exactly what the product is. If possible, use original images over stock images as Google values unique content.

Another essential factor is to ensure that your images are well-described. This goes beyond the alt text; consider the context surrounding the image—your website content should provide relevant information that supports the image. The more context Google has to understand your image, the better chance it has of appearing in Google Lens Visual Search results.
Finally, remember that Google Lens is particularly effective for local SEO. If you have a physical location, make sure your signage is clear and easily readable in photos of your location.
By preparing for Google Lens Visual Search, you’re staying ahead of the curve in SEO strategies, ensuring your WordPress site is optimized for the future of search.
Best WordPress Plugin for Optimizing Images
While there are numerous plugins available to optimize images and incorporate a CDN on your WordPress site, a combination of Imagify Image Optimizer and RocketCDN offers a uniquely powerful solution.
Imagify Image Optimizer
Imagify Image Optimizer is a popular WordPress plugin that automatically optimizes your images upon upload. The plugin offers three levels of compression – Normal, Aggressive, and Ultra. This range allows you to balance between image quality and file size reduction, depending on your specific needs.
Furthermore, Imagify provides a convenient option for bulk optimization. This feature is particularly useful for existing websites with a large media library, as it allows you to optimize all your images at once, saving you valuable time.
RocketCDN
RocketCDN, on the other hand, is a highly efficient Content Delivery Network service that integrates seamlessly with your WordPress site. By distributing your content across a global network of servers, RocketCDN ensures that your images load quickly for users in any location.
RocketCDN also offers image optimization features, including automatic image format conversion to WebP and on-the-fly image resizing. This means your images will not only be delivered faster but will also be the ideal size and format for each user’s device and browser.
In conclusion, combining Imagify Image Optimizer with RocketCDN gives you a comprehensive solution for optimizing your images for SEO. From reducing file size to delivering content quickly across the globe, this combination ensures your WordPress site performs optimally, creating a better user experience and enhancing your SEO efforts.
Conclusion
In summary, image optimization is a vital aspect of SEO that should not be overlooked. By using descriptive file names, SEO-friendly alt text, and purposeful image captions, you are providing valuable context to both users and search engines. Employing the right SEO tools, such as the Imagify Image Optimizer and RocketCDN, not only aids in reducing image file size but also ensures a swift content delivery to your audience worldwide.
Moreover, it’s worth mentioning the importance of using the correct image format, creating an image sitemap, adding social media thumbnails, and enabling lazy load for your images. All these steps contribute significantly to optimizing your images, making your website more accessible, and improving your search engine ranking.
Remember, consistency is key to SEO. Develop and adhere to a clear image optimization strategy for all your images, and you’ll soon notice a marked improvement in your website’s performance and visibility. No matter the type of content you produce, an SEO-friendly approach to your images will undoubtedly enhance your user experience and boost your site’s SEO.
Test your knowledge
Take a quick 5-question quiz based on this page.

