The choice of font can greatly influence the effectiveness of your design. Canva, a popular online design tool, allows you to use a variety of pre-loaded fonts or upload your own. This helps you align your designs with your brand identity.
Fonts play a critical role in creating consistent and professional branding. To upload fonts in Canva, you need to log into your account.
This guide explains how to upload fonts to Canva step by step, helping you expand your design options and create customized, engaging content.
Let’s get started.
Why Add Custom Fonts on Canva?
Adding custom fonts to Canva helps you keep your brand identity consistent in all designs. Using your brand fonts makes the design process faster and ensures all projects align with your branding. Uploading fonts to Canva is simple and expands your options beyond the default fonts available.
Preparing Your Font Files
Before adding custom fonts to Canva, ensure you have the correct font files.
You can download fonts from websites like DaFont. If the font is in a zip file, unzip it before uploading it to Canva.
Choosing the Right Font Format
When preparing to upload fonts to Canva, it’s critical to select the correct font file format. Canva currently supports three primary formats: OTF (OpenType Font), TTF (TrueType Font), and Web Open Font Format (WOFF). These formats are widely used, ensuring you can easily upload your fonts to Canva for your unique design needs.
To upload the font, first, ensure that your font file is in the correct format – either OTF or TTF. If you have access to multiple formats of the same font, it’s best to choose the OTF format as it offers more advanced typography features.
Once you have your font file ready, you can start the process of uploading custom fonts to Canva. However, it’s important to note that this feature is exclusive to Canva Pro, Canva Enterprise, Canva Education, and Non-profit accounts.
Converting Your Font to a Web Font Format
Before you can upload your brand fonts to Canva, you might need to convert them to a web-friendly font format. The Web Open Font Format (WOFF) is the standard for use on the web.
If you have your brand’s font files in TTF or OTF formats, you can convert them to WOFF using various online conversion tools. TTF and OTF fonts are not specifically designed for optimal web usage, which can result in inconsistent display across various devices.
How to Add Fonts to Canva
Now that you have your font files ready, it’s time to add fonts to Canva. Follow these simple steps:
First, you need to add text to your design screen to access the fonts menu. This is an essential step in the font uploading process.
Next, navigate to the Brand Hub or Brand Kit menu. From there, you can access the fonts menu where you can add new fonts for use in your designs.
Step 1: Log into Your Canva Pro Account
To upload your fonts to Canva, you will need to have a Pro membership, Canva Enterprise, or Canva Education account. Log into your account from your device.
While the Canva app is useful for many functions, uploading fonts requires using a web browser instead of the app.
Step 2: Access the Font Dropdown Menu
Once logged in, navigate to “Create a design”.

In your chosen design, select the text box where you want to apply a new font. This will activate the font dropdown menu at the top of the editor. The fonts dropdown menu will display all existing fonts, including default and previously uploaded fonts.
To further customize your text elements, you can adjust the font size within the font dropdown menu, allowing you to create a cohesive and visually appealing brand identity in your designs.

Step 3: Initiate the Font Upload Process
In the font dropdown menu, you’ll find the option to “Upload a font” at the very bottom.
Click on it to start the process of adding your font to Canva.
Please note, that this feature is not available in Canvas free version.
Step 4: File Selection
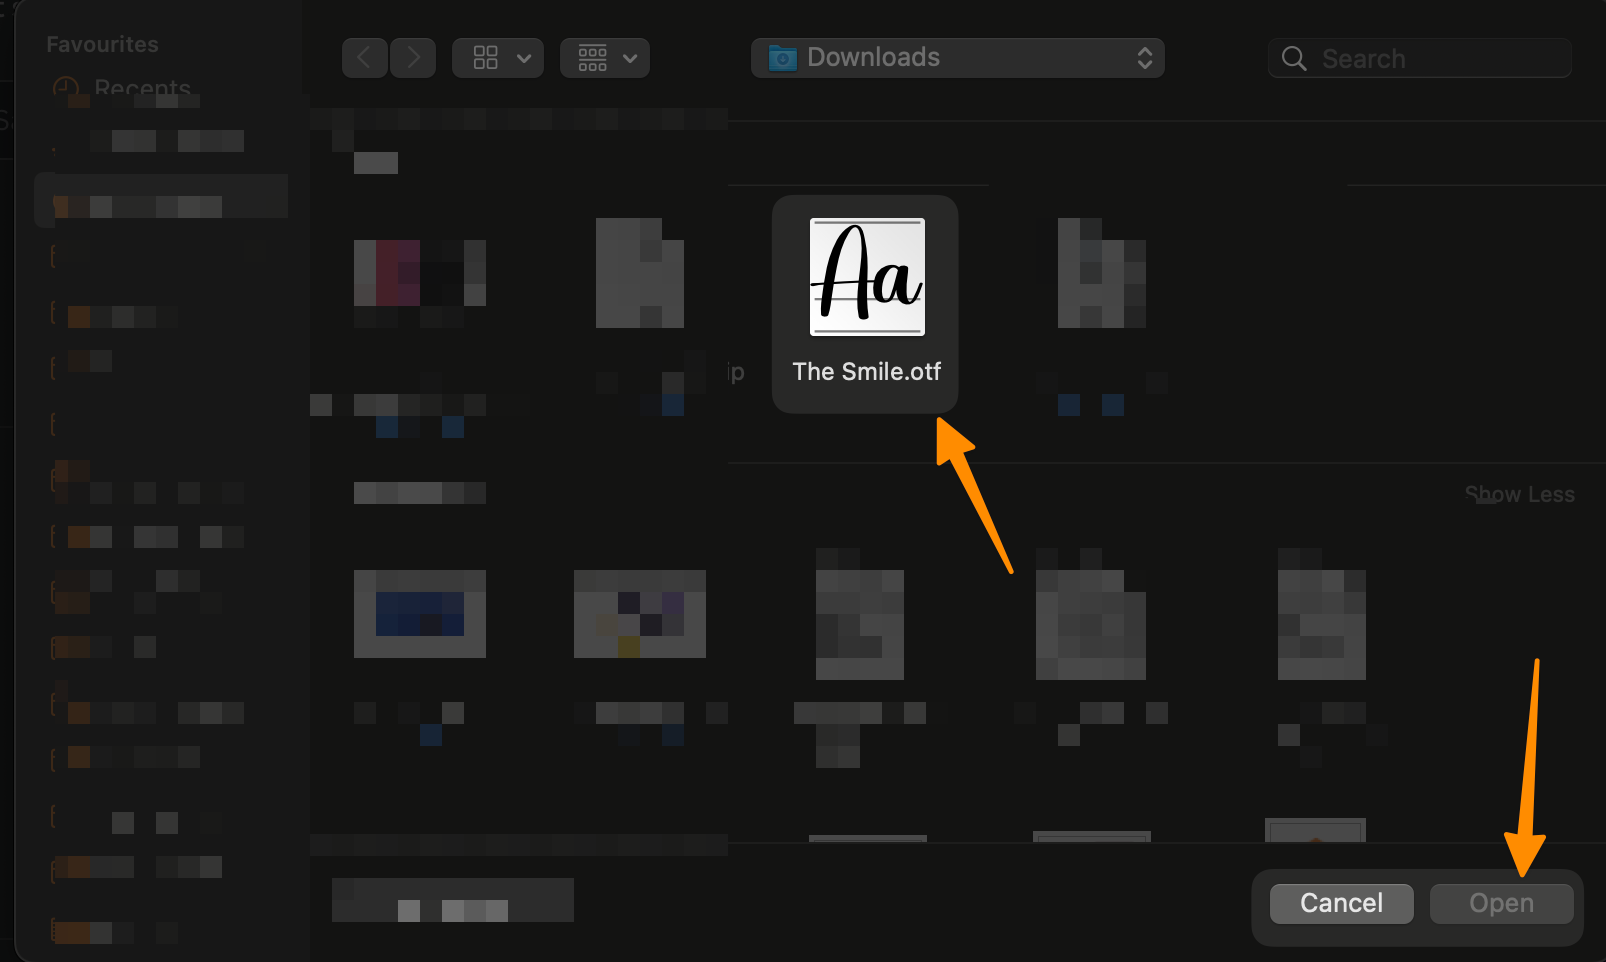
A pop-up notice will appear, asking you to select the font file from your device. The file should be in OTF, TTF, or WOFF format for successful upload. You can only upload one font file at a time.
Step 5: Upload the Font File to Canva
Select the desired font file and click on ‘Open’. Canva will then upload the selected font file to your account.
Step 6: Use Your Uploaded Font
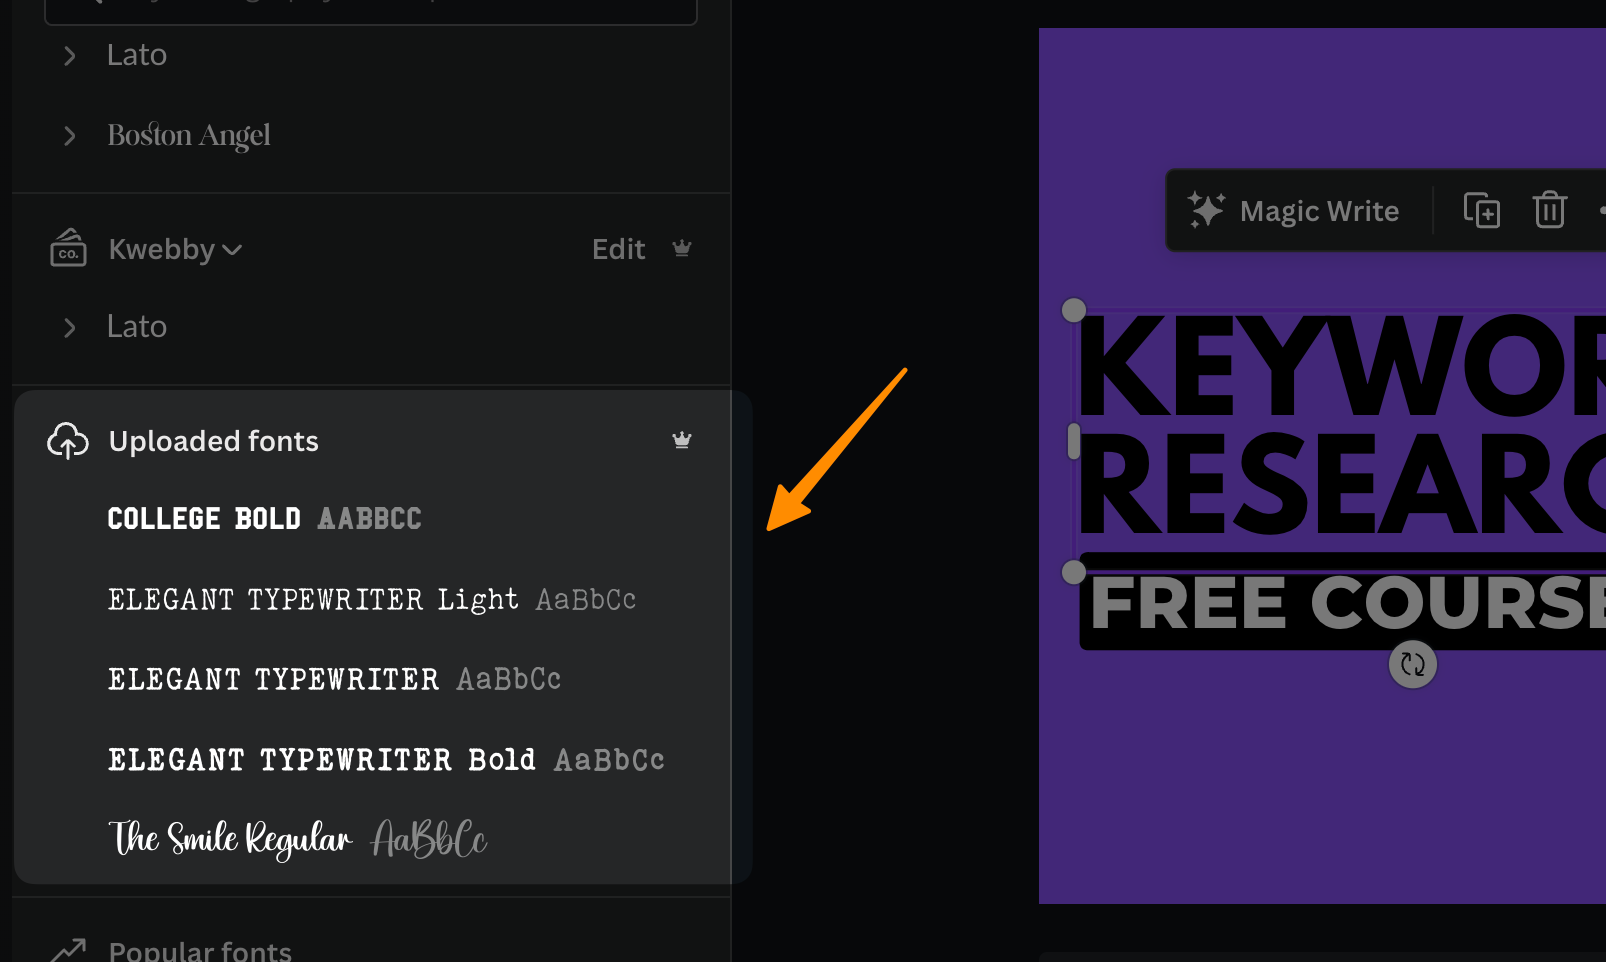
Once the upload is complete, your new font will be available in the font dropdown menu. You can now apply the newly uploaded font to your Canva designs.
Remember, while Canva offers a multitude of free fonts, the ability to upload and use your fonts provides an unparalleled level of customization, ensuring your Canva designs perfectly echo your brand identity.
How to Add Fonts to Canva Using Brand Kit
If you’re a Canva Pro user, you can utilize the Brand Kit feature to add your fonts to Canva. This easy-to-use function allows you to store your brand colours, uploaded fonts, and logos, ensuring you have quick access to your whole brand kit with just a few clicks.
Follow these steps to upload your custom fonts using the Brand Kit option:
Step 1: Access Your Canva Pro Account
Log into your Canva Pro account. Again, uploading your fonts to Canva requires a Canva Pro subscription, Enterprise, Education, or Non-profit account.
A Canva Pro subscription provides unlimited access to a wide range of design features and content, enhancing your creative options beyond the basic offerings.
Step 2: Navigate to Your Brand Kit
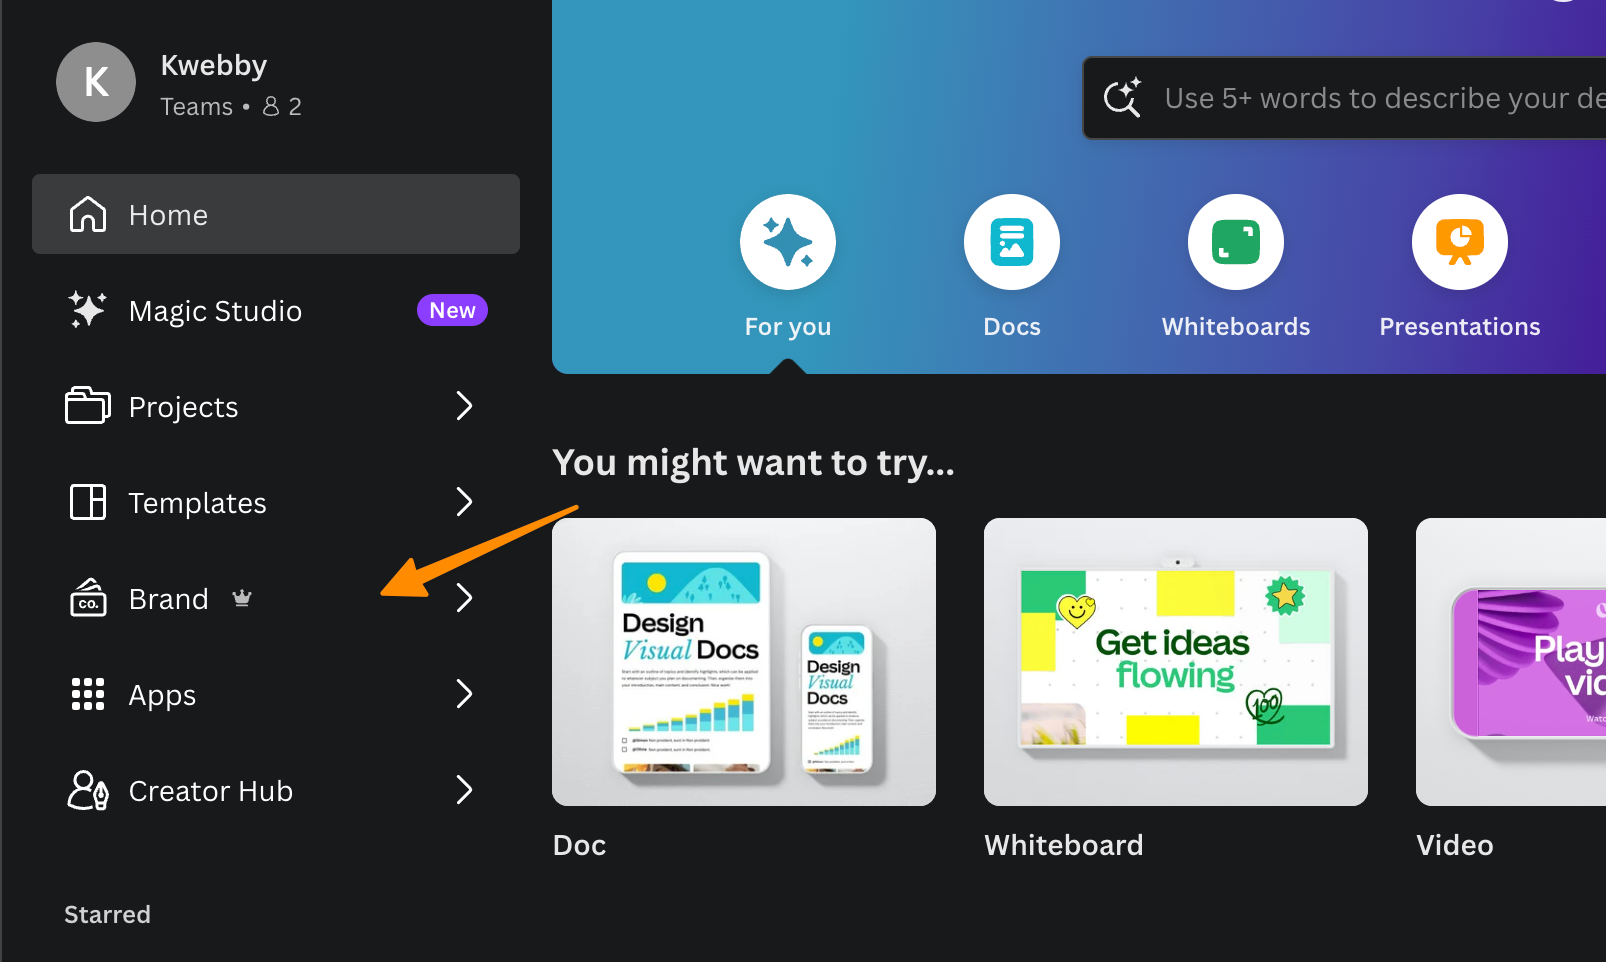
Once logged in, find the “Brand Kit” option located in the menu on the left-hand side of your page. You can use the search function to quickly find the Brand Kit option. If you have multiple brand kits, select the appropriate one for the fonts you wish to upload.
Step 3: Access the ‘Upload Fonts’ Feature
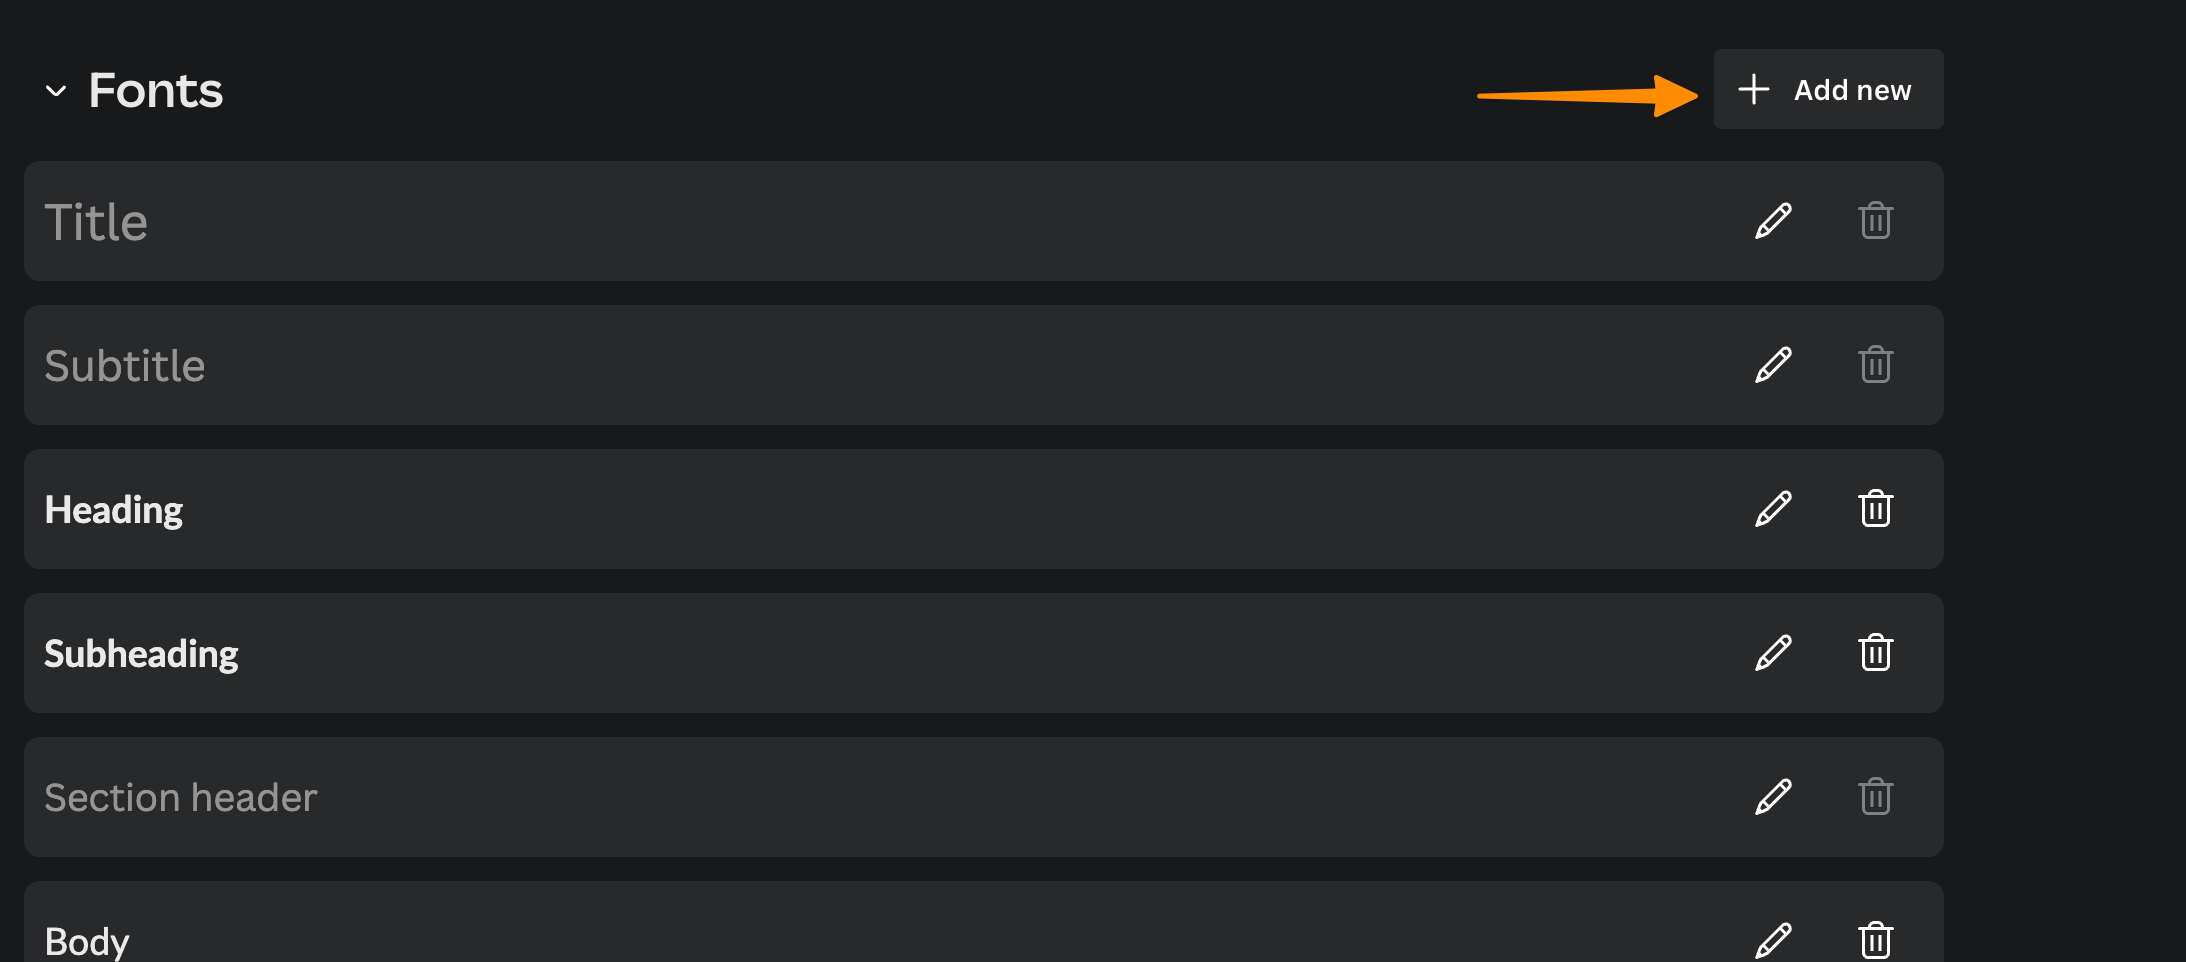
In your chosen Brand Kit, scroll down to find the “Upload Fonts” option. This feature allows Canva Pro users to upload their custom fonts to Canva’s font library. Uploading fonts enhances the uniqueness of designs and helps in achieving specific branding goals, particularly for both novice and professional designers.
Step 4: Initiate the Font Upload Process
Click on the ‘Upload a font’ button. Note that this feature is not available with Canva’s free version.
Step 5: Choose the Font File to Upload
You’ll be prompted to select the font file from your computer or mobile device. Ensure that your font file is in the correct format – either OTF, TTF, or WOFF. Unfortunately, Canva does not support the upload of zip format files.
Step 6: Confirm the Font Upload
Once you’ve selected the appropriate font file, simply click ‘Open’. Canva will then upload the font file to your Brand Kit.
Step 7: Apply Your Font to Your Designs
After uploading, your custom font should be readily available in the font dropdown menu. You can now apply your newly uploaded font to any of your designs.
With these steps, you can conveniently upload your own fonts to Canva using the Brand Kit. This feature not only simplifies the design process but also ensures brand consistency across all your designs.
Best Practices when Adding Fonts to Canva
To ensure a seamless process when adding custom fonts to Canva, we recommend following these best practices:
Use high-quality fonts that are legible and visually appealing.
When choosing a new font to add to Canva, always test it out first using the “preview”
Avoid using too many different fonts in one design. Stick to two or three maximum for a more cohesive look.
When it comes to design, fancier is not always better. Ensure that your custom font is legible and easy to read.
Test your font on multiple devices and screens to ensure consistency in display.
If you’re using Canva for your brand’s designs, upload your brand fonts to maintain consistency and reinforce your brand identity.
Manage text layout options effectively by including headings, subheadings, and body text to create a well-structured and visually appealing design.
Conclusion
In conclusion, understanding how to add fonts to Canva breathes new life into your designs, elevating their appeal and distinctiveness. While the process requires some technical know-how, the payoff in terms of design diversity and uniqueness is well worth the effort. Remember, the key to impactful design lies in the details and the fonts you utilize can make a significant difference.
Test your knowledge
Take a quick 5-question quiz based on this page.

