Deleting a Facebook page can feel overwhelming, but Facebook offers a straightforward process to help users manage their pages with ease. Whether you want to delete a Facebook page permanently or deactivate it temporarily, understanding the steps is key.
Through the Facebook app or browser, you can access the necessary settings to control your account. From selecting the proper options in the menu to confirming your decision, the process can be completed in just a few steps.
This guide will walk you through how to delete your Facebook page, providing additional information on reactivation, cancellation, and data management to ensure you stay in control of your Facebook profile.
Deleting a Facebook Page on Desktop
To delete a Facebook page on desktop, follow these clear and simple steps. Whether you wish to deactivate temporarily or permanently delete a Facebook page, these instructions will guide you through the process. Note that you will need access to the account managing the page and your Facebook password to proceed.
Log in to your Facebook Account
Start by logging into your Facebook account via your browser. Use your email or phone number and password to access your account.
Select Your Page

On the left-hand side of the Facebook homepage, you’ll see a list of pages you manage. Select the page you want to delete from the options provided.
Switch to the Page
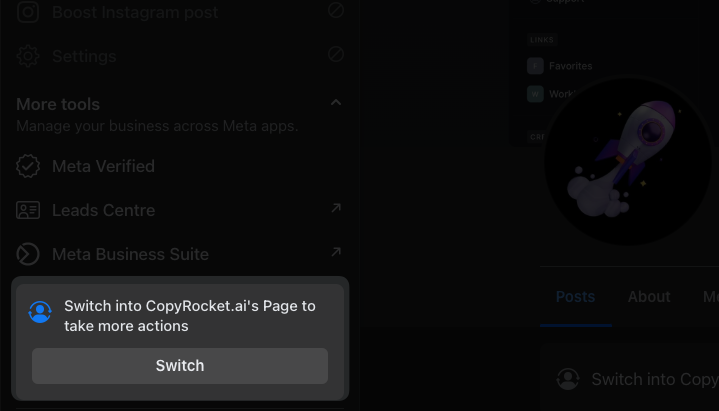
Once you’ve selected your page, you’ll need to switch into page mode. Click the switch button on the left panel to ensure that you are operating as the page.
Access Settings
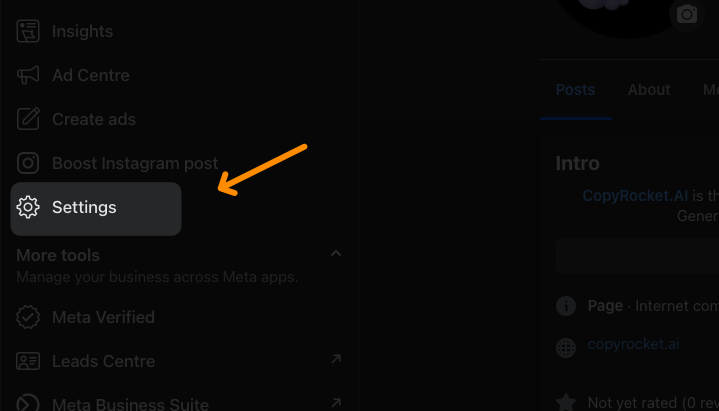
Navigate to the top right of the page. Click on the menu button (three horizontal dots) or the dropdown menu to find and select the “Settings & Privacy” option, then choose “Settings.”
Scroll to “Access and Control”

In the settings menu, navigate to the page settings section and locate the “Access and Control” option.
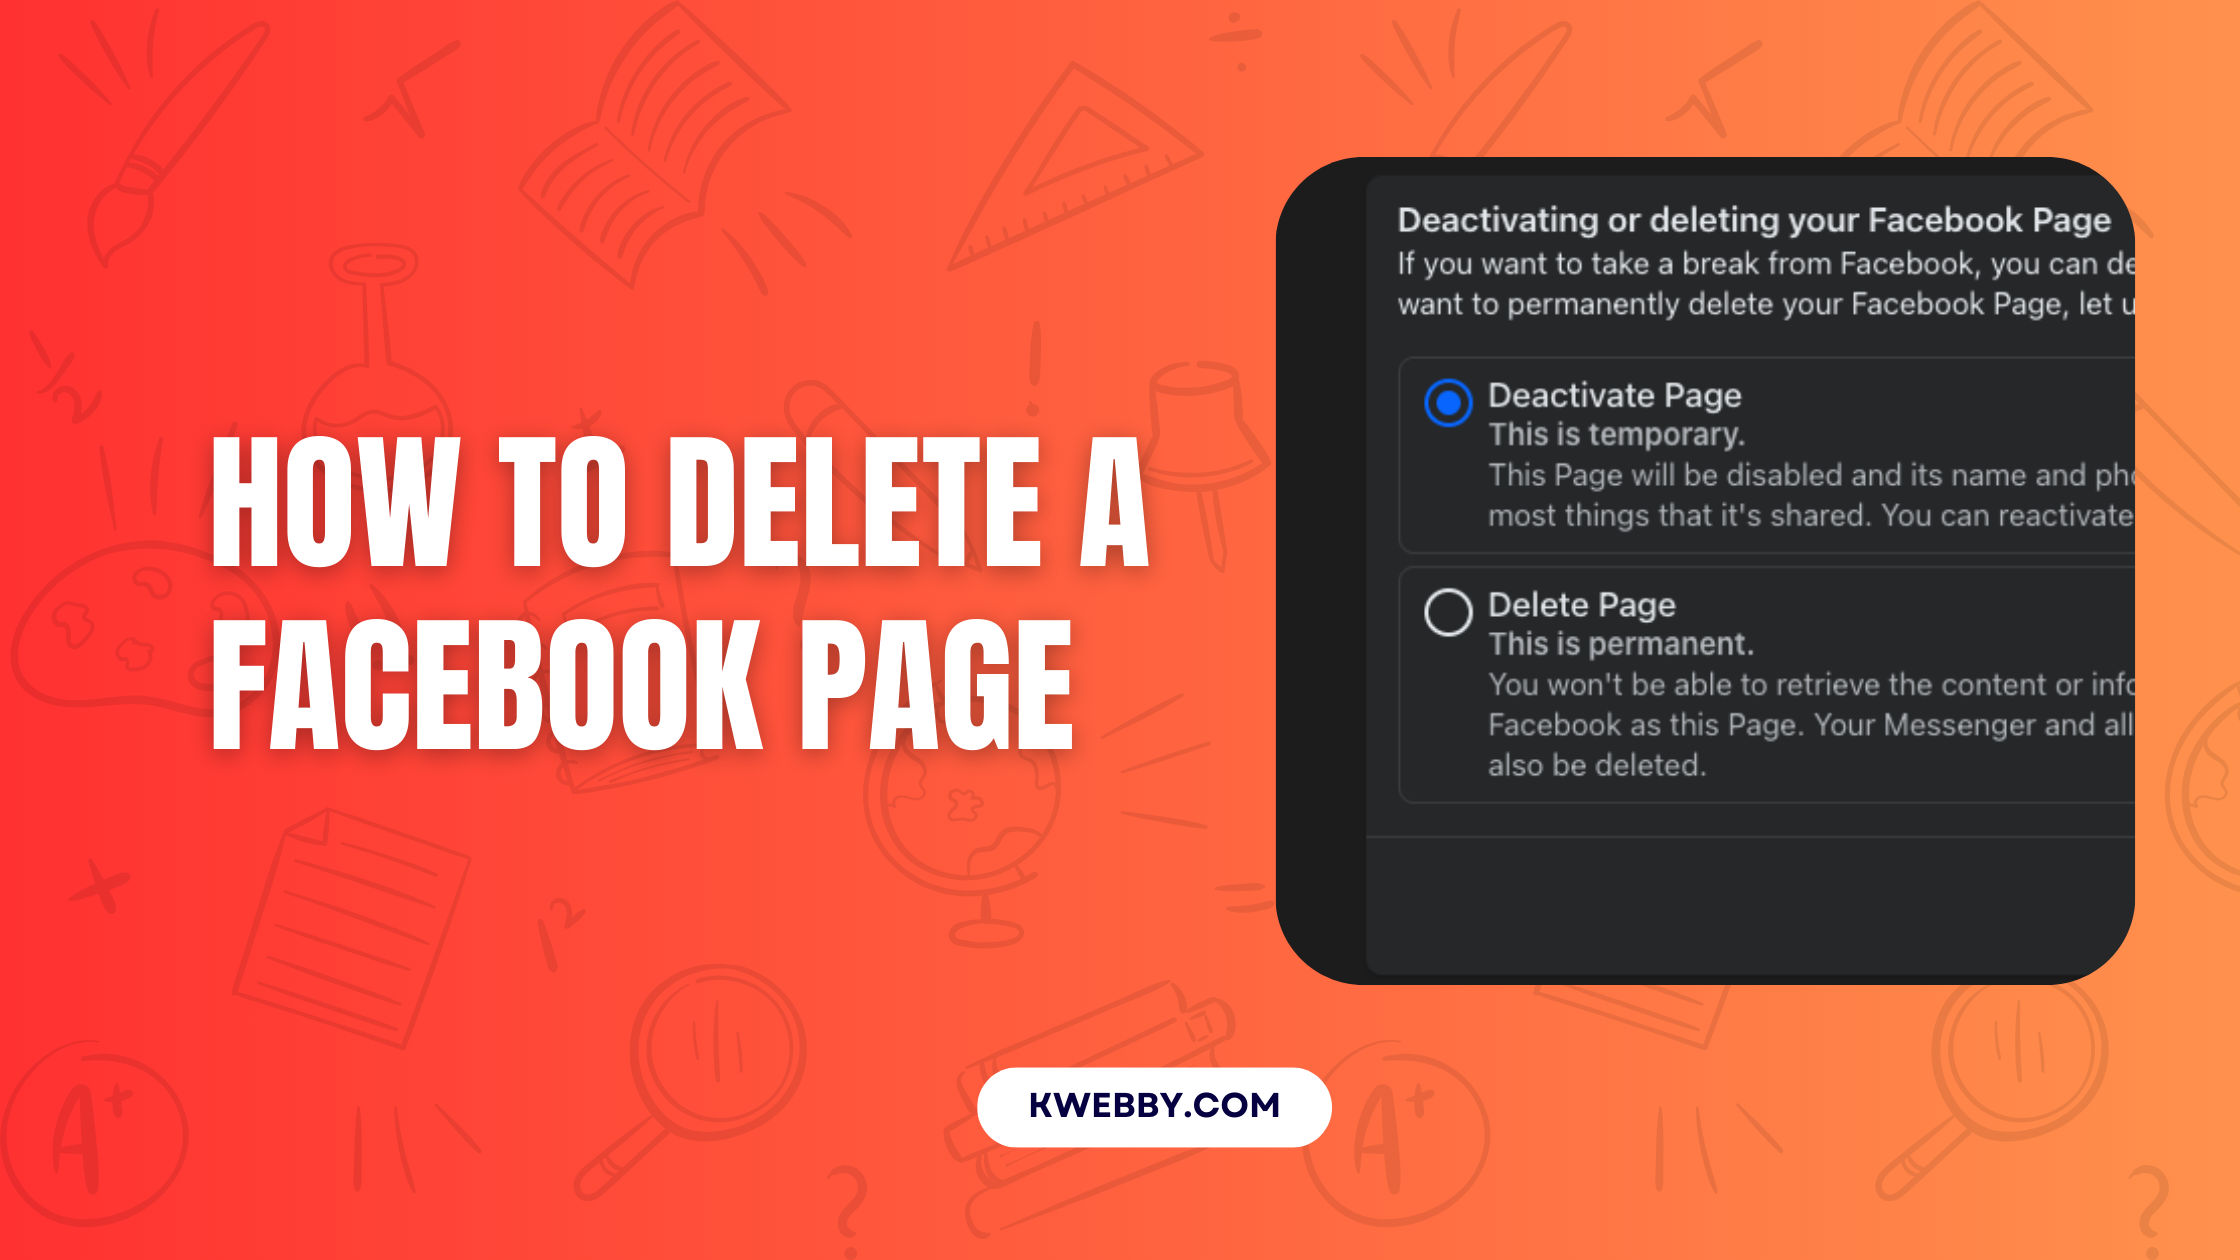
Choose Between Deactivation or Deletion
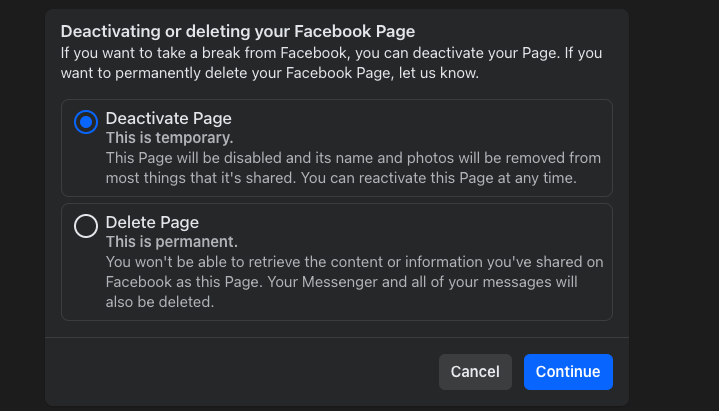
Under the “Access and Control” option, you will be presented with two choices:
Deactivate Page – This is a temporary option that makes your page invisible to users but allows you to reactivate it later.
Permanently Delete Page – This will completely delete your page. Note that deleted pages cannot be restored after the cancellation period.
Select Your Preferred Option
Depending on your choice, click “Deactivate” or “Delete.” Make sure to review any additional information or options provided.
Confirm and Continue
Facebook will guide you through a final confirmation process. Enter your Facebook password if prompted, and click “Continue” to finalize your decision.
Cancel Deletion (Optional)
If you choose to delete your page permanently but change your mind within the grace period, you can cancel the deletion by logging into your account, accessing the page, and clicking “Cancel Deletion.”
By following these steps, you can effectively manage your Facebook page, ensuring it aligns with your current needs.
Whether you deactivate or delete your page, the process can be completed in just a few clicks. Take control of your Facebook profile and make changes easily with these actionable instructions.
Deleting a Facebook Page on Mobile (App)
Deleting a Facebook page using the mobile app is a straightforward process and can be done quickly with just a few steps. Follow the instructions below to manage your Facebook page on the Facebook app.
Open the Facebook App
Launch the Facebook app on your Android or iPhone device and ensure you’re logged into your account.
Switch to the Page You Want to Delete
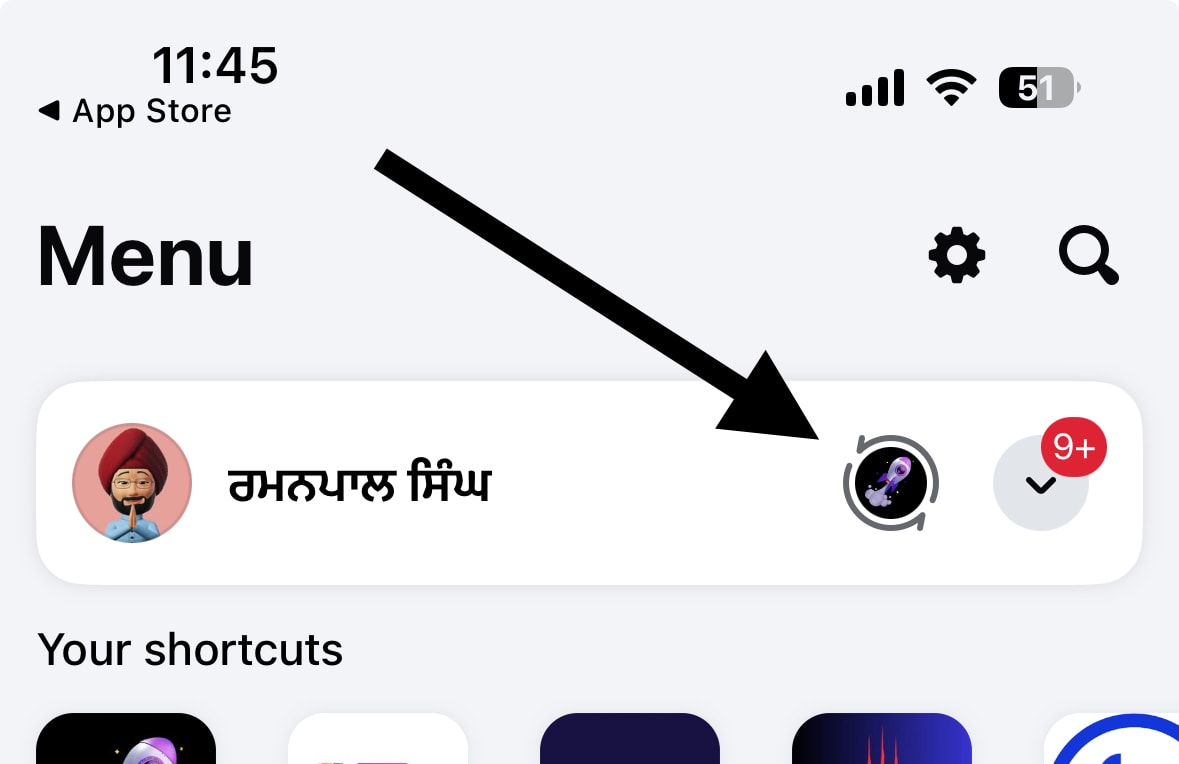
Navigate to your Facebook profile and use the switch option to access the page you wish to delete. This can be found in the dropdown menu near the top.
Go to the Page’s Profile
Once you’ve switched to the correct page, visit its profile page.
Tap on the Settings Icon
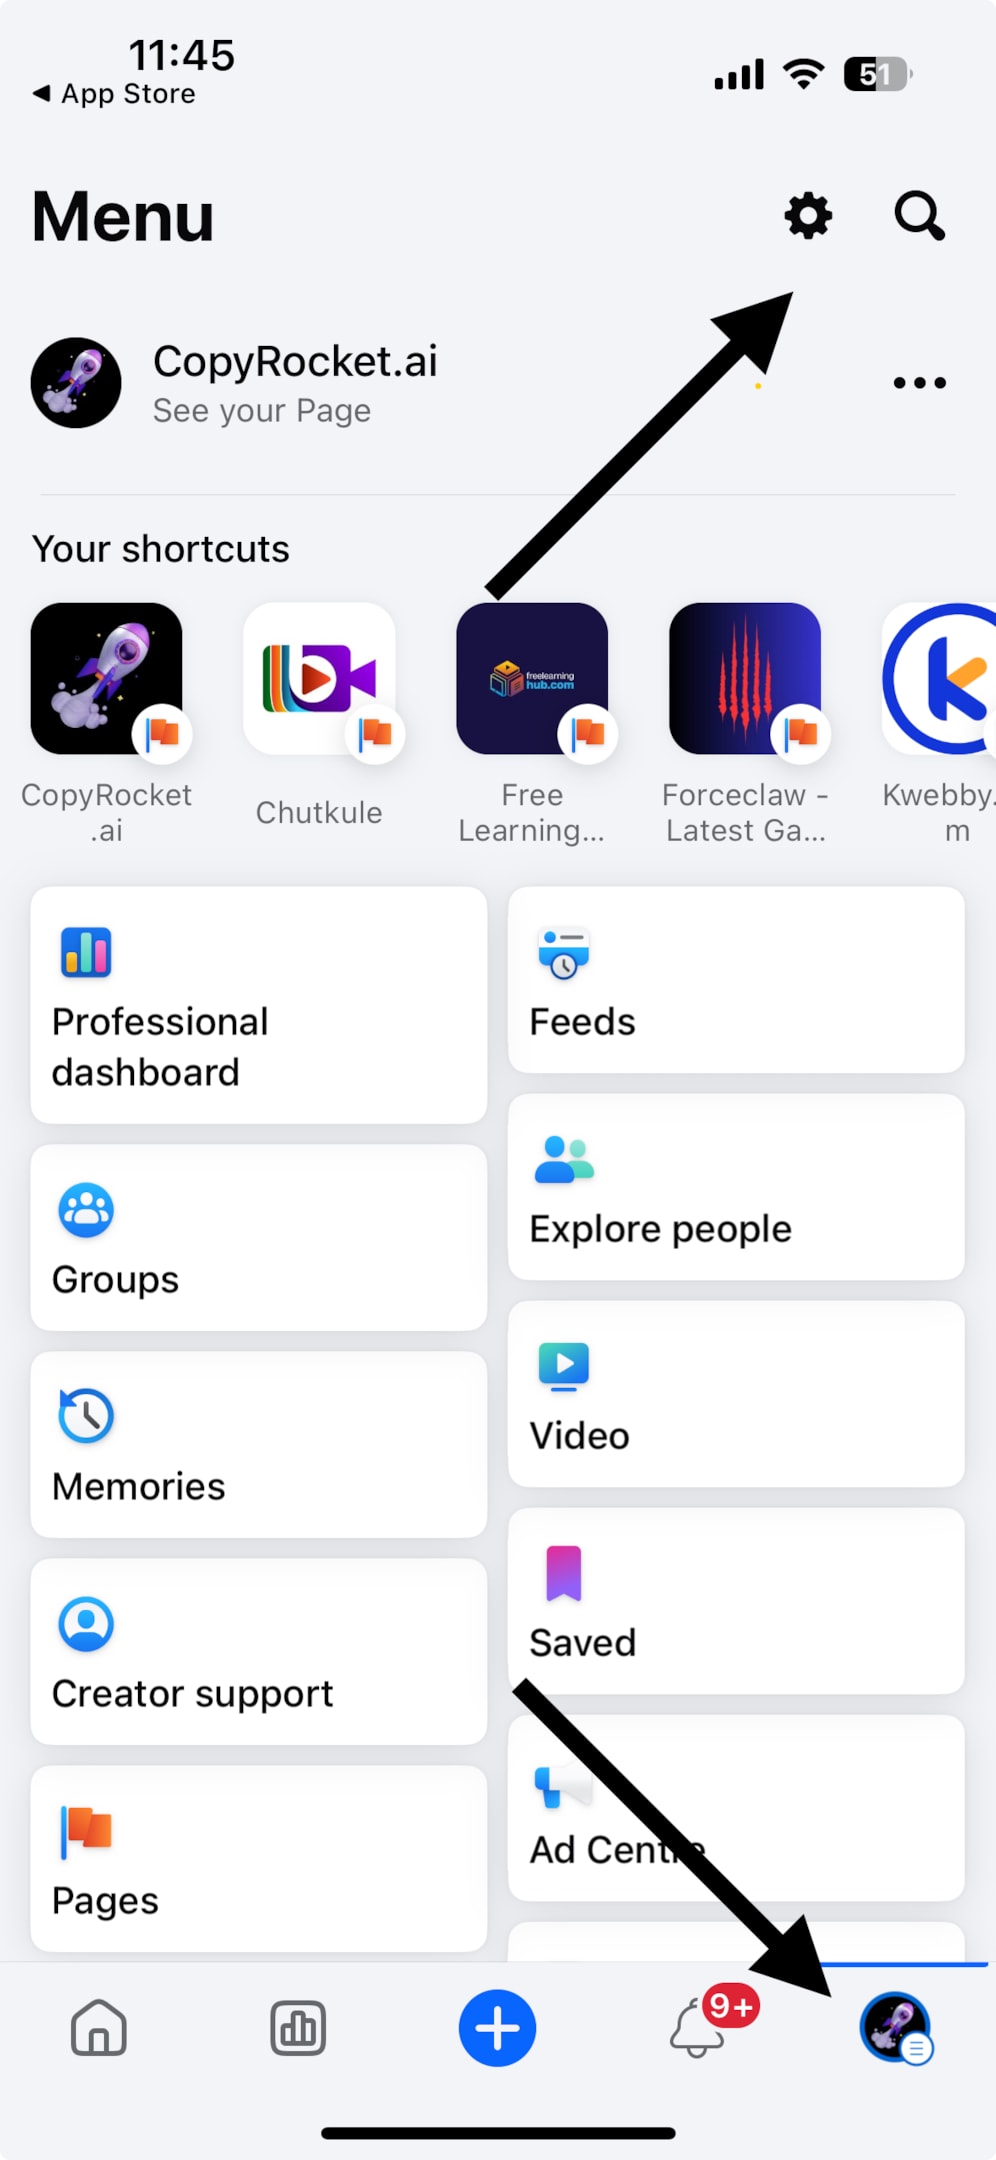
Look for the settings icon located at the top-right corner of the page and tap on it.
Scroll Down to Access and Control
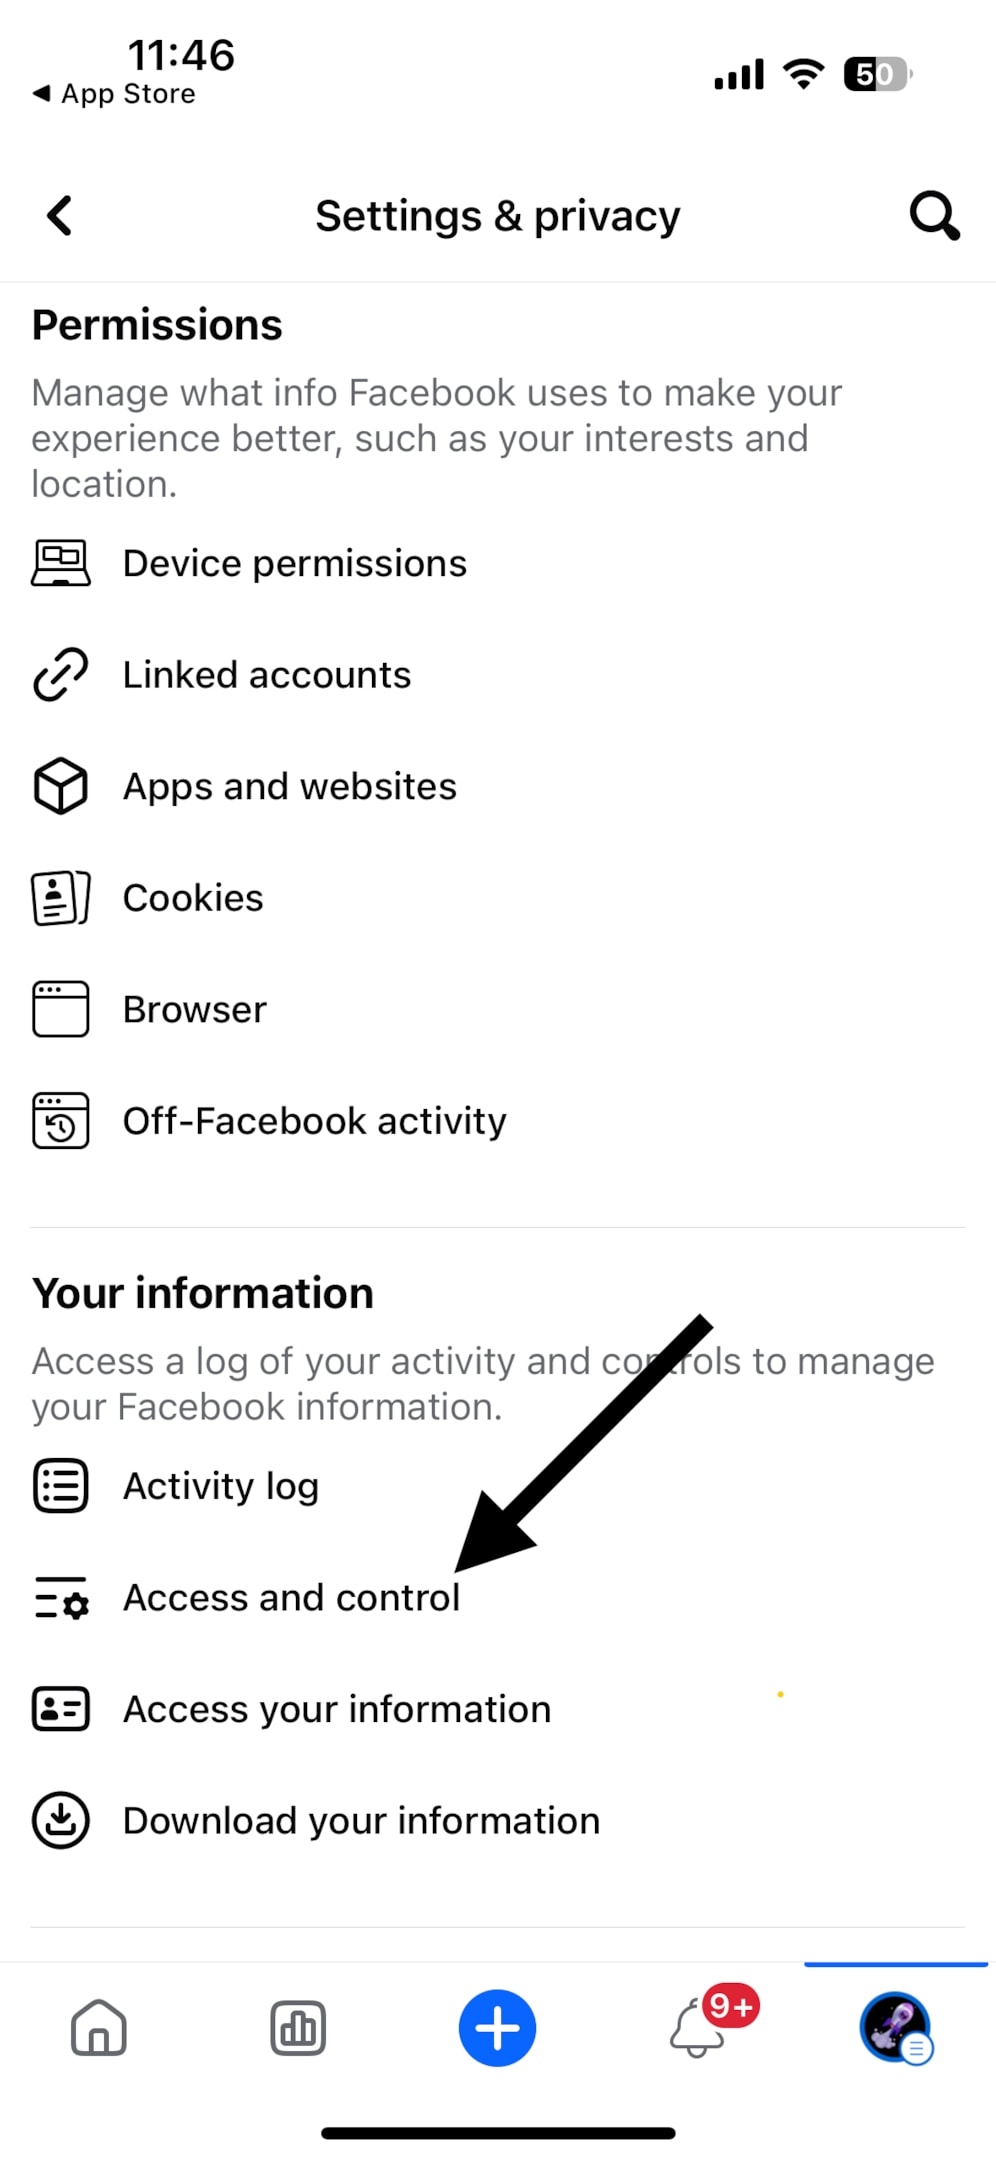
In the settings menu, navigate down to the “Access and Control” option and select it to continue.
Choose Deactivate or Delete
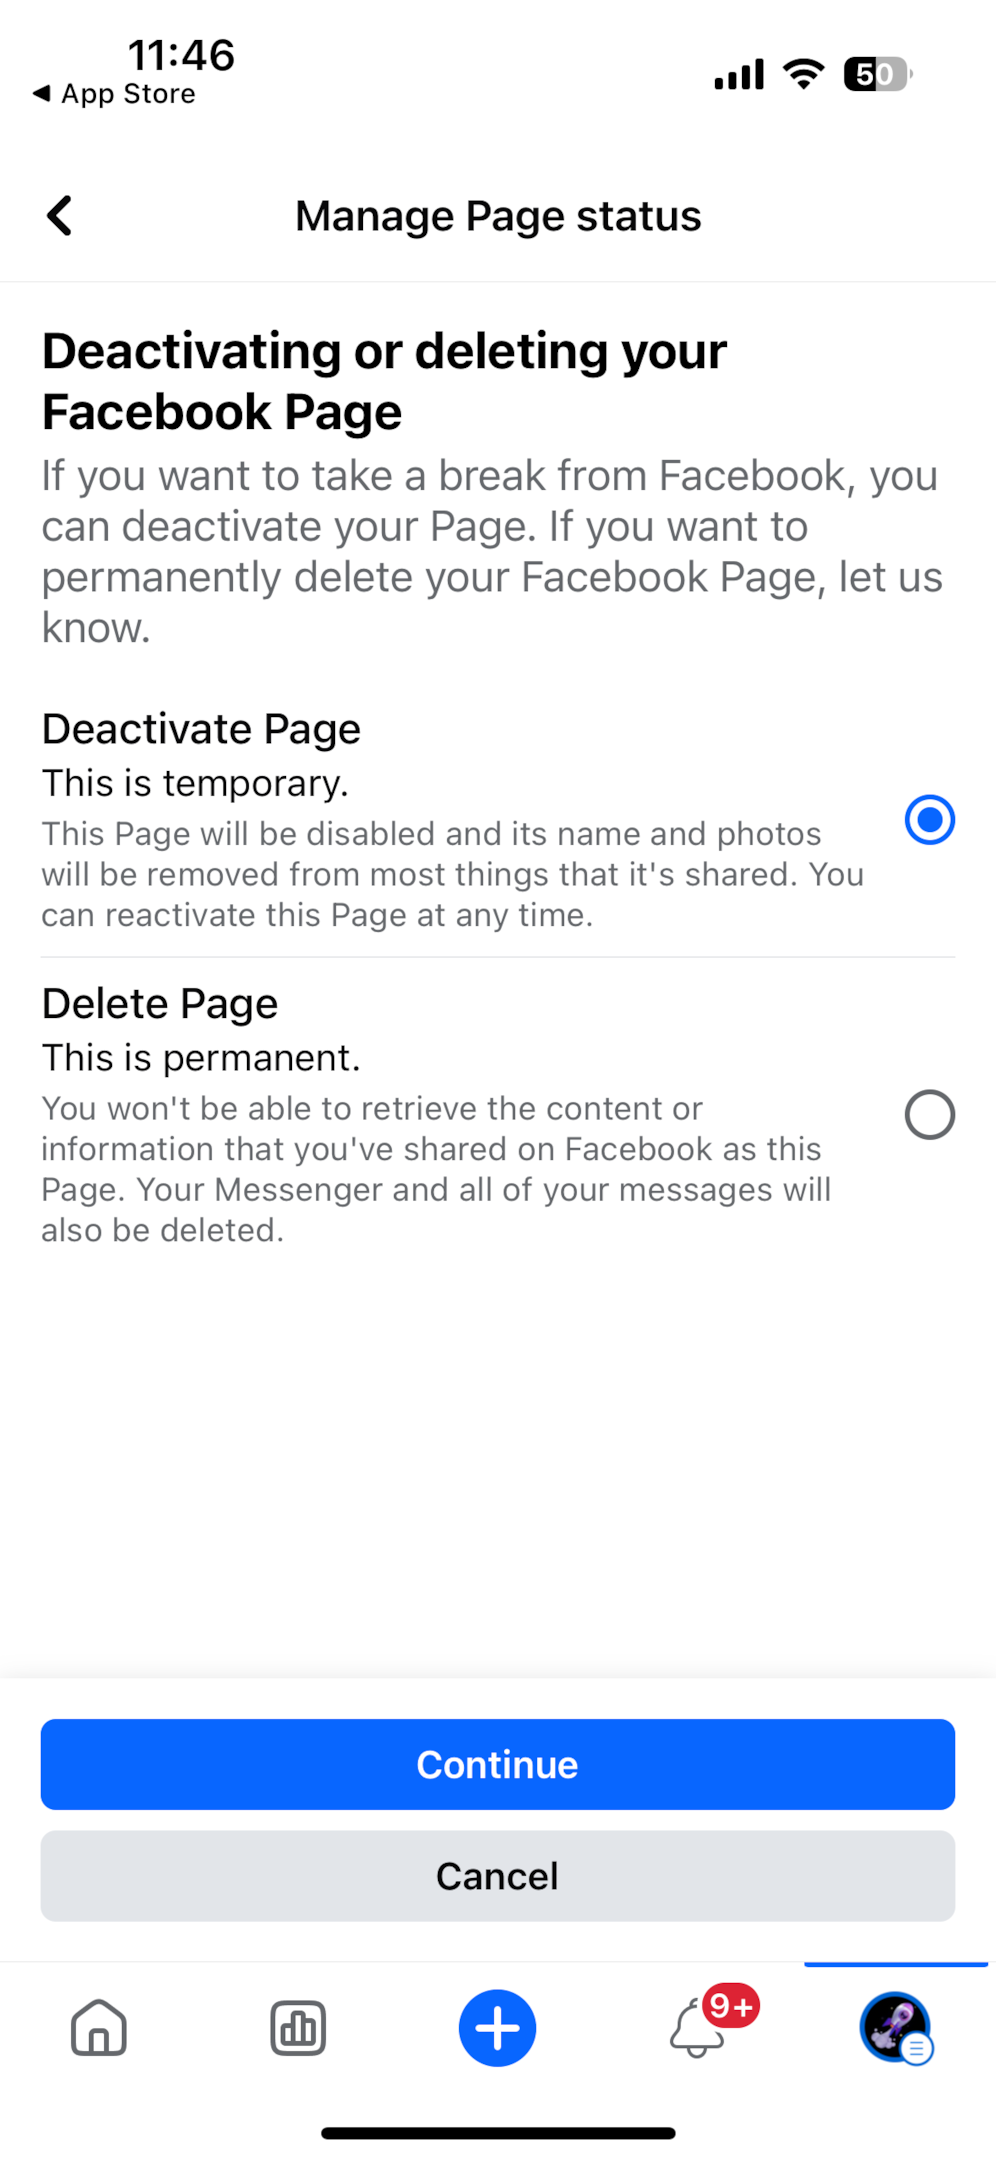
Facebook offers two options here:
Deactivate: Temporarily deactivate your page, making it hidden but allowing you to reactivate it later.
Delete: Permanently delete the page, making it inaccessible after the deletion process completes.
Confirm Your Decision
After selecting your preferred option, you may need to enter your Facebook password. Follow the prompts, tap on “Continue,” and confirm your decision to either deactivate or delete the page.
Additional Notes:
If you choose to delete your page permanently, remember that Facebook provides a grace period where you can cancel deletion by logging back in, navigating to the page, and selecting “Cancel Deletion.”
Ensure you’ve reviewed any important page data or downloaded what you need before proceeding, as deleted pages cannot be restored after the grace period.
This process allows users to take control of their pages, whether looking to temporarily hide them or permanently delete them. From accessing settings and managing pages to confirming deletions, the Facebook app provides a seamless way to make changes.
What Should You Do – Deactivate or Delete?
Deciding whether to deactivate or permanently delete a Facebook page depends on your specific needs and circumstances. Both options have unique advantages and challenges that can affect your online presence and personal goals.
Deactivating a Page
Deactivation is a temporary solution ideal for scenarios where you want to step back without permanently losing control of your page.
For instance, if you’re on vacation or reevaluating your social media strategy, you can use the Facebook app to tap settings and deactivate your page. Your page will no longer be visible to users, and any ads or scheduled posts will be paused.
Additionally, this process allows you to maintain your page’s data and videos without needing to download anything.
Later, you can easily click reactivate in the Facebook settings to restore your page and resume activity. However, keep in mind that while deactivated, your audience may lose engagement and traffic may shift to competitors.
Permanently Deleting a Page
On the other hand, deleting a Facebook page is the best choice if you’re ready to remove it entirely.
For example, if a business has closed or a project is no longer relevant, deleting ensures it is no longer searchable and eliminates any outdated links associated with your brand.
By selecting delete from the dropdown menu in the settings privacy options, you can delete your Facebook page quickly.
Although you can cancel deletion within a grace period by logging back in, once finalized, this step is irreversible. Before you proceed, it’s recommended to review and download any essential data or videos you may need. The challenge here lies in the loss of all accumulated comments, likes, and Facebook profile insights, which could be useful for future analysis.
Choosing Wisely
Facebook offers both deactivation and deletion to ensure your preferences and control remain intact.
Evaluate your goals and what aligns best with your brand or personal needs. Whether you’re using an iPhone or Android, simply scroll through the menu button to access your settings and make the appropriate adjustments.
Whether you tap deactivation or select delete, ensure you confirm your decision carefully.
Both options put you in charge of your page’s visibility and future.
Facebook provides helpful tools, like the log and manage options, to make this process seamless, whether you’re using a computer or browser. Always consider additional information available on the site to make an informed choice.
Frequently Asked Questions (FAQs)
How can I delete a Facebook page permanently?
To permanently delete a Facebook page, open the Facebook app or use a browser on your computer. Navigate to the top-right menu button and tap settings or click settings under your account. From there, select your Facebook information or access the page settings to find the delete page option. After confirming your Facebook password, tap continue or click continue to finalize the page deletion. Note that you have 14 days to cancel deletion if you change your mind.
Can I reactivate or cancel a deleted Facebook page?
Yes, Facebook offers the option to reactivate your Facebook page during the 14-day cancellation period. Simply log in to your account, access the dropdown menu, and click reactivate under the page settings. If the deletion window has passed, the page and its data will no longer be retrievable.
How do I deactivate a Facebook page instead of deleting it?
To deactivate a Facebook page, go to the Facebook settings by scrolling through the menu button on your iPhone or Android device or using a computer. Tap deactivation under the settings privacy options and confirm your Facebook profile password. Deactivation hides the page temporarily, making it invisible to users, but you can reactivate it anytime by logging back into your account.
Final Thoughts!
Deleting or deactivating your Facebook page is a big decision, but the process is simple. Go to Facebook settings via the app or browser to access deletion or deactivation options. You can cancel deletion within 14 days by logging back in and reactivating the page. Be sure to confirm your password and download any data you need. Properly managing your Facebook pages ensures better control over visibility, ads, and other features. Check the settings section for more details.
Test your knowledge
Take a quick 5-question quiz based on this page.

