Parental controls in Windows acts as a safety net for your children. It restricts harmful web content from reaching the kids and also limits their screen time. Parents can increase their child’s safety by adjusting the Microsoft parental controls based on age and interests.
to set up parental controls follow the steps below:
- First sign into your own Microsoft account.
- Create a child account. To do this, navigate to Windows Settings, then select accounts from left and select Family.
- Click Add someone and then click on “create one for a child”;
- It’s crucial to accurately enter your child’s email address during the Microsoft account setup process for your kid. This step is essential for creating or adding a Microsoft Account for the child, ensuring they can complete the account setup and access their new account.
- After creating a kid account, your child will receive an email asking them to accept your invitation.
- To configure parental restrictions, click Manage Family Settings Online.
All parental control settings are disabled by default. Enable each function individually and customize your settings. You can monitor your online activities, screen time, app and game usage, content restrictions, and spending.
Let’s understand each of these steps in detail.
How to find your Saved WiFi password Easy on Windows 11?
Add your child to your family group
Open the Windows Start Menu
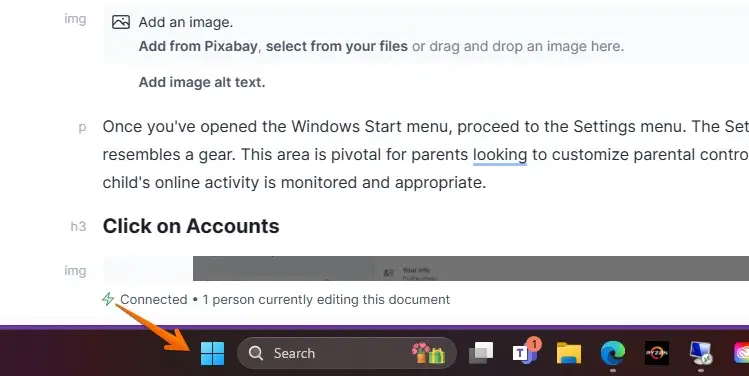
To begin setting up parental controls on Windows, open the Windows Start menu. This can be done by clicking the Windows icon located at the bottom left corner of your screen.
Navigate to Settings
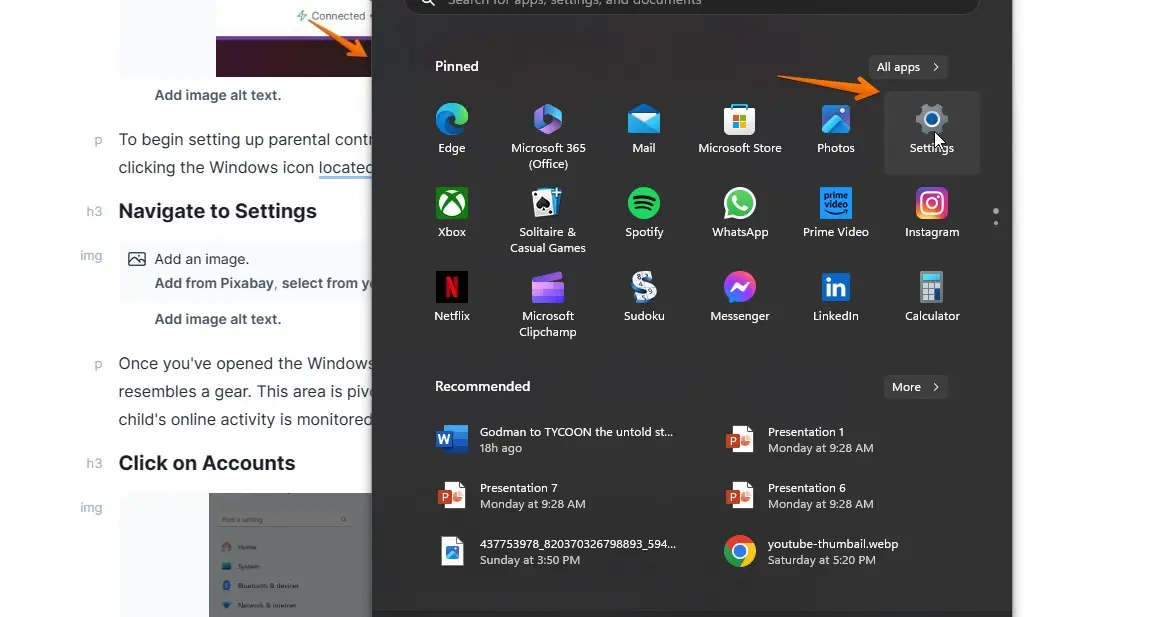
Once you’ve opened the Windows Start menu, proceed to the Settings menu. The Settings icon usually resembles a gear. This area is pivotal for parents looking to customize parental controls, ensuring their child’s online activity is monitored and appropriate.
Click on Accounts
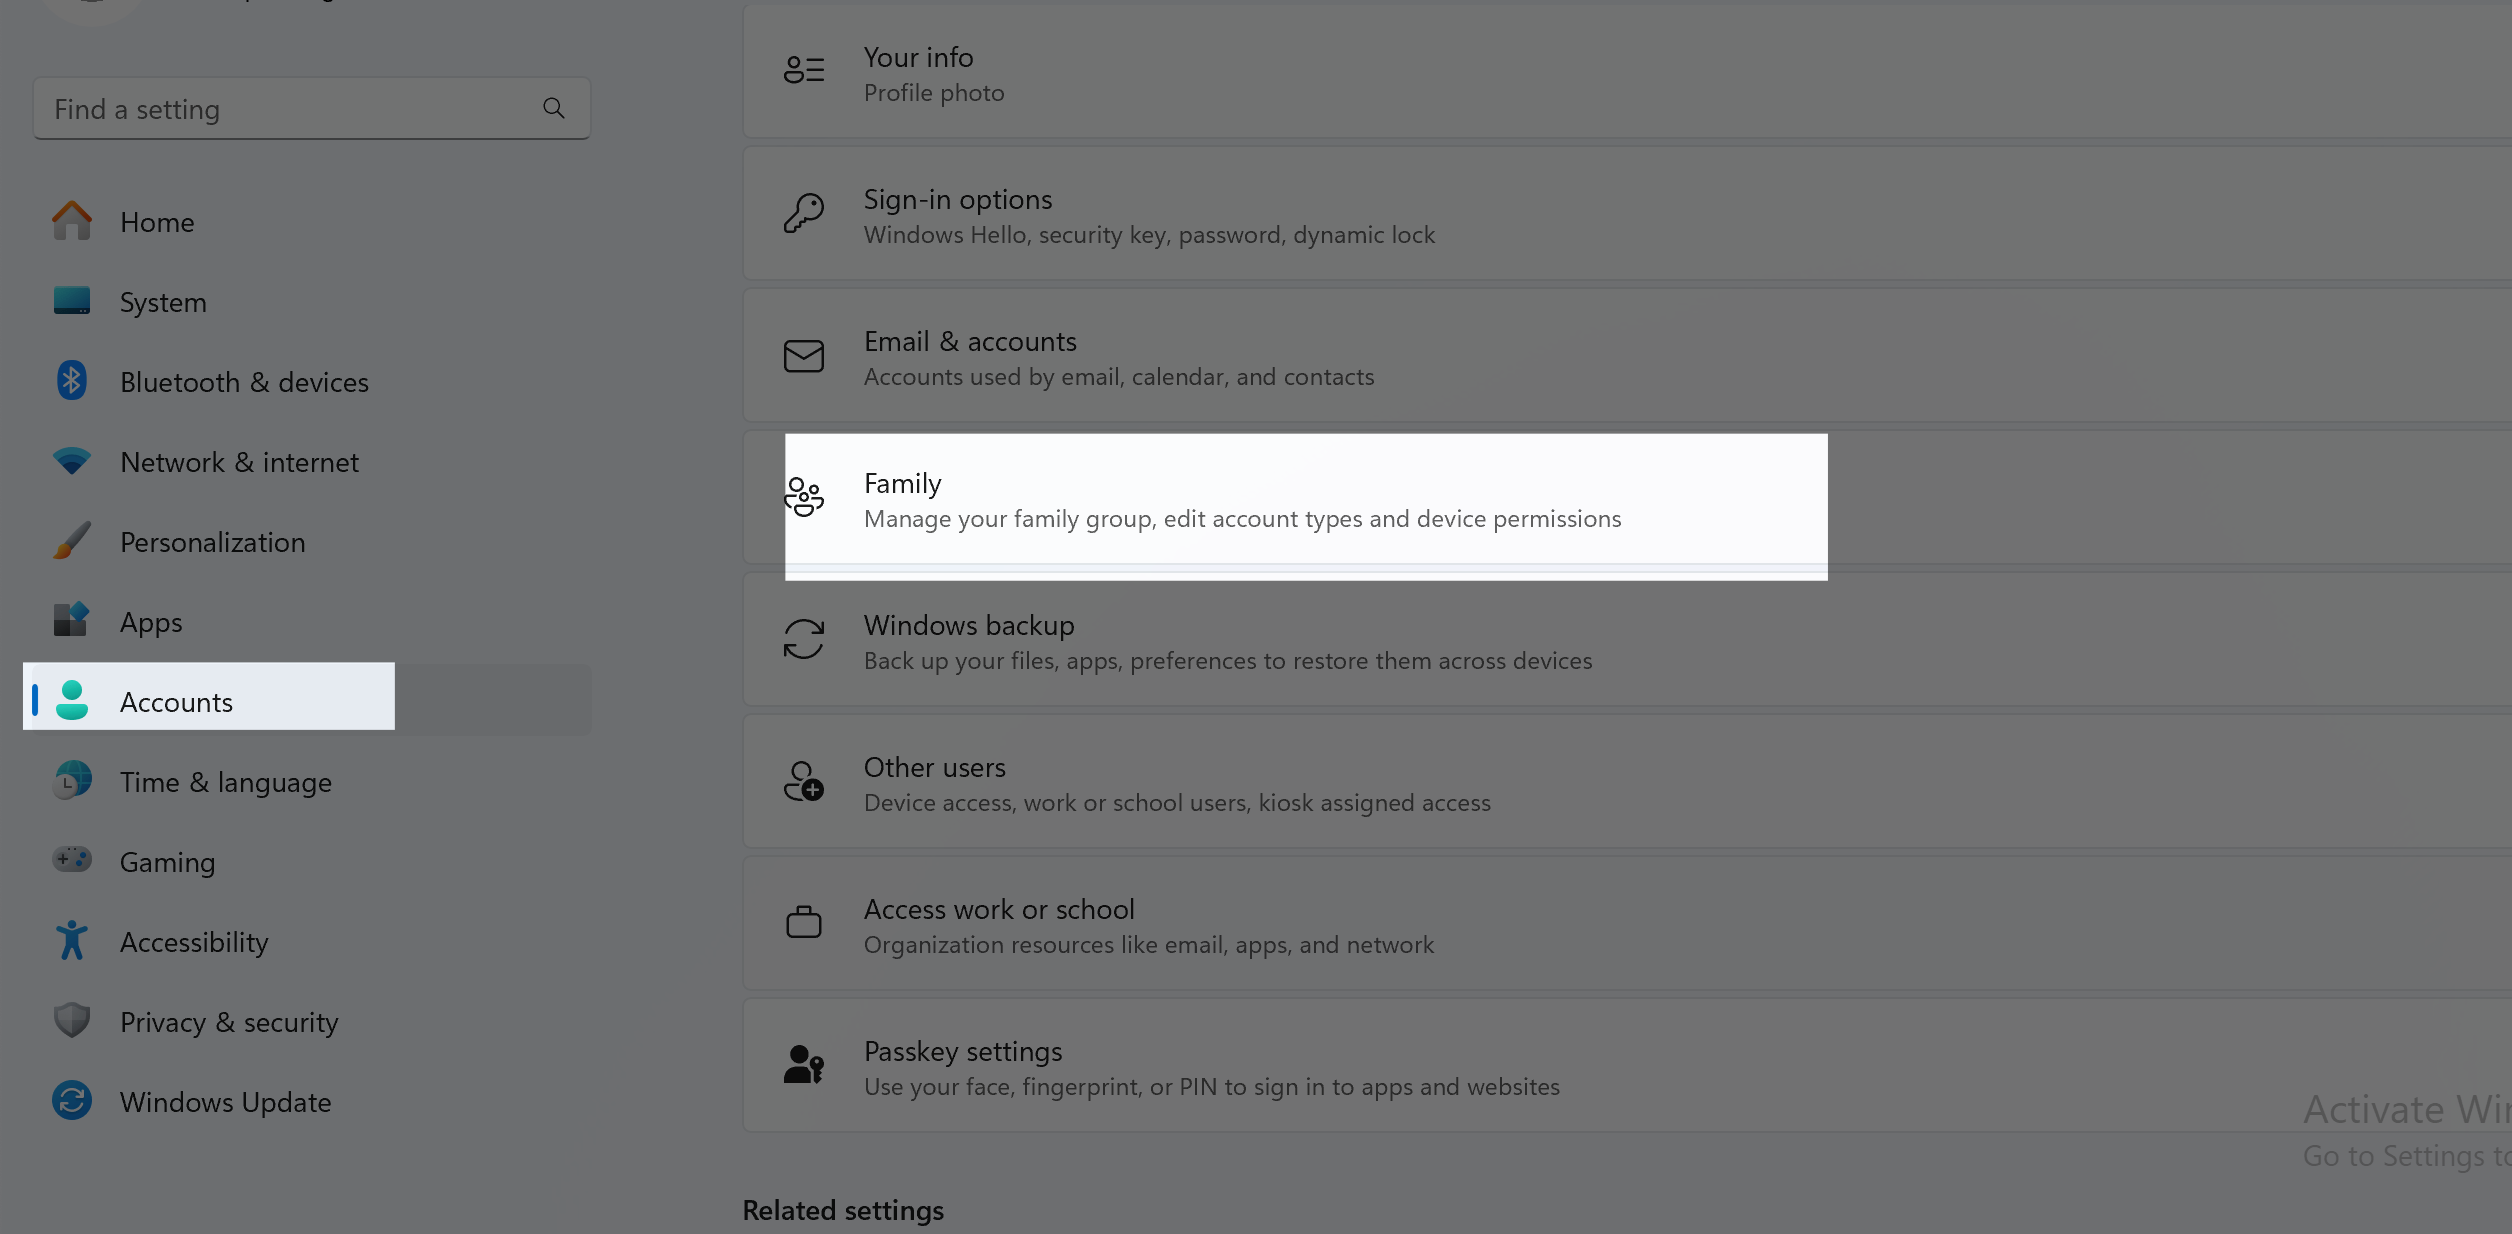
After opening the Settings menu, select the “Accounts” option. This section allows you to manage all user accounts associated with your Windows 10 device.
Select Family & Other Users
In the Accounts settings, you will find the “Family & other users” section. Click on this to proceed.
Add a Family Member
Click on “Add someone” to start the setup process. You will be given the option to add a child or an adult. Since you are looking to set up parental controls, choose to add a child account.
Enter Your Child’s Microsoft Account Email
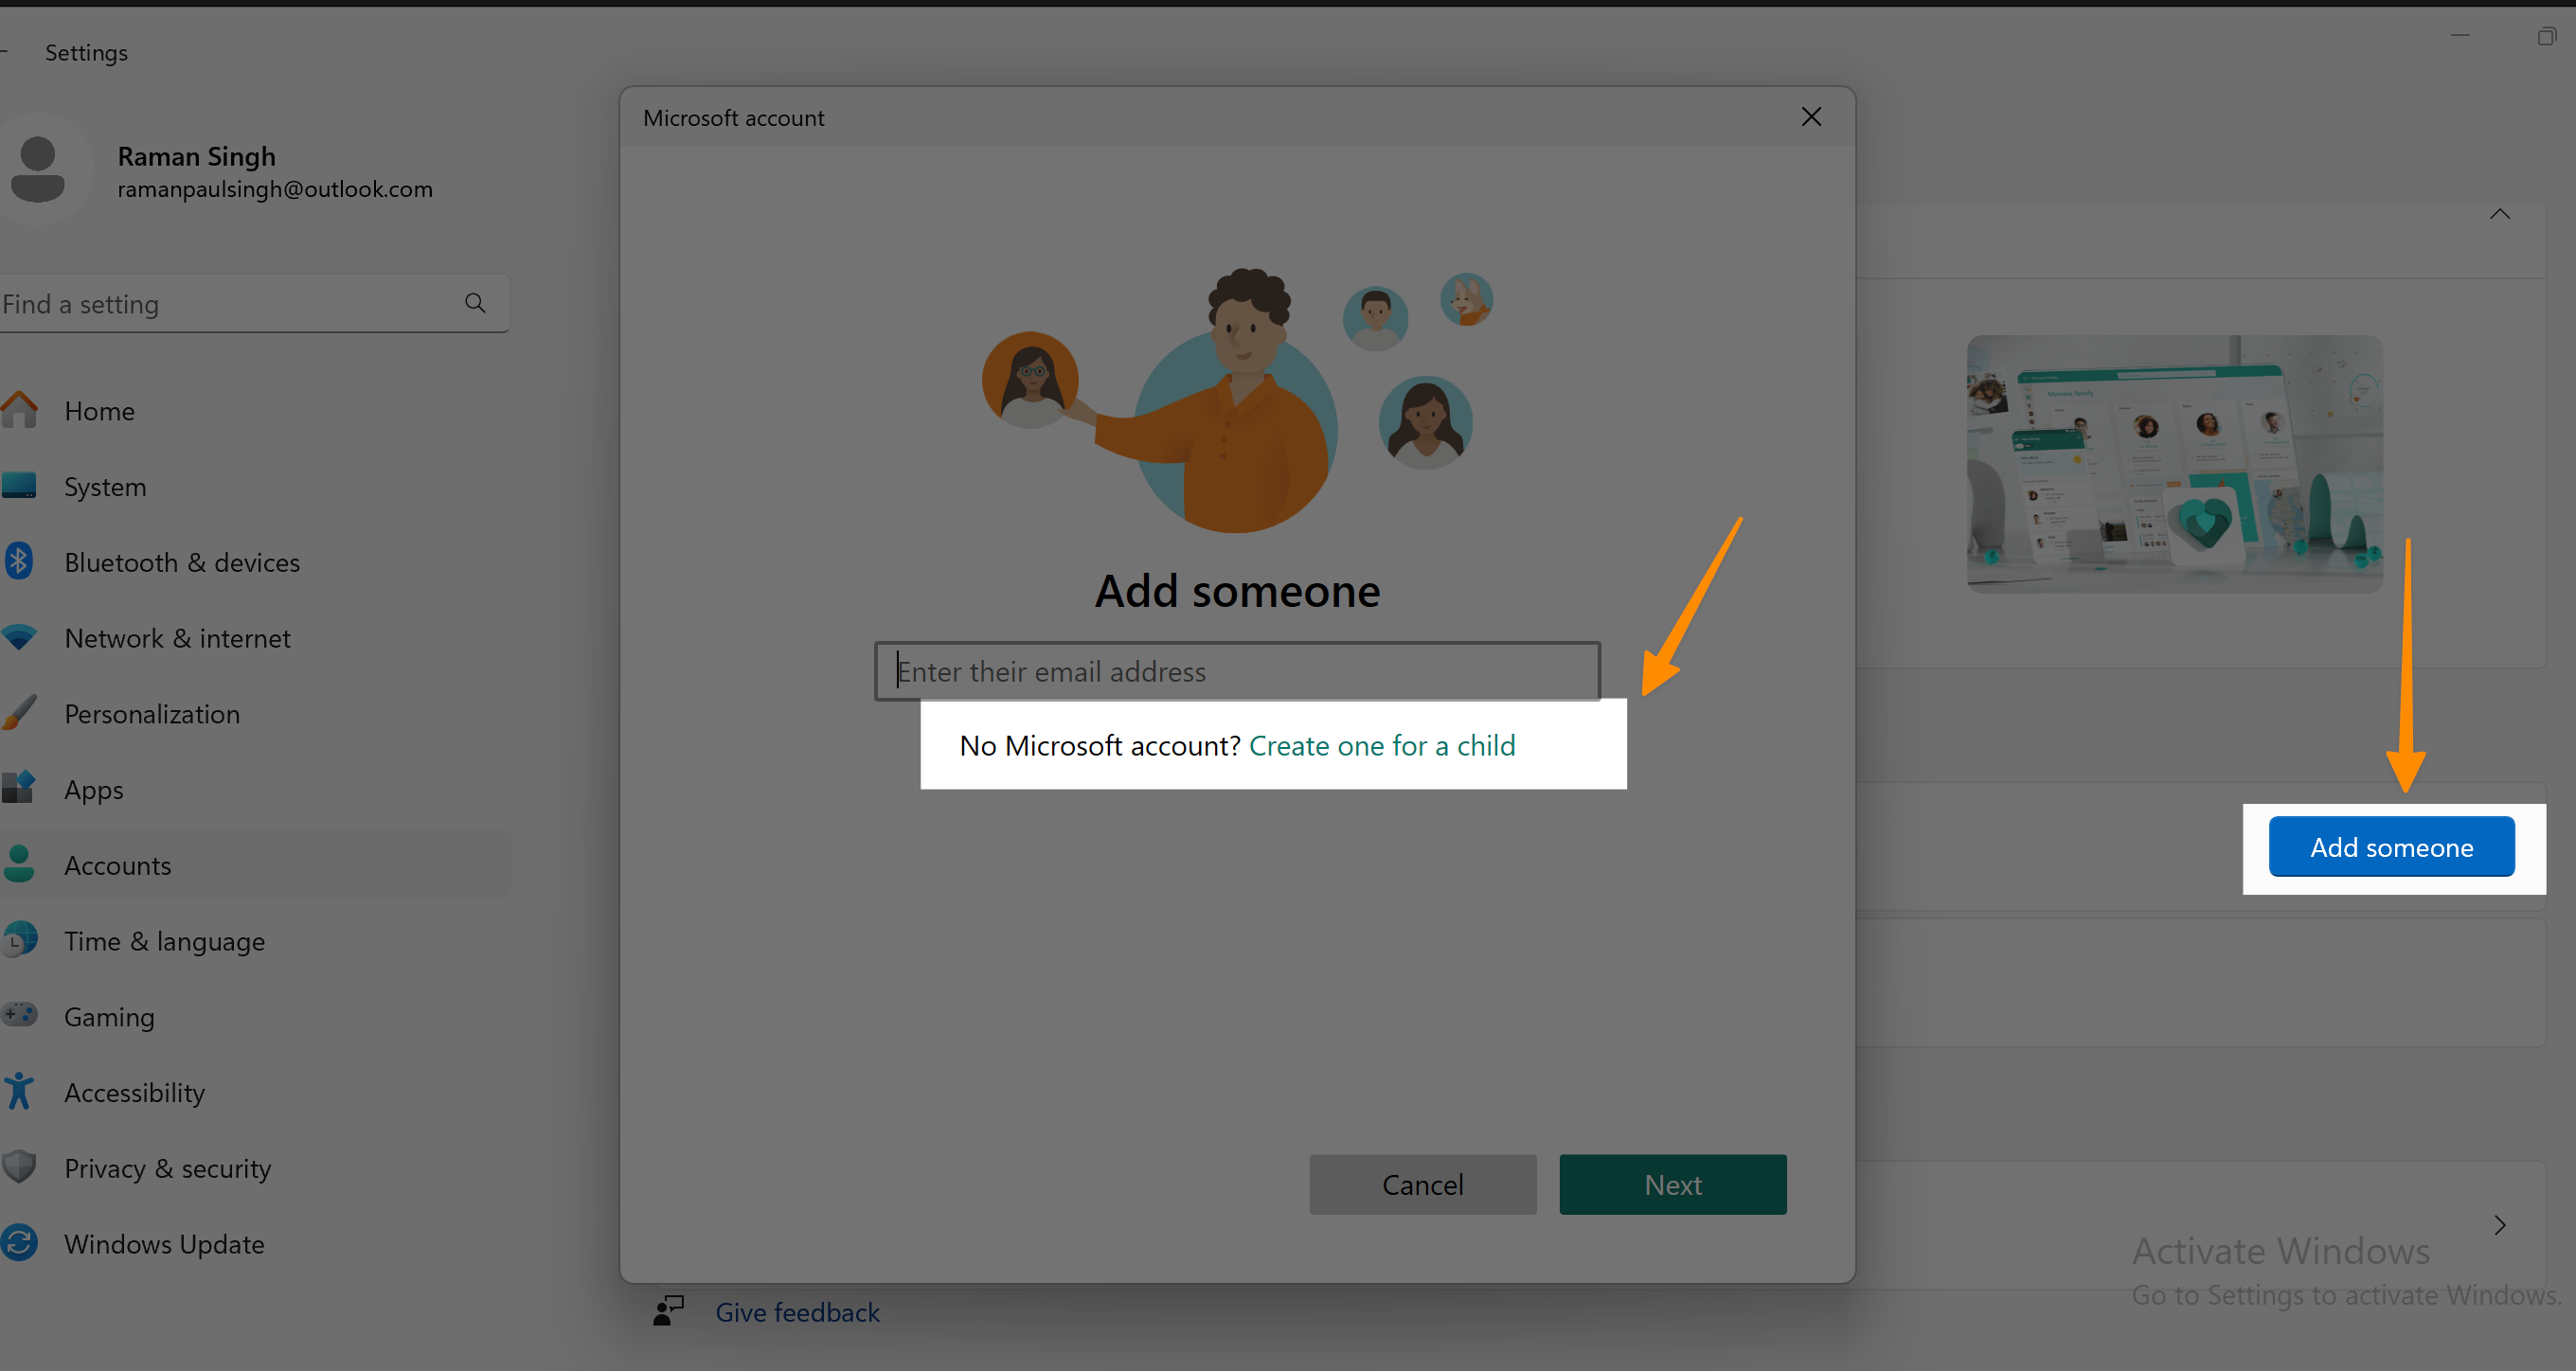
If your child already has a Microsoft account, enter their email address in the field provided. Doing so will link their account to the family group, allowing you to monitor their online activities, enforce time limits, and block inappropriate websites or apps directly from the family safety settings.
Creating a Microsoft account for your child
If your child does not already have a Microsoft account, you can easily create one during the process of adding a family member. Follow the steps outlined below to ensure a smooth setup:
Click on “Create one for a child”
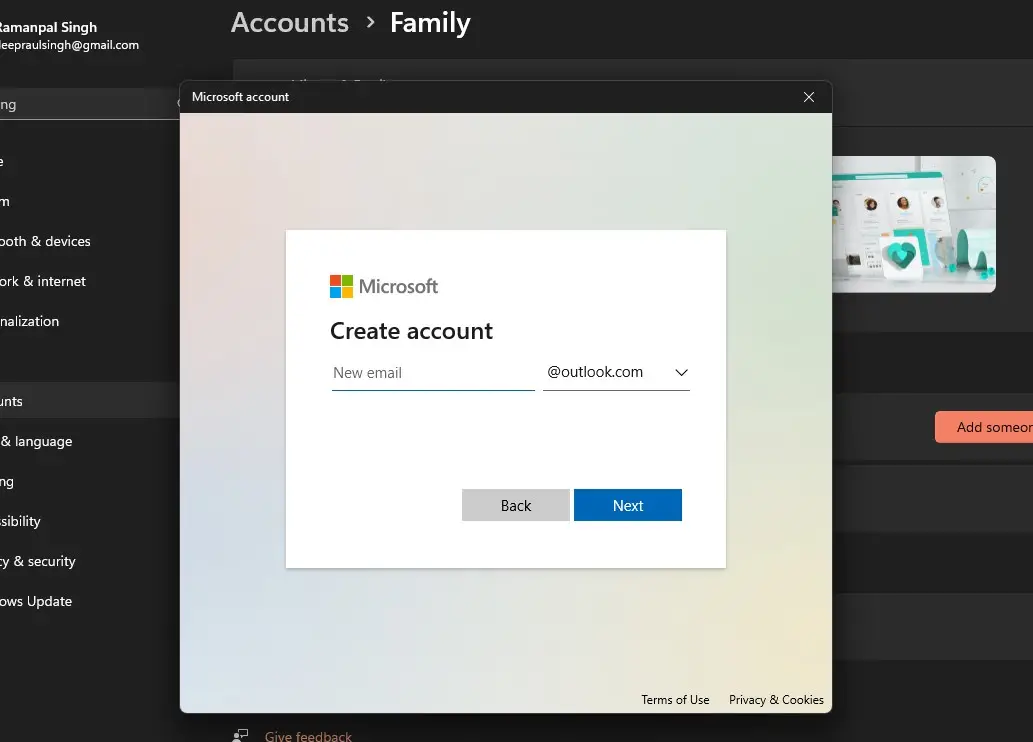
In the “Add a family member” section, after choosing to add a child account, you’ll see an option to create a Microsoft account for your child if they don’t have one. Select “Create one for a child.”
Enter a New Email Address for Your Child
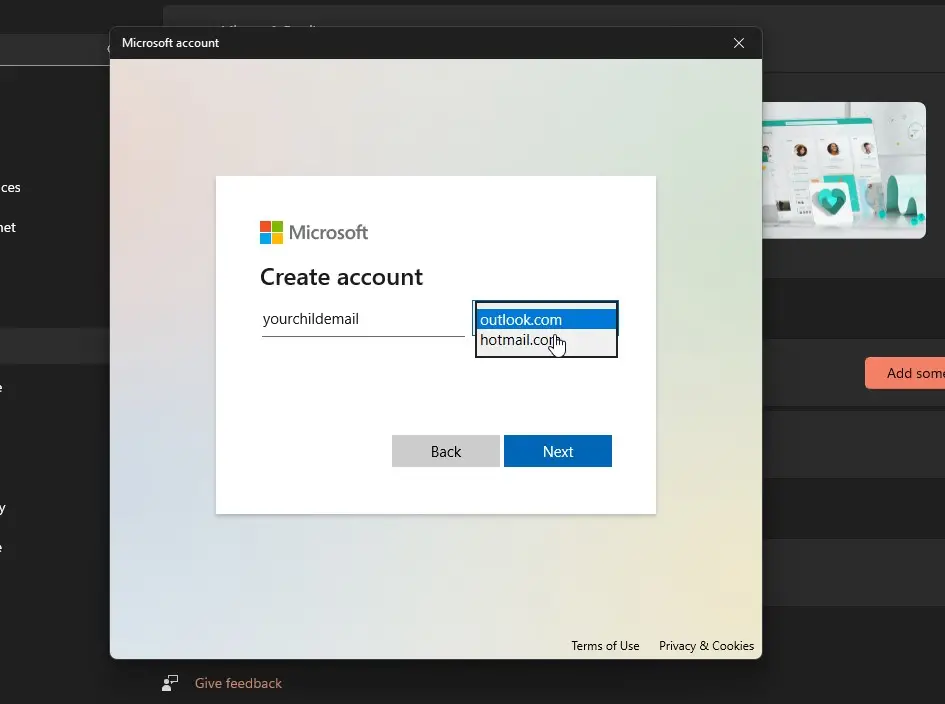
You will be prompted to enter a new email address that will be associated with your child’s new Microsoft account. If your child does not have an existing email address, you can create a new one during this step.
Create a Password
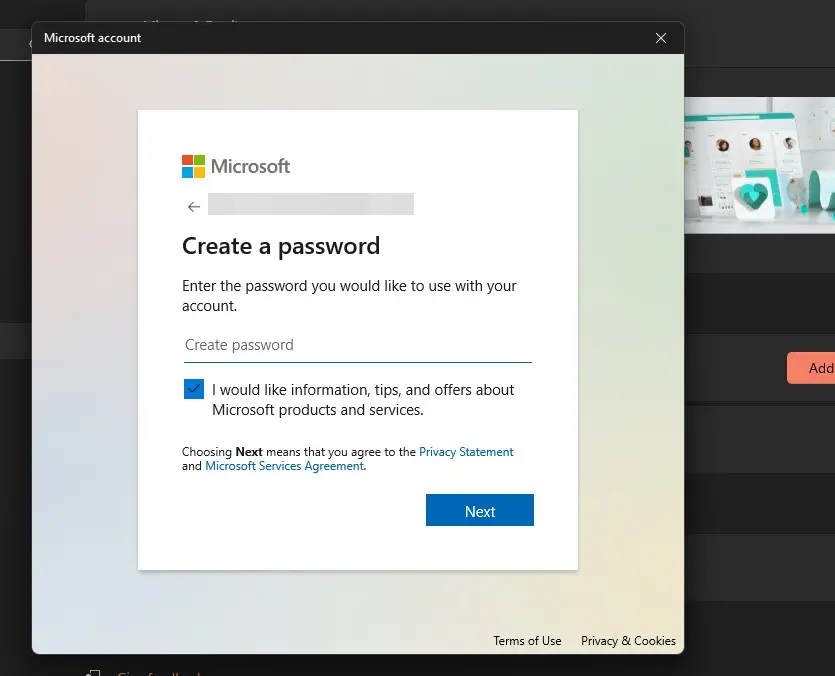
Next, create a secure password for your child’s Microsoft account. Ensure this password is robust to help protect your child’s online activity and personal information.
Fill in Personal Details
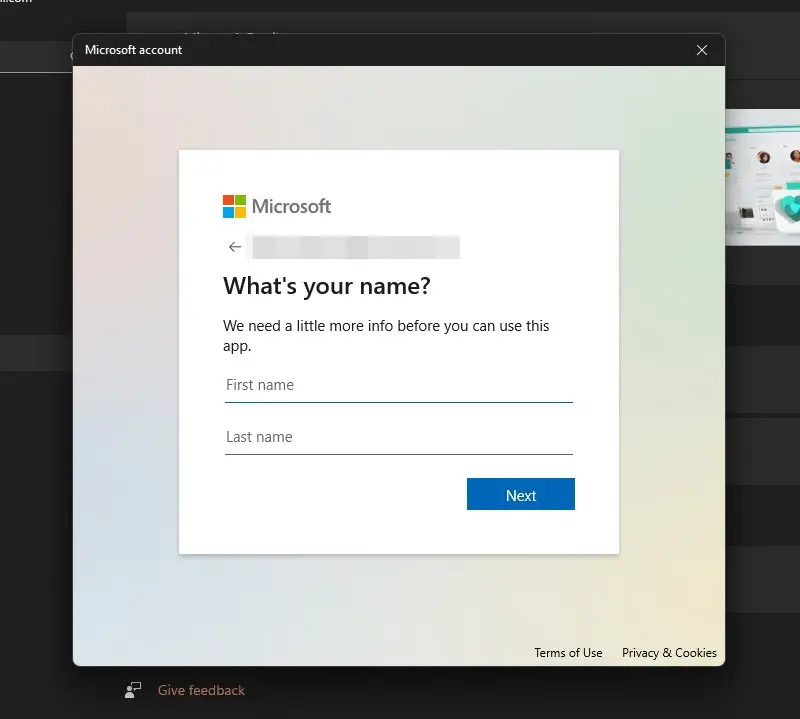
You will need to enter your child’s first and last name, select your country/region, and input your child’s birthdate. This information helps in customizing the experience for your child’s age and ensures compliance with local regulations.
Consent to the Creation of Your Child’s Account
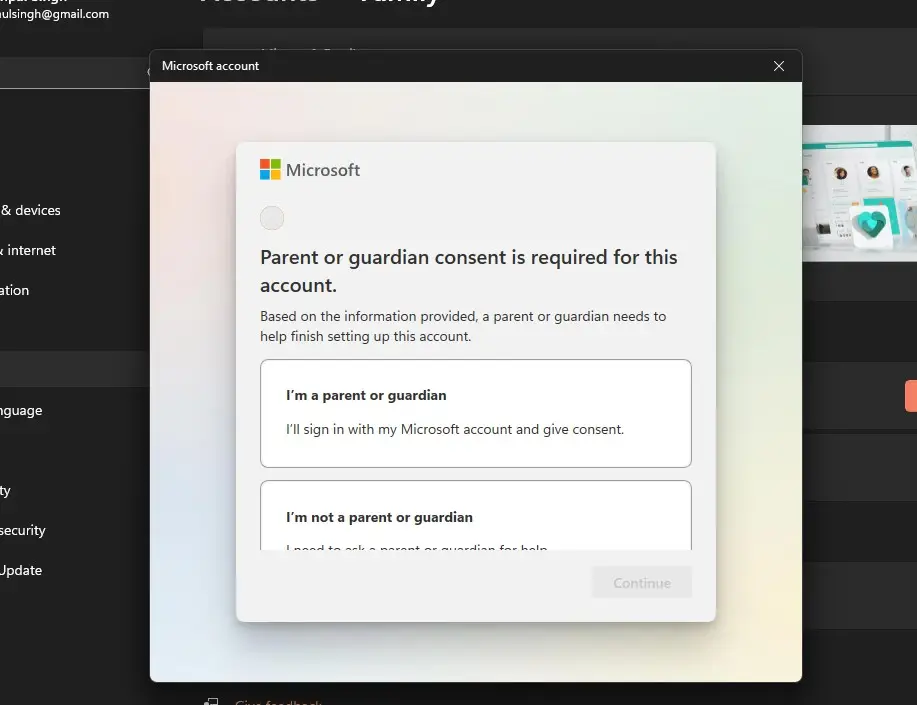
After entering the necessary details, you, as a parent or guardian, will need to give consent for the creation of your child’s Microsoft account. Review the terms, scroll down, and click “Yes, I agree.”
Confirmation
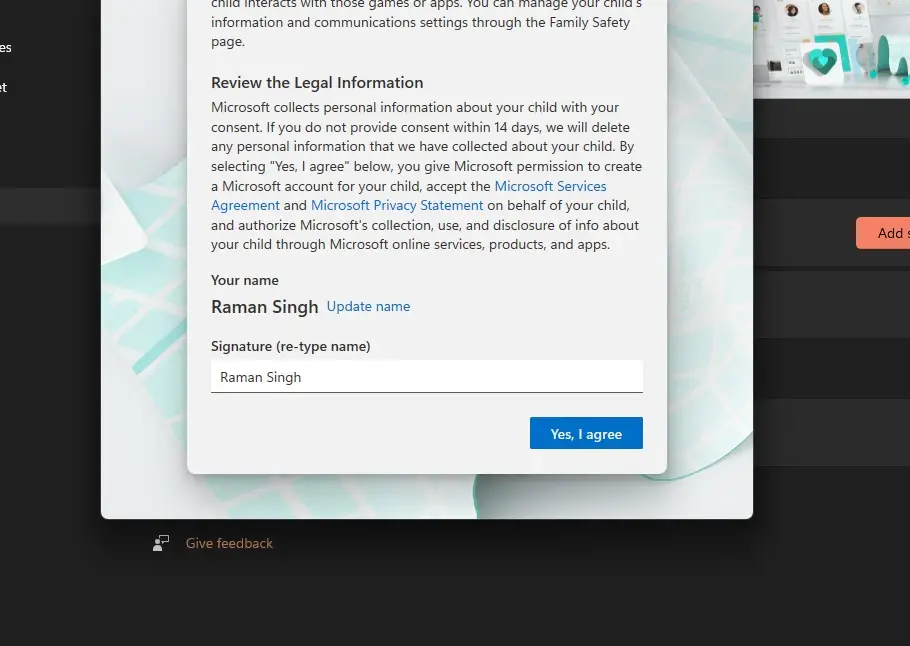
Upon agreeing to the terms, you will receive a confirmation email with instructions to connect your child’s device. This step is crucial for applying the family settings to your child’s activities.
Connect Your Child’s Device
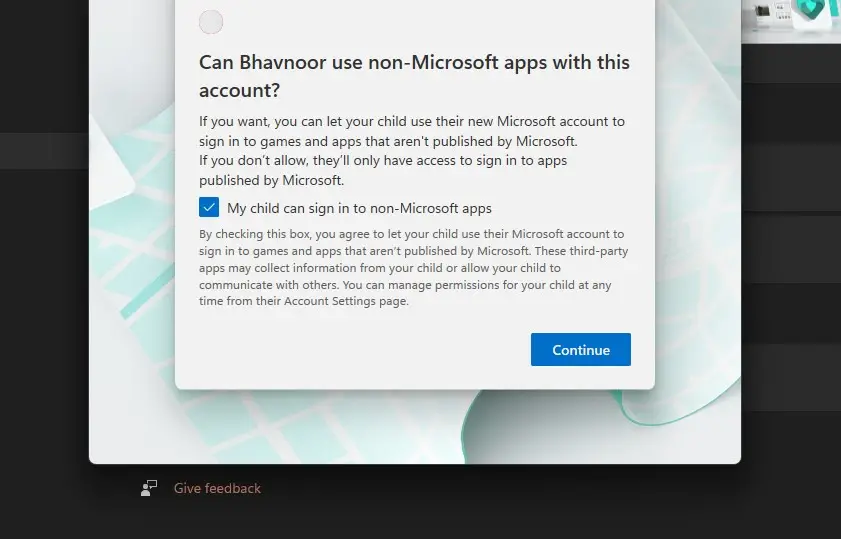
Following the instructions in the confirmation email, click on “Connect a device” to integrate your child’s device with the newly created account. This enables the application of family settings and parental controls.
Managing Parental Controls
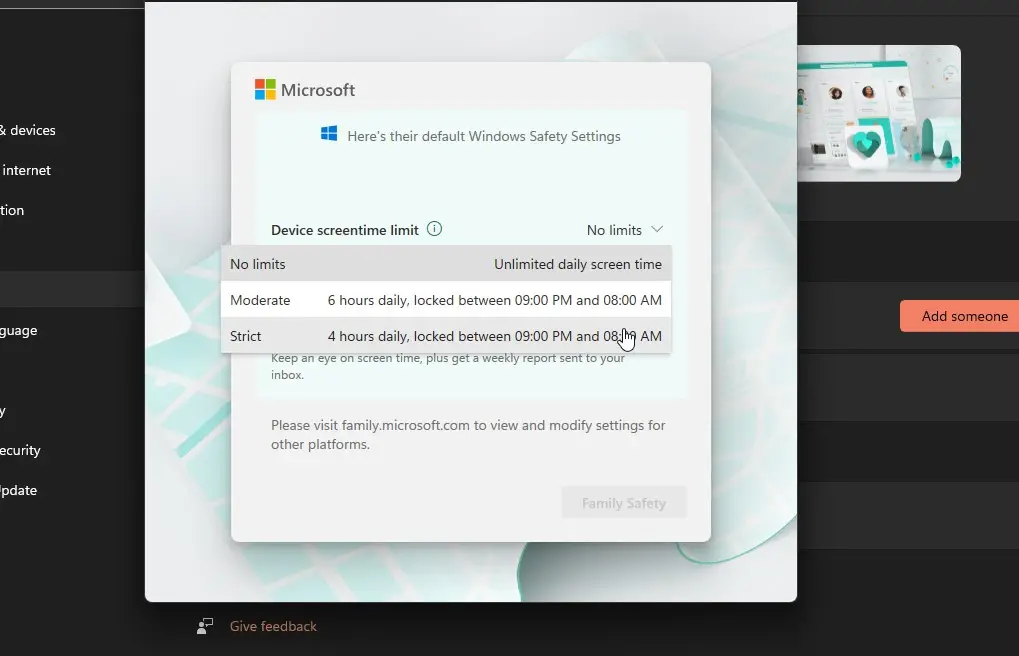
Once your child’s account is connected, you have the option to set up parental controls immediately. This can be done during the addition of your child’s account to your family group, or later, by selecting “Manage family settings online.”
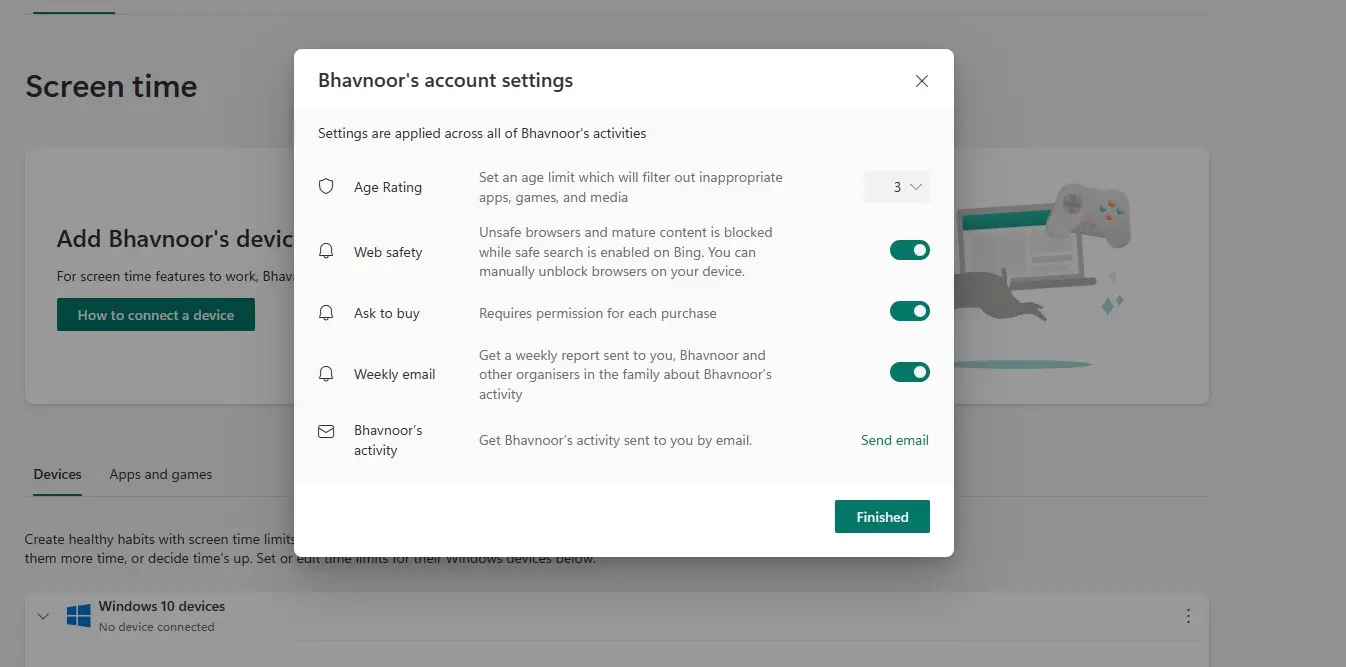
Here, you can enable parental controls, set screen time limits, block inappropriate websites and apps, and monitor your child’s online activities effectively.
Locating your parental control settings
Once you have successfully linked your child’s account to your family group, setting parental controls to ensure your child’s safety online becomes a straightforward process.
Here’s a step-by-step guide to help you manage these settings effectively, ensuring a safe and productive environment for your child’s online activity.
It’s crucial to set parental controls to customize safety measures for your child’s online experience, guiding you through the process of limiting screen time, blocking inappropriate content, and tailoring controls for optimal child safety.
You can block inappropriate apps and more with this.
Open the Windows Start Menu
Begin by clicking the Windows icon located at the bottom left corner of your screen. This action opens the Start menu, your gateway to controlling your child’s computer usage through the built-in parental controls on Windows 10.
Navigate to Settings
From the Start menu, select the “Settings” icon, which looks like a gear.
Click on Accounts
Within the Settings menu, find and click on “Accounts.” This section is crucial for managing different user accounts, including those of family members.
Select Family & Other Users
Now, locate “Family & other users” within the Accounts section.
Click Manage Family Settings Online
To access and configure the parental control settings for your family, click on “Manage family settings online.”
Configuring Parental Controls
After reaching the Microsoft family safety dashboard, you’ll see the option to manage your family options by selecting the specific child you wish to set controls for.
Here, click the Options icon (three dots) on your child’s tile, and select “Go to overview.”
Here, you can enable various parental controls.
Setting Screen Time Limits on Windows 10
Setting screen time limits is an effective way to manage how long your child can spend on their device. Microsoft Windows 10 parental controls provide a detailed overview of your child’s screen time, helping you to make informed decisions on appropriate time limits.
Here’s a step-by-step guide on how to set these limits for a healthier digital lifestyle for your child:
Click on Screen Time
On your child’s profile overview within the Microsoft family safety dashboard, look for the “Screen time” option on the left side.
Set Daily Time Limits
You have the flexibility to set specific time limits for each day of the week. To adjust these settings, simply click on the day you wish to set, choose the desired time limit, and then click “Done”.
Configure Time of Day Restrictions
Apart from setting daily limits, you can also specify the times of day the device will be accessible. For example, to encourage better sleep habits, you might restrict screen time to daylight hours only or establish specific windows for use, such as two hours in the morning and another two in the evening.
Apply Universal or Device-Specific Schedules
The Windows 10 parental controls allow you to “Use one schedule on all devices” for consistency across devices or set up different schedules for each device, tailoring the limits to particular usage patterns or needs.
By systematically applying these steps, you can ensure your child enjoys the benefits of digital resources without overindulgence.
How to block websites on Windows 10
Ensuring your child’s online safety involves managing their access to potentially harmful websites. The steps below provide a guide on how to block specific websites or limit your child to an approved list of sites, leveraging Windows 10’s parental control capabilities.
Navigate to Content Filters
First, access the Microsoft family safety dashboard and select your child’s account. Look for the “Content filters” option on the left side menu. This section is crucial for customizing what content your child can view online.
Block Specific Websites
Within “Content filters,” find the “Blocked sites” option. Here, you can add URLs for any websites you want to prevent your child from accessing. By entering the website address and clicking “Add,” you ensure these sites are inaccessible, thus protecting your child from inappropriate content.
Allow Only Approved Websites
Alternatively, if you prefer to limit your child to browsing only pre-approved sites, switch to the “Allowed sites” tab within the same section. Here, input the URLs of websites you deem safe for your child. This whitelisting approach ensures your child accesses only those sites that you have explicitly permitted.
How to control online spending on Windows 10
Windows 10 provides powerful tools to help parents manage their child’s online spending effectively. With options ranging from not linking a credit card to your child’s account, requiring approval for every purchase, or setting up an account balance for your child, Windows 10 equips parents with the necessary controls to ensure safe and responsible online spending. Below is a step-by-step guide on how to set these controls using Windows 10 parental control features:
Navigate to “Spending” in Microsoft Family Safety Dashboard
First, you should open the Microsoft family safety dashboard and select your child’s account. Look for the “Spending” option on the left side menu. This is where you can manage all aspects related to your child’s online purchases and spending.
Choose Your Preferred Online Spending Control Method
Within the “Spending” section, you have several options to control how your child can spend money online:
Not Linking a Credit Card to Your Child’s Account: This option ensures that your child cannot make any purchases without your explicit intervention.
Require Approval for Every Purchase: By linking a credit card but requiring approval for each purchase, you stay in full control over what your child buys, preventing any surprise spending.
Add Spending Money to Your Child’s Account Balance: This method allows you to deposit a set amount of money into your child’s account balance. Your child can spend freely up to this limit, giving them a sense of independence while ensuring they cannot overspend.
Set the Appropriate Payment Controls
For Non-Linked Credit Card Option: Simply skip the process of adding a payment option to your child’s account.
For Purchase Approval Requirement: Link a credit card to your child’s Microsoft account but select the option that requires your approval for every transaction. You will receive a notification every time your child attempts to make a purchase, and you can approve or deny each one directly.
For Account Balance Setup: Choose to “Add money” to your child’s account balance. Enter the amount you wish to deposit, and follow the on-screen instructions to complete the transaction. Your child will then be able to spend the money as they wish, within the set limit.
By following these step-by-step instructions, parents can leverage Windows 10 parental controls to manage their child’s online spending effectively, ensuring a safe and controlled digital environment for their family members.
The Bottom Line: Benefits of using parental control settings?
Use parental control to keep your children safe on the internet. You can set time limits to prevent your child from spending excessive time on apps or games, monitor and restrict the websites they access, and keep track of their online spending.. Additionally, parental controls offer the ability to monitor and manage your child’s online activity, ensuring they have a safe online environment.
Parental control will allow you to:
Filter web searches to exclude mature content.
Block problematic apps, games, and websites, or compile a list of permitted sites.
Limit your entire screen time.
Limit the amount of time your youngster can spend on a certain app or game.
Examine the websites they visit.
Before your child can make an online purchase, they must first obtain parental permission.
Receive updates whenever your child makes a transaction.
Create a Microsoft account balance to limit your child’s internet spending.
Test your knowledge
Take a quick 5-question quiz based on this page.

