In the ever-evolving landscape of digital content, keeping your WordPress posts up-to-date is crucial. However, wouldn’t you want your readers to know when you last updated a post, ensuring they’re accessing the most current information?
That’s where the ‘Last Updated’ date comes into play. In this guide, we’ll walk you through how to use ‘Last Updated’ dates in WordPress, a simple yet powerful feature that can enhance your site’s credibility and user trust.
Let’s get started!
What are the Published and Last Updated Dates in WordPress
To view the ‘Published’ and ‘Last Updated’ dates in WordPress, navigate to your WordPress dashboard and open the specific post you want to check.
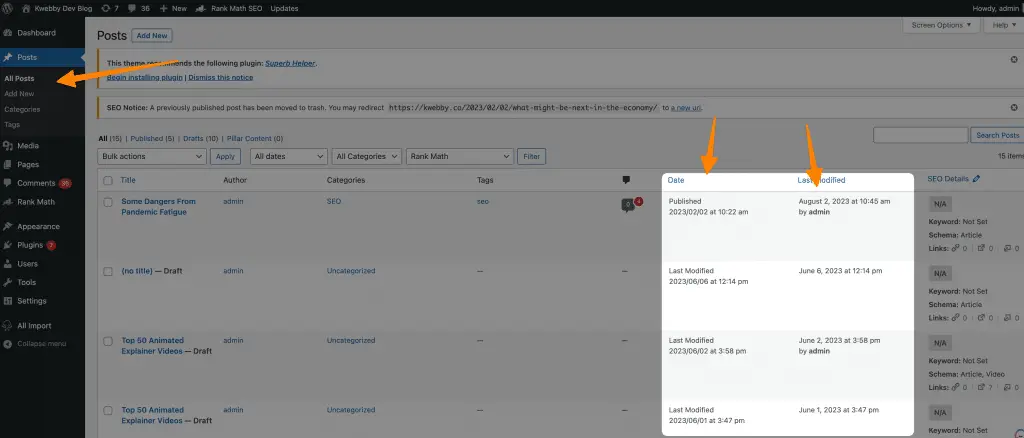
The ‘Published’ date is usually visible right under the post title. For the ‘Last Updated’ date, depending on your theme and settings, it may be displayed near the ‘Published’ date or at the end of the post.

If you can’t locate the ‘Last Updated’ date, it’s likely that your theme may not support this feature, or it’s not enabled in your WordPress settings.
Check your theme documentation or consult your theme developer for guidance on how to enable or customize this feature. Remember, showing the ‘Last Updated’ date is not just about transparency—it also adds to the credibility of your content, reassuring readers that they are consuming fresh and accurate information.
Advantages of “Last Updated” dates in WordPress
The ‘Last Updated’ dates in WordPress come with a myriad of advantages that contribute to enhancing your website’s value and user experience.
- Credibility and Trust: Showing ‘Last Updated’ dates can enhance the trustworthiness of your content. It indicates to your audience that you are committed to providing them with the most current information.
- SEO Benefits: Search engines like Google value fresh content. Regular updates can help your posts rank higher in search engine results, increasing the visibility of your site.
- User Engagement: Updated posts can foster user engagement as users are more likely to share, comment on, or link to posts that they perceive as current and relevant.
- Navigation and Usability: The ‘Last Updated’ date can be useful in helping users navigate your site and decide which posts to read, especially for time-sensitive topics.
Remember, the ‘Last Updated’ feature is more than just a date stamp. It’s a testament to the validity and relevance of your content.
How To Show the Last Updated Date in WordPress
To display the ‘Last Updated’ date on your WordPress posts, first, ensure your theme supports this feature.
Method #1: Add WordPress Function Shortcode to Theme
If it doesn’t, you may need to add a small piece of code to your theme files or use a plugin. Here’s a simple step-by-step guide on how you can do it:
- Login to your WordPress dashboard and navigate to ‘Appearance’ > ‘Theme Editor’.
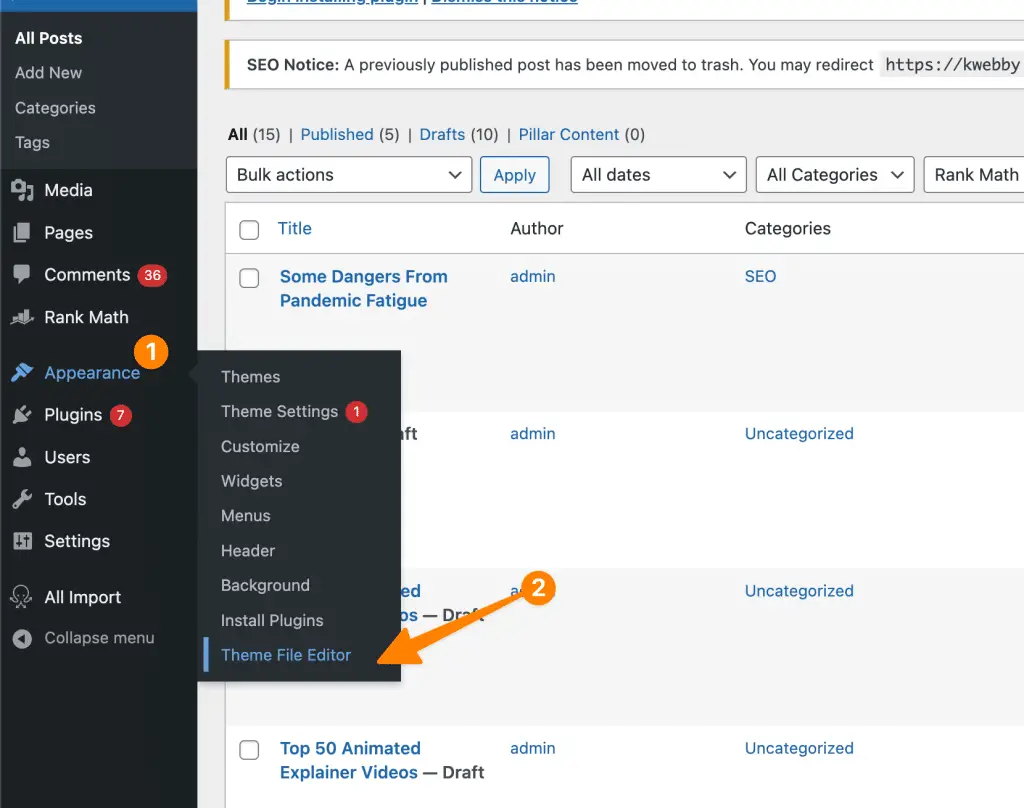
- In the ‘Theme Files’ section on the right, look for ‘Single Post’ (usually named as ‘templateparts/content-single.php’) and click on it to edit.
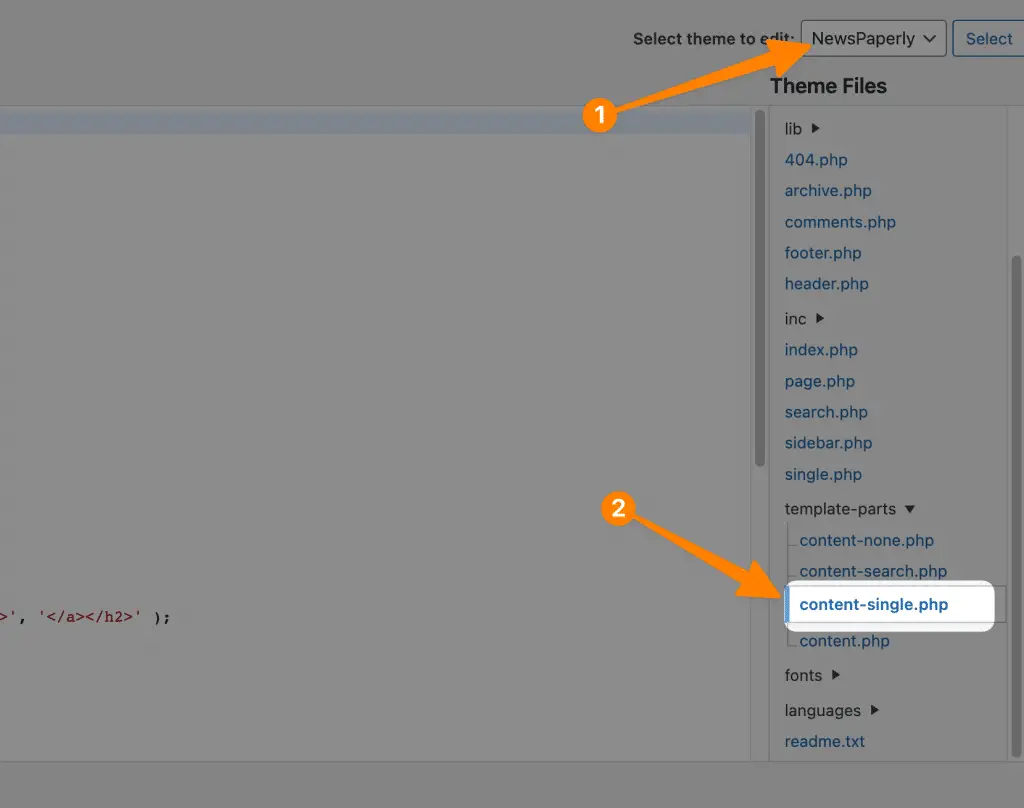
- In the code editor, locate the line of code that displays the post date. It typically looks something like this: `<?php the_date(); ?>`, In custom themes, it’s should be added with your theme name like in our case below;
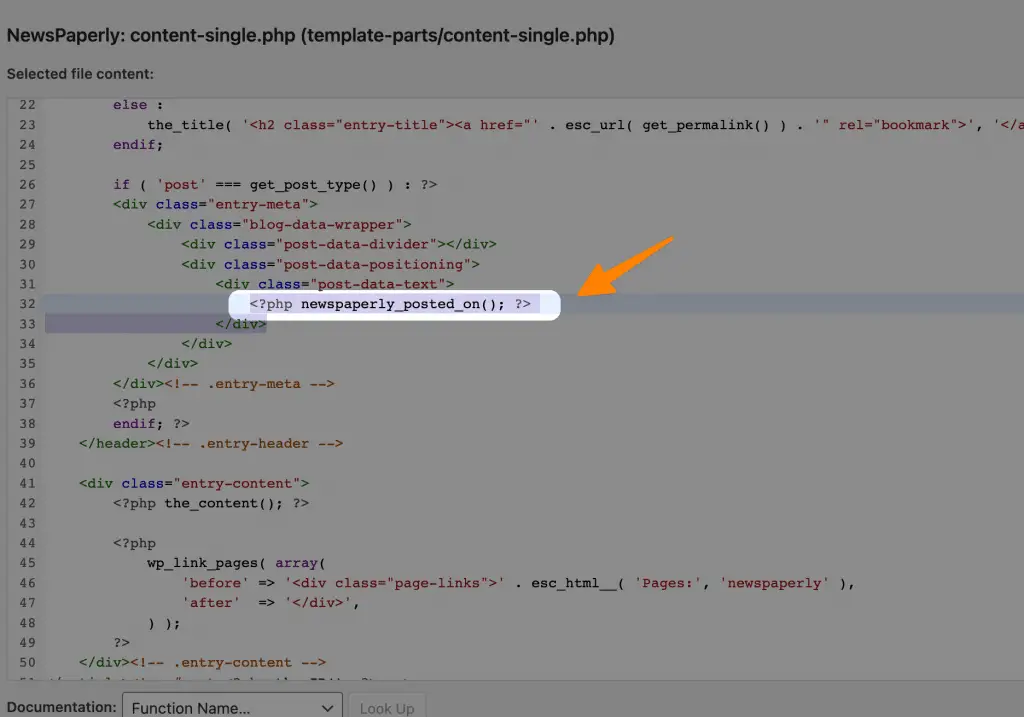
- Replace the above line with the following code: `Last Updated on: <?php the_modified_date(); ?>` This will display the ‘Last Updated’ date instead of the ‘Published’ date.
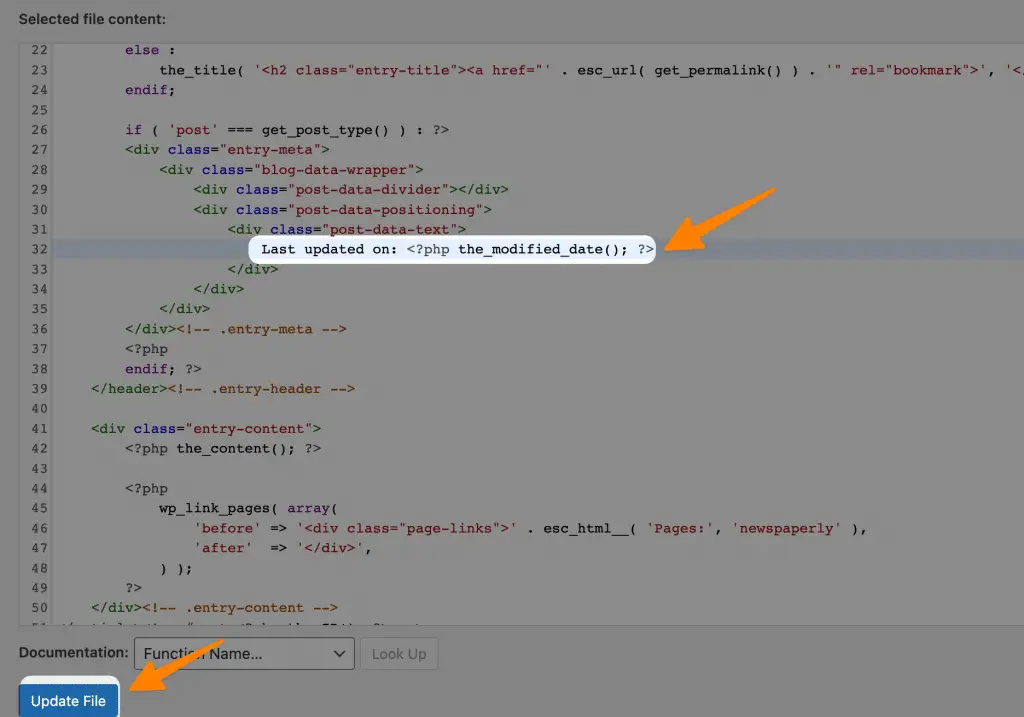
- Click ‘Update File’ to save your changes.

You can also add the following to add time and add to the code as follows;
<?php printf( __( 'Last Modified: %1$s at  %2$s', 'textdomain' ),
	get_the_modified_date( 'F j, Y' ) ,
	get_the_modified_date( 'g:i a' )
); ?>
The output will be as follows;

Please remember, dealing with theme files can be risky, especially if you’re not familiar with PHP. Always make a backup of your theme files before making any changes. If you’re uncomfortable with editing theme files, consider using a WordPress plugin like ‘Last Updated’ or ‘WP Last Modified Info‘ that can handle this task for you which we will discuss later in this tutorial.
As a final note, it’s important to remember that displaying the ‘Last Updated’ date on your WordPress posts is not just about adding a date stamp. It’s about demonstrating to your readers (and to search engines) that your content is current, relevant, and trustworthy.
Remember, in the world of digital content, freshness matters!
Method #2: Add Custom Function to your Functions File (With time)
Another method you can use to show the ‘Last Updated’ date in WordPress is to add a custom function to your ‘functions.php’ file. This method is a bit more advanced and involves using PHP, so proceed with caution to avoid breaking your site. Here’s how you can do it:
- From your WordPress dashboard, go to ‘Appearance’ > ‘Theme Editor’.
- In the ‘Theme Files’ section on the right, look for ‘Theme Functions’ (usually named ‘functions.php’) and click on it to edit.
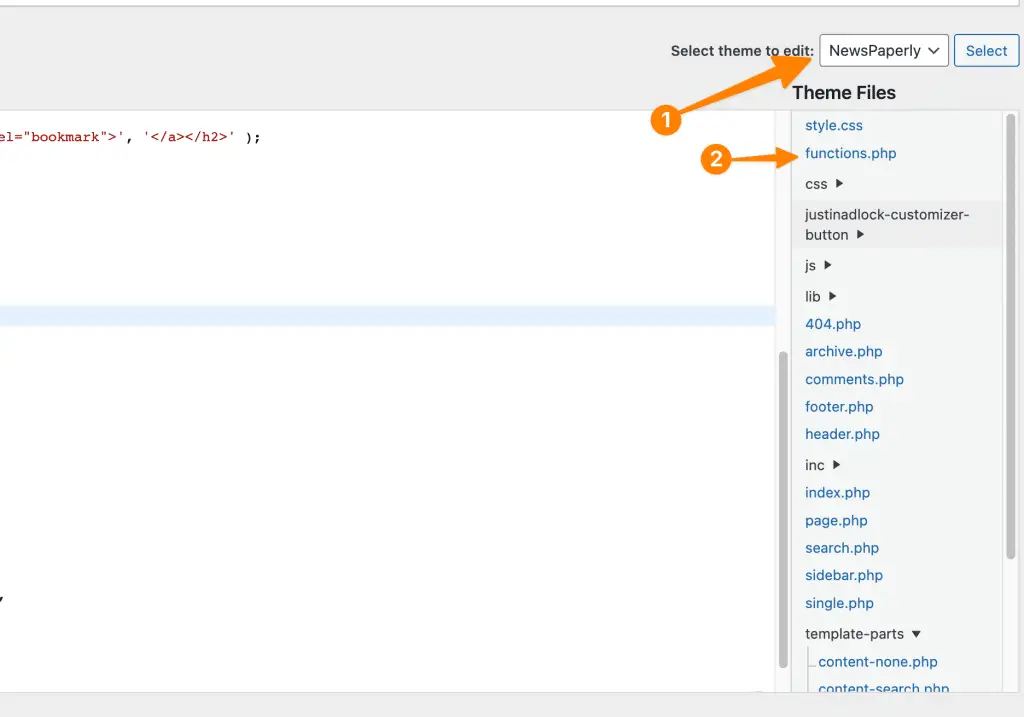
- In the code editor, go to the bottom of the file and add the following code:
function wpb_last_updated_date($content) {
$u_time = get_the_time('U');
$u_modified_time = get_the_modified_time('U');

if ($u_modified_time >= $u_time + 86400) {

$updated_date = get_the_modified_time('F jS, Y');

$updated_time = get_the_modified_time('h:i a');

$custom_content .= '

Last updated on '. $updated_date . ' at '. $updated_time .'';

}

$custom_content .= $content;

return $custom_content;

}

add_filter( 'the_content', 'wpb_last_updated_date' );
This code creates a custom function that adds a ‘Last updated’ timestamp to your posts. The timestamp includes both the date and time of the last update.
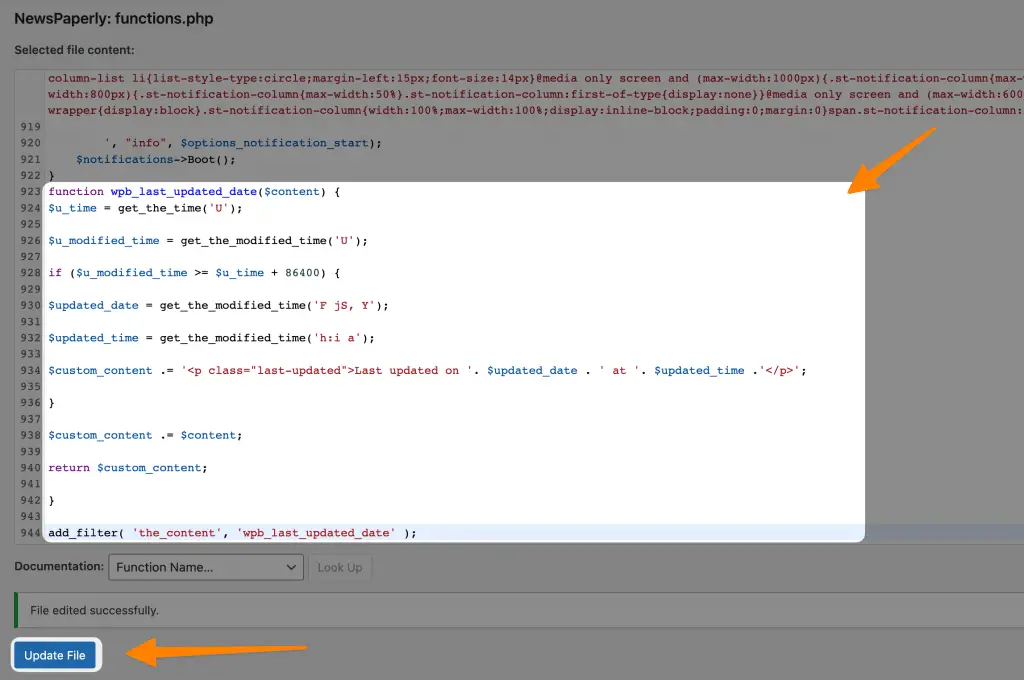
- After you’ve added the code, click ‘Update File’ to save your changes.

Please note, before you make any changes to your theme files, it’s always a good idea to make a backup in case something goes wrong. If you prefer not to edit PHP files, or if you’re unsure about the process, consider using a WordPress plugin that provides the ‘Last Updated’ feature.
Add the Author’s Name to the above code
You can also add author’s name to above code if you have multi authors on your wordpress site. All you need to do is to customize the above functions.php code to the follows;
function wpb_last_updated_date($content) {
$u_time = get_the_time('U');
$u_modified_time = get_the_modified_time('U');

if ($u_modified_time >= $u_time + 86400) {

$updated_date = get_the_modified_time('F jS, Y');

$updated_time = get_the_modified_time('h:i a');

$author_name = get_the_author(); // Get the author's name

// Append the author's name to the output

$custom_content = '

Last updated on ' . $updated_date . ' at ' . $updated_time . ' by ' . $author_name . '';

} else {

$custom_content = '';

}

$custom_content .= $content;

return $custom_content;

}

add_filter('the_content', 'wpb_last_updated_date');
Here is the result;

Styling the ‘Last Updated’ Timestamp
The newly added ‘Last Updated’ timestamp can be styled using CSS to match the look and feel of your website. This is done by targeting the class `.last-updated` that we’ve applied to the paragraph in the code above.
- Navigate to your WordPress Customizer. This can be accessed from your WordPress dashboard by going to ‘Appearance’ > ‘Customize’.
- Once in the Customizer, locate the ‘Additional CSS’ section. This is where you can add custom CSS rules to style your site.
- In the ‘Additional CSS’ section, you can add your custom CSS rules for the `.last-updated` class. For example, you might use something like this:
.last-updated {
font-size: 14px;

color: #777;

margin-top: 20px;

}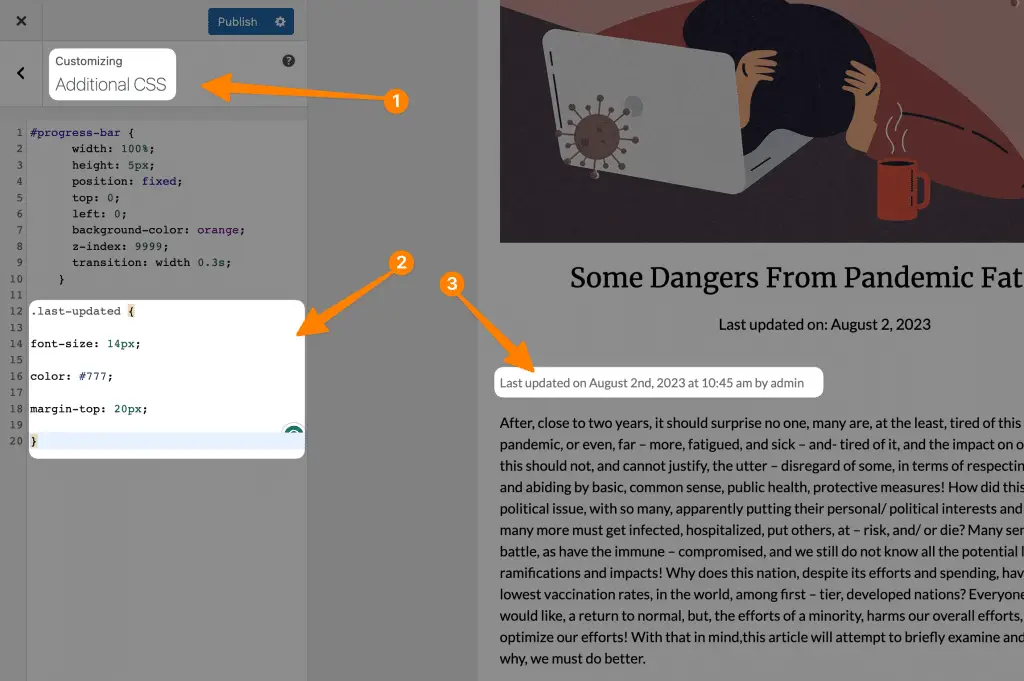
This code will set the font size of the ‘Last Updated’ timestamp to 14px, the color to a light gray (#777), and add a top margin of 20px.
- After you’ve added your CSS, click ‘Publish’ to save your changes.
Alternatively, if you’re comfortable editing theme files, you can add your CSS directly to your theme’s `style.css` file. Simply append your CSS rules for the `.last-updated` class at the end of the file and save your changes.
Remember, it’s always a good idea to back up your theme files before making any changes. If you’re unsure about the process, consult a professional or use a WordPress plugin that offers CSS styling options.
How to Remove Old “Posted on” timestamp from Your Posts
In some cases, it may be desirable to remove the old “Posted on” timestamp from your WordPress posts to avoid redundancy or confusion with the ‘Last Updated’ timestamp. Here’s how you can do it:
- Go to your WordPress dashboard, navigate to ‘Appearance’ > ‘Theme Editor’.
- In the ‘Theme Files’ section on the right, find the ‘Single Post’ file (usually named as ‘single.php’) and click on it to edit.
- Look for the piece of code that looks like this: `<?php the_date(); ?>` or in our custom theme its <?php newspaperly_posted_on(); ?>. This is the code that displays the ‘Posted on’ date.

- Delete or comment out this code. To comment out the code, simply encase it in `/` and `/` like this: `/<?php the_date(); ?>/`. Commenting out the code instead of deleting it is preferable as it allows you to easily reinstate the ‘Posted on’ date in the future if needed.
- Click ‘Update File’ to save your changes.
Please note, changing theme files can be risky. Always make a backup before proceeding. If you’re uncomfortable making these changes, consider hiring a professional or using a WordPress plugin that can achieve the same result.
How to Use “Last Updated” Only on Posts, not Pages
In some instances, you might want to display the ‘Last Updated’ timestamp only on your posts and not on your pages. To achieve this, we will modify our custom function to check if the content being served is a post before adding the ‘Last Updated’ timestamp. Here’s how you can do it:
- Edit your ‘functions.php’ file as described in the previous sections.
- Modify the `wpb_last_updated_date` function to include an `is_single()` check like this:
function wpb_last_updated_date($content) {
$u_time = get_the_time('U');
$u_modified_time = get_the_modified_time('U');

if (is_single() && $u_modified_time >= $u_time + 86400) {

$updated_date = get_the_modified_time('F jS, Y');

$updated_time = get_the_modified_time('h:i a');

$author_name = get_the_author();

$custom_content = '

Last updated on ' . $updated_date . ' at ' . $updated_time . ' by ' . $author_name . '';

} else {

$custom_content = '';

}

$custom_content .= $content;

return $custom_content;

}

add_filter('the_content', 'wpb_last_updated_date');- After making the modification, click ‘Update File’ to save your changes.
Now, the ‘Last Updated’ timestamp will only be added to your posts, not your pages. This allows you to keep your pages clean and uncluttered while still providing useful update information on your blog posts. Remember, always backup your theme files before making changes. If you’re unsure, consider hiring a professional or using a WordPress plugin.
Method #3: Using a Plugin
If you prefer a less hands-on method, or if you’re uncomfortable modifying theme files, using a plugin is an excellent alternative. A popular choice is the “Last Modified Info” plugin available on the WordPress plugin repository. Here’s how to use it:
- From your WordPress dashboard, go to ‘Plugins’ > ‘Add New’.
- In the search field, type “Last Modified Info” and hit enter.
- The plugin should be the first result. Click the ‘Install Now’ button. Once the plugin is installed, the button will change to say ‘Activate’. Click it again to activate the plugin.
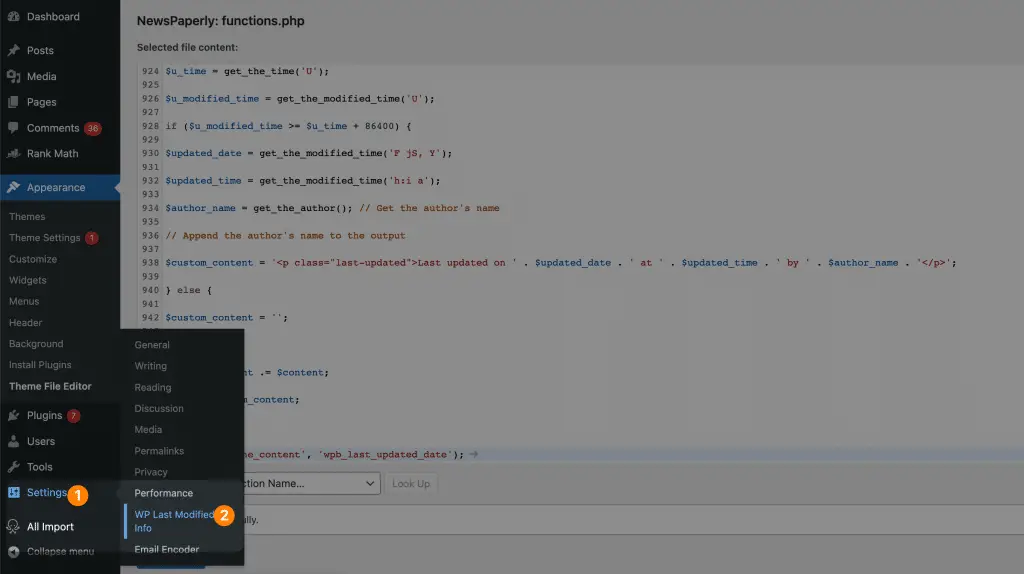
- Once activated, go to ‘Settings’ > ‘Last Modified Info’. Here, you can configure how and where your ‘Last Updated’ timestamp is displayed, just toggle the button “Show Info on Frontend” to display on content.
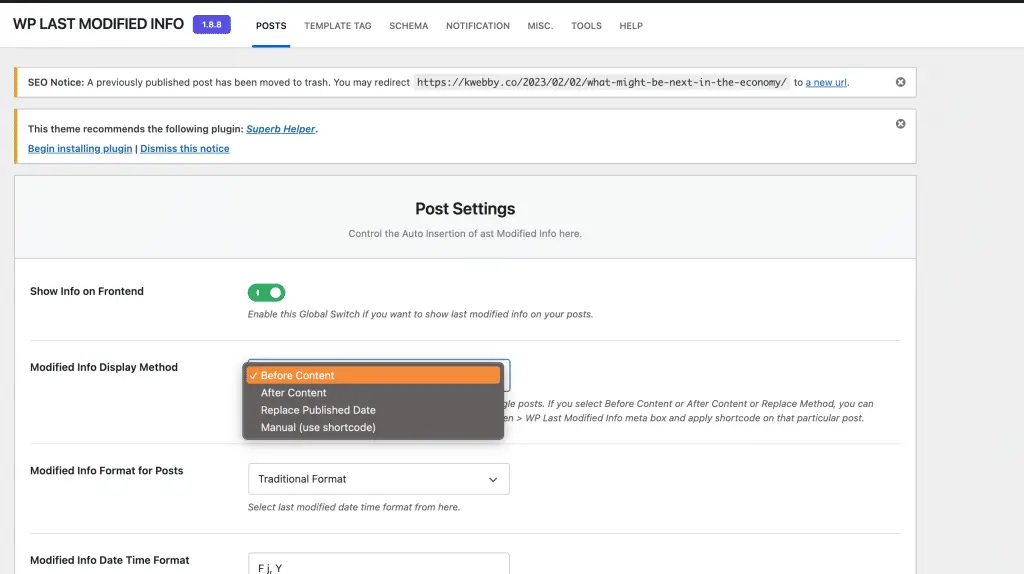
The plugin has more options i.e. to show before or after content and much more, you can checkout the plugin and choose what’s best for you.
The plugin allows you to show the last updated date on posts, pages, or custom post types. It also provides shortcodes that you can use to show the last updated date anywhere on your website.
The “Last Modified Info” plugin is an easy and efficient way to manage and display ‘Last Updated’ timestamps on your WordPress website. Visit the plugin page for more information and detailed usage instructions.
Other WordPress Resources
8 Best WordPress Cache Plugins to skyrocket your website’s speed
How to Speed Up WordPress Performance? (20+ Easy Tips)
NGINX vs Apache Web Server: Which is best for WordPress in 2023?
WordPress 6 – What’s new, Exciting Features and more
How to Remove “OBJ In a Box” in WordPress in 2 Easy Steps
How to Setup Google Tag Manager in WordPress in 2023 (Without Issues)
10 Time-Saving Tips for WordPress Gutenberg Block Editor Users
How to Migrate WordPress Site to New Host or Server: A Step-by-Step Guide
How to Redirect URL in WordPress: A Comprehensive Guide (4 Methods)
Conclusion
In conclusion, managing ‘Last Updated’ dates on your WordPress website can significantly enhance your site’s transparency and trustworthiness by informing visitors about the timeliness of the content.
Whether you choose to manually code the function, modify theme files, or use a plugin like “Last Modified Info,” the process can be streamlined and effective. Remember, it’s crucial to backup your files before making changes and consult a professional if you’re unsure.
With the right approach, you can ensure your ‘Last Updated’ timestamps serve their purpose without disrupting the aesthetic or functionality of your website.
Test your knowledge
Take a quick 5-question quiz based on this page.

