How to Add Audio to Canva Video in 2 Easy Steps
Whether it’s your own audio or a tune from an extensive library, adding audio tracks to your Canva videos elevates the experience from good to unforgettable.
Canva offers a plethora of options, from adding music to enhance the mood, to including sound effects to punctuate key moments. And it’s all easily accessible from the uploads tab, conveniently located on one device.
Imagine the ease with which you can enrich your video, adding sound effects with a simple double click or exploring different types through the comprehensive tools section found on the right side of your screen. Embark on a journey to create a video that not only looks good but sounds spectacular.
Explore the depths of the versatility that is Canva, and turn your projects into an immersive sensory experience by utilizing the uploads feature to enrich your content right from your device.
Canva Magic Studio: Step-by-Step Comprehensive Guide
Adding Audio to Canva Videos
To add audio to your Canva videos, start by accessing Canva’s extensive audio library or uploading your audio files.
Step 1 – Open a Canva Video Template
Navigating the vast trove of professional-looking designs on the Canva design platform is a breeze; but when it comes to enhancing your video, Canva makes this a straightforward process.

Begin by selecting a video template that aligns with your social media strategy or marketing campaign. On the graphic design platform, simply use the search bar to explore Canva’s wealth of options. Once you find the template that fits your vision, adding audio becomes an integral step toward a multi-sensory impact.
Step 2 – Add Audio to the Canva Video
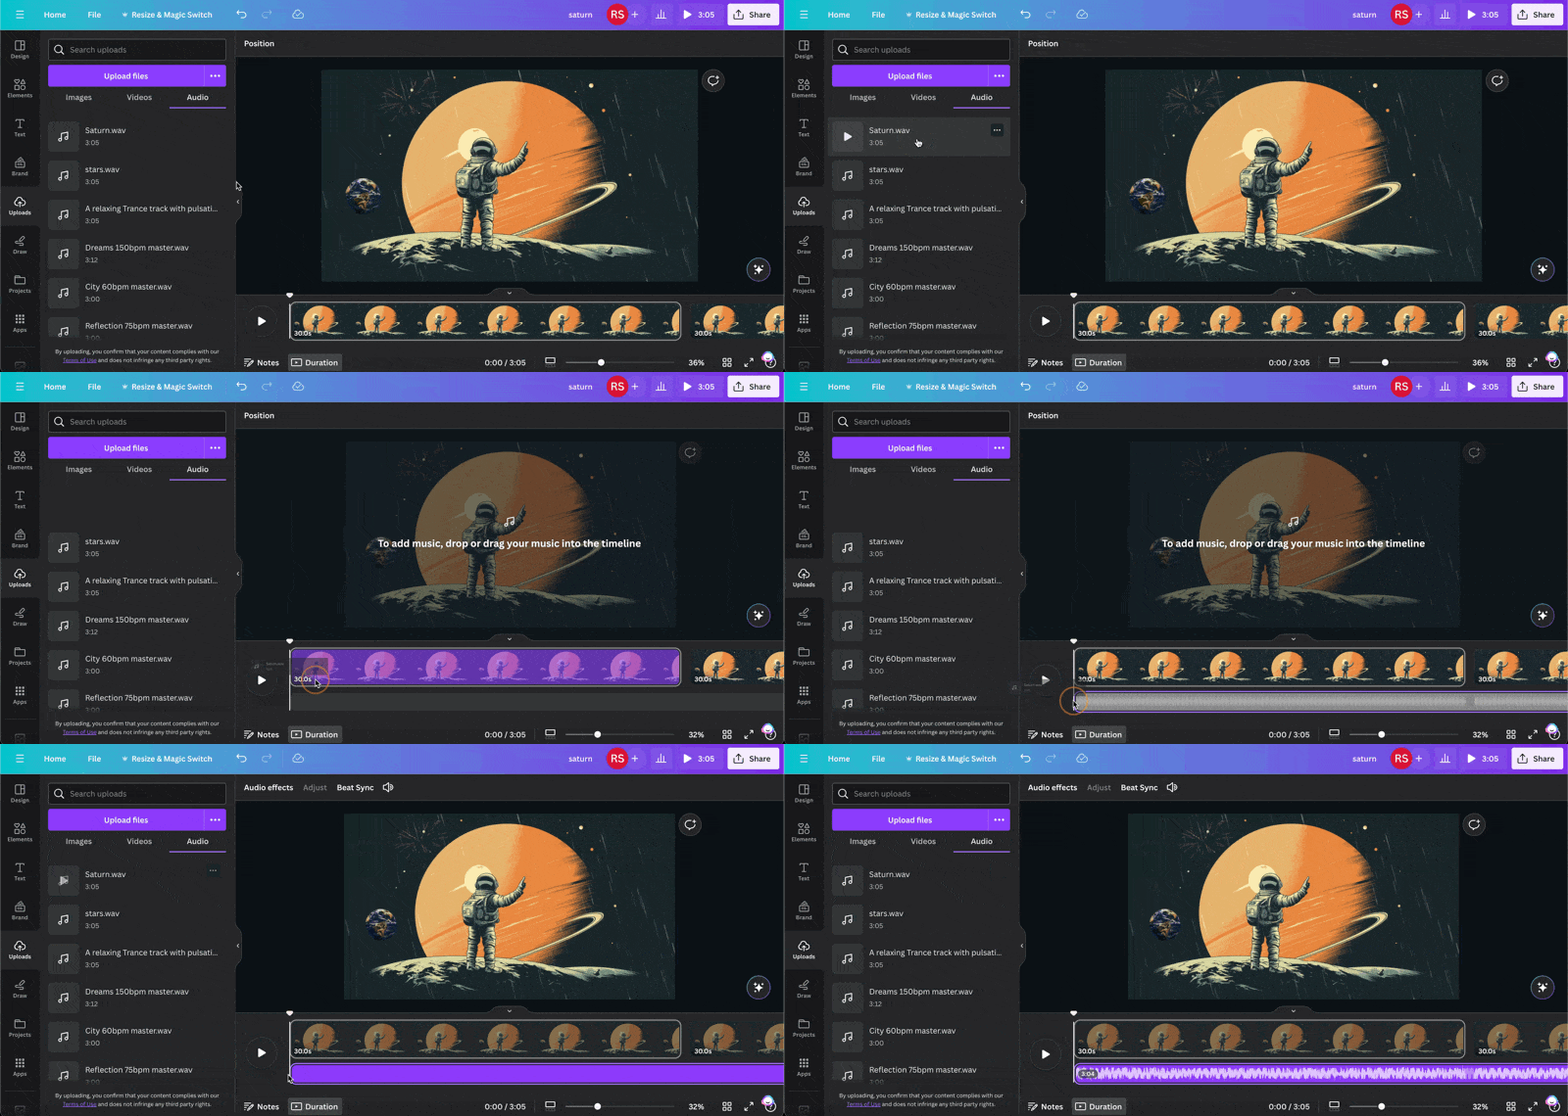
Now that you have selected your perfect video template, it’s time to infuse it with sound. Adding audio is a breeze with Canva’s intuitive video editing platform. Look for the audio icon within the editor, and prepare to explore Canva’s extensive audio library.
From background music that evokes the right emotion to sound effects that bring your visual content to life, the options are abundant and just a few clicks away. Should you desire to personalize your project further, add your audio files into the mix.
On Mobile
In the Canva mobile application, you will find the upload option conveniently located in the menu at the bottom. This feature allows you to effortlessly add audio files to your videos, enhancing your creative projects with captivating sound.

On PC
On your Canva page, after opening it on your PC, you can easily find the upload option in the left menu. Once you click on it, you’ll be able to add audio tracks to your videos. This feature allows you to enhance your creations by incorporating soundtracks or voiceovers, adding a whole new dimension to your clips.

Step 3: Enhancing Audio Settings in Canva Video
When designing a multimedia project, it’s all about striking the right balance. In Canva video, adjust audio settings and ensure that your message takes center stage. You can experiment with music volume, sound effects intensity, and more – adding nuance to each element of your video. To access additional options for the file, simply click on the three dots located next to it at the bottom of the screen.

You can also add beat sync to the audio file to customize it accordingly.
How to Group on Canva in 2 Clicks (Mobile & Desktop)
Modify the Audio Selection
After adding audio tracks to your Canva design, you have the flexibility to adjust their settings. Simply click on the audio track to access the audio settings panel. From there, you can fine-tune the volume, enable looping, and choose whether the audio should play automatically or on click.
Additionally, you have the option to trim the audio to specific sections by dragging the edges of the audio waveform. This is particularly useful if you only want to use certain parts of the audio tracks.
How Do You Hyperlink on Canva? (Mobile and Desktop)
Edit the Audio Effects
Editing audio effects is where your creativity meets Canva’s functionality. With features allowing you to adjust fade in and fade out, equalizing sound levels to prevent jarring transitions is a meticulous yet simple process in Canva.
Canva ensures seamless integration allowing your audio and visual elements to work in unison, thus preserving the narrative flow of your video. It’s worth asking yourself if your current content creation tool provides you with such granular control with ease.
The Adjust option can also be found at the top of the screen. Simply click on the Audio Effects button to return to the main screen.
How to Curve Text in Canva (4 Methods)
Adjust the volume, duplicate, or remove an audio track
Perfecting the audio nuances within your Canva video can be the distinguishing factor that sets your content apart. With Canva, adjusting the volume of your track is as simple as clicking on your chosen audio and using the slider to increase or decrease volume levels, ensuring your audience hears every word or note precisely as intended.
Canva has foreseen such scenarios. With the duplicate feature, you can replicate your selected audio track with a single click. It is the blend of ease and functionality that makes Canva stand out.
And let’s face it, not every audio selection is a perfect fit. If you find yourself needing to remove an audio track, there’s no need for complex procedures. Canva allows you to swiftly delete any track, giving you the flexibility to continuously refine your video content.
How to Add Fonts to Canva (2 Easy Methods)
Step 4: Include a Voice Recording
Adding a voice-over to your clips is an effortless process with Canva’s intuitive features. Click on the share button and then click on the ‘Present and record’ button, and you’re ready to go. Upon uploading your voice files, you can adjust the clip length and volume settings – every creator knows that the devil lies in the details.
And if you need to make adjustments, Canva empowers you with the ability to tweak or re-record as many times as necessary. Once you’re satisfied with your recording, the editor provides settings that enable you to edit and upload sound bites seamlessly, putting you in full control of the audio-visual narrative.
How to Have Transparent Background in Picture from Canva (Free Alternative)
Step 5: Dividing Audio Among Video Frames in Canva
Creating a cohesive video narrative often requires the precise alignment of visuals with sound. Canva simplifies this intricate process through its robust features.
In Canva, you can drag and upload your audio files easily and intuitively place them across different frames in your video. Whether it’s an inspiring piece from Canva’s audio library you’ve selected, or it’s the distinctive touch of your audio recording, each audio file can be adjusted to play across several frames or set to play at a particular moment with a simple play button click.
We moved the voice audio to the beginning of the video and shortened the music audio. This enabled Canva to seamlessly insert the audio file automatically.
You now have the option to save it in MP4 format. Just click on the Share button at the top right corner and choose your preferred method to save, share, or download the file.
How to print a page from Canva design (2 Easy Method)
Why Add Audio?
Audio can add depth and emotion to your videos, making them more engaging and impactful. It allows you to create a multi-sensory experience for your audience, leaving a lasting impression.
By adding audio to your Canva videos, you can also enhance the storytelling aspect of your content. You can choose music or sound effects that complement the message or theme of your video, making it more memorable for your viewers.
How to Use Canva Magic Switch? (3 Badass Tools!)
Selecting the Right Audio
The truth is, that the right audio breathes life into your visual content, significantly affecting its overall impact. When choosing audio for your Canva video, consider the mood you intend to set. Opt for tracks that support and enhance your message, rather than distract from it.
It’s essential to consider the quality of the audio as well. High-quality soundtracks can reinforce the professionalism of your project, while poor quality can considerably undermine it. Additionally, keep in mind the legal side of audio selection – ensuring the tracks are royalty-free or properly licensed for use in your video.
How to Use Canva Magic Write (3 Unique Ways)
Formatting Your Audio
Canva allows you to upload audio files in MP3, M4A, and WAV formats. Keep this in mind when selecting the audio for your video. If you want to use a track that is not in one of these formats, you can easily convert it using free online converters. Once you have the audio file in the correct format, you can proceed to add it to your Canva video.
Conclusion
In conclusion, Canva emerges as the consummate tool for enriching videos with superior audio capabilities—be it introducing an evocative soundtrack, integrating immersive sound effects, or overlaying a personal voice-over. Each feature is tailored to amplify your message, transforming a simple own video into an auditory experience that captivates. Whether for social media content, app presentations, or personal projects, Canva equips you with a plethora of audio tracks and the ease of adding music and sound, granting your videos that professional edge.


