Home / Blog / SEO / Core Web Vitals / How to Serve static assets with an efficient cache policy
Core Web Vitals, Performance, Tutorials, Wordpress Tutorials

How to Serve static assets with an efficient cache policy
Choose Your Language:
Are you keen to elevate your website’s performance and tackle the “Serve static assets with an efficient cache policy” recommendation from Google PageSpeed Insights?
You’ve arrived at the right destination. Google PageSpeed Insights is an invaluable tool for assessing website performance, but some of its recommendations can be daunting.
This guide is designed to demystify the “Leverage browser caching” advice, now updated to “Serve static assets with an efficient cache policy,” and walk you through actionable optimization techniques for your WordPress or non-WordPress site.
In this article, we will explore various strategies to efficiently serve static assets and implement an effective cache policy. We’ll break down what browser caching entails and why it’s crucial for enhancing your website’s user experience and performance.
Additionally, you’ll learn the importance of setting appropriate cache headers and how plugins like Flyingpress or W3 Total Cache can simplify achieving optimal results.
To illustrate the impact of these optimizations, we’ll conduct a performance test before and after applying these techniques. By the end, you’ll see how these measures can dramatically improve your Google PageSpeed score, reduce server load, and ensure faster loading times for a seamless browsing experience.
Checkout Full Resources – What is Google Core Web Vitals? Step-by-step Guide to Improve it in 2024
1 What is the reason Behind the “Serve Static Assets With An Efficient Cache Policy” Issue?
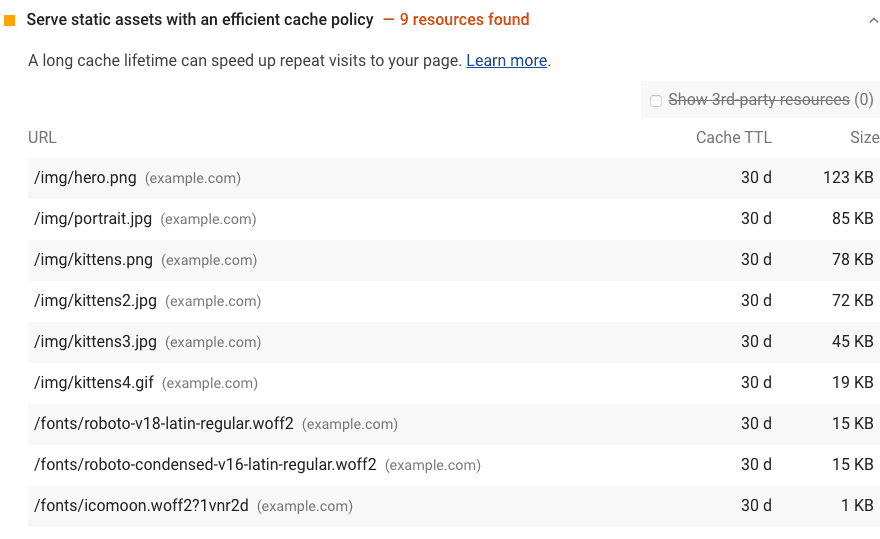
The issue flagged by Google PageSpeed Insights relating to “Serve static assets with an efficient cache policy” focuses on how web browsers handle and store your website’s static files — such as fonts, images, media files, scripts, or stylesheets.
Essentially, you’re being asked to specify how long these files should be stored (cached) locally in a visitor’s browser.
Two primary headers, “Cache-Control” and “Expires,” manage this caching process.
If you encounter this issue in Lighthouse, it generally means that these headers are missing or the expiration period set in them is too short.
This can impact your site’s performance, making it less efficient in delivering static content quickly to users.
1.1 Reason #1 – Utilize Browser Caching for Google Analytics and Tag Manager
Google Analytics, widely used for statistics on WordPress sites, can trigger this warning. The “analytics.js” script frequently communicates with Google’s servers, treating it as a new external resource each time. The default caching policy for this script is only two hours, which Lighthouse deems insufficient. Consequently, the frequent re-validation with the server slows down your site.
1.2 Reason #2 – Utilize Browser Caching for Third-Party and External Scripts
Third-party plugins that add external scripts — such as YouTube videos or Instagram feeds — can also be culprits. Sometimes, these plugins come with predefined cache policies set by their authors, which might fall short of the optimal cache duration recommended by Lighthouse. This again results in frequent server requests, adversely affecting loading times and user experience.
1.3 Reason #3 – Improperly Set Expiry Headers on Nginx Servers
Nginx, known for its efficiency in delivering content, doesn’t utilize a .htaccess file like Apache. This means you have to manually add the appropriate caching headers in the main server block to be recognized by Nginx and Lighthouse. Without these headers, Nginx defaults to a shorter cache duration, leading to the flagged issue.
By optimizing your caching headers, you can significantly improve loading speeds and reduce server load, enhancing the user experience. Whether you’re using a cache plugin like FlyingPress, or configuring your server manually, correct implementation of browser caching is crucial for boosting your website’s performance.
2 How to Serve Assets With an Efficient Cache Policy
Whether you’re running a WordPress site or a custom-built non-WordPress website, implementing an efficient cache policy for your static assets is essential for both improving your PageSpeed score and enriching your user experience.
2.1 For WordPress
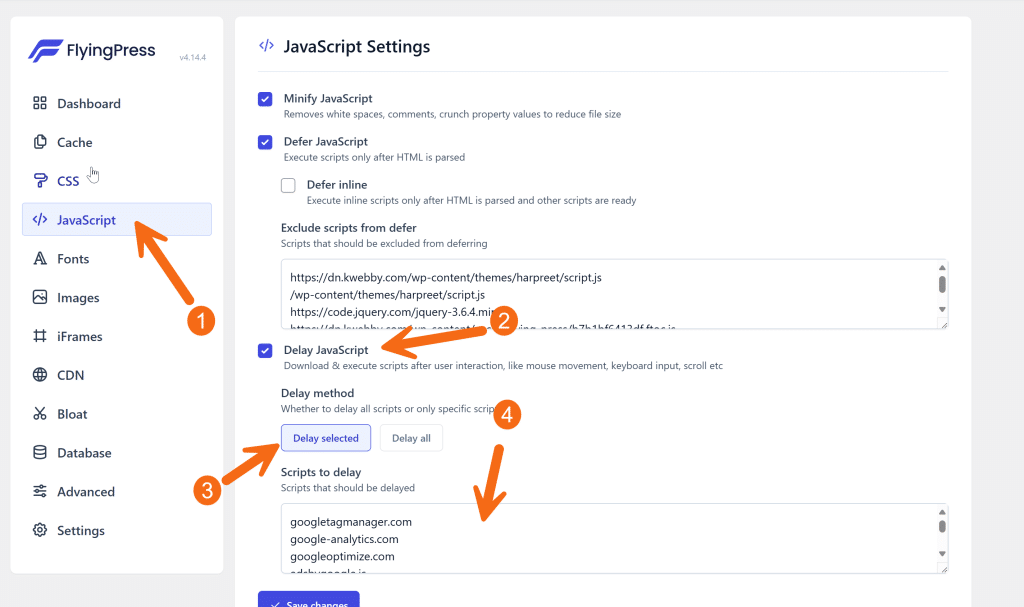
For WordPress users, we recommend using Flyingpress, which handles everything for core web vitals and makes your website blazing fast.
- Download and activate the plugin: First, head to the Plugins section in your WordPress dashboard and install Flyingpress.
- Enable caching: Once activated, navigate to the Flyingpress dashboard from the left sidebar in your WP dashboard and enable caching. This step is crucial to serve static assets with an efficient cache policy and improve loading times.
- Delay JavaScript: Next, select “JavaScript” from the left sidebar. Here, you’ll find an option to “Delay JavaScript”. From the list of scripts, choose which specific scripts you want to delay. Delaying these scripts helps in efficient browser caching and reduces total blocking time.
- Save changes: Finally, don’t forget to click on “Save Changes”. This ensures your cache policy settings are applied correctly, optimizing static file delivery and minimizing server load.
By following these steps, you’ll be leveraging browser caching to the fullest, setting appropriate caching headers such as “Cache-Control” and “Expires”, and significantly improving your website performance.
These changes will ensure your static content like images, stylesheets, and scripts are served with optimal cache expiration policies, ultimately leading to a smoother user experience and better PageSpeed Insights scores.
2.2 For Non-WordPress Sites
2.2.1 Method #1 – Serve Third Party Scripts through Cloudflare’s Zaraz
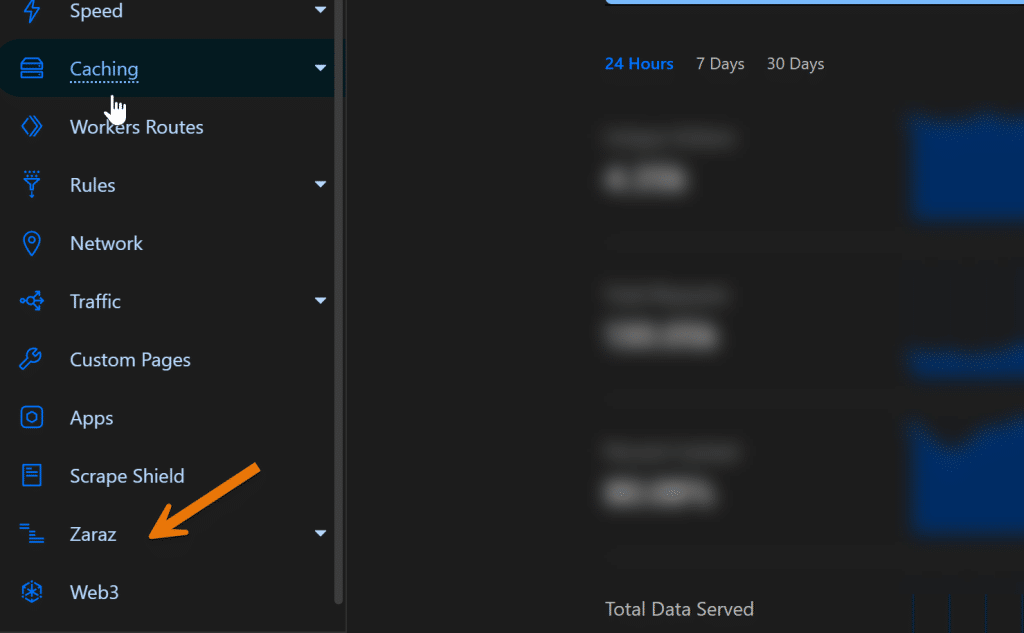
Cloudflare’s Zaraz offers a streamlined way to handle all third-party scripts through their cloud service, enhancing your website’s performance and implementing an efficient cache policy. Below are the step-by-step instructions to configure Zaraz and leverage browser caching effectively:
- Sign up and configure Cloudflare: If you haven’t already, sign up for a Cloudflare account and configure it for your site. This setup will enable you to serve static assets with an efficient cache policy.
- Navigate to site settings: Once your site is configured, go to the site settings within your Cloudflare dashboard.
- Select Zaraz: From the left sidebar, scroll to the bottom and click on “Zaraz.” This tool allows you to manage all your third-party scripts in one place, optimizing your cache policy.
- Add or select third-party scripts: Depending on your needs, you can either add new third-party scripts or select from available ones. Options include Google Analytics 4, Google Tag Manager, Meta Pixels, or use “Custom HTML” to embed any additional scripts. Properly configured, these scripts help in reducing total blocking time and improving browser caching efficiency.
- Save changes: Finally, click on “Save Changes” to ensure all your settings are applied. This step is crucial to leverage browser caching, set appropriate caching headers like “Cache-Control,” and improve your PageSpeed Insights scores.
By using Cloudflare’s Zaraz, you can efficiently manage your site’s cache policy, reduce server load, and ensure that static files are delivered more quickly.
This not only enhances website performance but also enriches the user experience by leveraging a content delivery network, optimizing loading times, and implementing the best caching practices.
2.2.2 Method #2 – Add “Cache-Control” and “Expires” Headers to your Server
Nginx Server
To enhance your website performance and optimize browser caching on your Nginx server, follow these step-by-step instructions to add appropriate “Cache-Control” and “Expires” headers. This will ensure that your static assets are served efficiently, ultimately leading to reduced server load and improved user experience.
- Open your server block file: Locate your Nginx server block file, usually found at `/etc/nginx/sites-enabled/default`. Open the file with a text editor of your choice (e.g., `nano` or `vim`).
- Add Cache-Control Headers: Insert the following snippet inside your server block to specify cache control for different types of static assets:
location ~* \.(png|jpg|jpeg|gif)$ {
    expires 365d;
    add_header Cache-Control "public, no-transform";
}

location ~* \.(js|css|pdf|html|swf)$ {
    expires 30d;
    add_header Cache-Control "public, no-transform";
}
This ensures that images are cached for 365 days and other static files like JavaScript and stylesheets are cached for 30 days, which optimizes load times and leverages browser caching effectively.
- Add Expires Headers: If you prefer using “Expires” headers, you can add the following snippet instead, which also ensures efficient cache policies for your assets:
location ~* \.(jpg|jpeg|gif|png)$ {
    expires 365d;
}

location ~* \.(pdf|css|html|js|swf)$ {
    expires 30d;
}
By setting these “Expires” headers, you define how long browsers should cache content before re-fetching it from the server, thus improving PageSpeed Insights scores.
- Save Changes and Restart Nginx: After adding these snippets, save the file and restart Nginx to apply the changes:
sudo systemctl restart nginxBy serving static assets with an efficient cache policy and setting appropriate cache-control and expires headers, you can significantly enhance your website’s performance.
These adjustments reduce total blocking time, improve your PageSpeed Insights scores, and provide a smoother user experience. Whether leveraging Nginx’s configuration or using a cache plugin, implementing these practices will result in an optimized caching policy for your site.
For Apache Users
If you use an Apache server, you can also add “Cache-Control” and “Expires” headers to your .htaccess file to enhance browser caching. Follow these simple steps:
Access your .htaccess file: Locate your website’s root folder and access the .htaccess file using a text editor of your choice (e.g., `nano` or `vim`).
Add Cache-Control Headers: Insert the following snippet inside the <IfModule mod_expires.c> block in your .htaccess file to specify cache control for different types of static assets:
<filesMatch ".(ico|pdf|flv|jpg|jpeg|png|gif|js|css|swf)$">
    Header set Cache-Control "max-age=2592000, public"
</filesMatch>
This ensures that images are cached for 365 days and other static files like JavaScript and stylesheets are cached for 30 days, optimizing load times and leveraging browser caching effectively.
Add Expires Headers: If you prefer using “Expires” headers, add the following snippet instead, which also specifies efficient cache policies for your assets:
## EXPIRES CACHING ##
<IfModule mod_expires.c>
    ExpiresActive On
    ExpiresByType image/jpg "access 1 year"
    ExpiresByType image/jpeg "access 1 year"
    ExpiresByType image/gif "access 1 year"
    ExpiresByType image/png "access 1 year"
    ExpiresByType text/css "access 1 month"
    ExpiresByType text/html "access 1 month"
    ExpiresByType application/pdf "access 1 month"
    ExpiresByType text/x-javascript "access 1 month"
    ExpiresByType application/x-shockwave-flash "access 1 month"
    ExpiresByType image/x-icon "access 1 year"
    ExpiresDefault "access 1 month"
</IfModule>
## EXPIRES CACHING ##
By setting these “Expires” headers, you define how long browsers should cache content before re-fetching it from the server, enhancing PageSpeed Insights scores.
Save Changes: After adding these snippets to your .htaccess file, save the changes.
By adding “Cache-Control” and “Expires” headers to your server configuration, you can significantly improve website performance by leveraging browser caching.
These headers ensure that static assets are served efficiently and users experience faster loading times. Whether using Nginx or Apache servers, these simple adjustments can lead to a more efficient cache policy for your site.
2.2.3 Method #3 – Self Host Third Party Scripts
When it comes to optimizing your website performance, self-hosting third-party scripts can make a significant impact. Serving static assets with an efficient cache policy becomes more manageable, ensuring your static assets, such as JavaScript files, are easily accessible and not reliant on external servers. This approach is beneficial for reducing server load and enhancing the overall user experience.
- Download the Scripts: Begin by downloading the third-party scripts you need, such as those for Google Analytics or Facebook Pixel, directly from the respective service provider’s website.
- Upload the Scripts to Your Server: Place these downloaded scripts into an appropriate directory on your web server. This practice helps in controlling cache expiration, an essential factor for maintaining efficient browser caching.
- Update Your HTML Files: Modify the script tags in your HTML files to point to the locally hosted versions. This ensures that the static resources are served quickly from your own server, leveraging browser caching efficiently.
- Set Cache-Control Headers: On your server, configure appropriate caching headers like “Cache-Control” and “Expires” to specify how long these assets should be cached. This step is crucial to optimize load time and make the most of browser cache TTL.
- Monitor Using PageSpeed Insights: Utilize tools such as Google PageSpeed Insights and Chrome DevTools to monitor the impact of these changes. These tools help in identifying core web vital metrics and provide suggestions for further speed optimization.
By focusing on an effective caching policy and serving static assets from your own server, you can dramatically improve load times and reduce total blocking time.
This method not only enhances website performance but also aligns with best practices for caching headers, ultimately leading to a more efficient cache policy.
3 Frequently Asked Questions (FAQs)
3.1 How can I serve static assets with an efficient cache policy?
To serve static assets with an efficient cache policy, you should set appropriate cache-control headers and expire headers. This tells browsers how long to keep static files like images, JavaScript, and CSS in their cache, reducing load time and enhancing website performance.
3.2 What tools can I use to monitor my website’s caching efficiency?
Tools like Google PageSpeed Insights and Chrome DevTools are excellent for monitoring your website’s caching efficiency. They provide insights into core web vital metrics and suggest improvements for better cache utilization and website performance.
3.3 Why is browser caching important for user experience?
Browser caching is crucial because it stores static content locally on the user’s device for a set period. This reduces server load and load time, leading to a smoother and faster user experience. Using a caching plugin such as W3 Total Cache or WP Super Cache can help manage this effectively.
4 Conclusion
In conclusion, optimizing your website’s performance through effective cache policies is essential for delivering a superior user experience. By serving static assets with an efficient cache policy, you ensure that your static files such as images, JavaScript, and CSS are readily available to users, significantly reducing load time and enhancing overall website performance.
Implementing appropriate caching headers, like “Cache-Control” and “Expires,” and using tools like Google PageSpeed Insights and Chrome DevTools to monitor improvements can lead to significant speed optimization.
Utilizing caching plugins such as W3 Total Cache or WP Super Cache can further streamline the caching process and reduce server load. Additionally, hosting your static resources on a reliable web server and leveraging browser cache TTL helps maintain an efficient cache policy.
By addressing these factors, you can improve core web vital metrics, reduce total blocking time, and create a smooth, fast-loading website that keeps users engaged and satisfied.


