Has your vibrant, dynamic Instagram story ever transformed into a blurry, lackluster shadow of itself upon upload?
If so, you’re not alone. Many of us eagerly share our lives through Instagram stories, only to be met with frustration when those vivid photos and videos lose their clarity the moment they hit our followers’ screens.
But fear not, for your days of posting blurry Instagram stories can be a thing of the past. Whether it’s an issue with your mobile data connection, your Instagram app’s settings, or even the default camera app you’re using, there’s a solution at hand.
In this enlightening article, we’ll guide you through the essential steps to ensure your Instagram stories shine in the highest quality possible. By adjusting camera settings, optimizing internet connection, and tweaking a few Instagram settings, you can transform the way you share your moments.
Get set to dazzle your followers with high-quality videos and images that capture your essence, ensuring every upload reflects your vibrant digital narrative exactly as intended.
How To Play Instagram Emoji Game In 2 Taps
Are your Instagram Stories Blurry? Fix it in 5 steps
Blurry Instagram stories is no biggie. it happens all the time and there are several reason for why it may have happened. some of the common ones include platform mechanism, your network connection, camera and upload setup etc.
Whatever be the reason, lets understand how to fix such issues in 5 easy steps:
Fix 1: Enable High-Quality Uploads
Many of you might not know, but Instagram compresses images and videos to speed up loading times, which can unfortunately lead to a decrease in media quality. The good news is, you can opt to upload your stories in the highest quality possible with just a few simple steps:
Open your Instagram app: Launch Instagram on your device and click on your profile icon at the bottom of the screen to enter your profile.
Access settings: Tap on the three horizontal lines in the top right corner of your profile page. This will open a menu where you need to select Settings and Activity.
Data Usage and Media Quality: Scroll down within the settings menu until you find Data Usage and Media Quality. This is usually located under the Account section or you can search for it in the settings as below;
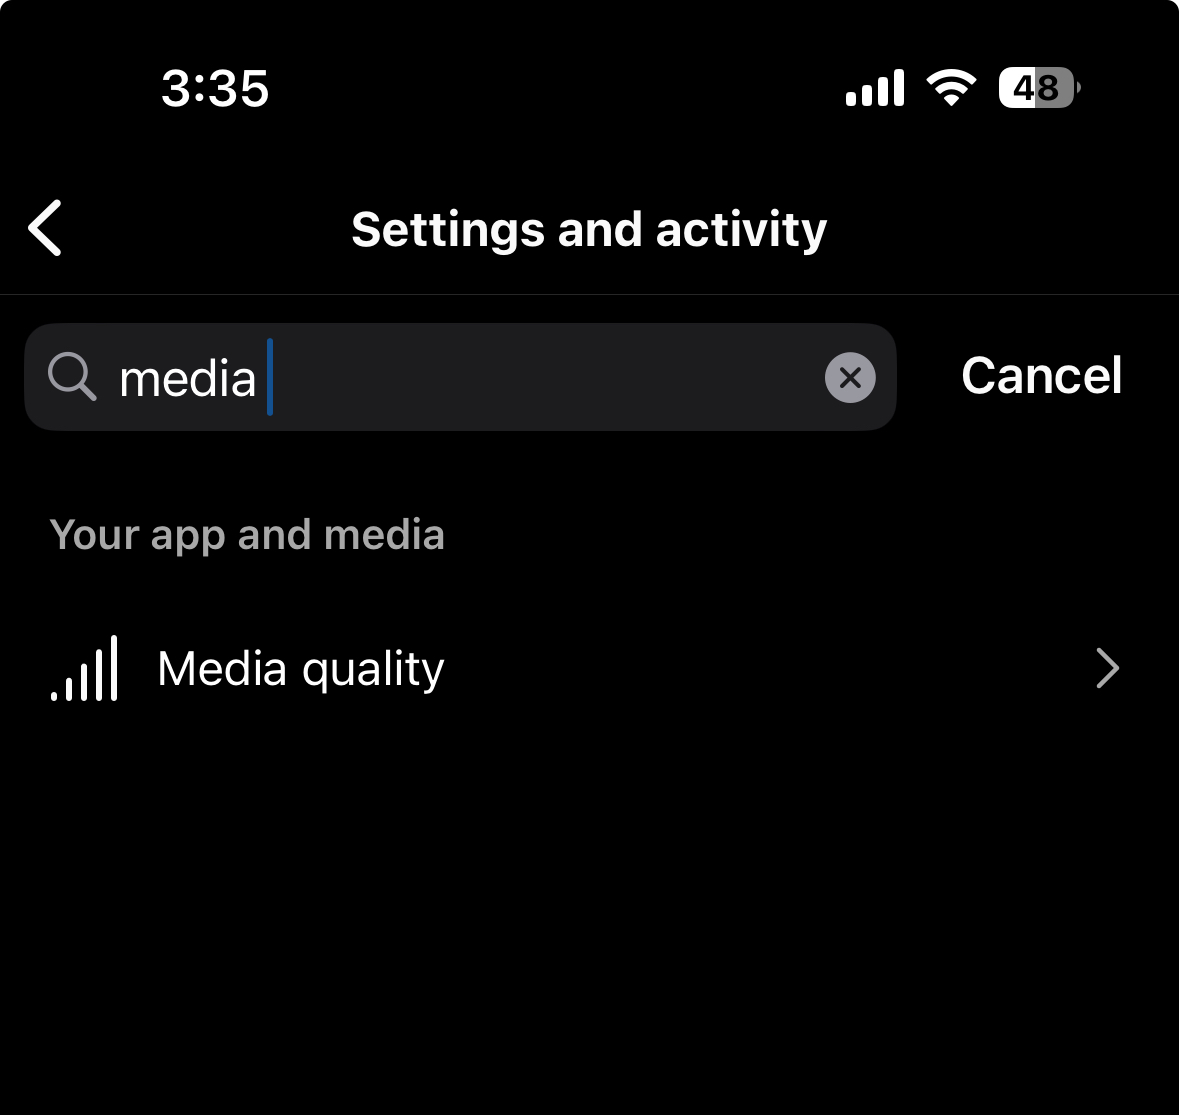
Turn on Upload at Highest Quality: In the Data Usage and Media Quality settings, you’ll see an option for Upload at Highest Quality. By turning this on, you allow your Instagram app to upload photos and videos in their maximum resolution, ensuring your content retains its clarity and vibrancy.
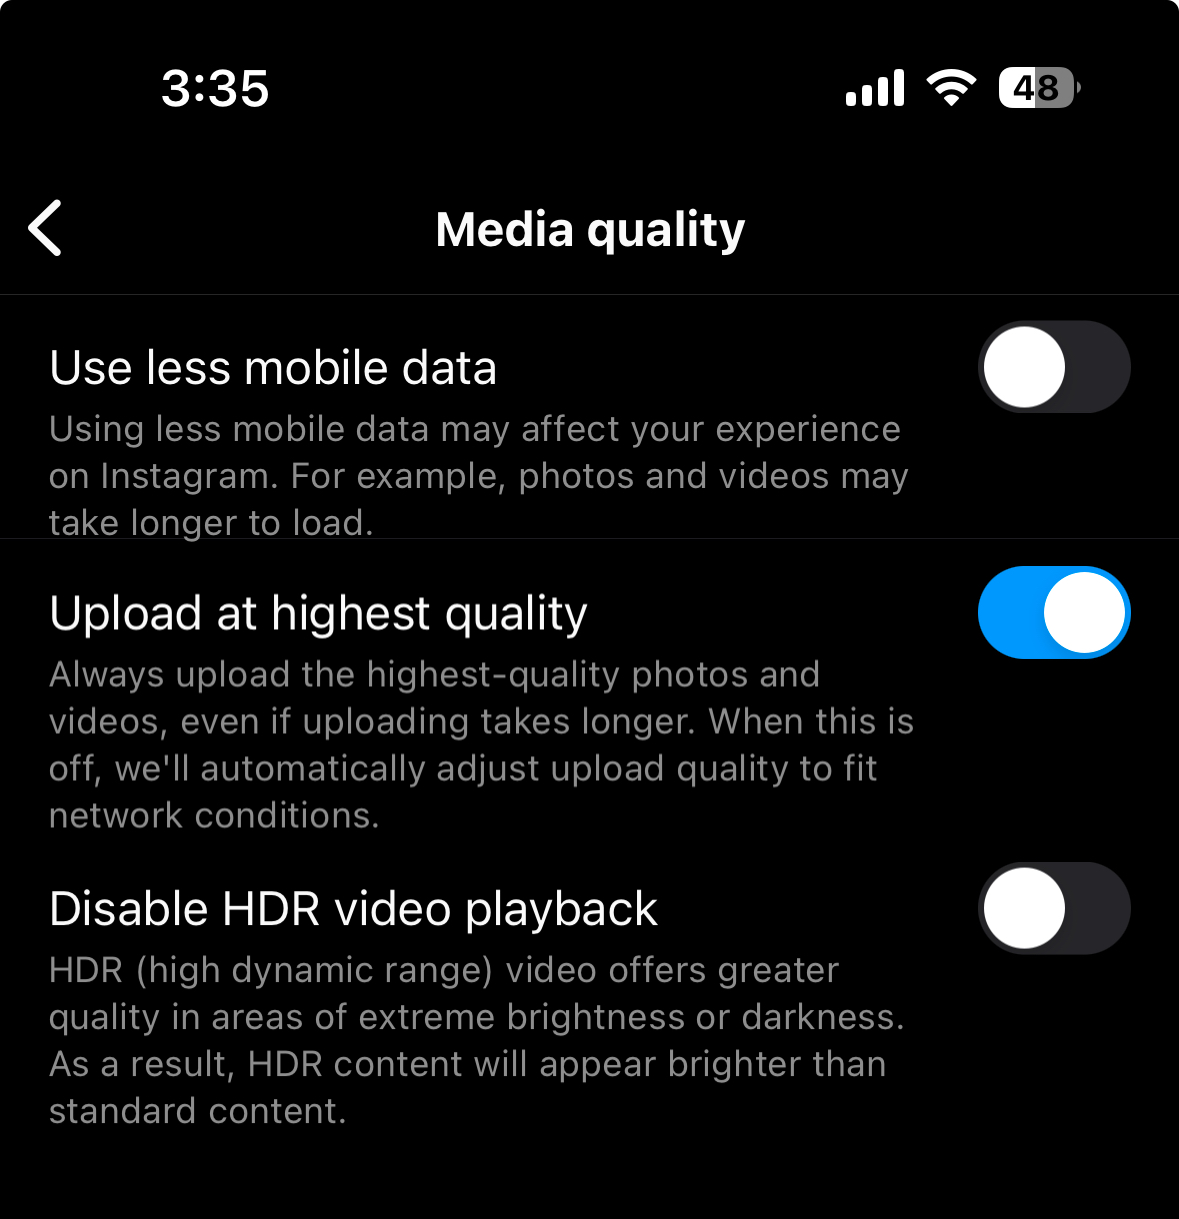
By following these steps, you encourage Instagram to prioritize quality over data saving, allowing your stories to shine brilliantly. Keep in mind, uploading at the highest quality might consume more mobile data or require a stronger Wi-Fi connection. However, it’s a worthy trade-off for stunning Instagram stories that capture your moments in all their glory.
Fix 2: Turn Off Data Saver Mode
Ensuring your Instagram stories maintain their quality doesn’t just stop with enabling high-quality uploads; another step to further enhance media clarity is by turning off the Data Saver mode. This feature, can negatively affect the resolution of your uploaded content, leading to those unwanted blurry Instagram stories.
Here’s how to disable this setting and enjoy clearer, higher quality uploads:
Navigate to your profile: Start by opening the Instagram app and tapping on your profile icon at the bottom right.
Open Instagram settings: Tap on the three horizontal lines at the top right of your profile to reveal additional options. Here, choose Settings and Privacy.
Select Data Usage and Media Quality: In the settings menu, find and select Data Usage and Media Quality. This option is typically located under the Account section.
Disable Data Saver: Within the Data Usage and Media Quality settings, you’ll find a toggle for Data Saver. Switch this off to disable the feature.
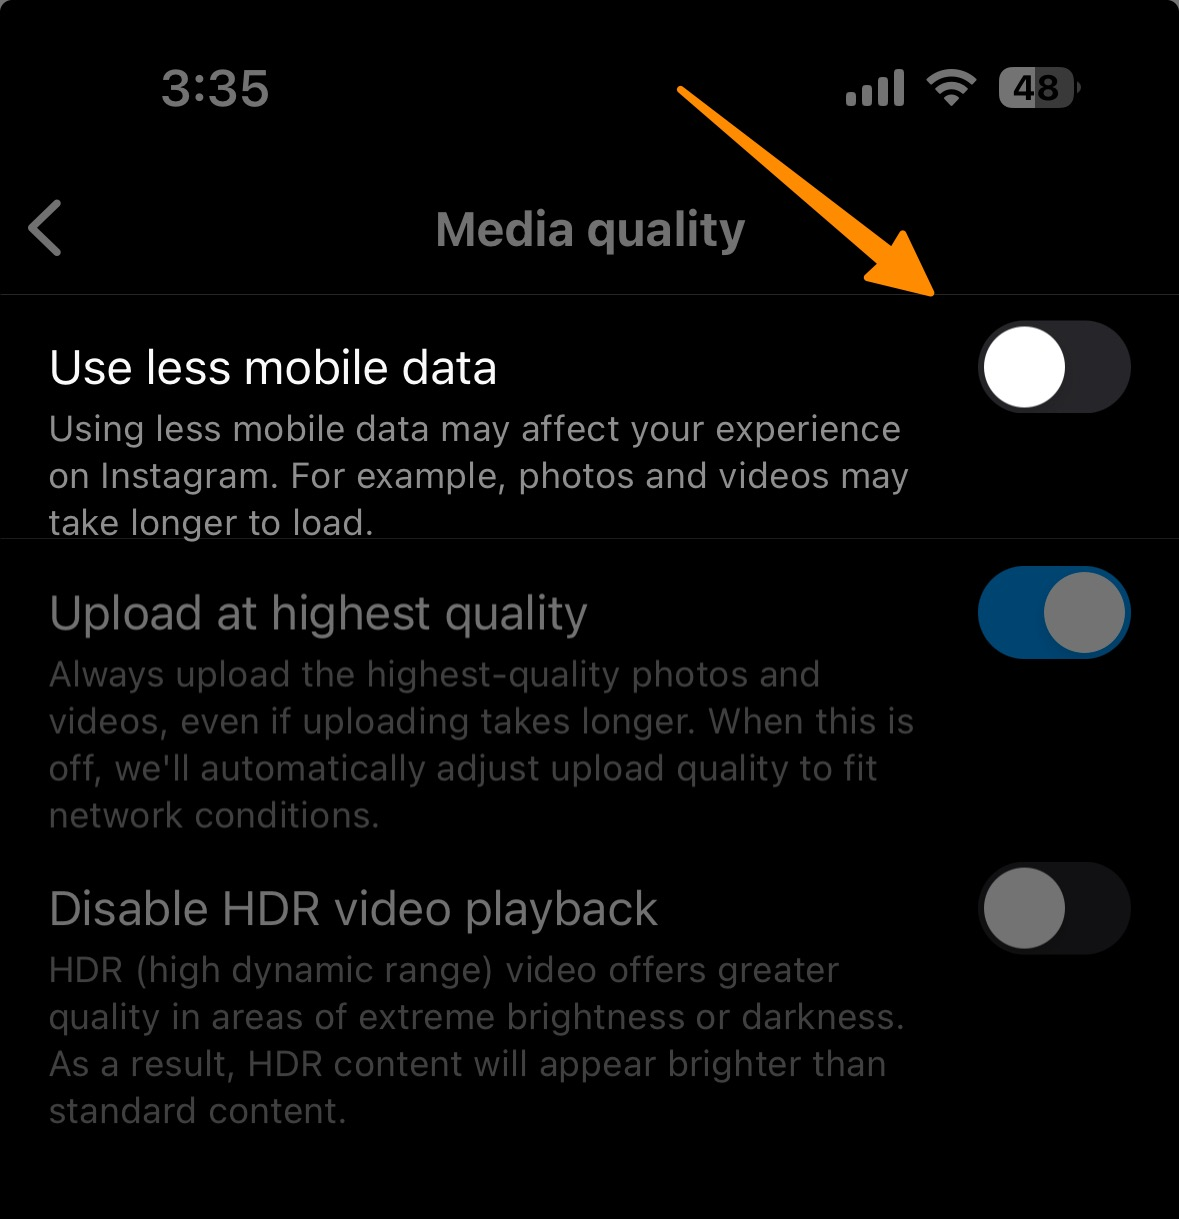
By deactivating the Data Saver mode, you prevent Instagram from automatically reducing the picture and video size of your uploads to save on mobile data usage. Remember, while this action may lead to higher data consumption, the payoff is crisp, clear Instagram stories that better reflect your intended visual narrative.
Adjusting these settings ensures your Instagram videos and photos stay vibrant and full of life, just the way you want them, making your social media platforms showcase your moments in the highest quality imaginable.
Fix 3: Clear Instagram Cache on Android Devices
Clearing the cache on your Android device can work wonders for fixing blurry Instagram stories. Over time, the Instagram app accumulates temporary data which, while intended to speed up your experience, can sometimes lead to issues such as reducing the quality of your stories.
Here’s a step-by-step guide to clear your Instagram cache:
Long Press on the Instagram app: Find the Instagram app icon on your device and press and hold it. You will see a small menu or icons pop up.
Tap on App Info: In the menu or icons that appear, tap on “App Info” or the “i” icon which will take you to the application’s information page.
Click Clear Data: You’ll find the “Clear Data” option within this section – but don’t worry, this won’t delete your Instagram account or your posts.
Tap Clear Cache: Finally, tap on “Clear Cache” and then on “OK” to confirm the process of clearing all cached data.
By following these simple steps, you eliminate stored data that might be contributing to the quality issues with your Instagram stories. This action can significantly ensure high quality uploads on Instagram, especially if the cause of blurry Instagram stories stems from problematic cached data.
Remember, clearing the cache will not affect your Instagram account or its content but can fix blurry Instagram stories by refreshing the app’s stored data. This can also improve overall app performance, reduce mobile data usage, and enhance media quality, making your Instagram stories and videos appear in the highest quality possible.
Plus, it’s a good practice to periodically clear the cache for all your social media apps to maintain optimum resolution and video quality for a new Instagram journey.
Fix 4: Optimize Media Before Adding to Your Instagram Story
Maintaining the best possible resolution for your Instagram stories is crucial for engagement and viewer satisfaction. Here’s a guide to ensure your media maintains its quality by optimizing it before uploading:
Pre-edit your content: Use your default camera app or a preferred editing app to add music, filters, GIFs, or adjustments to your photos and videos before uploading them to your Instagram story. This helps prevent Instagram from compressing the file further.
Adjust camera quality settings: Before capturing content intended for your stories, check your camera app’s settings. Ensure you’re set to shoot in the highest quality possible to avoid blurry Instagram stories.
Avoid adding elements within Instagram: Once you’ve pre-edited your content, upload it directly to your story without adding additional music, filters, or effects through the Instagram app. This reduces the chances of Instagram compressing your media, leading to high quality uploads.
Check your internet connection: A strong Wi-Fi connection or a stable mobile network can influence your upload quality. Weak or poor internet connections can result in partially uploaded files or low quality, blurry Instagram story videos.
Update Instagram regularly: Ensuring you’re using the latest version of the Instagram app can also affect media quality. Updates often contain bug fixes and improvements for uploading videos and photos, potentially fixing blurry videos or poor image quality.
By incorporating these practices into your new Instagram journey, you can significantly improve the media quality of your Instagram stories, ensuring they always appear in the highest quality. This not only enhances your viewer’s experience but also solidifies your presence on social media platforms with high-quality videos and images that reflect your intended message and aesthetic.
Step 5: Ensure Correct Dimensions and Format for High-Quality Instagram Stories
To prevent your Instagram stories from becoming blurry instagram stories, it’s crucial to start with media that meets Instagram’s preferred dimensions and format.
Follow these steps to ensure high quality uploads:
Step 5.1: Prepare Your Content in the Right Dimensions
Use the optimal resolution: Ensure your photos and videos are at a resolution of 1920 x 1080 pixels, which is the ideal size for Instagram stories. This prevents the Instagram app from stretching or compressing your content, which can lead to a reduction in media quality.
Step 5.2: Maintain Proper Image Quality
Adjust pixel density: Your images should have a pixel density of at least 72ppi. Higher pixel density can further improve the image quality and reduce the blurry instagram story effect. Use editing tools like PhotoScape or Canva to adjust this before uploading.
Step 5.3: Opt for the Correct Aspect Ratio
Keep the right aspect ratio: Select vertical images or adjust them to fit the 9:16 ratio without excessive zooming or cropping. This maintains the camera quality and image quality, making your Instagram stories look crisp and clear.
Step 5.4: Save in High-Quality Format
Choose JPEG or PNG: Save your images in a high quality format such as JPEG or PNG. Avoid using filters or effects in the default camera app or other editing software that might degrade the picture and video size and clarity.
Step 5.5: Update Instagram and Internet Settings
Ensure strong internet connection: A stable and strong Wi-Fi connection or active cellular network is essential when uploading. Weak or poor internet connection can affect the upload quality, leading to blurry Instagram story videos.
Update Instagram: Regularly updating the Instagram app ensures you have the latest features and bug fixes that might improve video quality and media quality, helping to fix blurry Instagram stories.
By adhering to these guidelines, you will not only fix blurry Instagram stories but also ensure high quality uploads, enhancing your new Instagram journey. Your followers will appreciate the improved video quality and media quality, enriching their viewing experience and increasing engagement on your social media platforms.
More Instagram Resources
- How to Save Music and Use the “Saved Music” Feature on Instagram
- How to Use Instagram’s Story Camera Widget on iOS
- How to get on the Instagram Explore page
- How to Reset Instagram Explore Page (3 Methods)
- How to view Instagram stories without them knowing (5 Options)
- How to use Wayback Machine for Instagram (And 2 Alternatives)
- How to see who Shared your Instagram post? (The Truth)
- How to Get Notes on Instagram in 2 Simple Steps
- How to Find Drafts on Instagram in Just Few Taps
- How to React to Messages on Instagram (PC and App)
- 7 Ways to Fix “We Limit How Often You Can Do Certain Things on Instagram” Error
- 7 Best Apps for Instagram for PC in 2024 (All are Free!)
Conclusion
In an era where social media platforms like Instagram play a pivotal role in our digital expression and connectivity, ensuring the highest quality of our uploads becomes not just a preference, but a necessity. By implementing the strategies outlined you can significantly enhance the media quality of your Instagram stories and videos.
Remember, each Instagram story and video is a reflection of your personal or brand narrative; make it count by making it high quality. Engage your audience with crisp, clear visuals that invite interaction and appreciation. Through less mobile data usage and high-quality uploads, your new Instagram journey promises to be more vibrant and impactful than ever before.
Ensure high quality uploads on Instagram and stand out in the virtual crowd with content that thrills, engages, and tells a story in the highest quality imaginable.
Test your knowledge
Take a quick 5-question quiz based on this page.

