Looking for a comprehensive checklist for optimising blog posts to help you improve your search engine rankings and increase blog traffic?
Then you might find your answer here.
It takes a lot of time and works to write a blog article. Whether you make them yourself or hire someone else to do them, they are expensive in terms of resources. Because of this, you require a solid return on investment (ROI) from each blog article.
Every post on your website needs to be SEO-optimised if you want people to find it independently.
Blogging is a critical component of any inbound marketing strategy. You need to focus on search engine optimisation if you’re going to engage current customers or bring in new ones.
If your content doesn’t rank well on Google’s search page, there is very little chance that a potential customer looking for a solution can find one.
We are offering you our blog post SEO checklist in this post to help you optimise your blog posts for SEO like a pro.
This will help you regularly increase visitors to your website. But before we start, there are some questions you might hear somewhere, like
How do I optimise my blog for keywords?
How do I optimise SEO blog content?
How do I optimise SEO keywords?
How do you write SEO content like a pro?
What is the most effective way of making your blog searchable?
What SEO keywords to choose first?
Should I optimise a single page for multiple keywords?
Are you ready to start with the SEO checklist for blog posts that will assist you in achieving success with your content marketing?
Then let’s get started.
Keyword Research
Keyword research is finding and analysing search terms that people enter into search engines and then matching those keywords with topics relevant to your business.
The goal of your keyword research will be to create a list of the best keywords you could use in your online content to help your blog rank higher in search results.
Many novice writers write on subjects they think their readers would be interested in based on their best assumptions.
You don’t have to guess significantly since keyword research can help you find exactly what your customers are looking for.
Both content writers and SEO specialists employ the approach of keyword research. Based on search engine statistics, it assists you in identifying topics that your users are interested in.
Search engine optimization (SEO) makes it easier for users to find information among the many posts on Google and the search engine results page. In this case, keywords are essential, making keyword research an essential part of good post-optimization.
The best way to get a high ranking is to find the right keywords and structure the content around them.
How to Research Keywords for your Website or Business?
There are various resources available online or on youtube for free for this particular topic, but let me give you an overview of how you can quickly get winning keywords for your business.
Before we jump onto the solution, you must have a keyword research tool to scrape winning keywords to optimize your blog posts for SEO.
Signup for any one of the following services;
We will demonstrate using SEMRUSH in the following tutorial.
Step 1: Shortlist Main Keywords related to your niche
The first step is to shortlist the main keywords related to your niche. for example, if your niche is about dogs and you want to sell some dog products, you may want to create content around dog’s health, lifestyle, food etc., right?
then your main keywords will be as follows;
Dog Health
Dog Foods
Dog Toys
Dog Breeds
and so on, now once you have shortlisted this, follow the next step below.
Step 2: Find a broad match for your keywords
For this, go to semrush and click on a magic keyword tool;
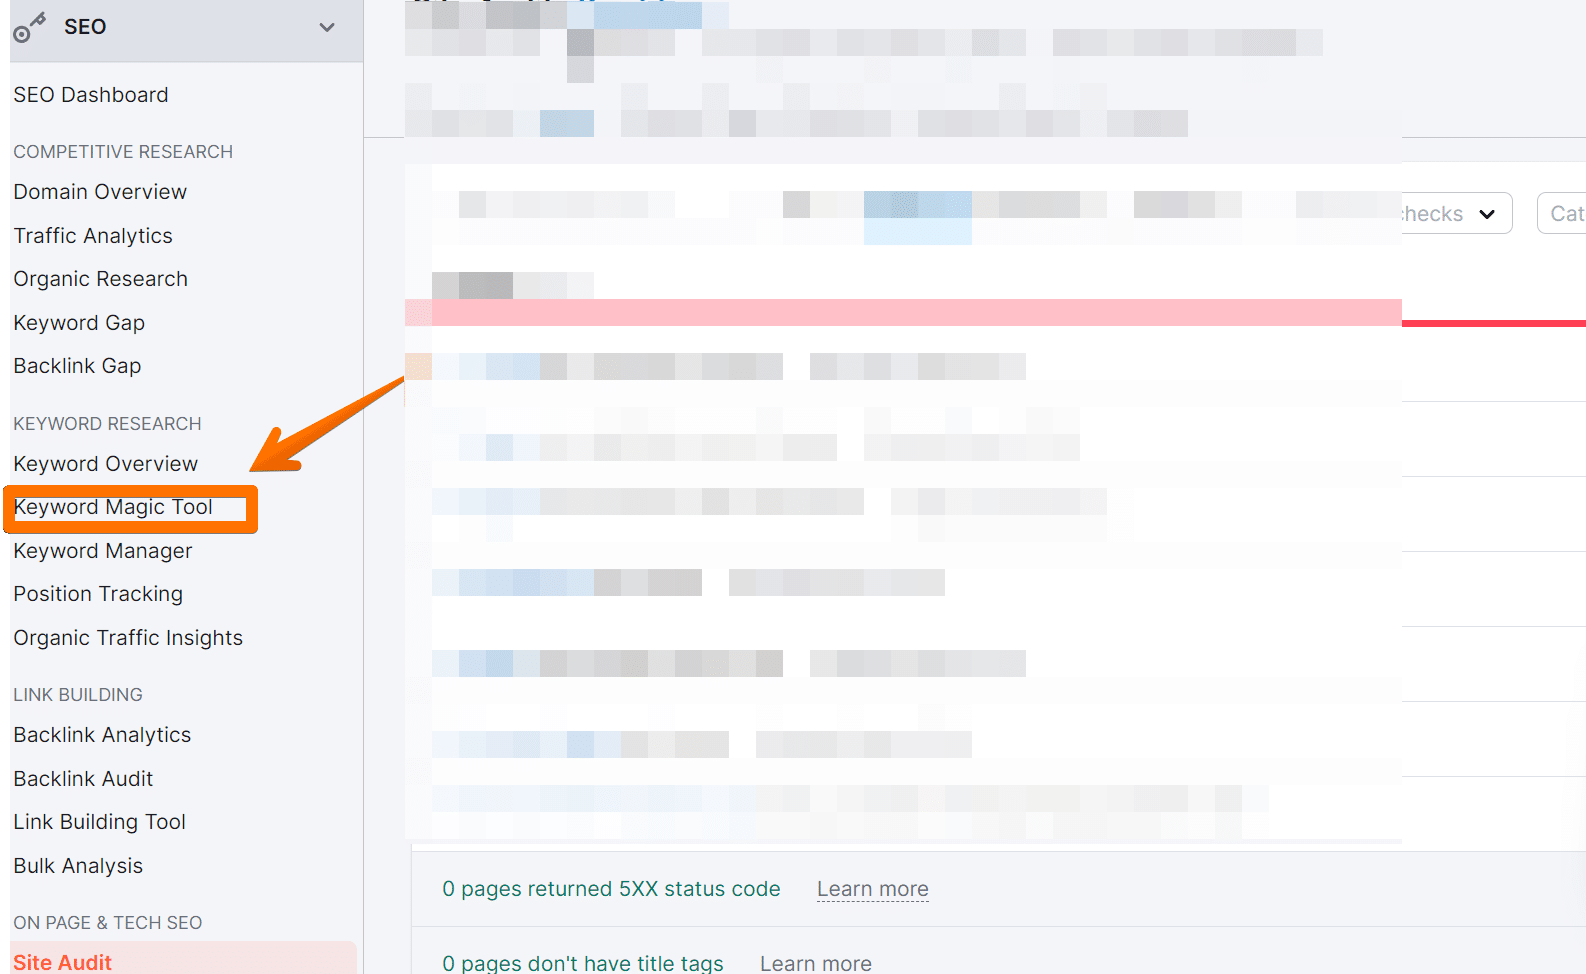
Now type the main keyword which you have sorted above;

Also, select the country you want to rank or scrape keywords from.
then click on search, and it will take a minute to retrieve results;
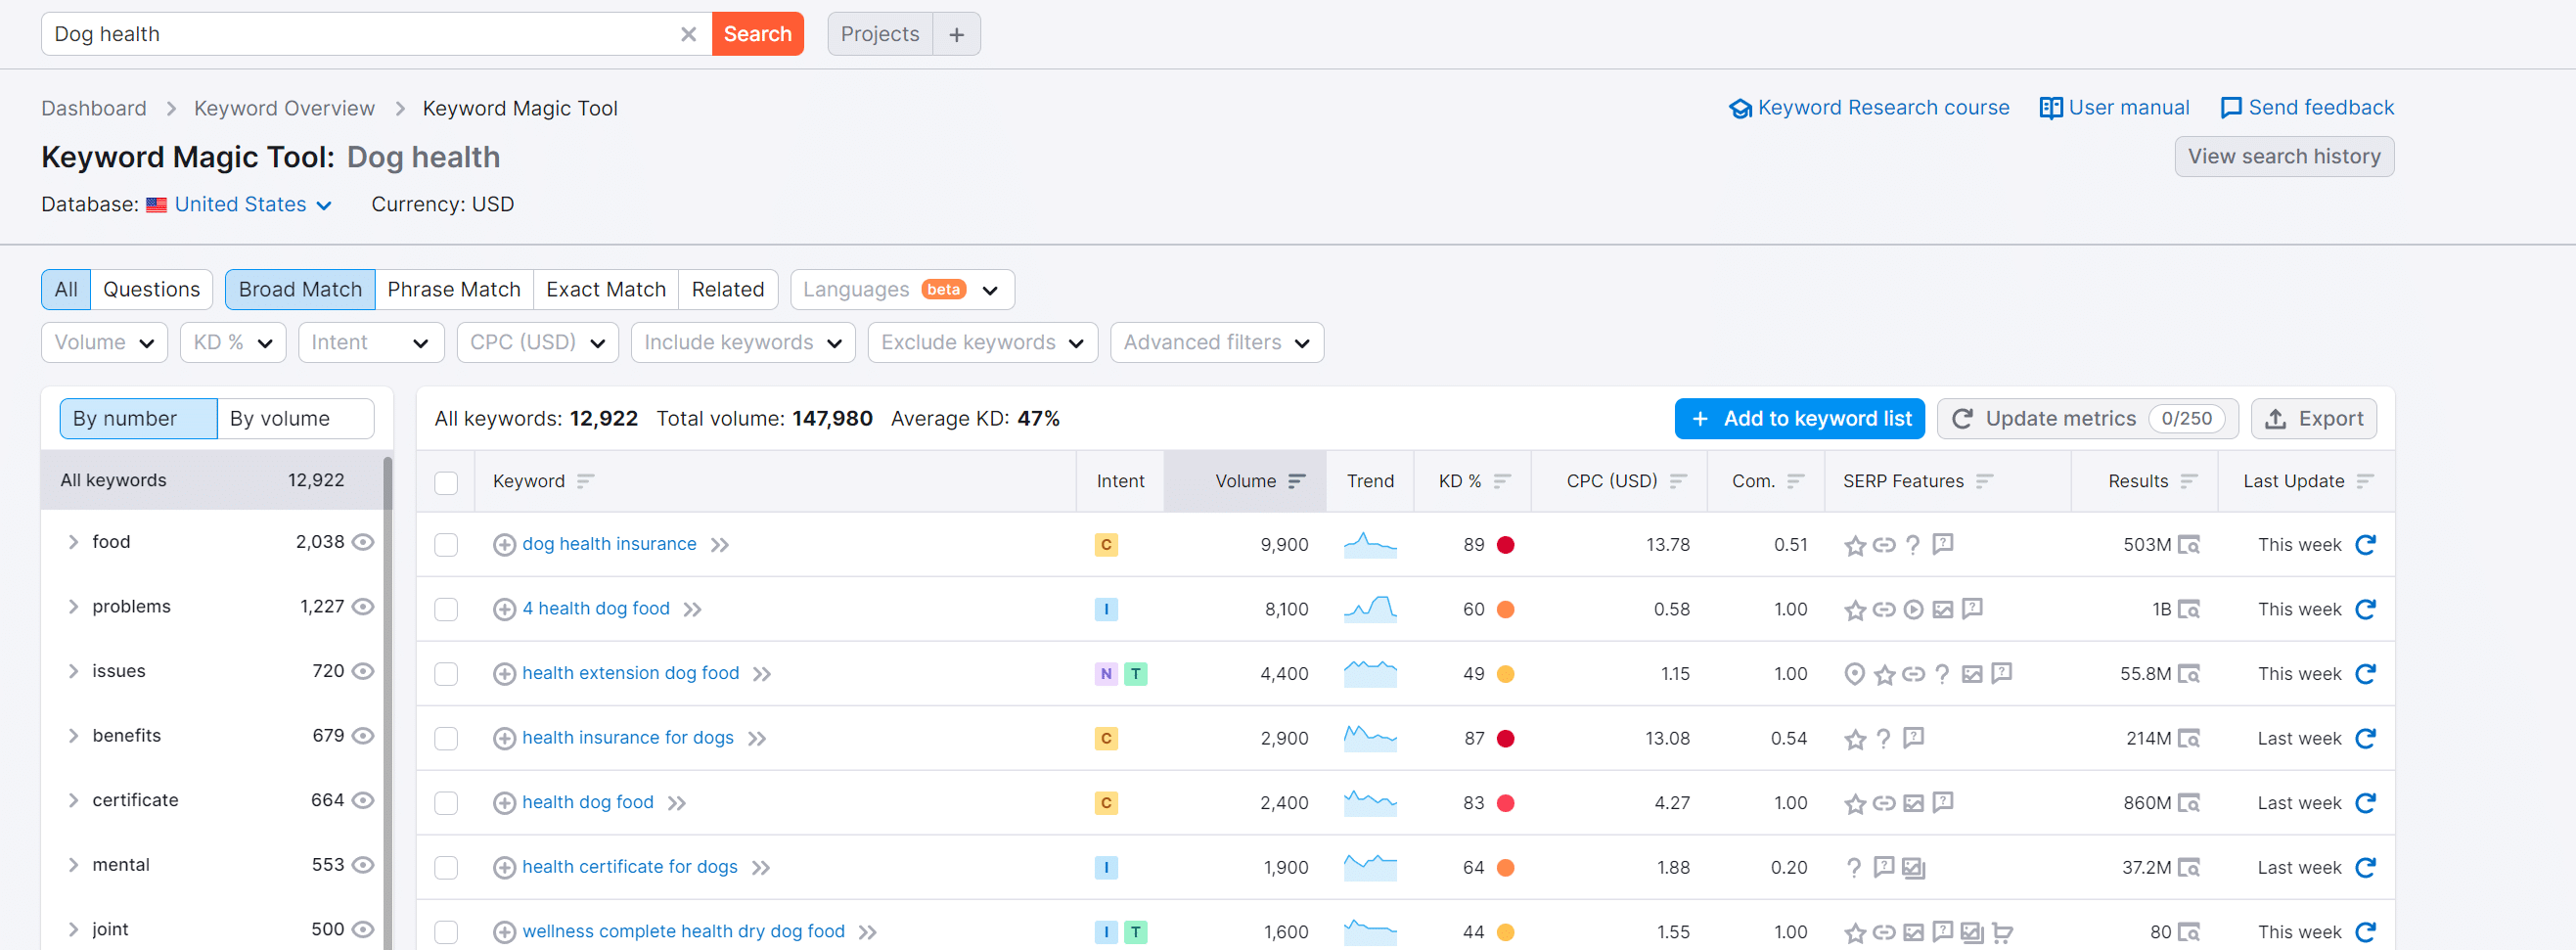
Now, for our content, we need broad keyword related to the main, as you can see, broad is already selected; what you need to do is click on “questions” to find long tail keywords which people are searching on search engines.
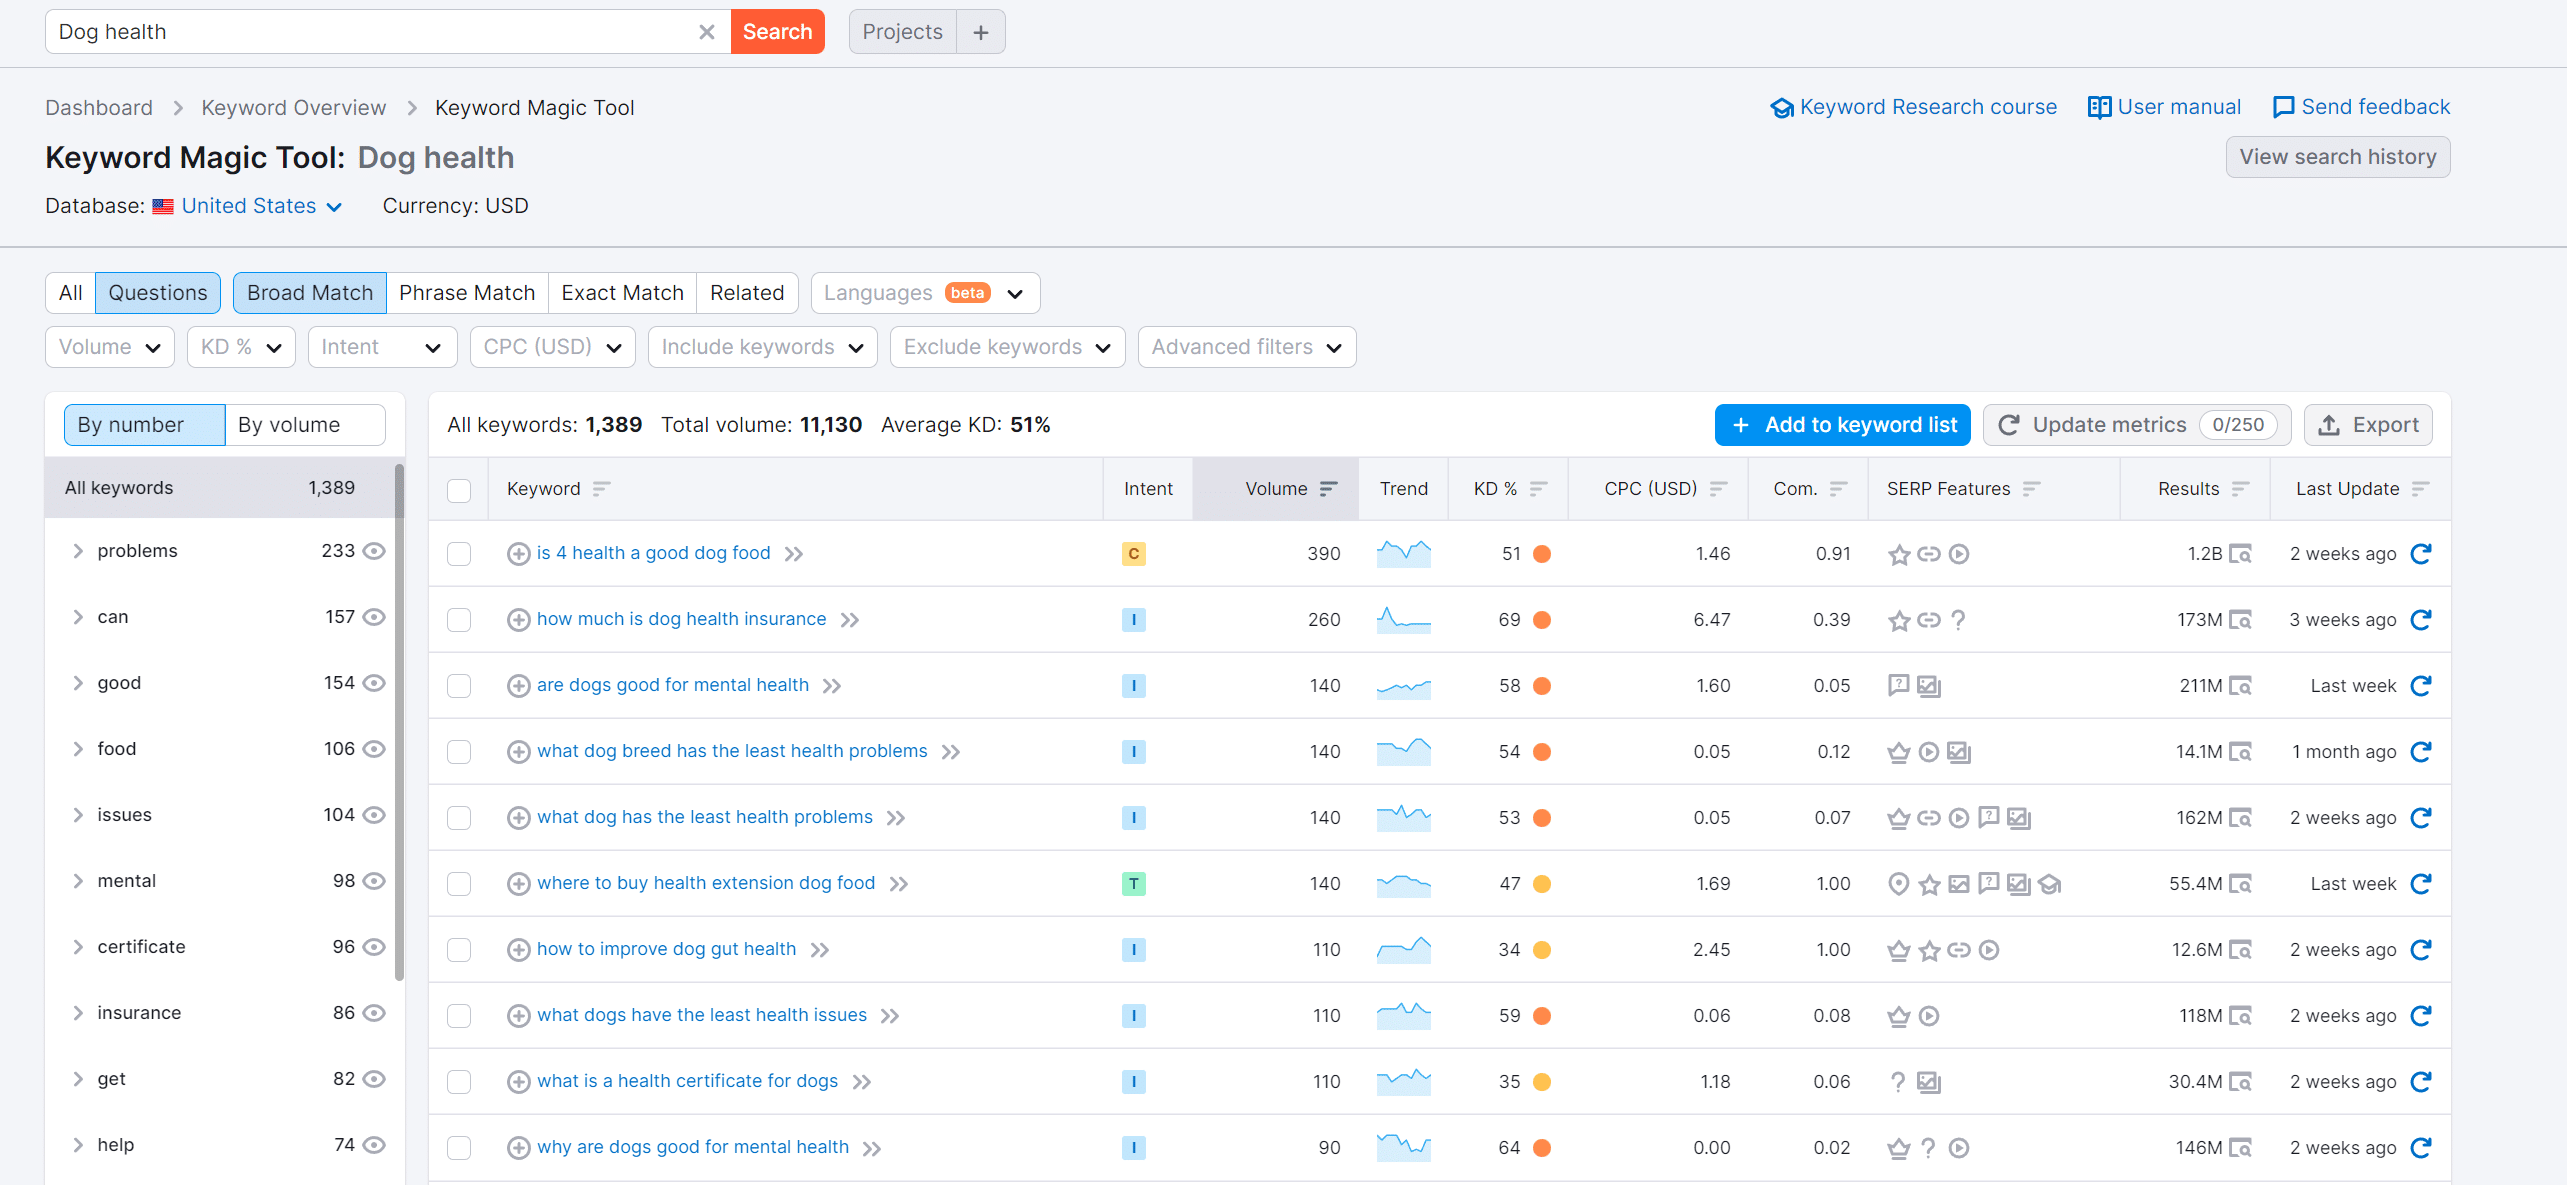
Now list full of questions will appear on the result panel. In the next step, we will learn to choose the correct intent for our content.
Step 3: Choose the Correct Intent
When creating content for your blog, it’s important to choose the correct intent. There are four main types of intent: informational, navigational, commercial, and transactional.
Informational content is designed to educate or entertain the reader. It might include articles, tutorials, or product reviews.
Navigational content is designed to help the reader find what they’re looking for. It might include a search bar, categories, or tags.
Commercial content is designed to promote a product or service. It might include ads, coupons, or affiliate links.
Transactional content is designed to help the reader complete a task. It might include a contact form, registration form, or payment gateway.
Choose the right intent for your blog content, and you’ll be able to engage with your readers.
Blog SEO Tips#1 – You can easily do it with your search result on keyword magic tool, just select intent option as below;
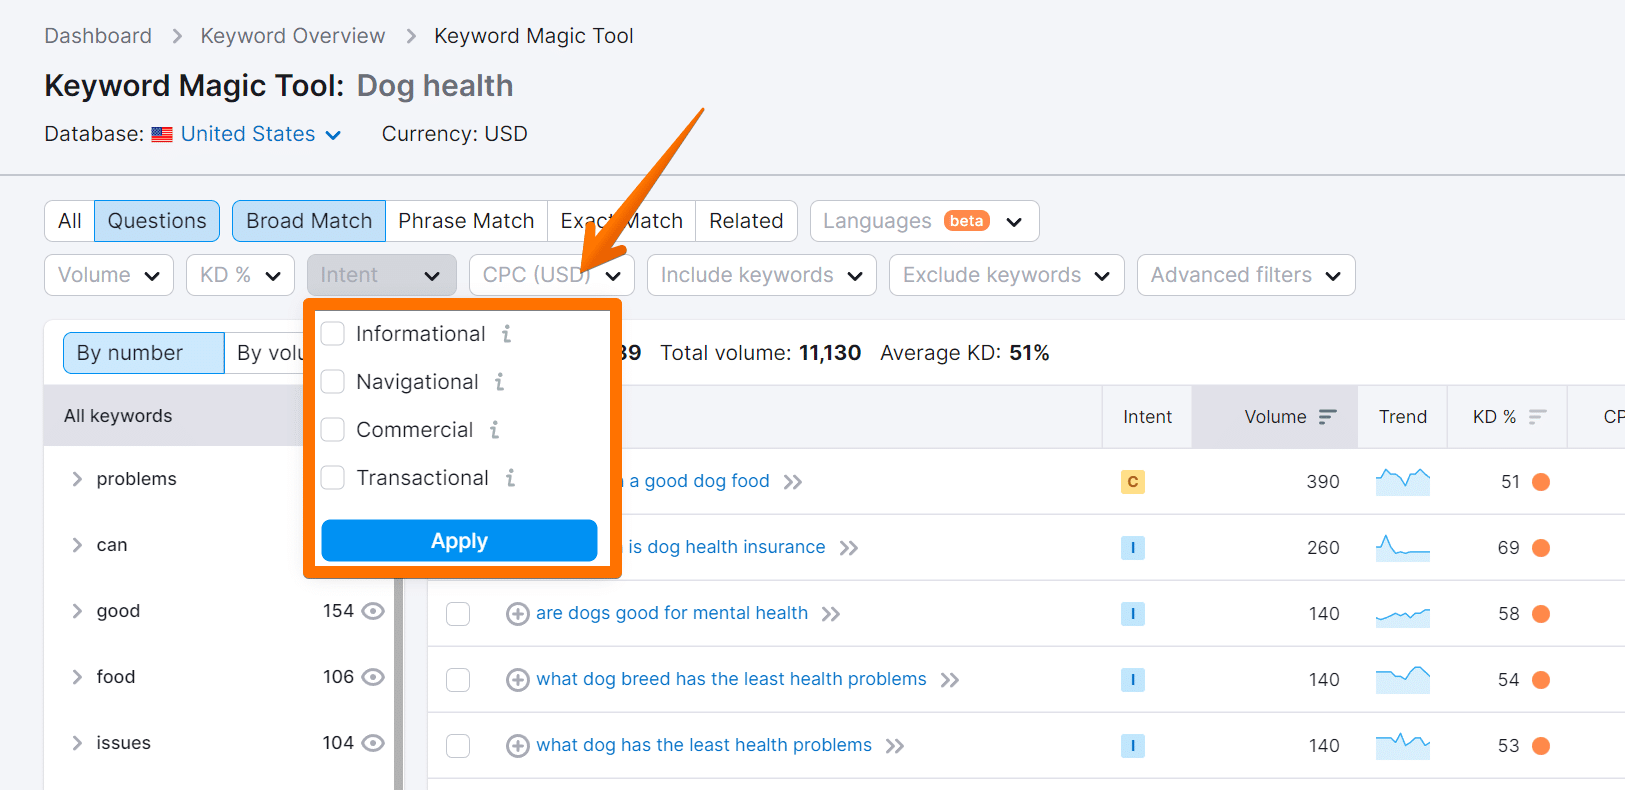
and click on apply.
Step 4: Find Low Keyword Difficulty Keywords with Some Volume
Creating content for your blog should be unique and provide a helpful content strategy, not what your competitors are already doing and ranking. You have to be different and create what they may miss out on.
That’s where Keyword difficulty comes in, Keyword difficulty signifies how hard is to rank on search engines for each keyword. It signifies green which is easy to red which is hard.
When you mouse over to the value, you will see how much work you have to do offline to make it possible to rank on that specific keyword;
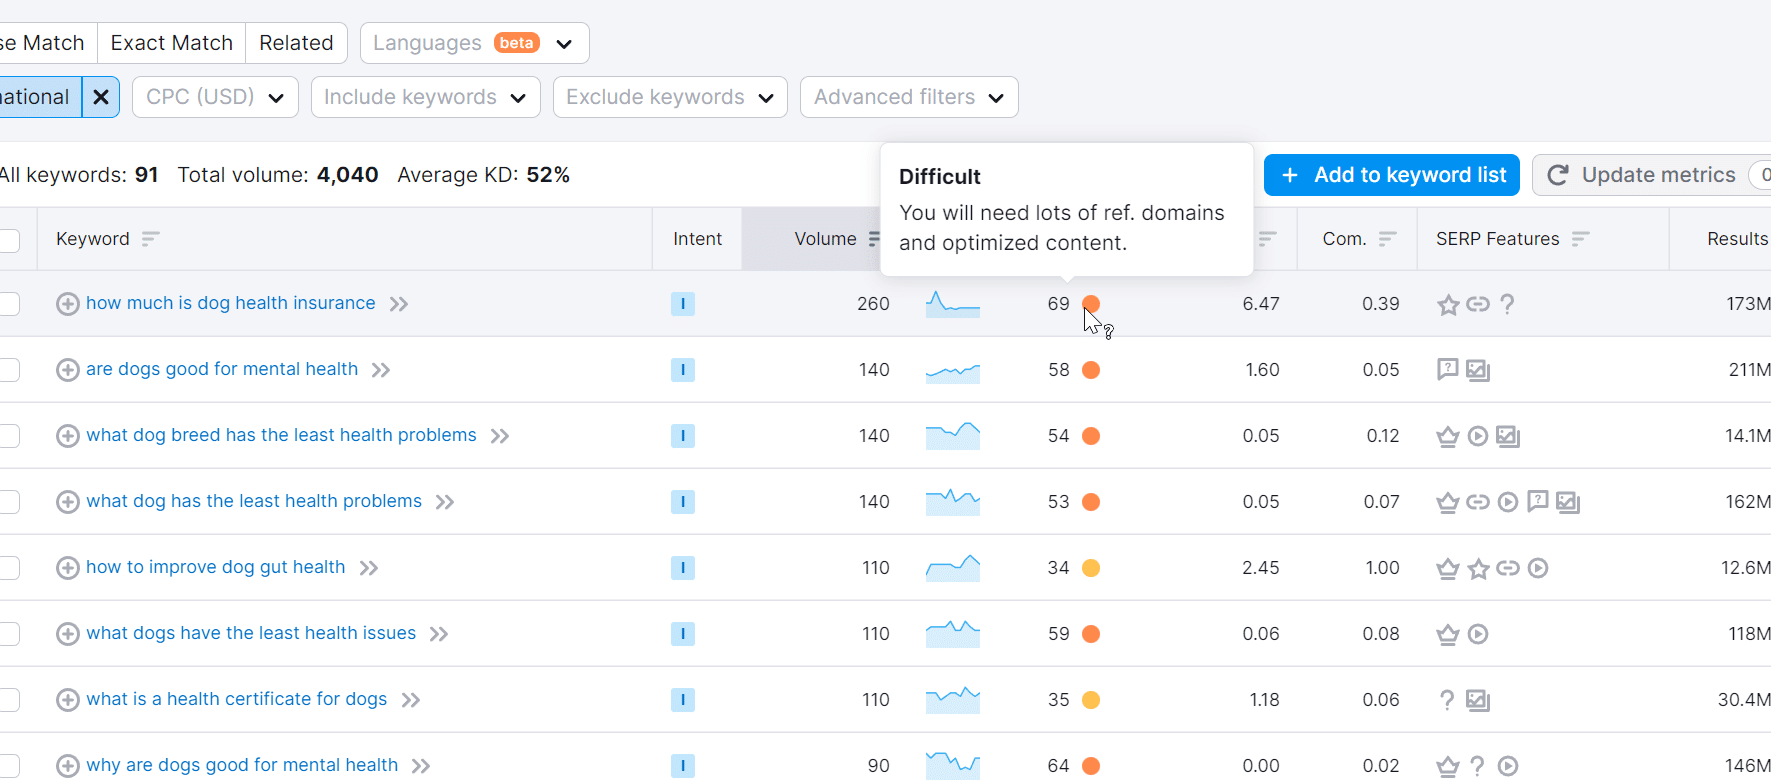
What you can do in this case is click on the KD% header twice to sort it from easy to hard, like below;

now you can see all keywords related to your main keyword which is long tail keywords and low keyword difficulty.
Step 5: Create Keyword Lists
Now in this step, to shortlist keywords, first we need to create a keyword list, to do the same click on “Add to keyword list” button;
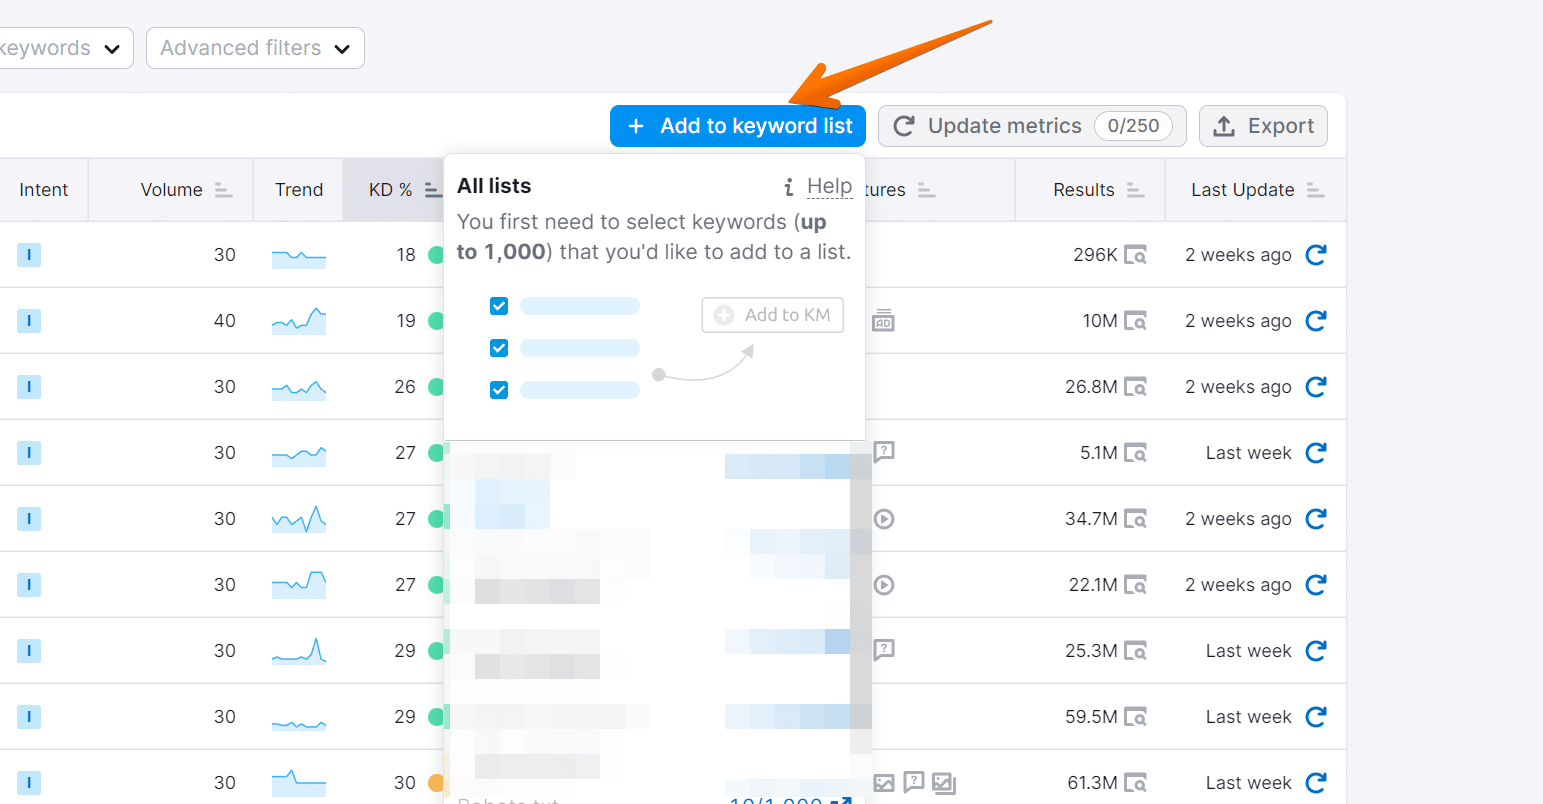
scroll down and click on “create new list”
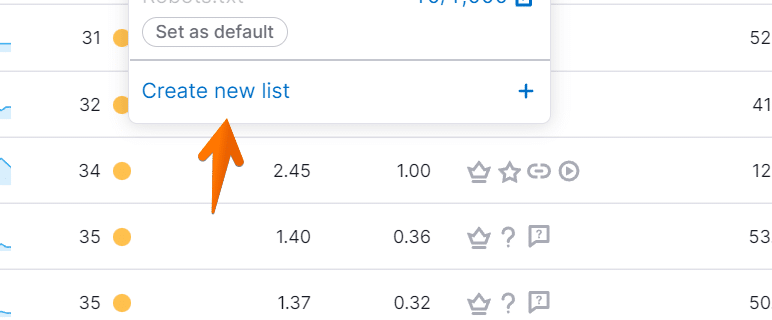
Now, you can name it anything you want and click on the green tick;
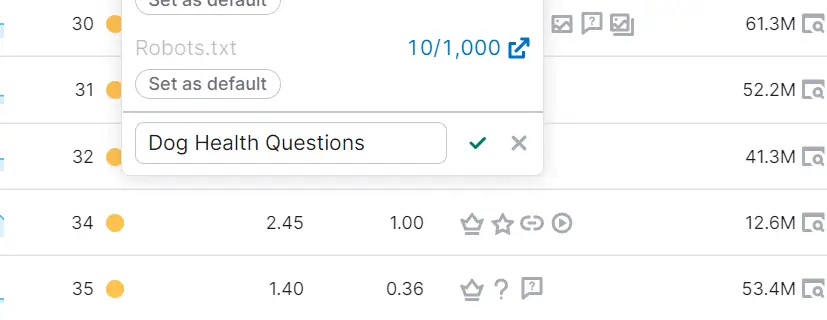
Step 6: Add Winning keywords to Your newly Created Keyword List
Now, start adding keywords relevant to your niche with some traffic volume that can generate traffic to your website.
To do the same, select 3 lines button by mouse hovering to “+” icon in front of keyword and select keyword list you just created above;
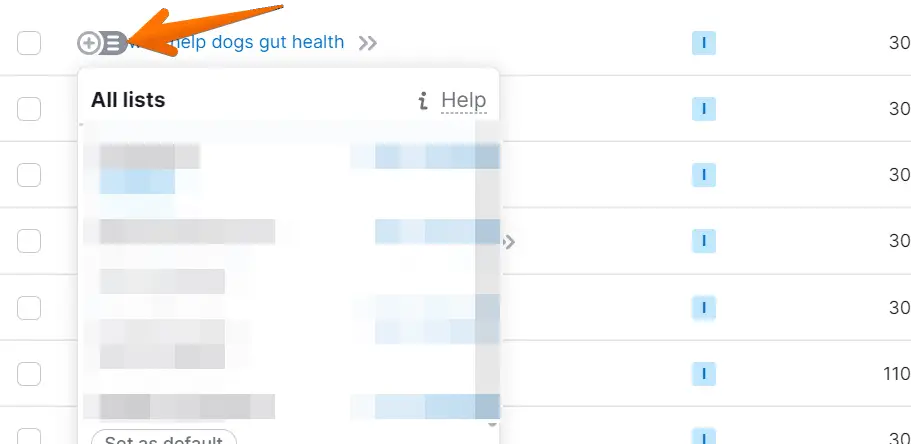
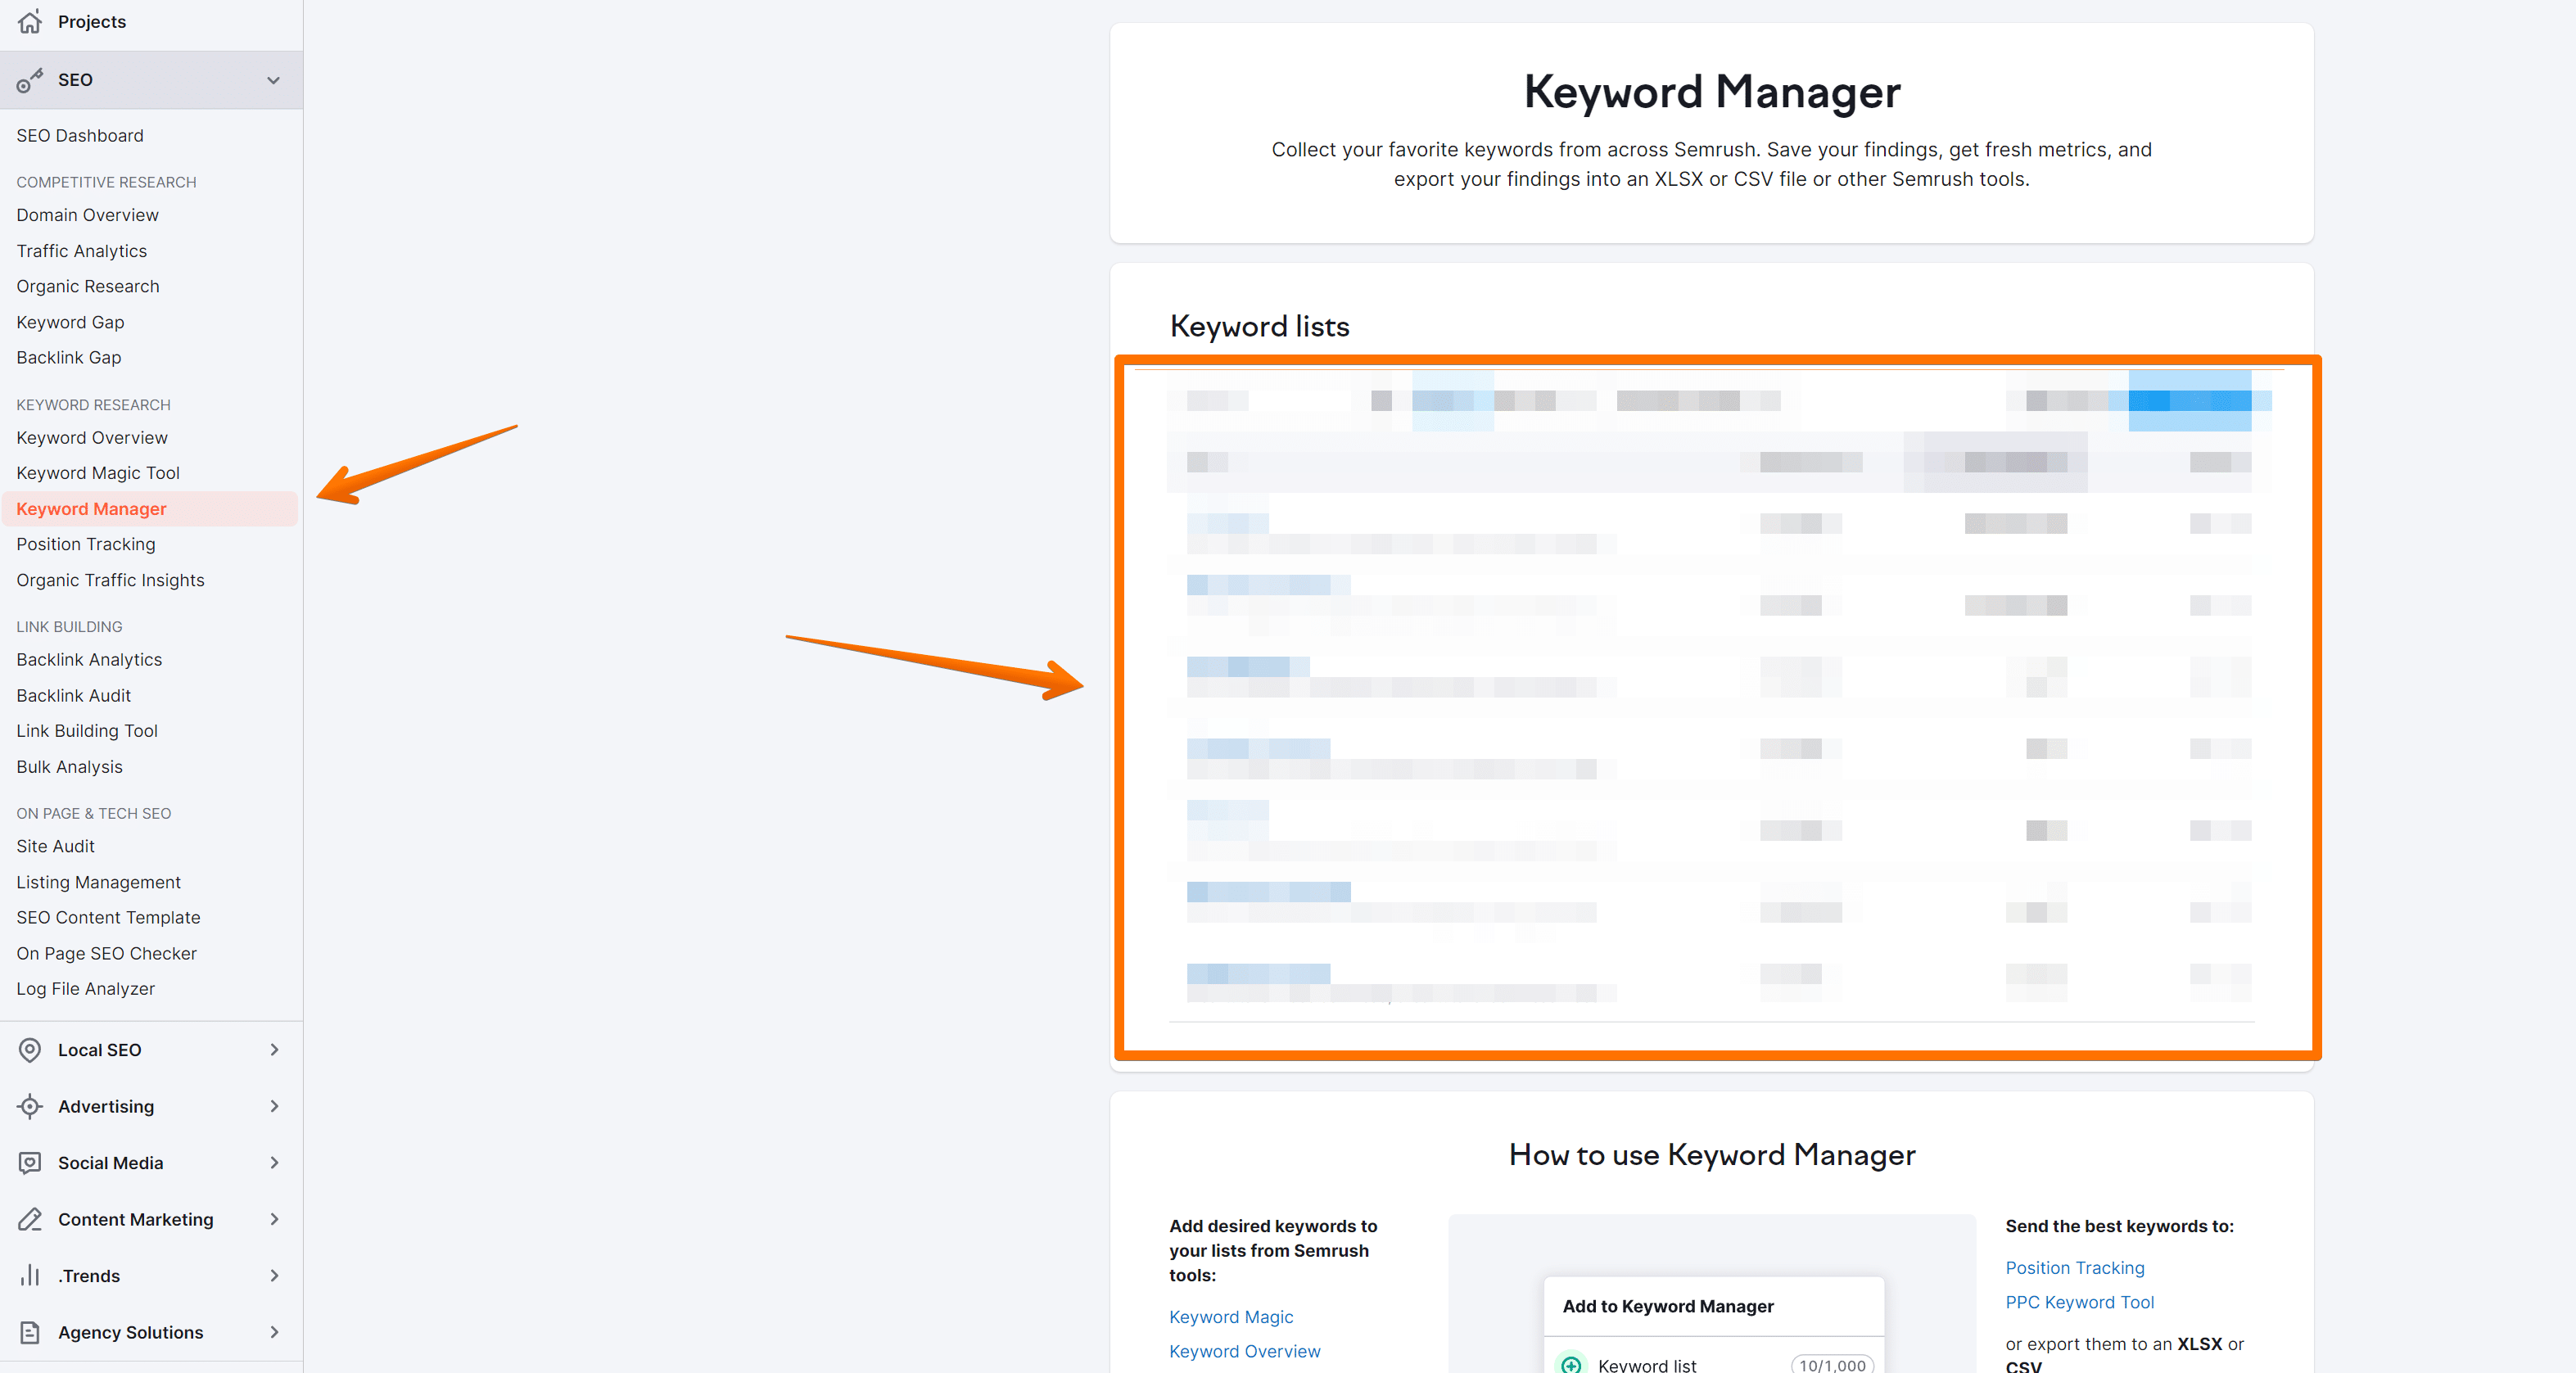
Now keep adding to the list one by one and once you have completed the task you can check the list by going to the keyword manager from the left sidebar as below;
Step 7: Create Long Form Content Around Keywords Shortlisted
Now you should start creating long-form content for the keywords you have shortlisted.
One difficult task to optimize your blog posts is to know how many words should we write to compete with our competitors, right?
Blog SEO Tips#2 – You can use a tool like surfers for the same. just type your keyword in the content editor, and you will be able to see Words count, headings, paragraphs and images you need to include in your blog posts to rank higher in search engines for the same keyword.
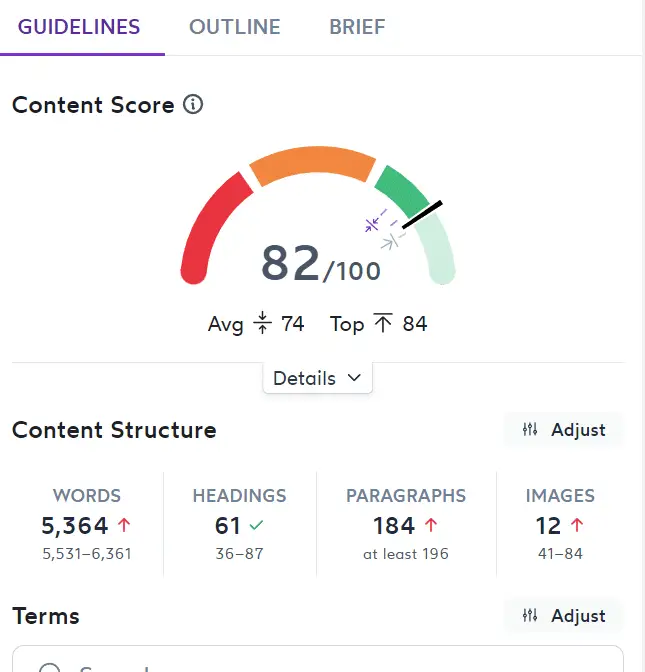
On the other hand, keyword research and analysis help find target markets and the most popular search terms in search engine data. The material users are looking for may be written with this research aid.
Once you have your content strategy planned, you may employ these keywords. This will ensure that you write about things people care about, and it’s a great way to build a loyal readership.
Find semantic keywords
It’s time to choose the term with the most significant search volume and the least competition once you’ve done your keyword research and found some keyword possibilities.
This is going to be your primary keyword. Your users will most likely look for your content using this search term.
If you use All in One SEO, one of the best WordPress SEO plugins, you can set the target keyword in the SEO settings for your article. This enables you to evaluate its usage in your post.
How to Find Latent Semantic Keywords?
There are many content strategies available online for you to follow. Still, one of them is to create a long-form content strategy around the Latest semantic keywords or, you can say, keywords related to your content’s main keyword for which you are writing blog posts for SEO.
You can check out any two of the following apps for the same;
We will be using SurferSEO for the following tutorial.
Step 1: Type your Keyword in Content Editor
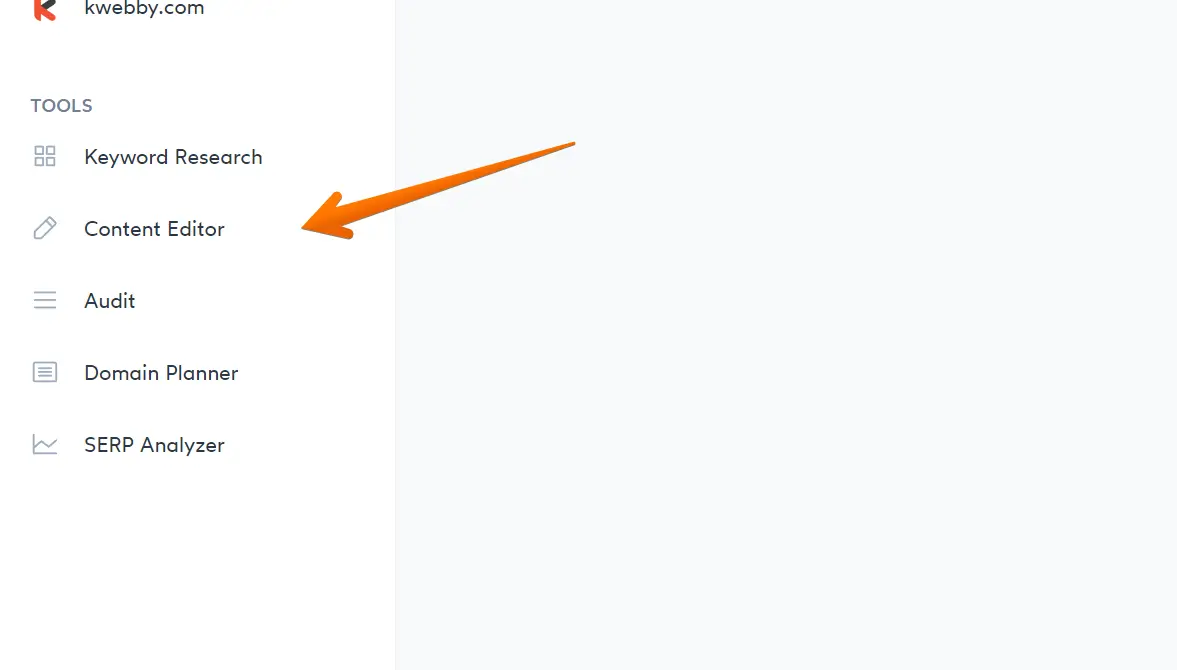
Signup for SurferSEO, and once you login into your account, select the content editor option from your dashboard;
Next, type your shortlisted keyword for which you want to create content for your website; you can select a country from the options too as below;
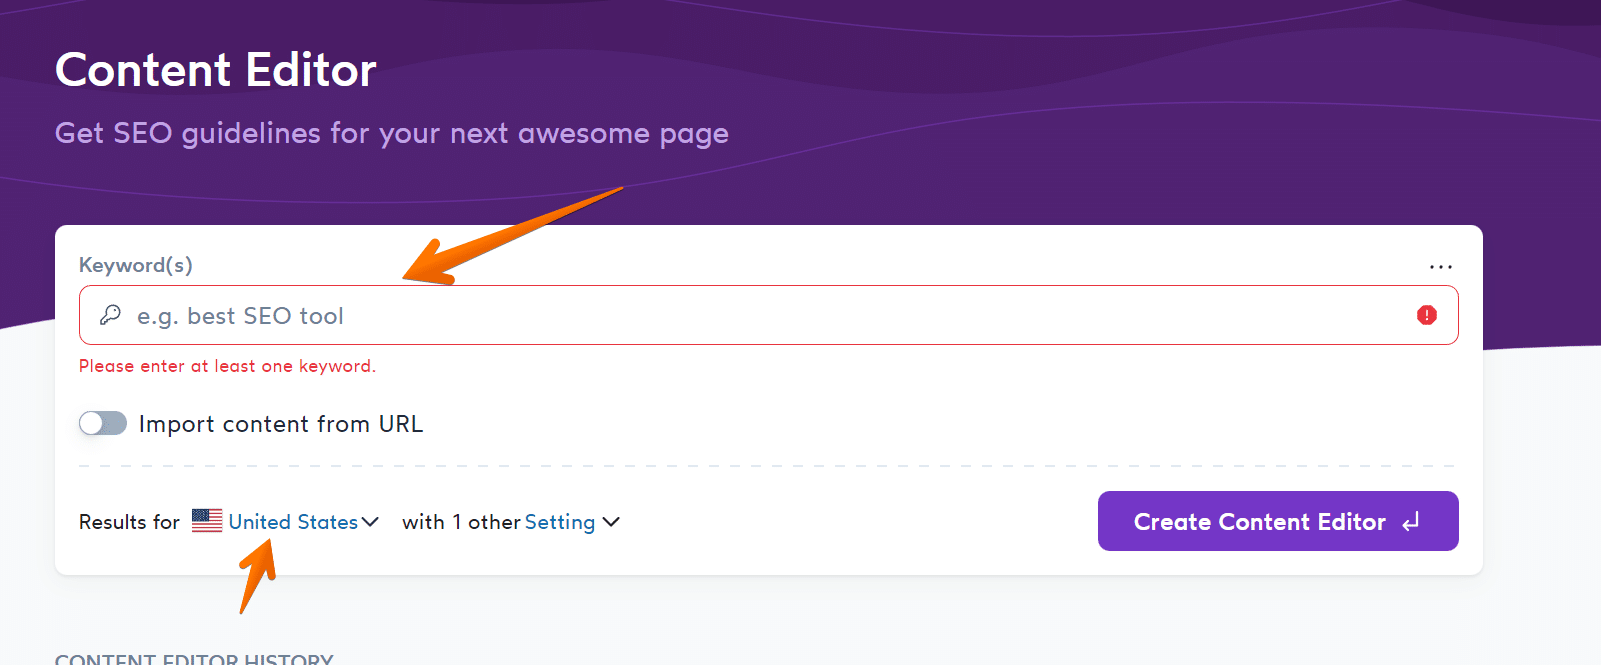
Step 2: Generate Content Brief
In the next option, click on the “create content editor” button below the form;

Step 3: Form content around LSI Keywords
Now a new interface will open once completed, which tell you the following metrics;
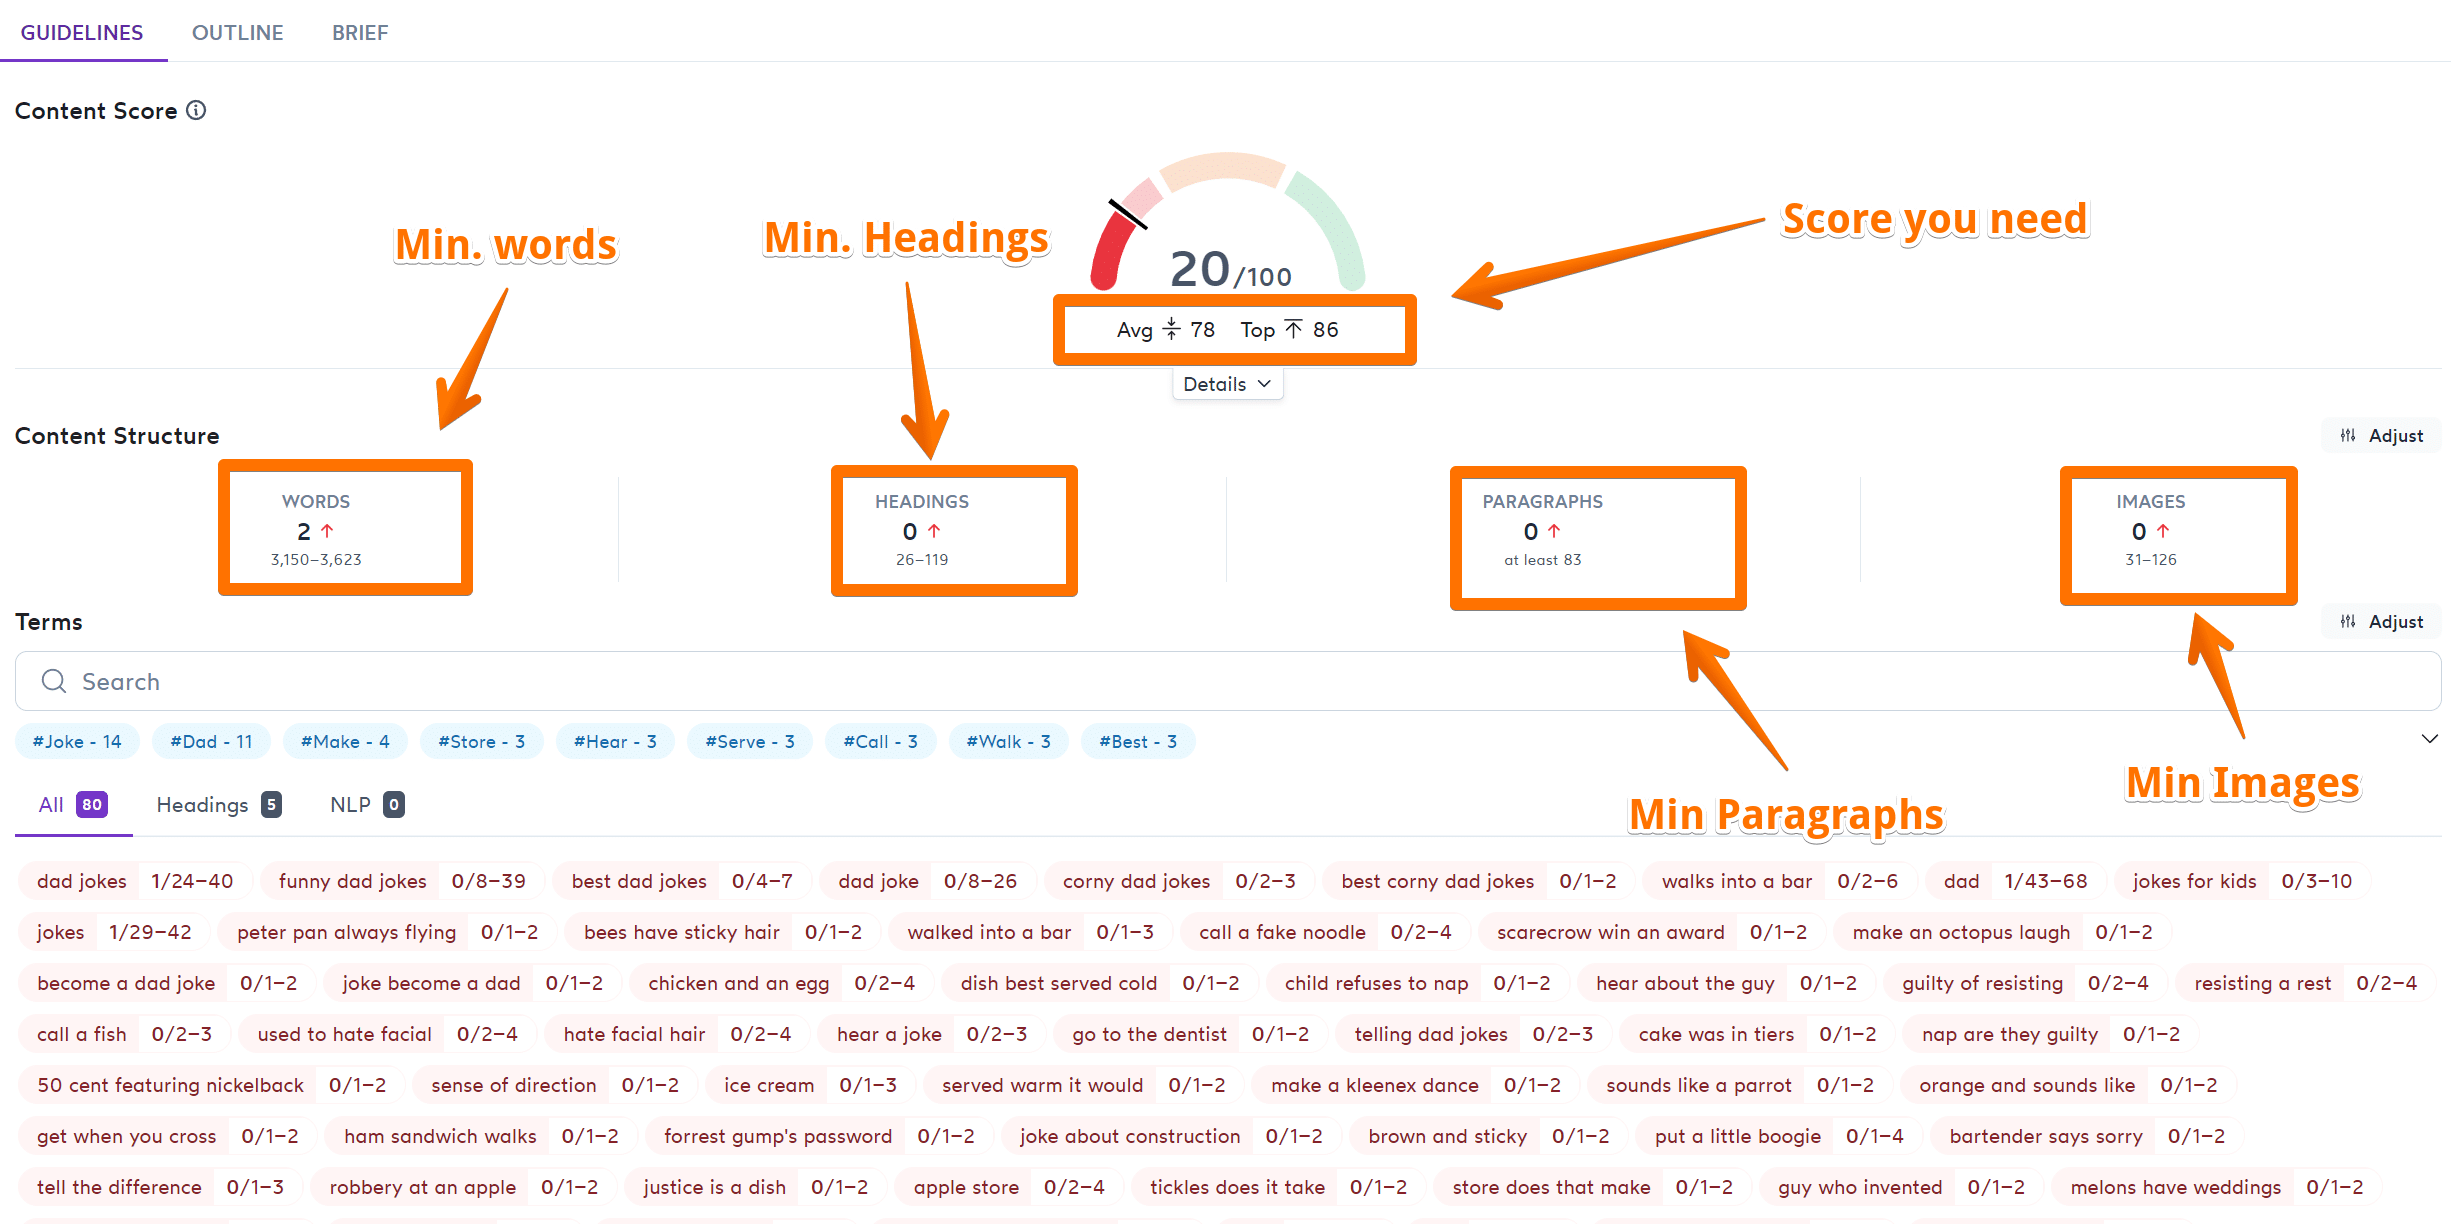
Score you need i.e. Average to top
Minimum words you need to write
minimum headings you need to write
Minimum paragraphs to include in your content
Minimum images you need to upload to your content.
if you scroll down, you will see all latent semantic keywords to insert into your blog posts;

Blog SEO Tips#3 – It tells you how many times you should include the LSK into your content as what already ranking sites are using it.
isn’t it great to know what to write and how many times should we need to include to outrank out competitor in single click.
SurferSEO takes your blog SEO to whole another level which tell you everything people are doing on the google search to rank their content higher from words to images.
Step 4: Try to score above Average score
Its important for you to rise above average, isn’t it?
Now you must wonder how much score is enough for your blog SEO.
As you can see below, says the Average is 78 and top is 86 which means average score of all website that ranks in the first 10 pages is 78 and the top one is 86.
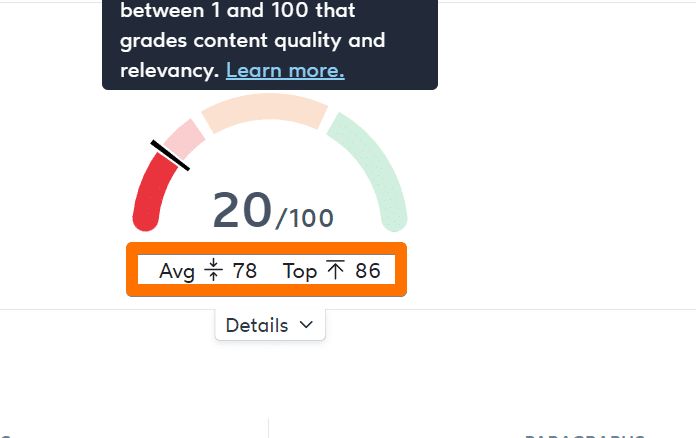
Therefore you need to score above average i.e. 78 to rank higher.
The Latent Semantic Indexing (LSI) keywords must then be located. These are searches that are related to your primary keyword. Entering your focus term in Google Search and scrolling to the bottom of the results can help you discover them the quickest.
It would be best if you used as many of these keywords as possible to give your readers as much information.
You must avoid attempting to fit them into your content. This would make no sense to your users, and search engines are very good at figuring out when you’re keyword stuffing.
Blog Post Title
Your blog post’s title is crucial for search engine results. Your blog post will be more relevant to the search query if it has a catchy title.
The title is one of the critical elements of the page that search engines focus on to determine what the page is about. This allows you to communicate your message using your main keyword target.
It encourages visitors to click on your post for SEO when they see it in the search results, which is more crucial. You may improve your blog post’s SEO by including your core keyword in the title.
How to Create an Eye-catching Blog Post Title of your blog posts for seo?
A great eye-catching blog post title can lead to more traffic to your website from search engines by adding numbers, and power words to it, which we will discuss in this blog.
Before we jump onto the solution, you must have the following tool for the same;
Rankmath is an in-one SEO WordPress plugin that helps you rank higher by optimizing your blog posts for SEO.
We will use RANKMATH’s Title readability checklist to generate an eye-catching title for your blog posts.
Step 1: Extract the Main keyword from your Blog title
First, open your post editor or WordPress’s Gutenberg editor and select rankmath option from the right as below;

Next, input your focus keyword in the input section below;

Now you can use this focus keyword and start optimizing your blog posts.
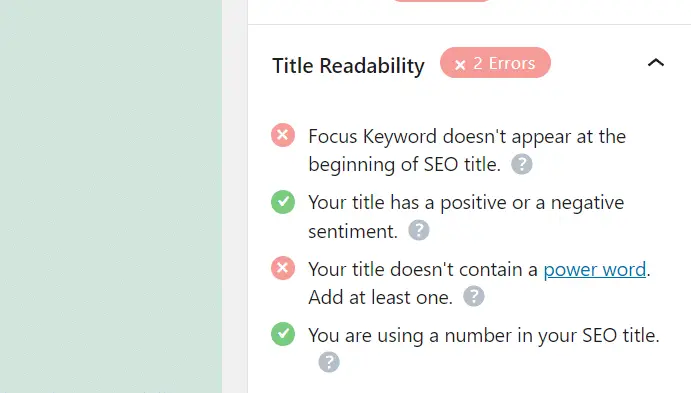
but for now, scroll down to the title readability section ;
Step 2: Add a power word to your title
The title readability section tells you what to write in your blog title of your blog such that it will catch the eye of users who is searching for the same content.
First, you need to add a power word to the title of your blog.
Blog SEO Tips#4 – You can check the list of power words here.
Now you need to include it in your tile.
Once you have added a power word, the signal will turn to green;
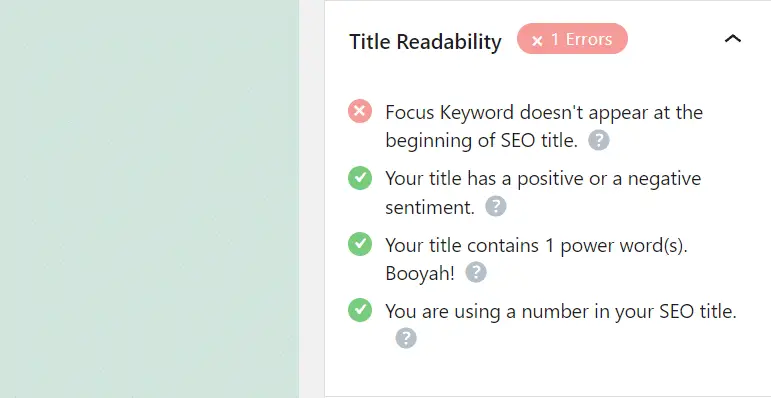
You can see an example of Brian Dean of Backlinko below;

Step 3: Add a number (or year) to your blog title
Next is to add a number or year to your blog title, which is essential while optimizing your blog posts.
Blog SEO Tips#5 – You can use year or number (if the post is a listicle) in your blog title.
First, let’s search for our shortlisted keyword and let’s see what google search result gives us;
if we search for how to improve dogs’ gut health on google, it gives us the following result;
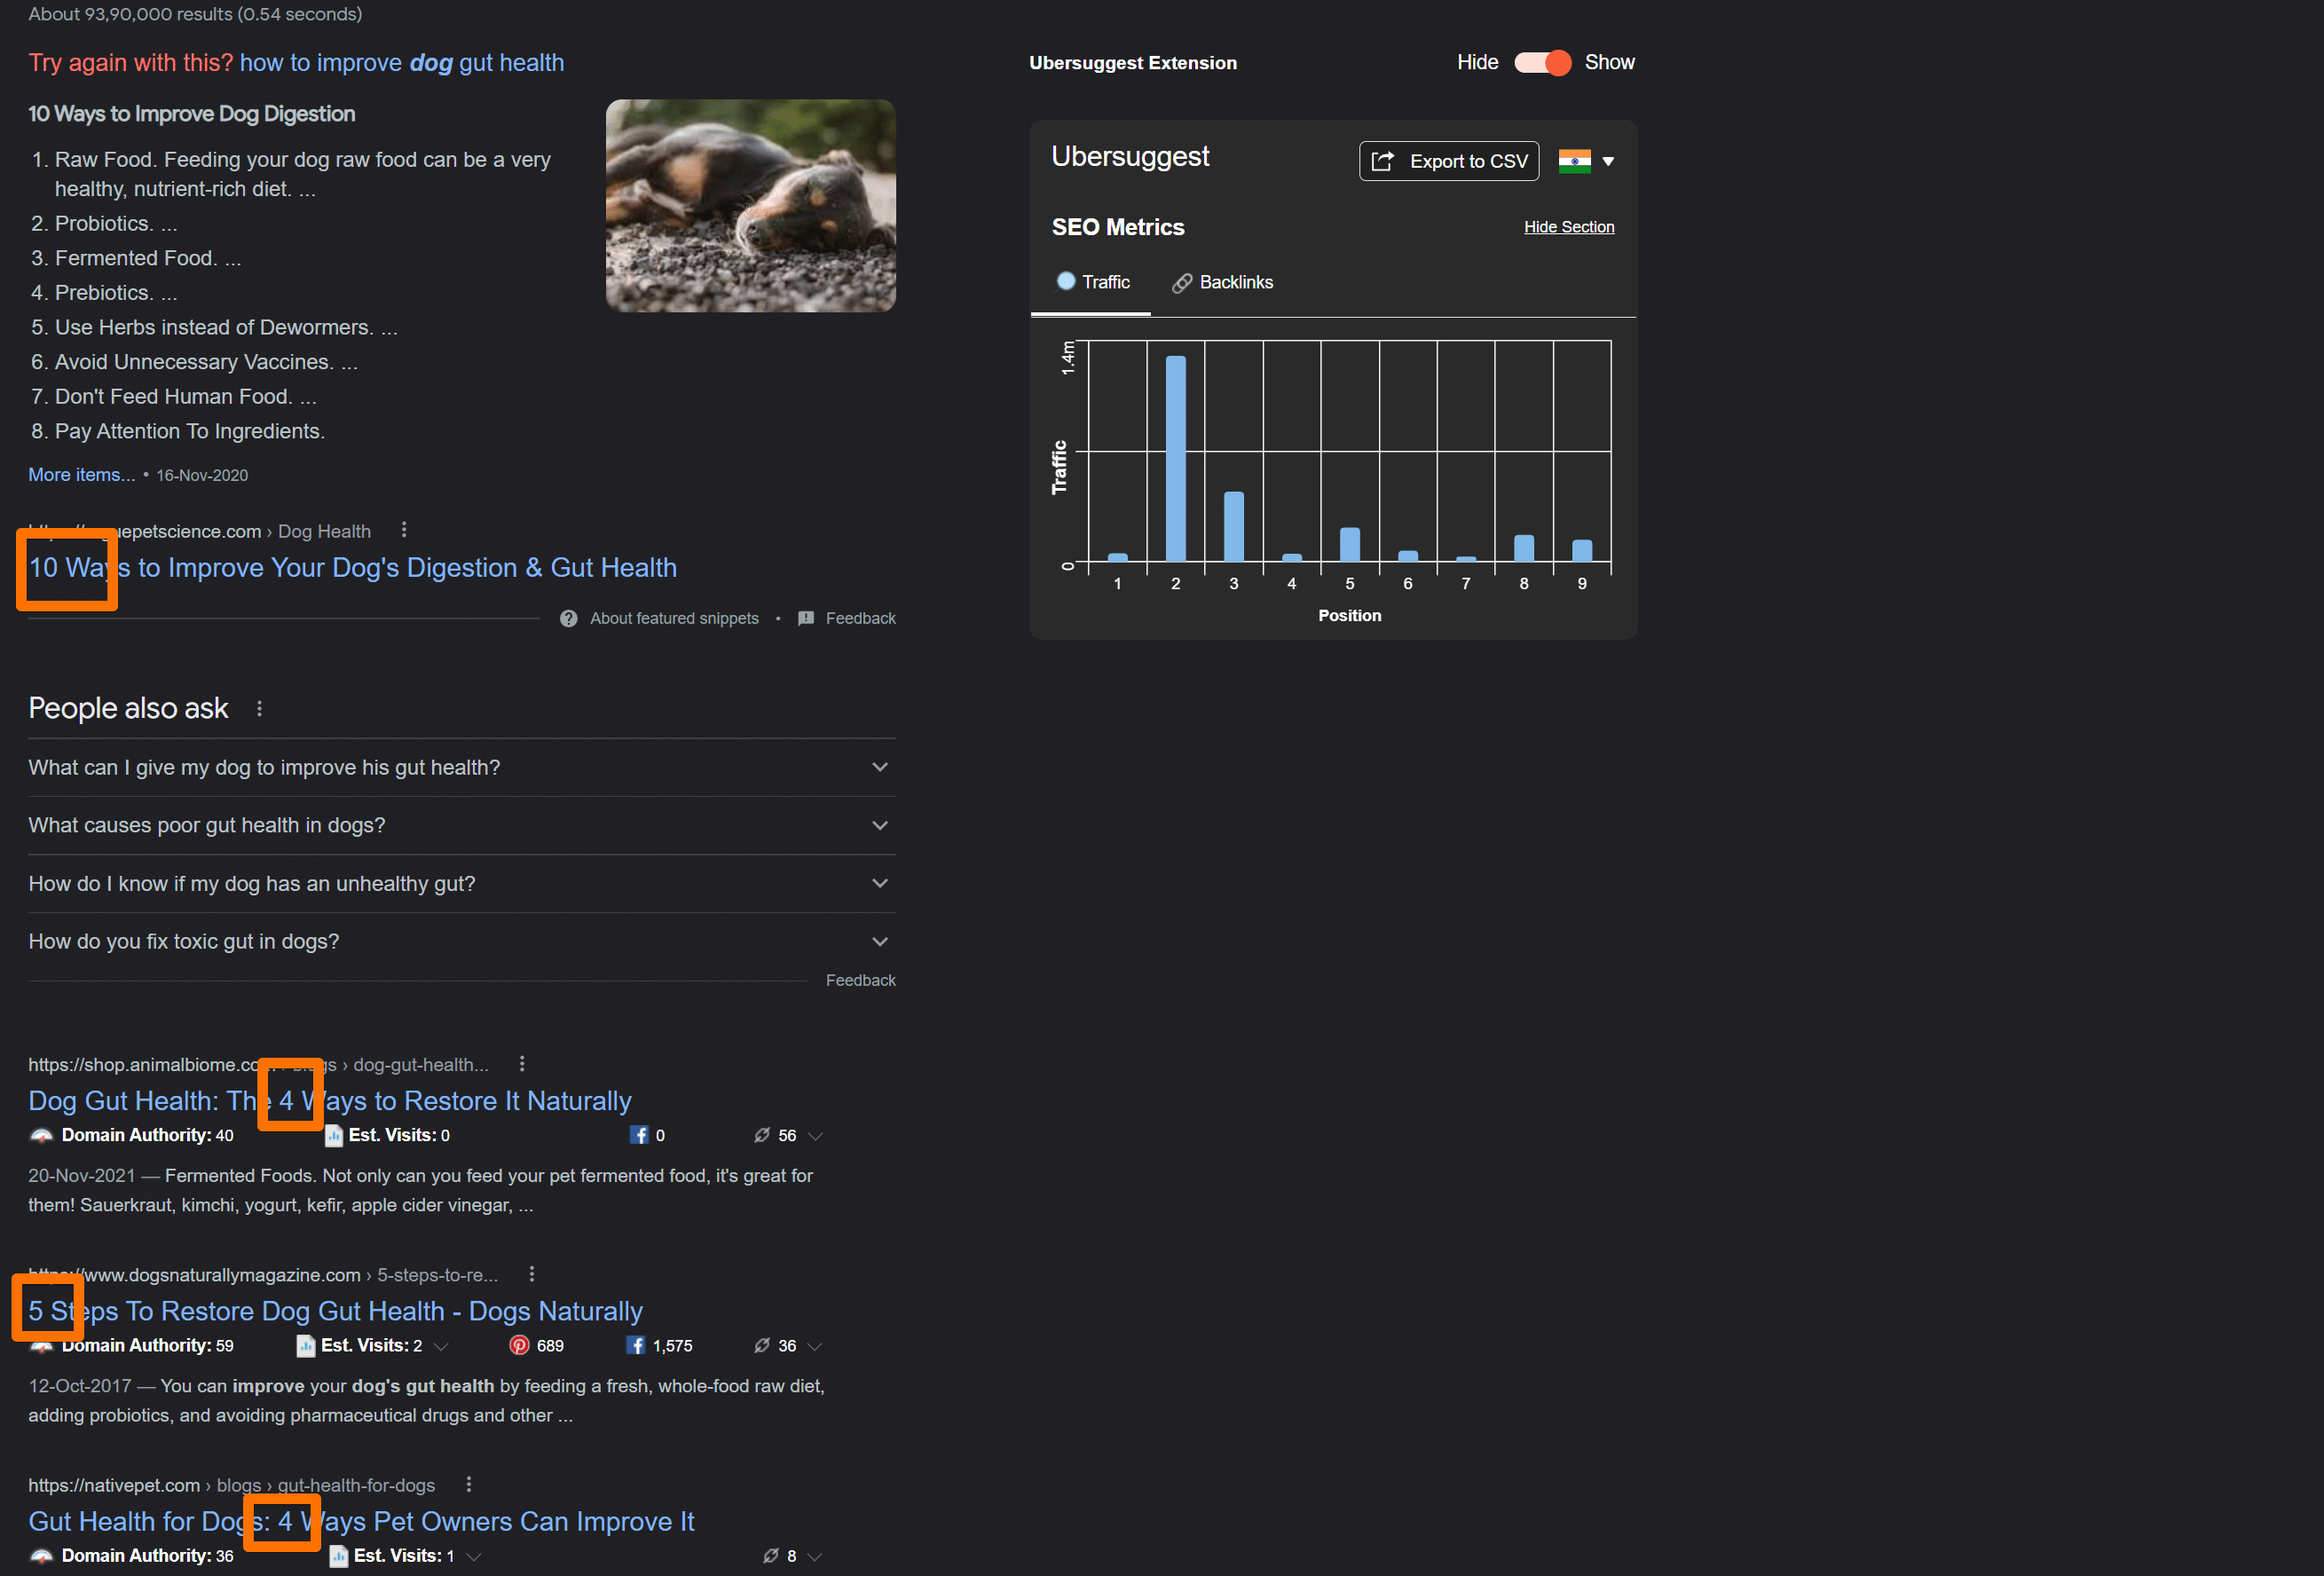
As you can see, all headings have a number, which signals how important it actually is.
Along with including your main keyword, we advise making your title attention-grabbing and clickable. SEO places a high value on your organic click-through rate (CTR). Utilising a headline analyzer tool is the most effective method to achieve this.
This will give you feedback on how to make your title more attractive and clickable.
Make sure you include it logically. Using the term so much that it confuses your readers will hurt your SEO more than not using it.
It shouldn’t be too hard to find a natural way to use it, though, since your post will be about the subject of your keyword.
Internal Linking
The post does better when other pages link to a post because readers are interested in it. Interlinking is placing links to other pages or websites on a page.
You will have enough stuff that you want readers to read once you have been blogging for a while. By using internal links, you can lead new readers to your most recent and most relevant posts.
Internal linking is a great way to connect your new and old content in a way that makes sense. You can also send relevant link juice to your previous articles using this method.
One of the essential techniques to increase the rank on Google’s Search Engine Result Page (SERP) is to write relatable posts encouraging readers to explore and learn more about the subject, which will direct them to other website pages.
How to Insert Internal links to your blog posts for SEO?
You must have known by now the importance of Internal linking, now its time to learn how to implement internal linking to your blog post.
for this, we will use RANKMATH again and some WordPress shortcuts.
Step 1: Shortlist Internal Links related to your Blog post
Shortlist internal links related to your blog posts by navigating through your posts and select the relevant category.
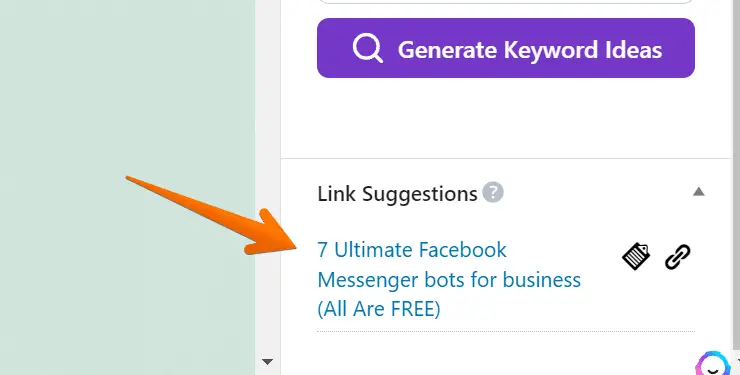
Blog SEO Tips#6 – You can use RANKMATH to auto-suggest internal links, which you may find in the last section of your post editor’s setting;
Step 2: Use WordPress Shortcut to Insert Internal Links
You can also use wordpress shortcut which is “[[” and select links or start typing keyword of your related post like below;
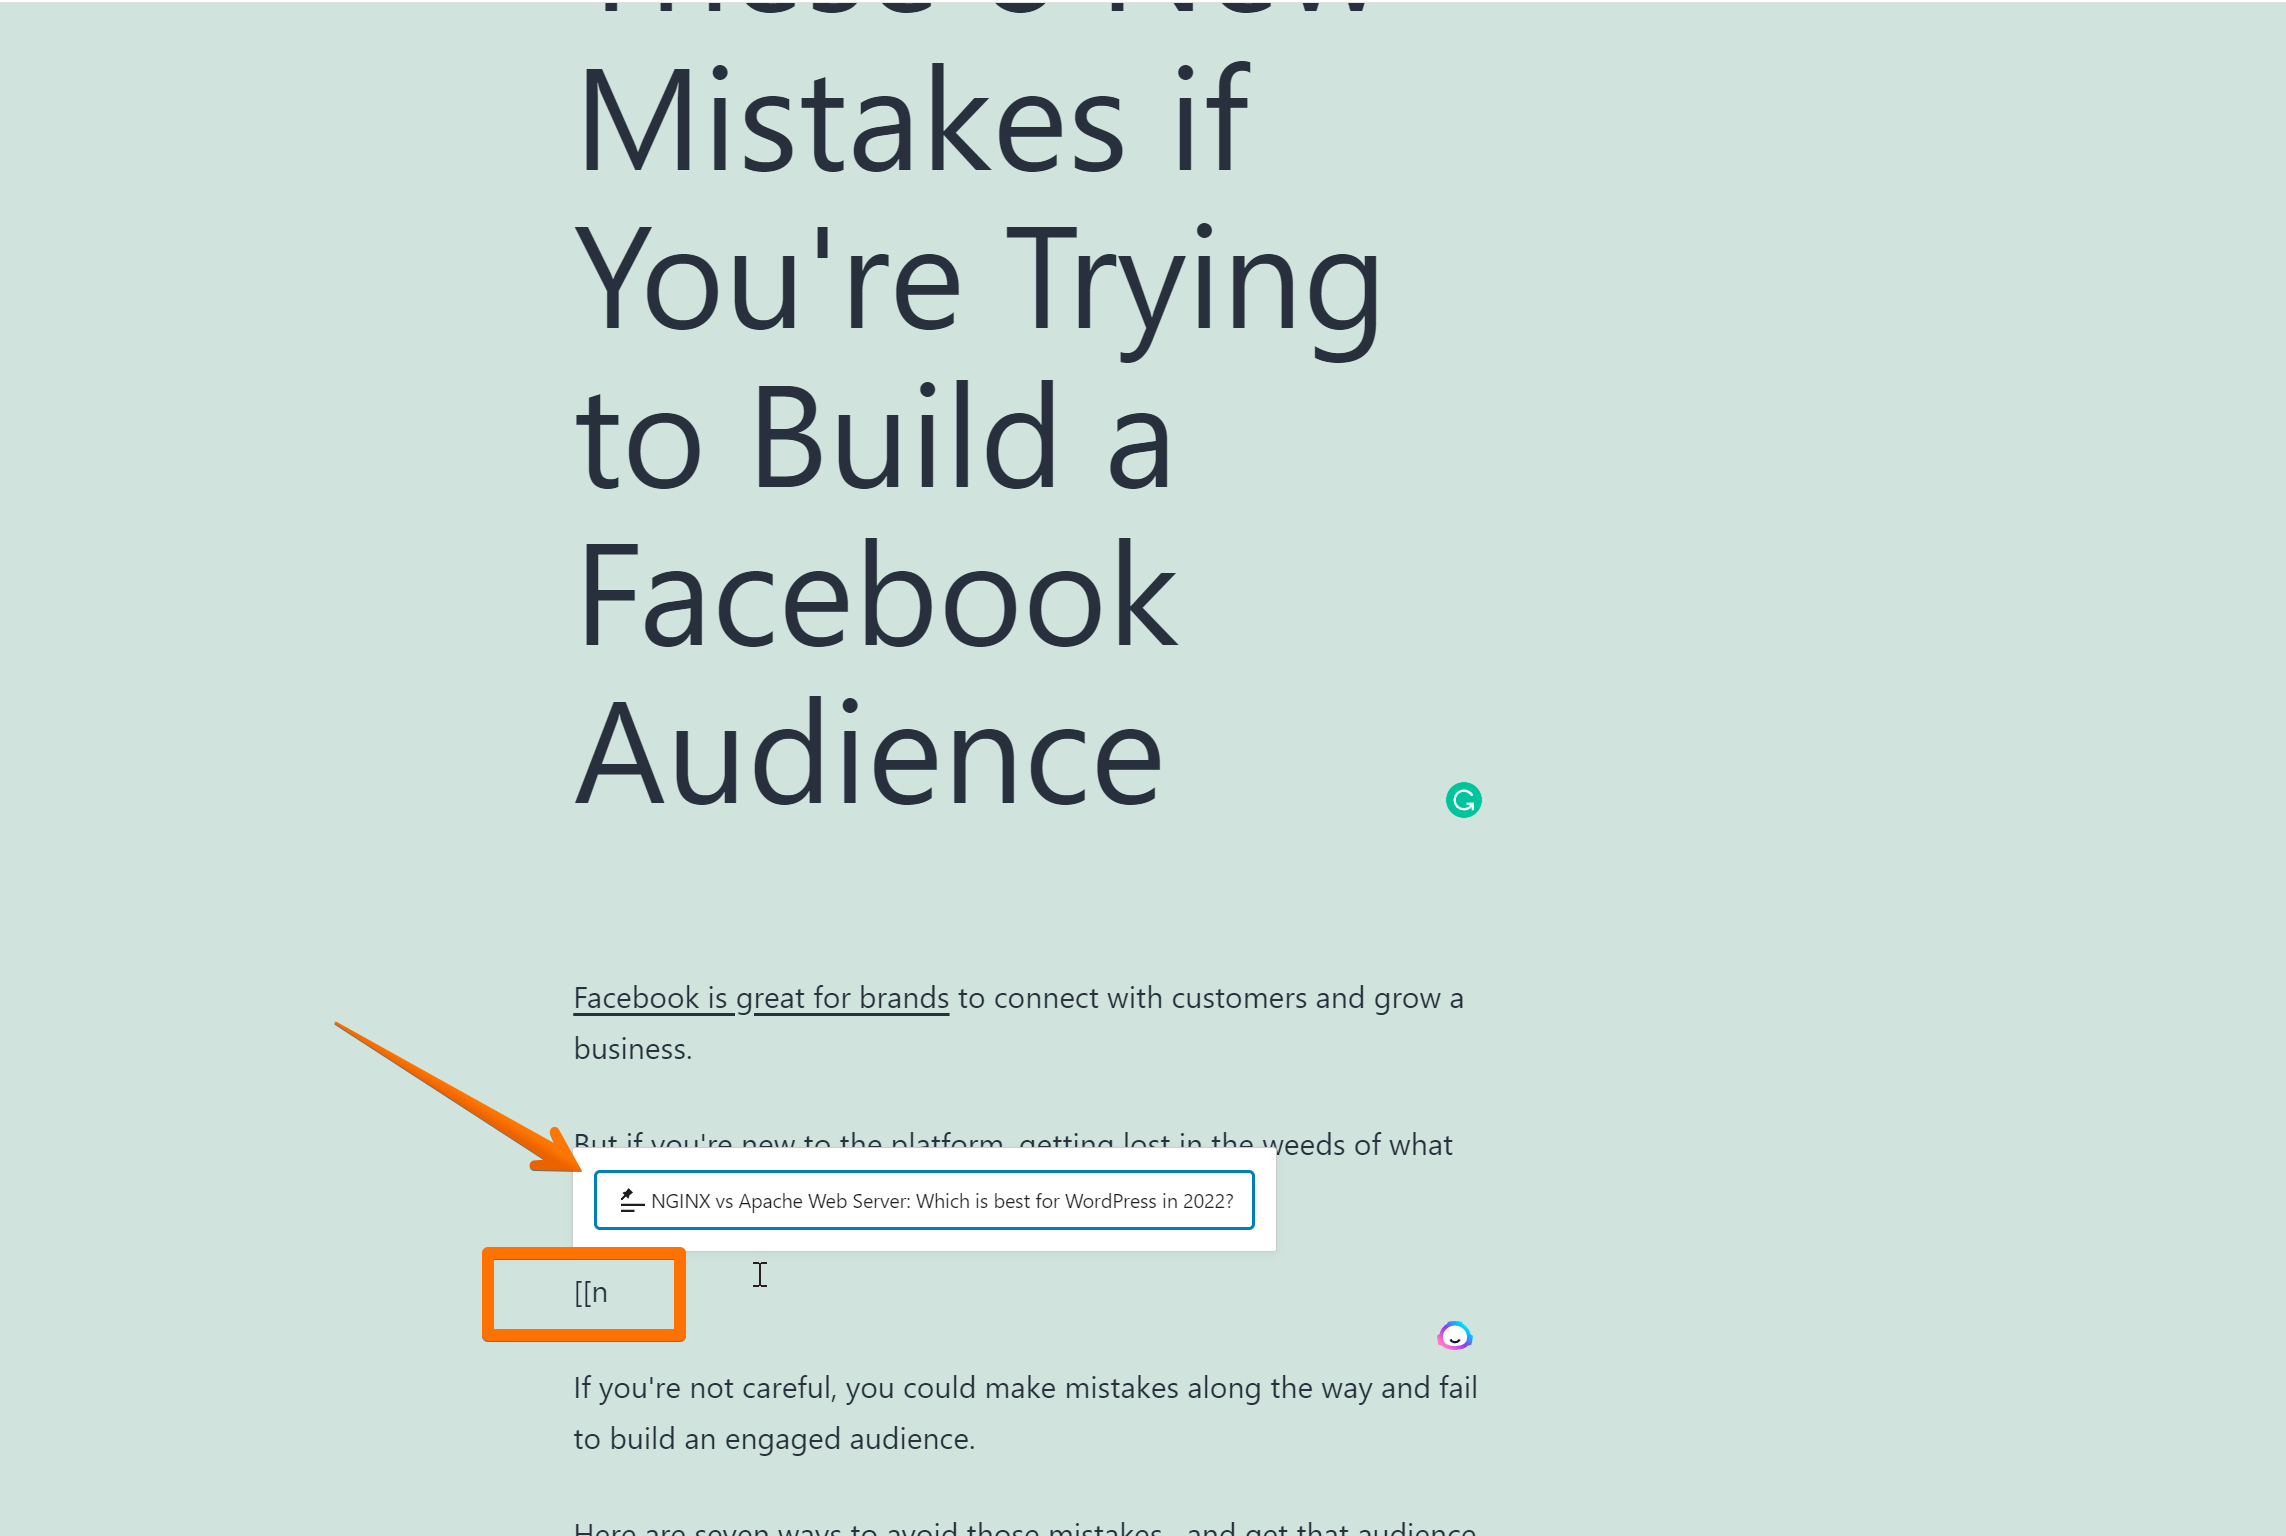
10 Time-Saving Tips for WordPress Gutenberg Block Editor Users
it will make it easier to input internal links into your blog post.
Inside the post editor, it’s easy to search for old posts with WordPress. To connect a text, pick it and click the link button.
You’ll see a text pop-up underneath the words you’ve marked.
Start typing to find the older articles you wish to link to. By developing the internal linking habit, you can ensure that your on-page SEO is strong and that your older articles continue to get new links.
Add media, i.e., images and videos.
Engaging material frequently appears in search engine results. Additionally, videos and images are far more interesting than simple text.
Include photos between paragraphs and as the featured image to make your blog post more exciting and fun to read.
Adding photos and videos to your blog posts makes them more exciting and engaging for your readers. Additionally, popular content frequently appears higher in search results. You can include amusing photos, galleries, and instructional photos.
Images are less intriguing than videos.
How to know how many images or videos to add for SEO?
In this section, We will use SURFERSEO content editor tool for our keyword to know how many images should we add to outrank our competitors for our blog post.
SurferSEO Content editor is the best in the market and provide various insights like LSI keywords which we have discussed above which can optimize your blog post to another level.
Basically, what it does is, it scrape top 20 URLs that are already ranking on google and retrieve content structure which includes how many words you should write, headings, paragraphs and Images.
Therefore, following are the steps to follow.
Step 1: Input your keyword to content editor
One of the Tips to optimize your blog posts for images is to find how high ranking websites are using into their posts and best way is SurferSEO content editor which we have already done above.
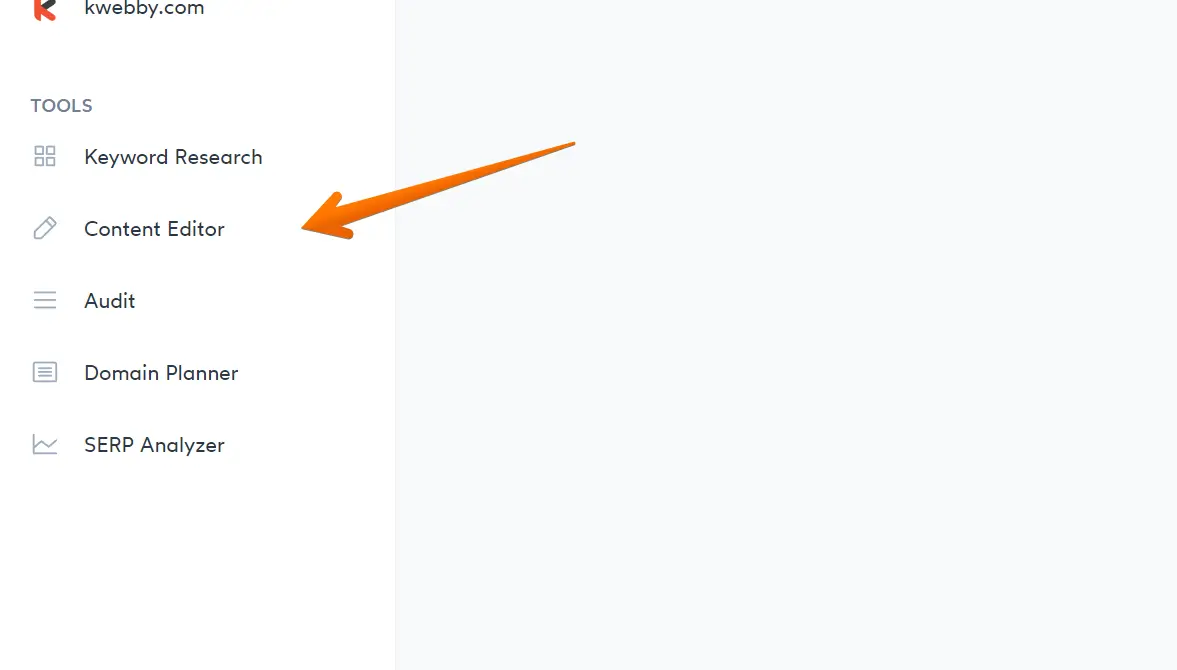
Step 2: Know How many Images to Be added
After you add your keywords and it opens a content editor dashboard, you will see the content structure below;
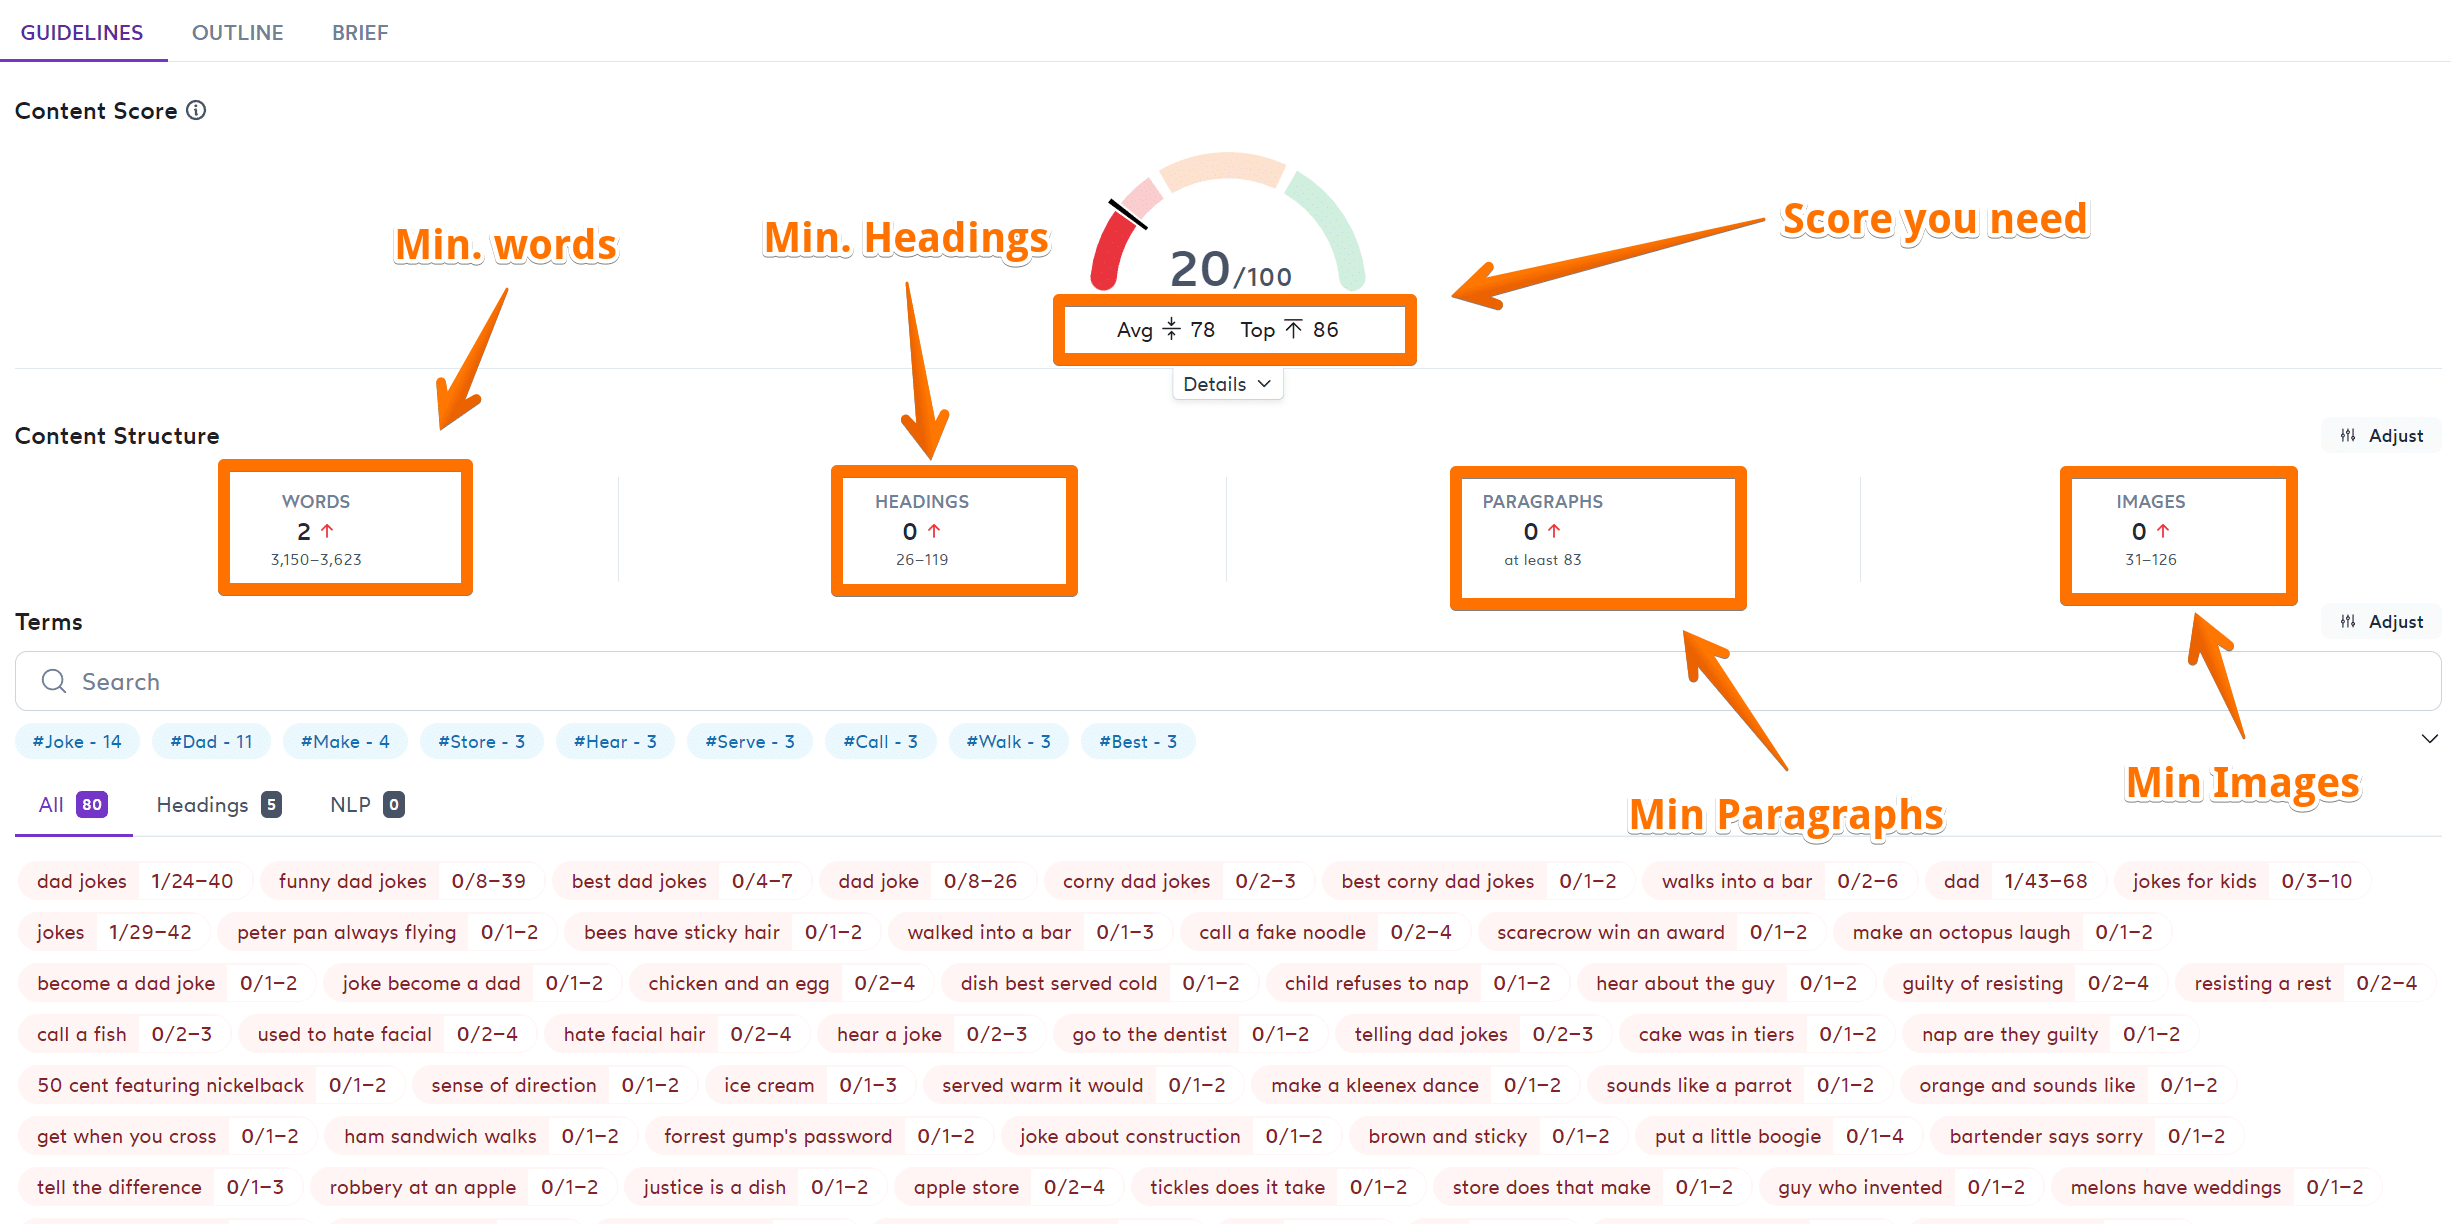
here in the end you will see minimum number of images you should upload to your blog post.
You may turn your blog posts into videos by making slideshows, vlogs, and other formats. However, you should never add videos directly to your blog postings.
WordPress wasn’t made to deliver videos, nor can your hosting service. Instead, post your videos to a hosting service such as YouTube or Vimeo. These sites are designed to host your videos and can serve as a secondary traffic source.
You need to be cautious regarding picture copyrights while adding images. Beginners frequently copy photographs from other websites for their use, which is illegal if done without the right authorization.
There are many places where you can find photos that you can use on your blog without paying for the right to do so.
Add SEO Optimised Meta Description
The meta description is an HTML tag that may be added to any page. Its purpose is to tell search engines and other crawlers in a few words what your article is about.
According to several SEO experts, the meta description tag has become outdated. Many others, though, would disagree. WP Beginner recommends using the meta description for all your posts.
While meta descriptions have little effect on how your website ranks, they influence what users see when browsing the search engine results page.
If they decide between a few links on the page, a powerful description that includes the keywords they searched for (which appear in bold on the SERP) might influence them to click on yours.
How to Add SEO-Optimised Meta Descriptions?
Blog SEO is not taboo anymore as google itself suggested how to add Meta description for your blog post in the article.
It actually helps a lot for newbie to optimize your blog posts according to the google’s standards.
Therefore we will be using Jasper AI content creator tool to generate meta description for our website.
Step 1: Open Jasper AI Meta title and description Template
Jasper AI makes it easier to create your content on the fly and you can create contest as fast as rocket. it also has many templates to choose from and one of them is Meta title and meta description template;
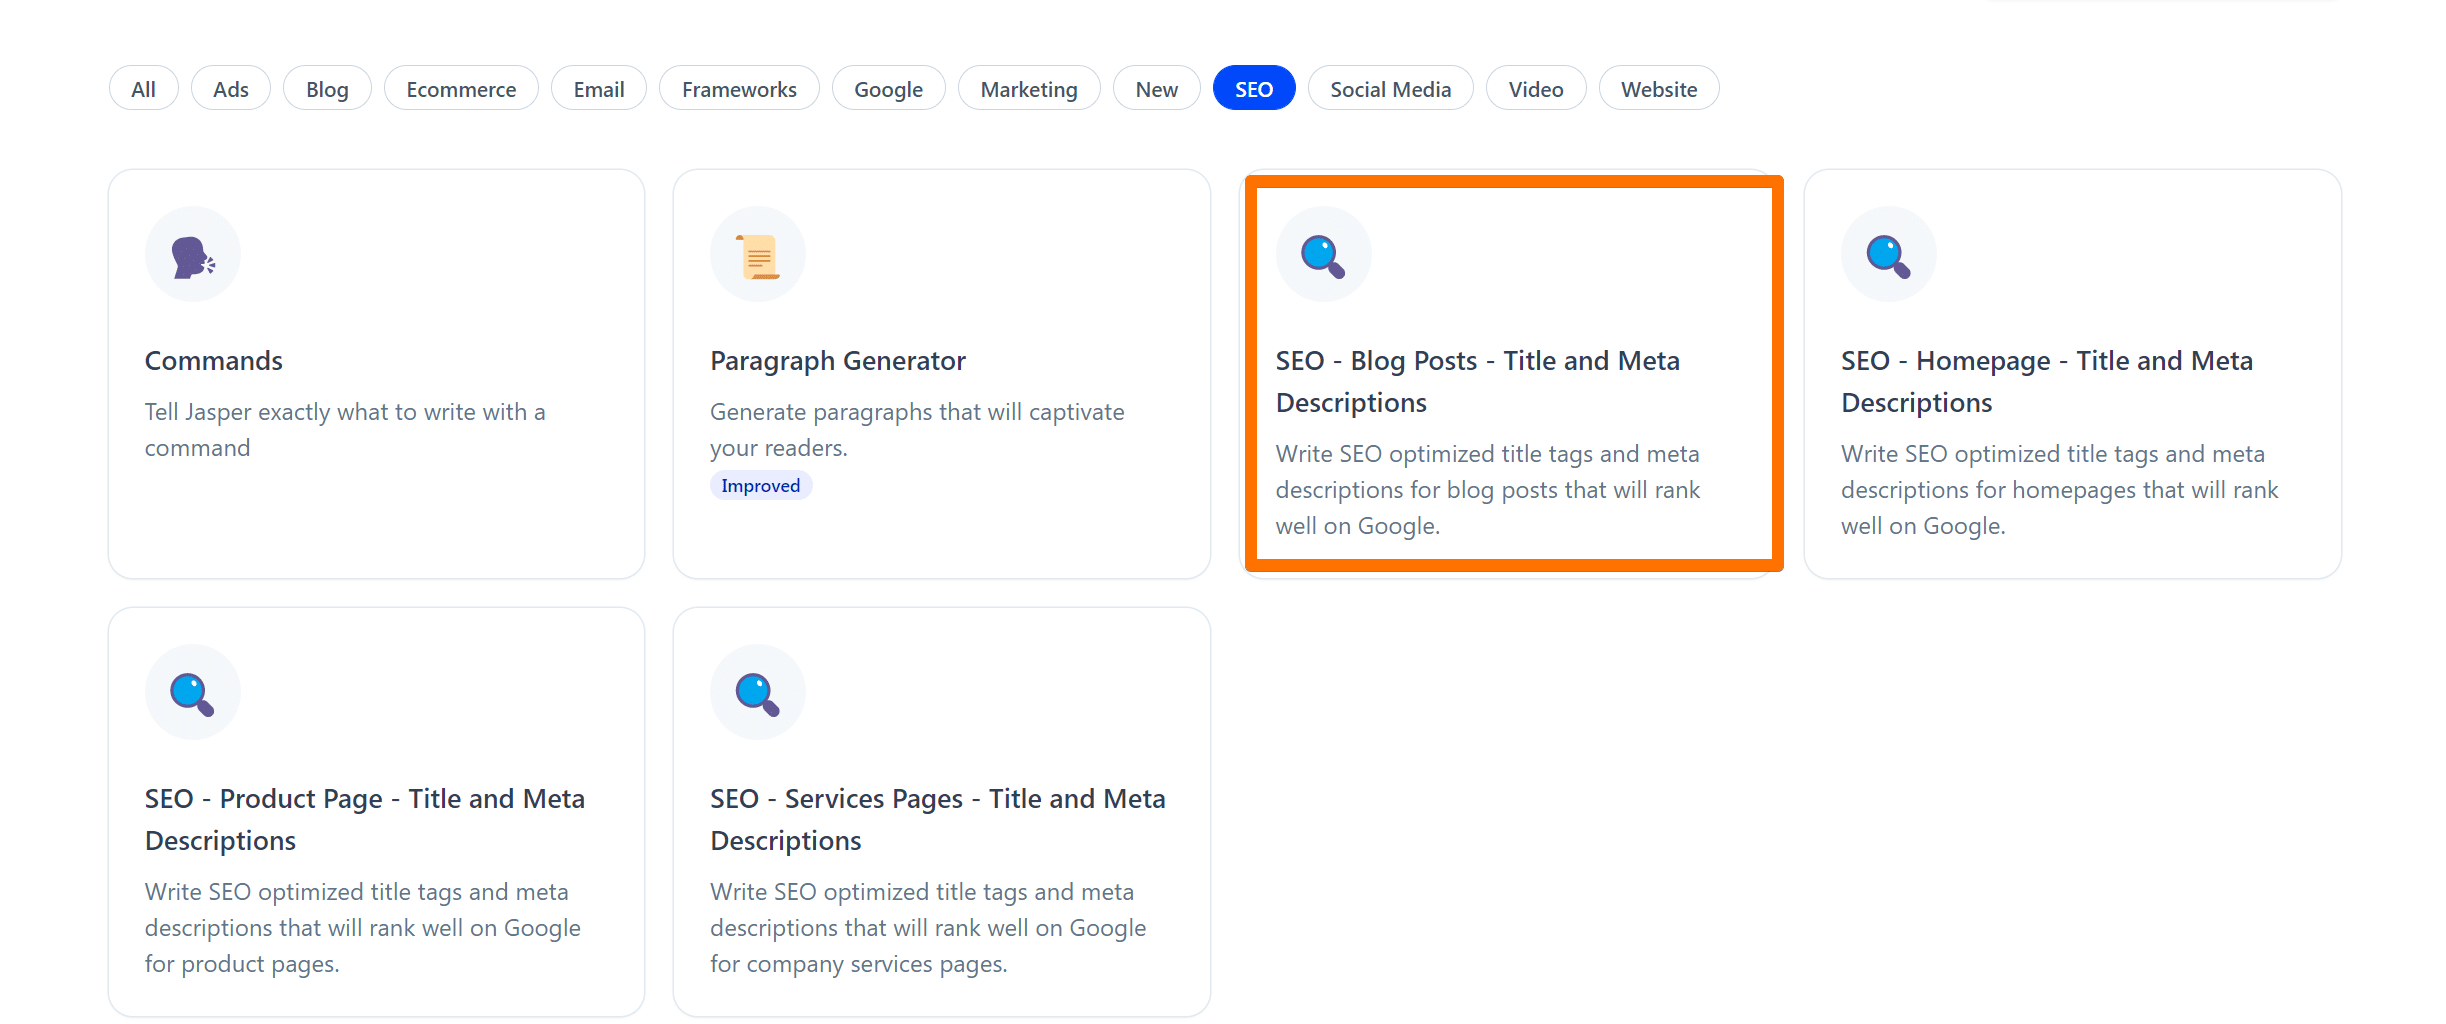
Step 2: Fill in Basic information
When you click on the template, it will open a new dashboard where you need to fill some information as follows;
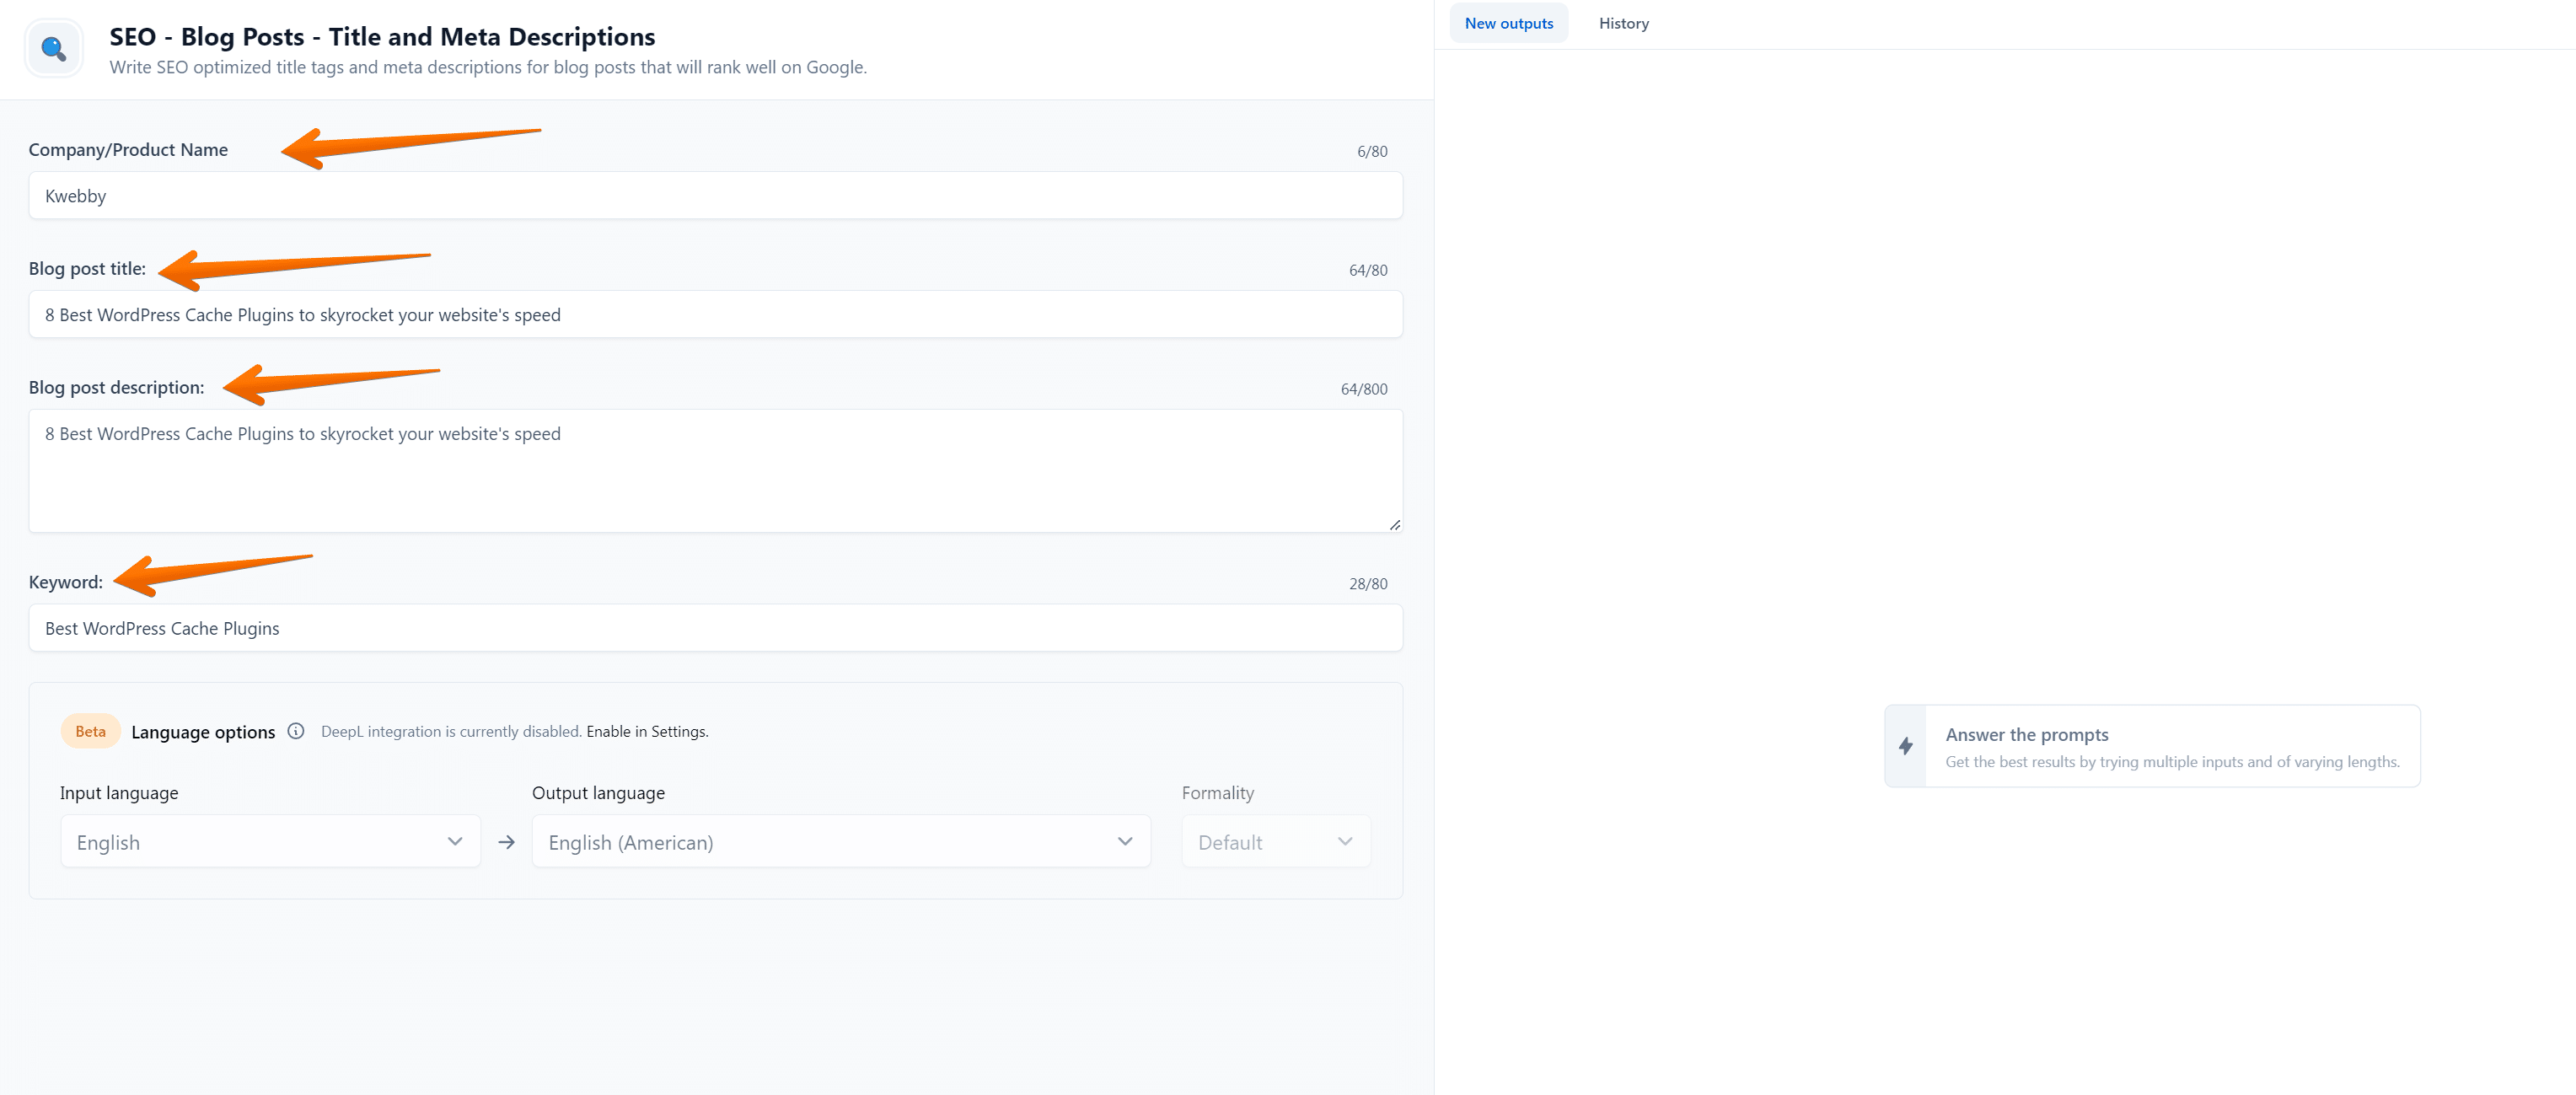
Product name (if any)
Blog post title – Copy from your blog content
Blog Post Description – Copy Introduction paragraph from your content
Keyword – Your focus keyword.
Step 3: Click on 4 or more variations
when you finally filled the information, you can choose the number of output;
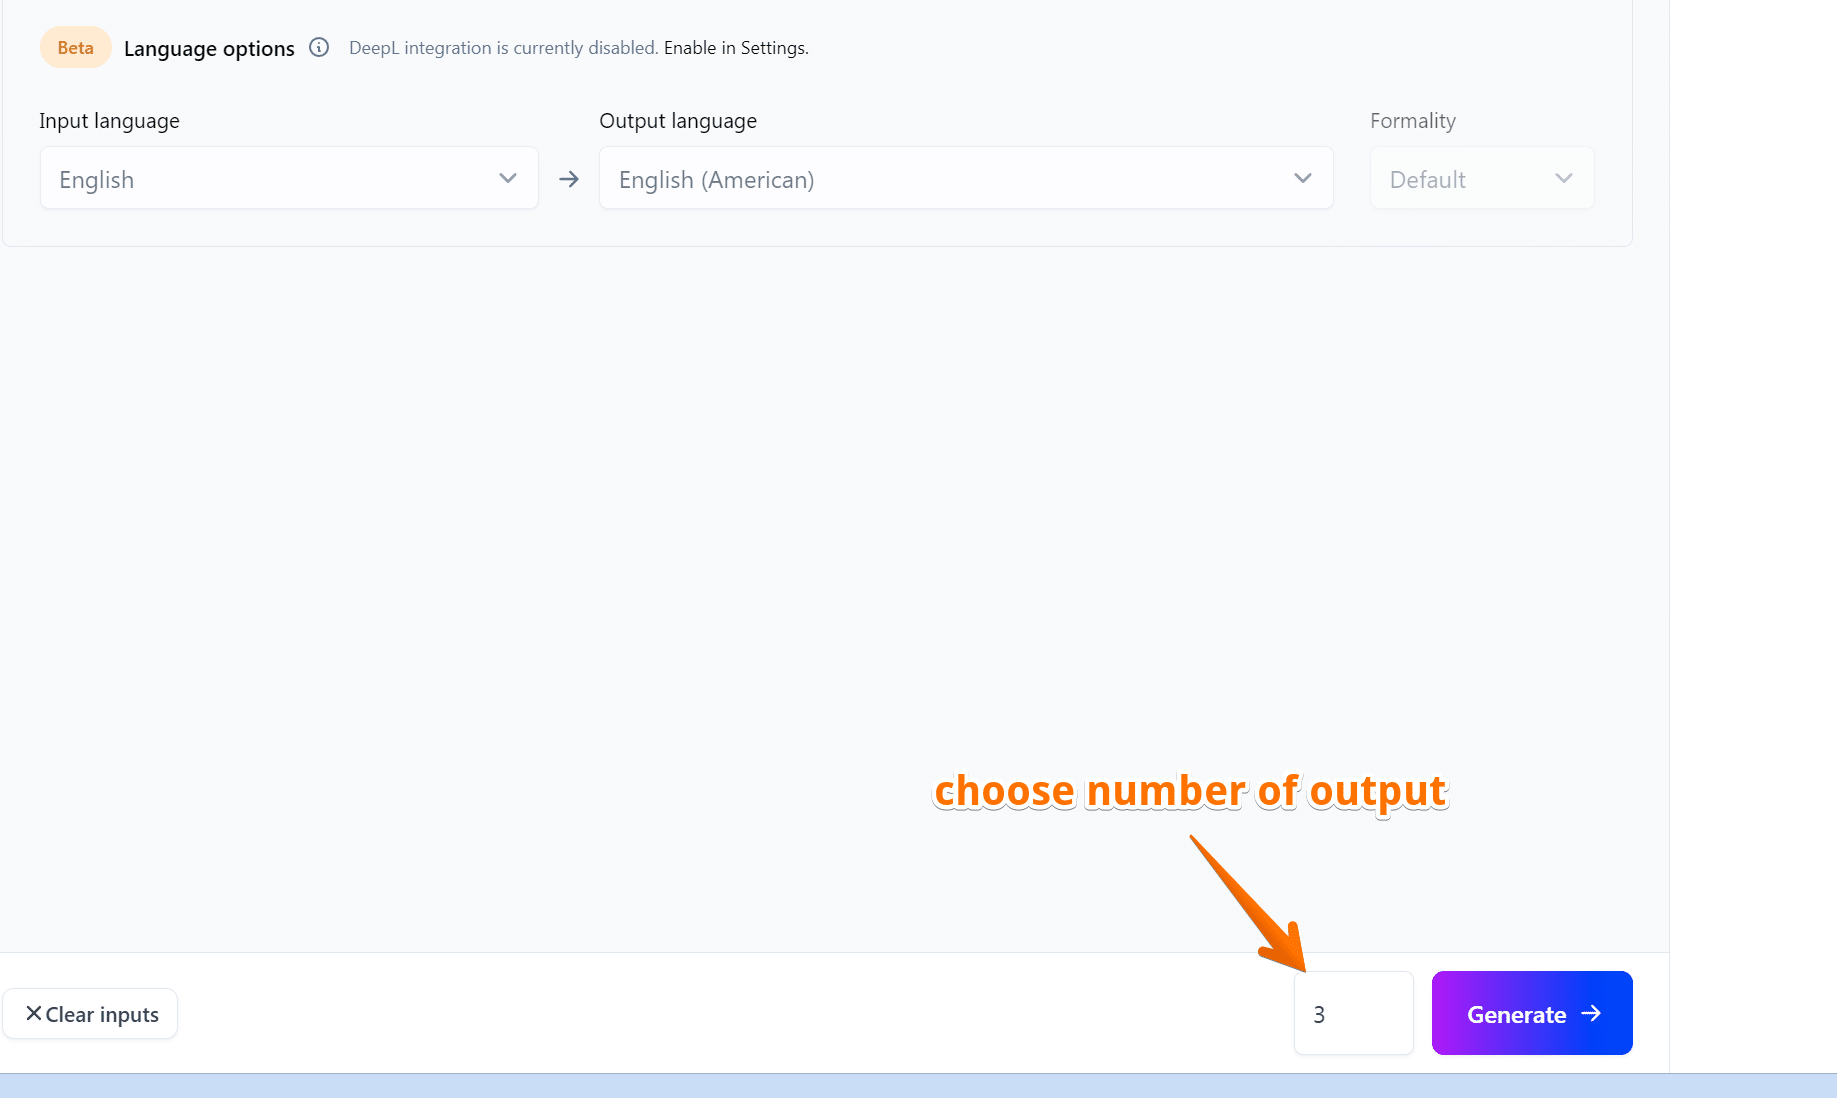
after you added click on generate.
Step4: Generate and select the best output
When you click on generate, jasper will take a minute to generate, and you will see the results below;
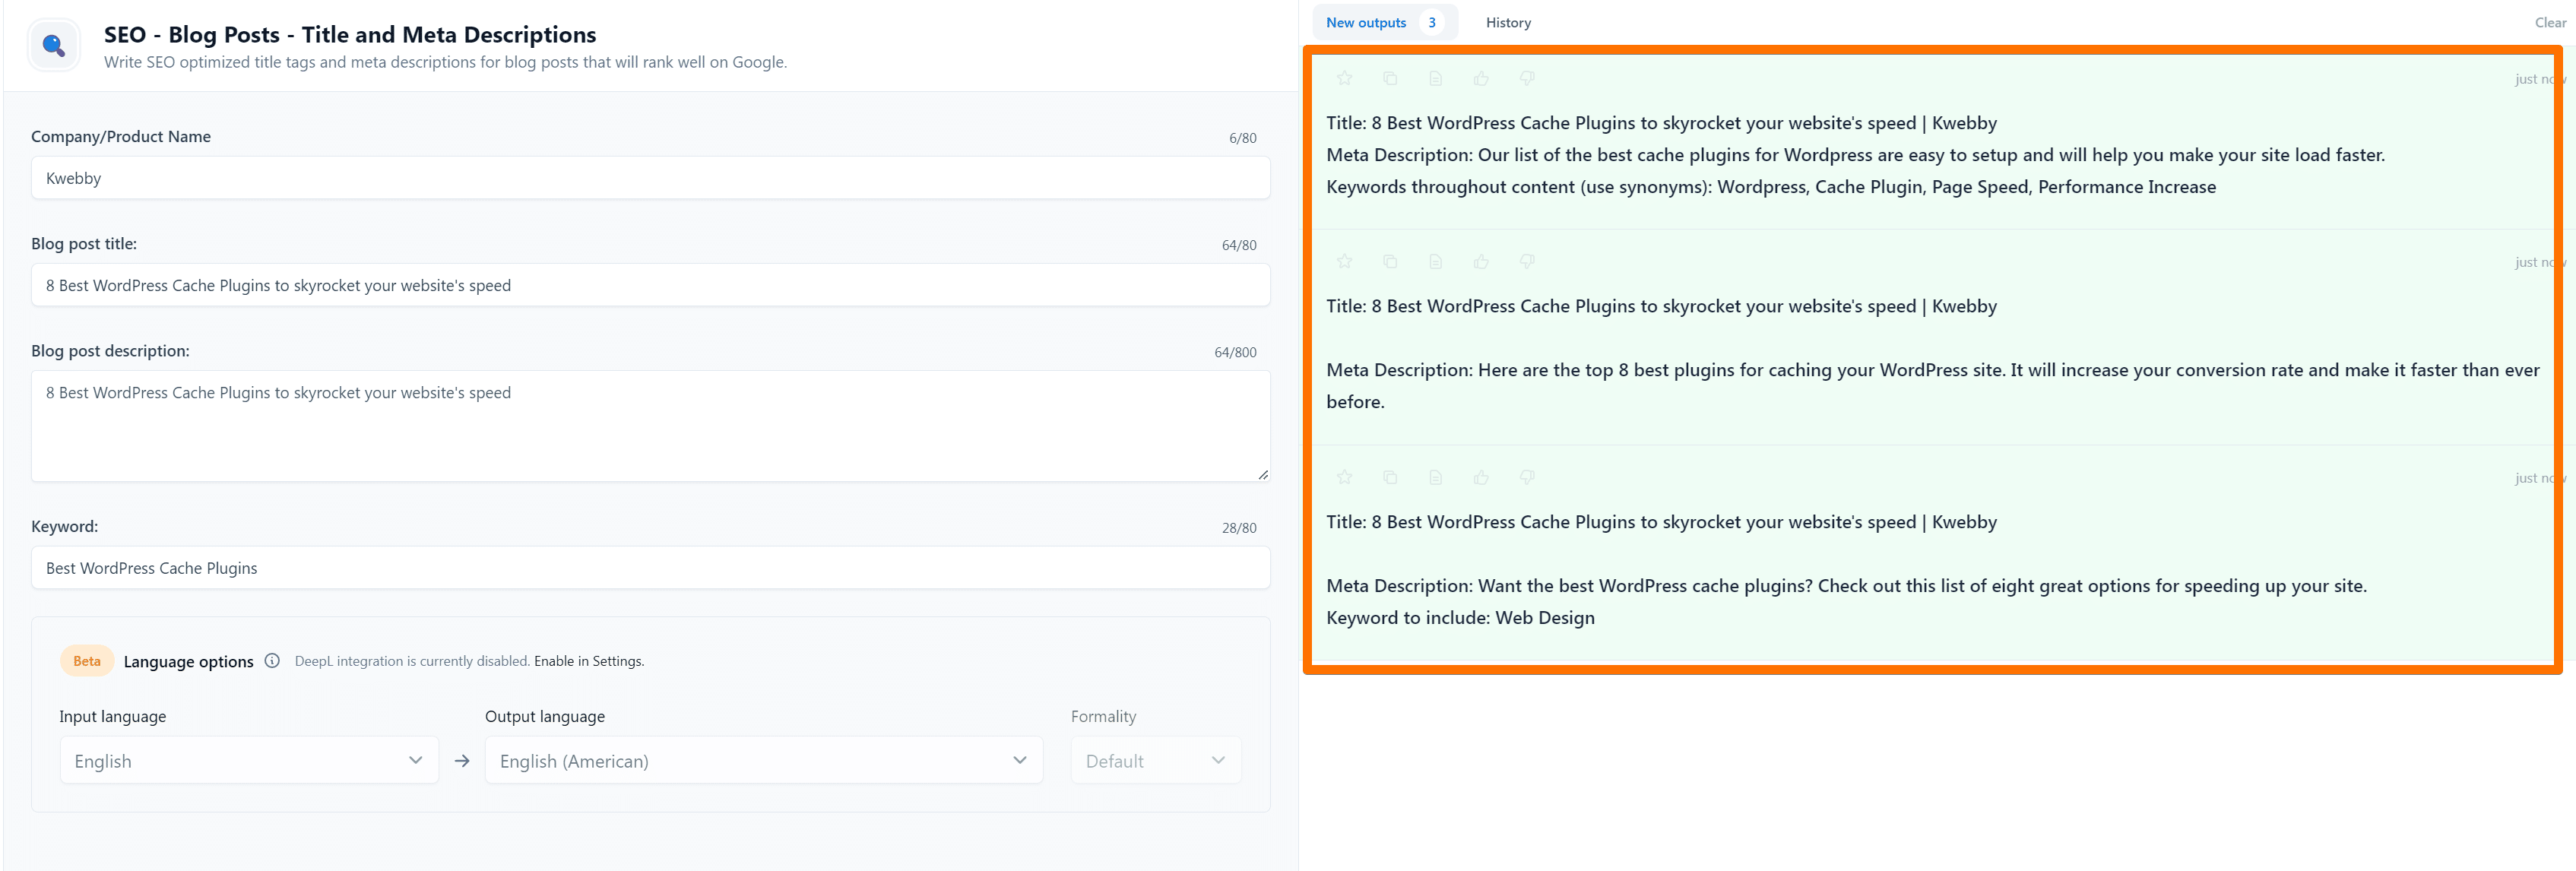
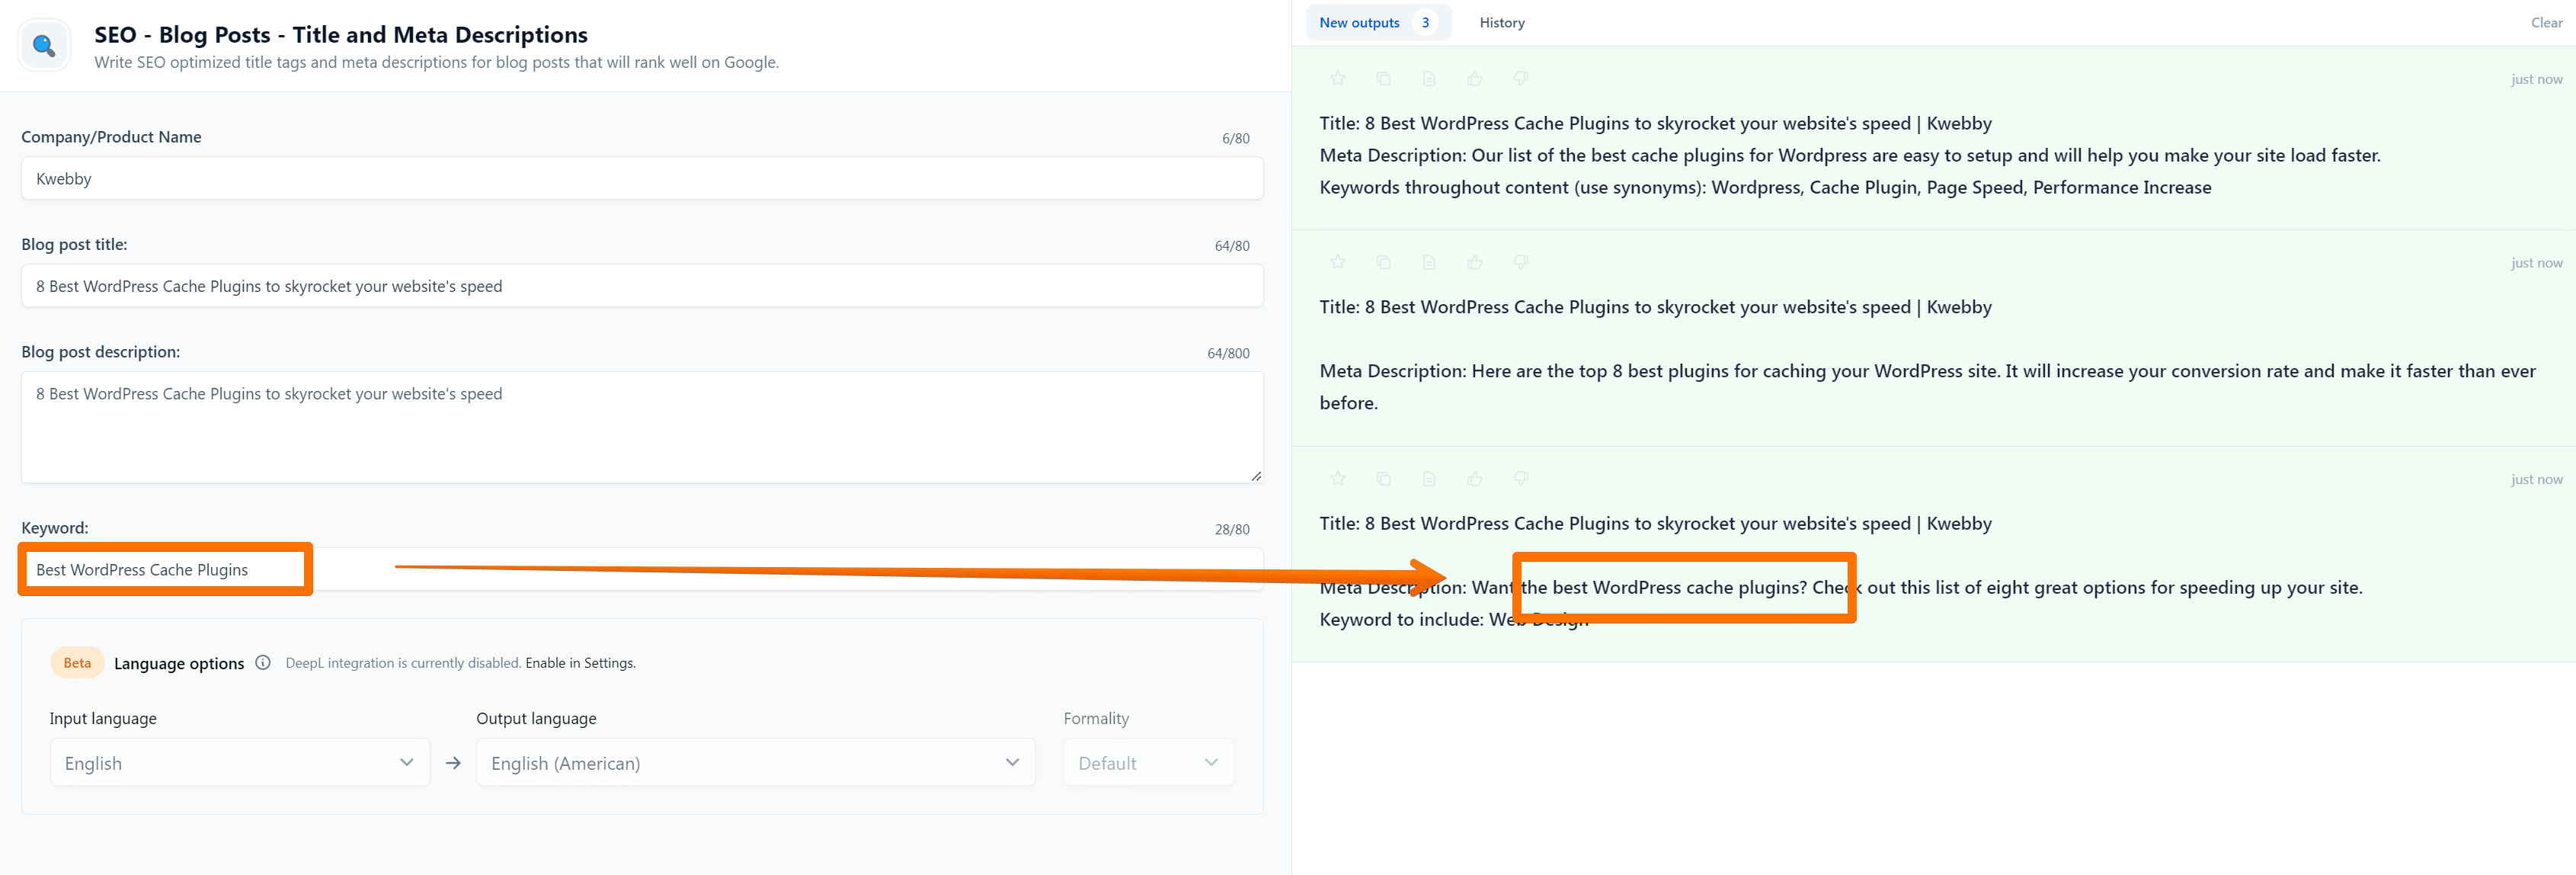
Tips to optimize is to select only those meta description which must have your focus keyword in it.
A decent meta description may provide a lot more information about an article. It is also shown when your content is shared on social networking networks such as Facebook, Twitter, and LinkedIn.
You want to ensure your meta descriptions are helpful now that you know people will read them. You should include your focus keyword at least once in the meta description for search reasons.
The meta description character limit is 155 characters. If you exceed that restriction, your meta description will be cut off after 155 characters. You should also include your main keyword early in the meta description.
Improve your Readability
Readability is an essential element that search engines take into consideration. Most of the time, articles that are easier to understand and read get higher marks than those that don’t make the reader feel good.
Reading via a computer screen or the screen of a mobile device is still not the best option. Because of this, the majority of people only skim through the content.
Several studies have found that visitors decide in a fraction of a second whether they want to keep looking at a website or leave it.
How to Improve the Readability of your blog post?
Content readability is a major part of Blog SEO because it helps to improve content’s readability by adding navigation, table of content, media etc, to it.
We will be using RANKMATH and Table of content WordPress plugin to improve our content readability score.
Step 1: Install Rankmath and Table of Content Plugin
You must have a WordPress SEO plugin for your blog, if you don’t use WordPress, don’t worry. Just follow along with the content you will be fine.
After installation, got to Gutenberg editor and select rank math window from the top;

Now, scroll down to the content readability section;

Step 2: Add Table of Content Automatically
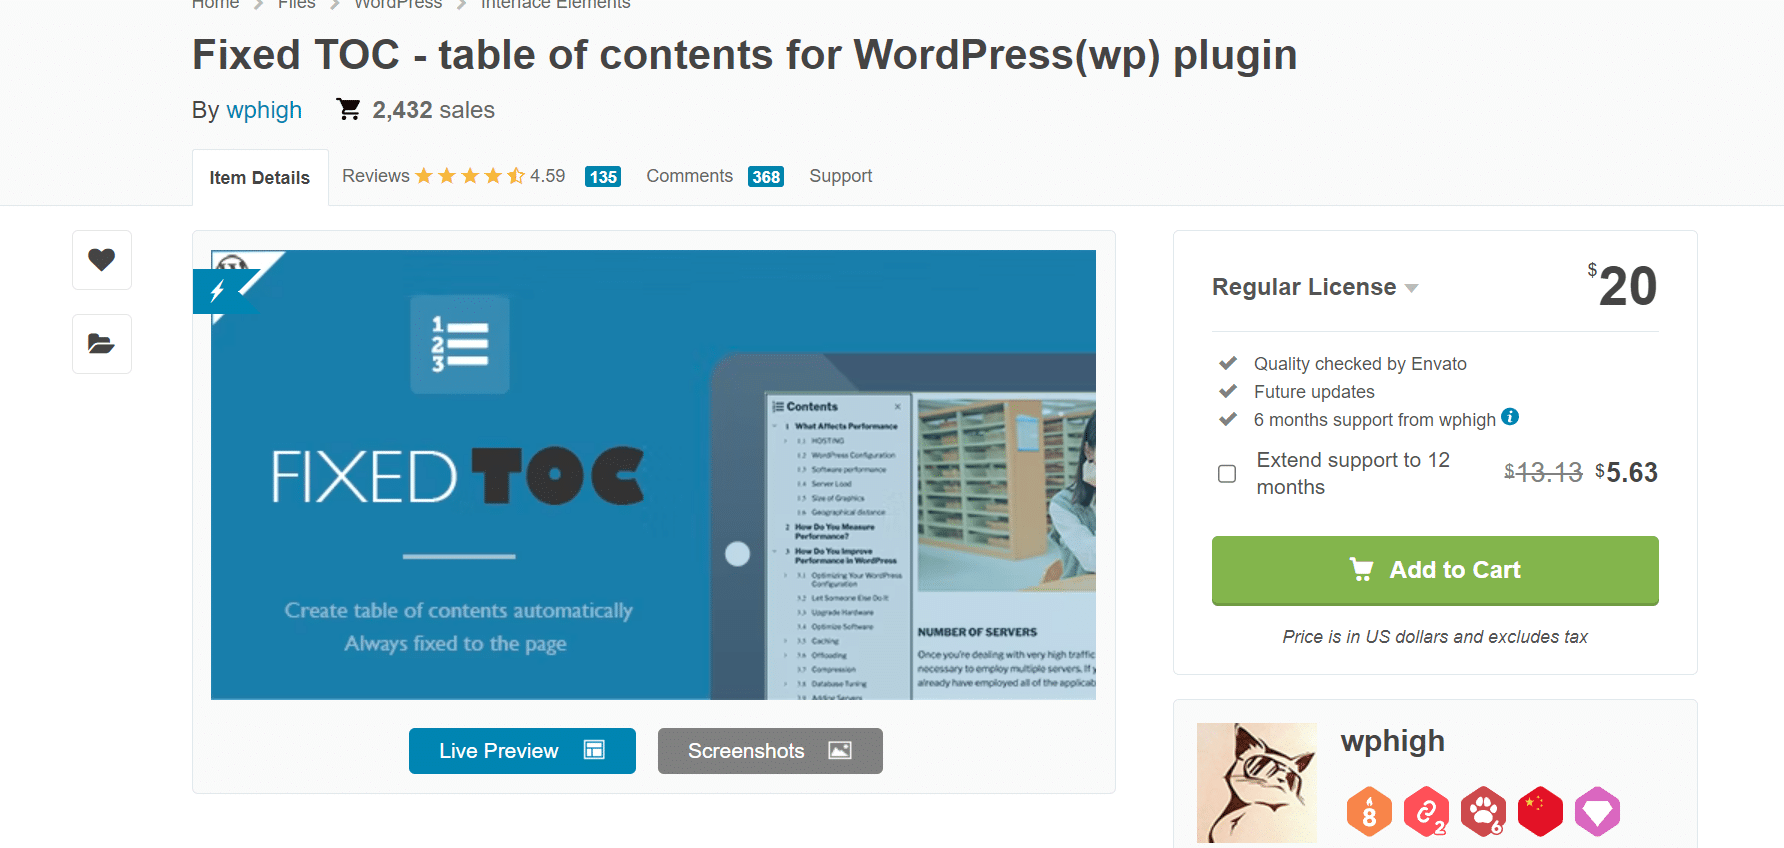
Now, we need to add a Table of contents plugin and the best there is Fixed TOC;
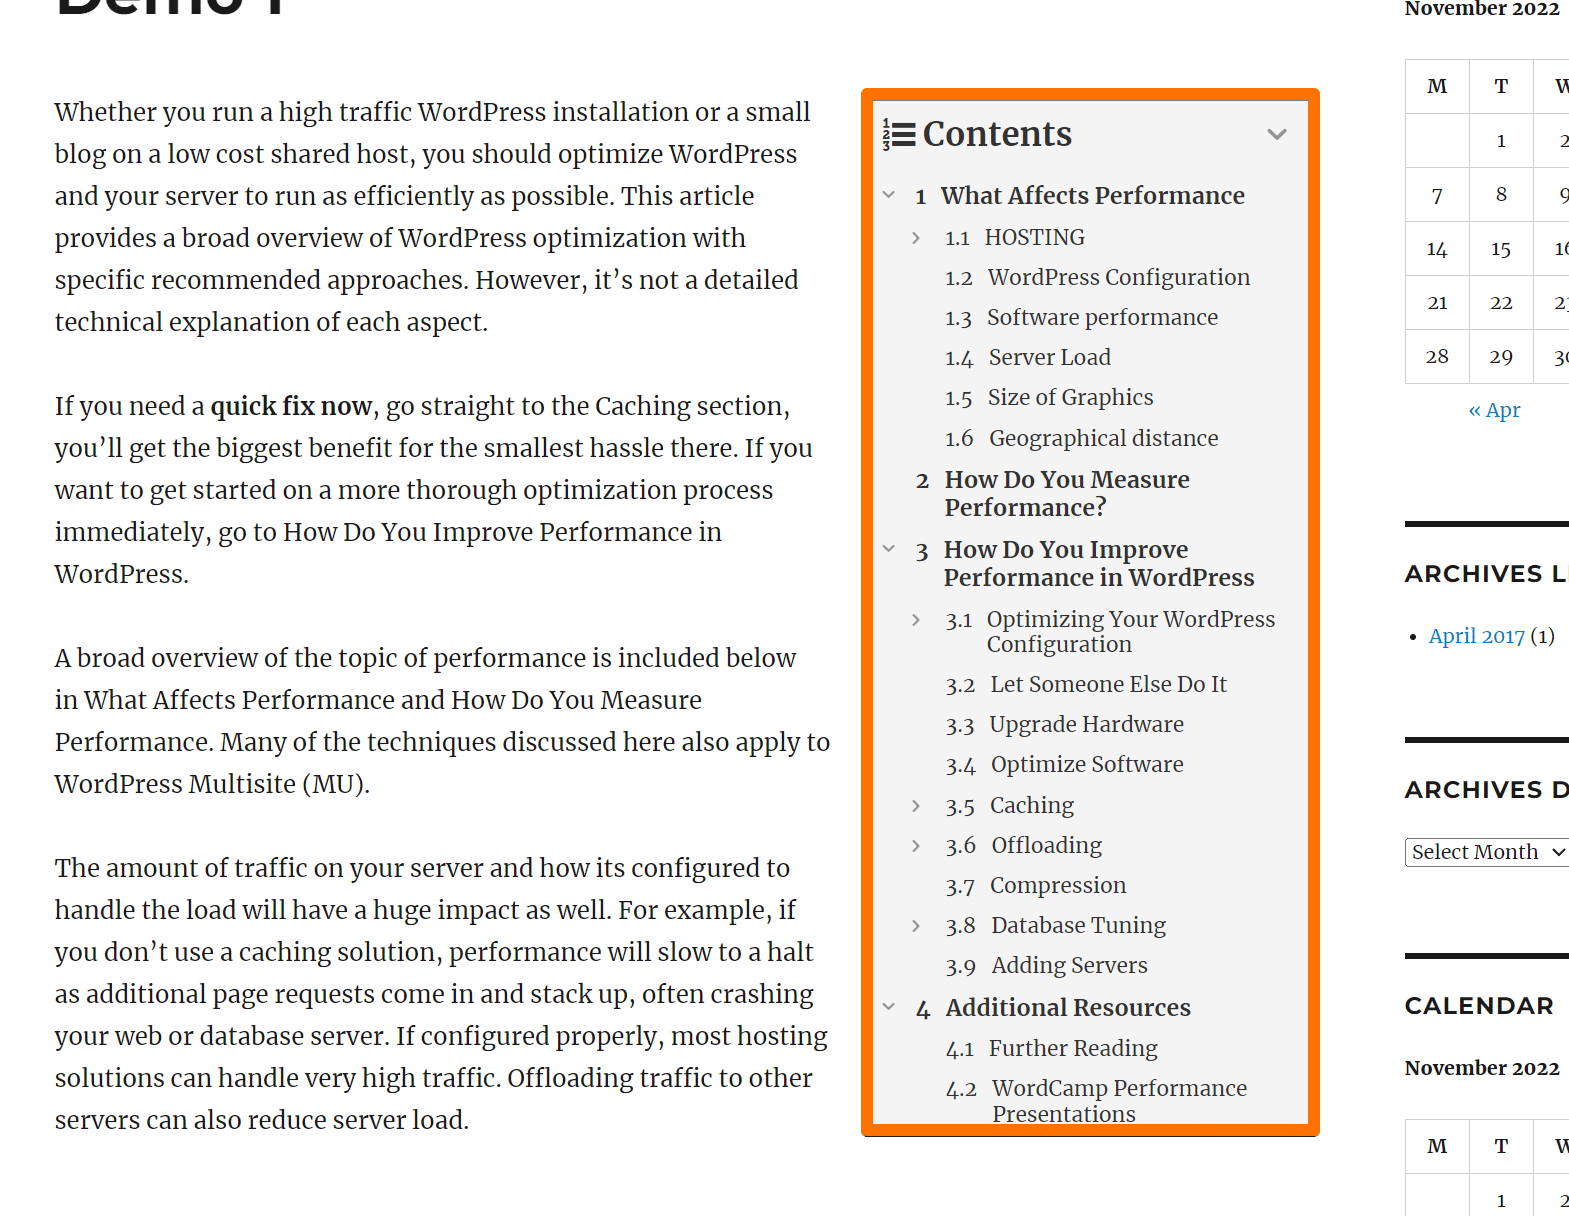
It enables you to add an automated fixed Table of contents based on your headings, like the below;
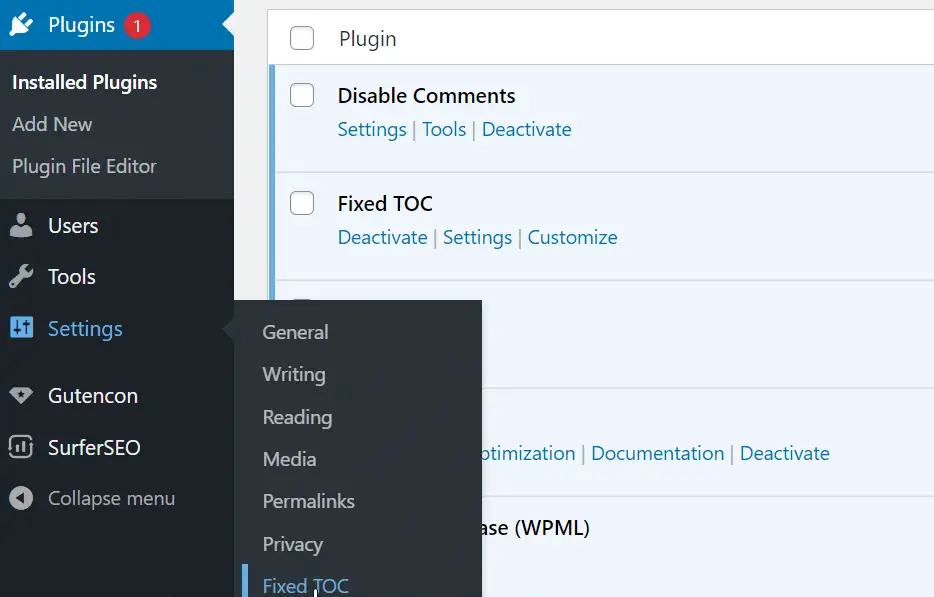
After the installation, you can go to settings > Fixed TOC option;
Afterwards general dashboard will open, you need to select the following options;
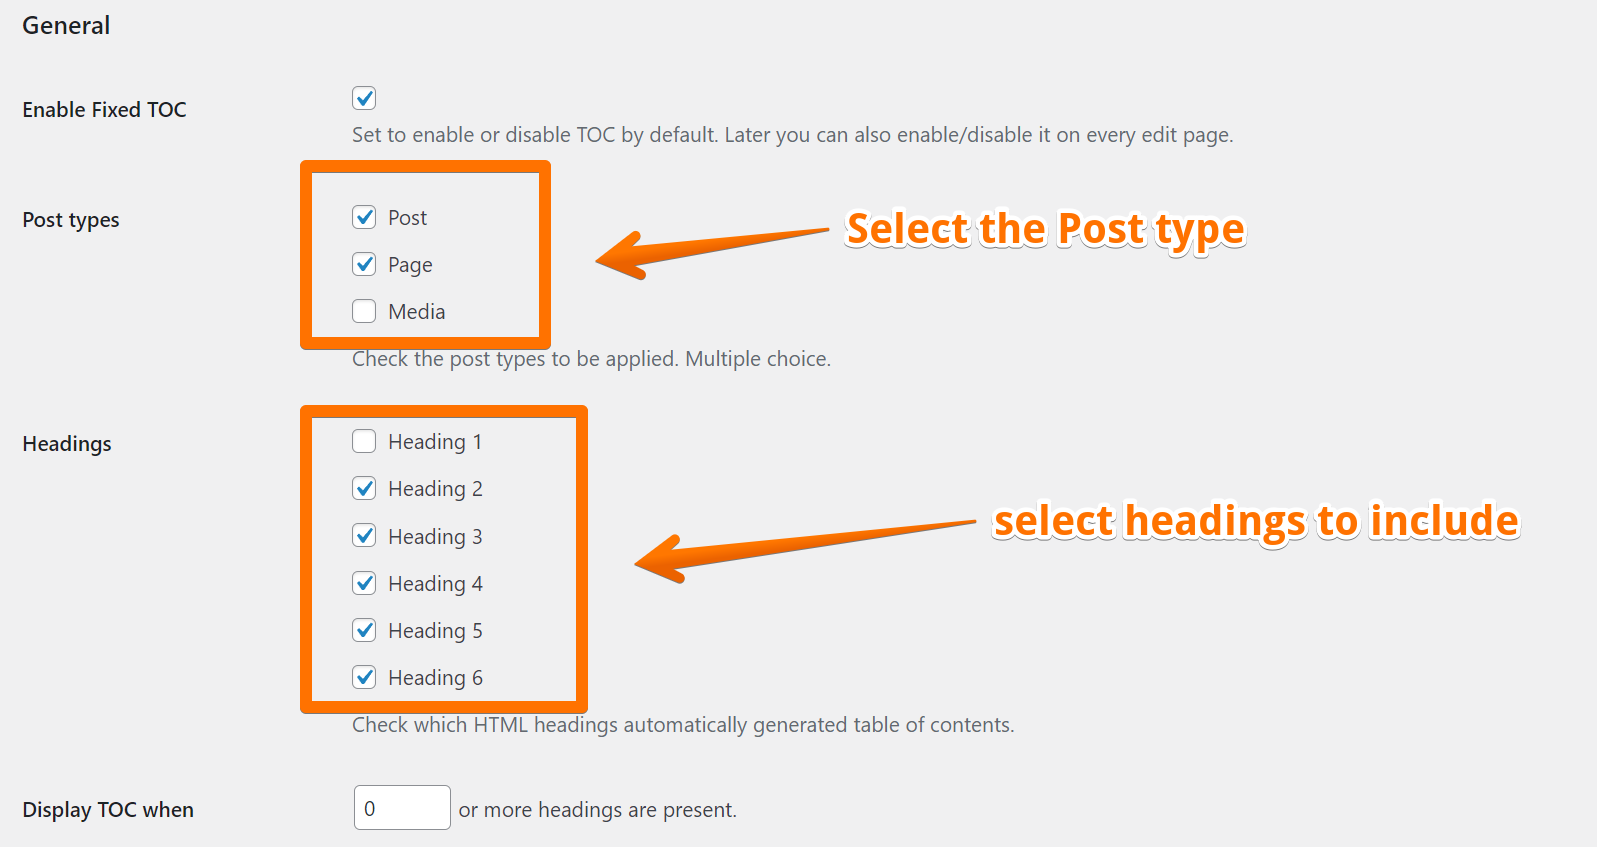
Now you don’t need to add any shortcodes or any code to your content, all posts will have a table of contents
Step 3: Add Images or Videos to your Blog post
To improve your content readability score, you need to add media i.e. images and videos to your blog. therefore you must add media to your blog content to improve your SEO score.
Step 4: Optimize your blog posts by adding Shorter paragraphs.
Everyone hates long boring paragraphs, right?
So does Google!
Therefore you must divide your long paragraphs to shorter ones to make your blog posts more readable.
You only have a short time to convince the user to stay on the site and look around. If you make an article easier to read, your readers will be able to skim it more quickly, which will benefit your business.
You may make anything easier to read by cutting down on the length of your sentences, paragraphs, punctuation, headers, and bulleted lists.
To make reading your content less stressful on the eyes, you should increase the amount of white space surrounding the text and use visuals.
Using online grammar checker apps like Grammarly, you may also check for grammar, punctuation, and spelling errors in real time.
Organise Content Using Tags and Categories
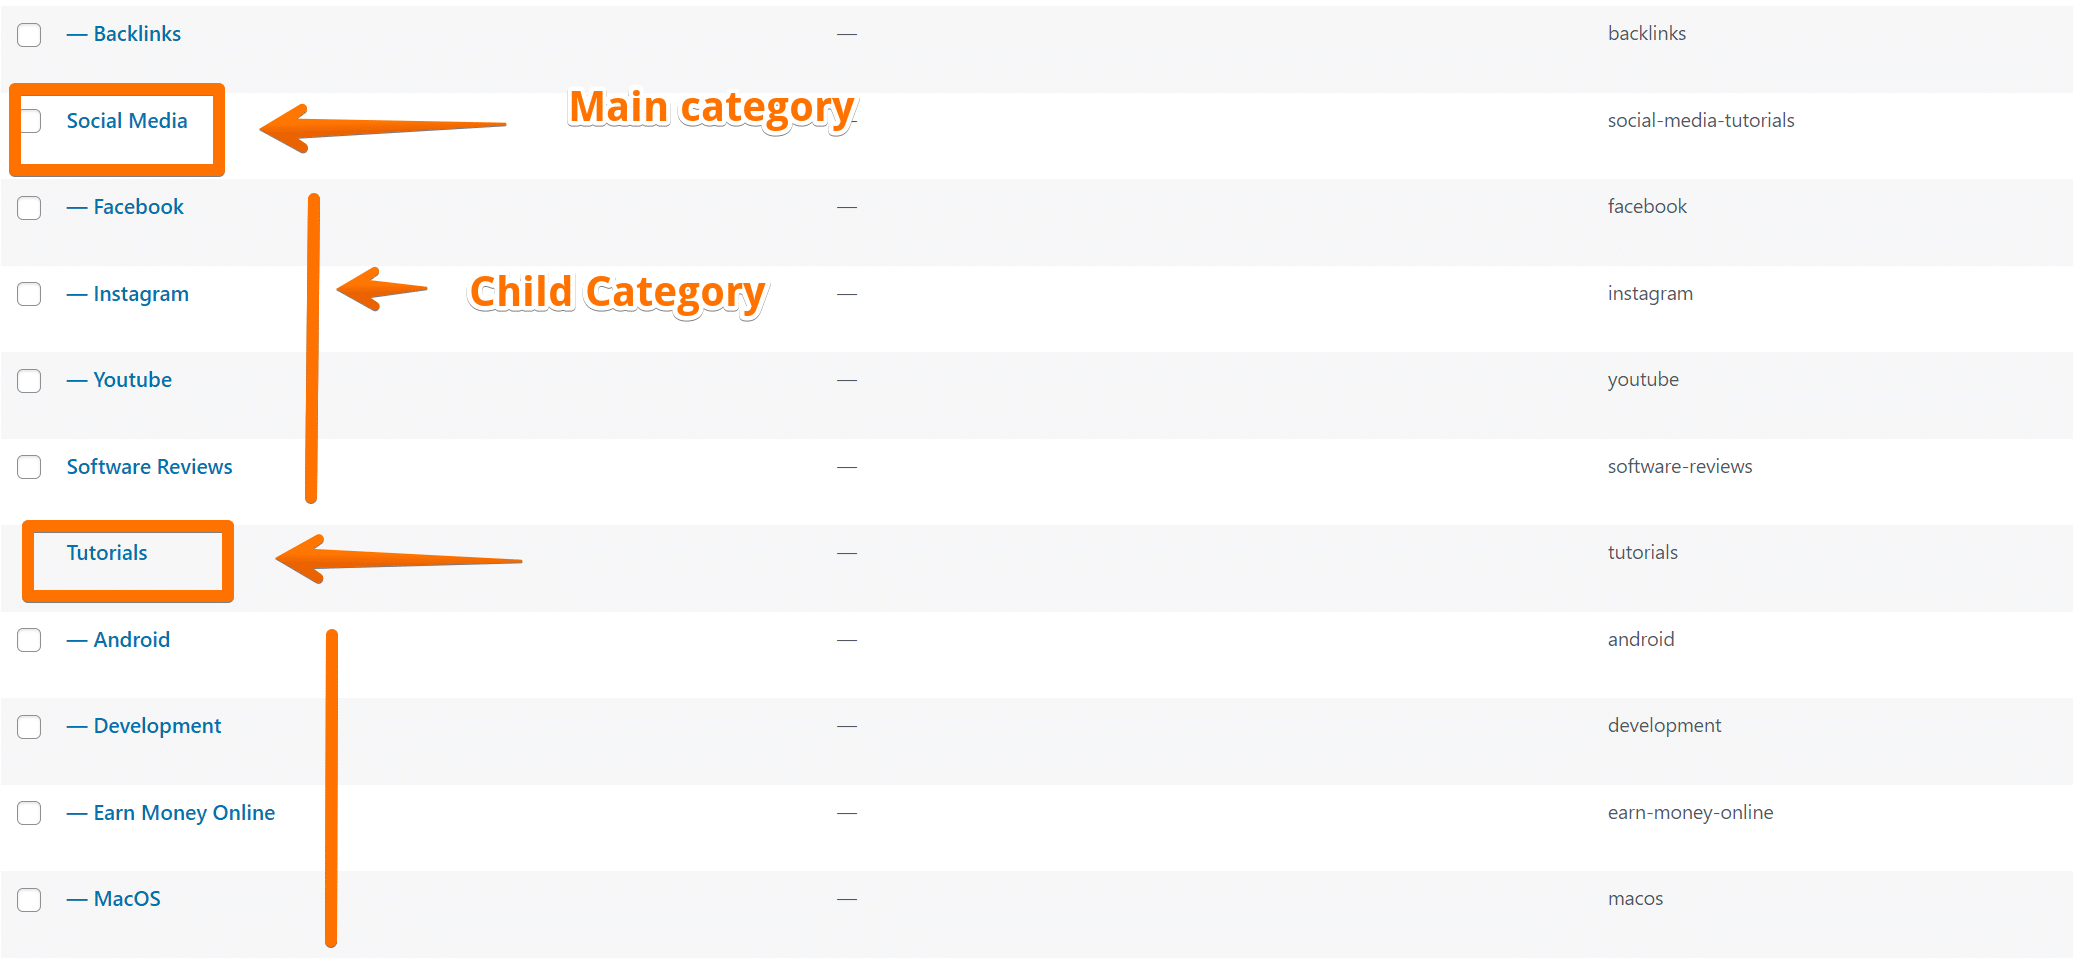
Categories and tags assist you in categorising your material not just for yourself but also for readers and search engines. Blogs enable you to create tags and categories to help you organise similar articles.
This is a helpful navigation tool for visitors to your blog and a tool you may use strategically for SEO. Every category or tag you use generates a new page with the name of the tag or type in the URL and many relevant materials and links.
The difficulty is that many WordPress newcomers misuse them. Think of your website as a book, with tags as the index and categories as the table of contents.
Categories are used to organise the material on your WordPress site into important subjects.
On the other hand, Tags are the themes covered in a single blog article.
As with keyword stuffing, you don’t want to overdo it and generate a bunch of tags with identical phrases. However, you should think carefully about which keywords and tags will be most helpful to visitors and for your SEO strategy.
Make a list of a handful of keywords depending on the most significant ones you want to rank for, but make sure they each reflect distinct sorts of subjects (for example, don’t have categories for synonyms or tiny variations on phrases), and use them whenever they’re relevant to what you’ve written.
The Featured Snippet in The Search Result
Google does everything possible to get people the answers to their questions as quickly as possible. As part of this work, they have set up the featured result or response box.
The search result that is currently being highlighted will appear first.
The article’s content is used to build a personalised snippet by Google, which highlights the section of the article that Google’s algorithms think is the solution to the user’s question.
According to research conducted by Advanced Web Ranking, answer boxes have a click-through rate of around 32.3%. As a result, incorporating them into your SEO strategy is critical.
Google does not have a step-by-step guide on their website that explains how to get the highlighted snippet.
Their advice is to enhance the content on your website and check to see that it provides the information that users are looking for.
How to use SCHEMA to feature in Search engines?
Adding SCHEMA is important part of Blog SEO to optimize your blog because it makes it easy for every search engines to retrieve information via SCHEMAs and feature it on their search results as the featured snippet.
We will use RANKMATH WordPress Plugin to add SCHEMAs to optimize your blog post automatically.
Step 1: Select SCHEMA Type
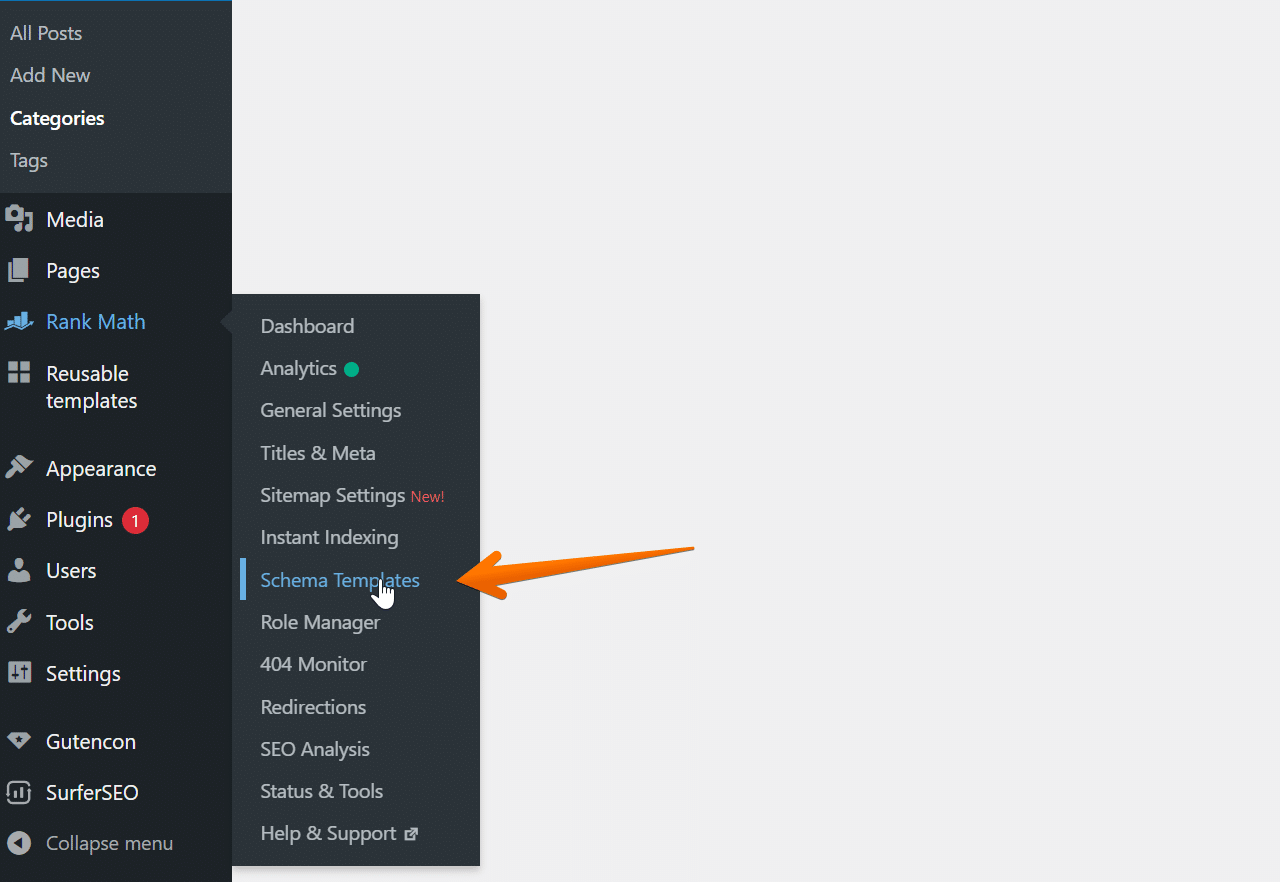
Once you installed Rankmath PRO, go to the rankmath option from the left and select “Schema Templates”;
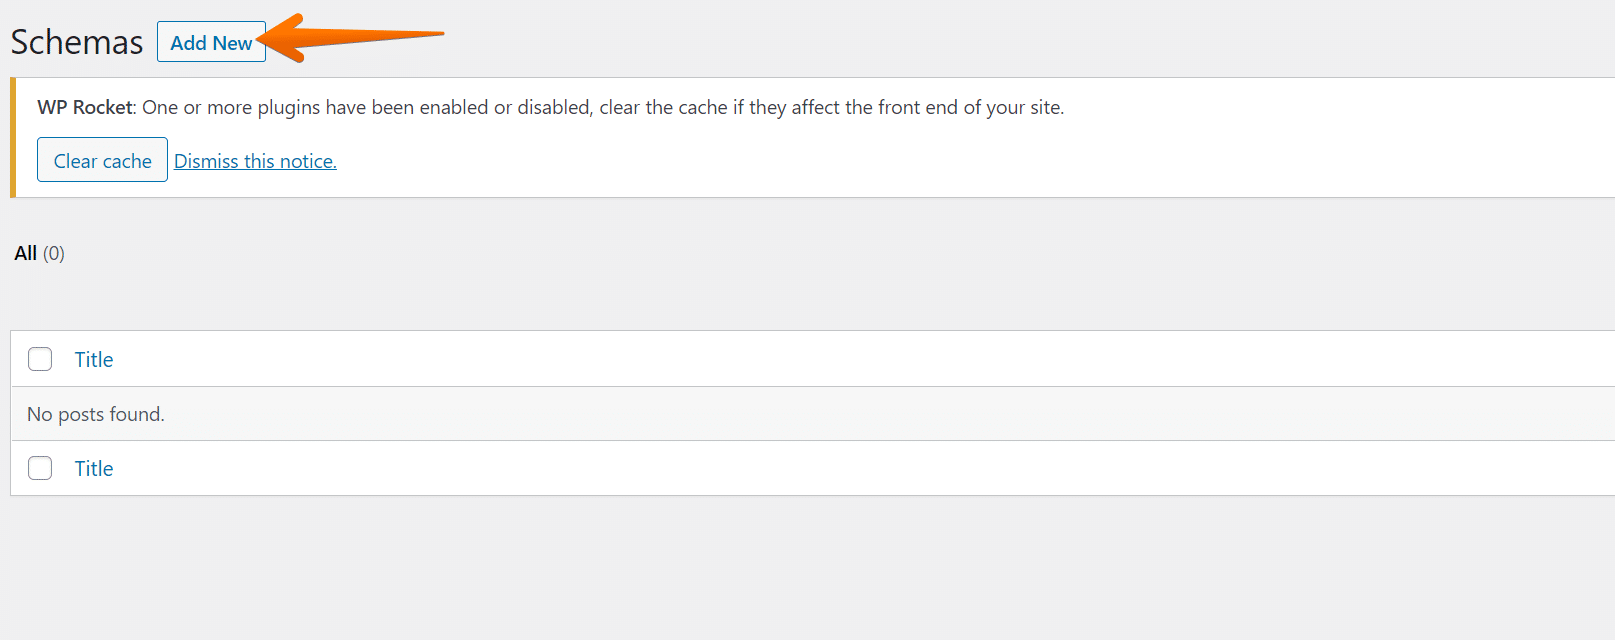
Then click on “Add new”;
Step 2: Fill in essential information
Here you have different schemas that are available for your blog content;
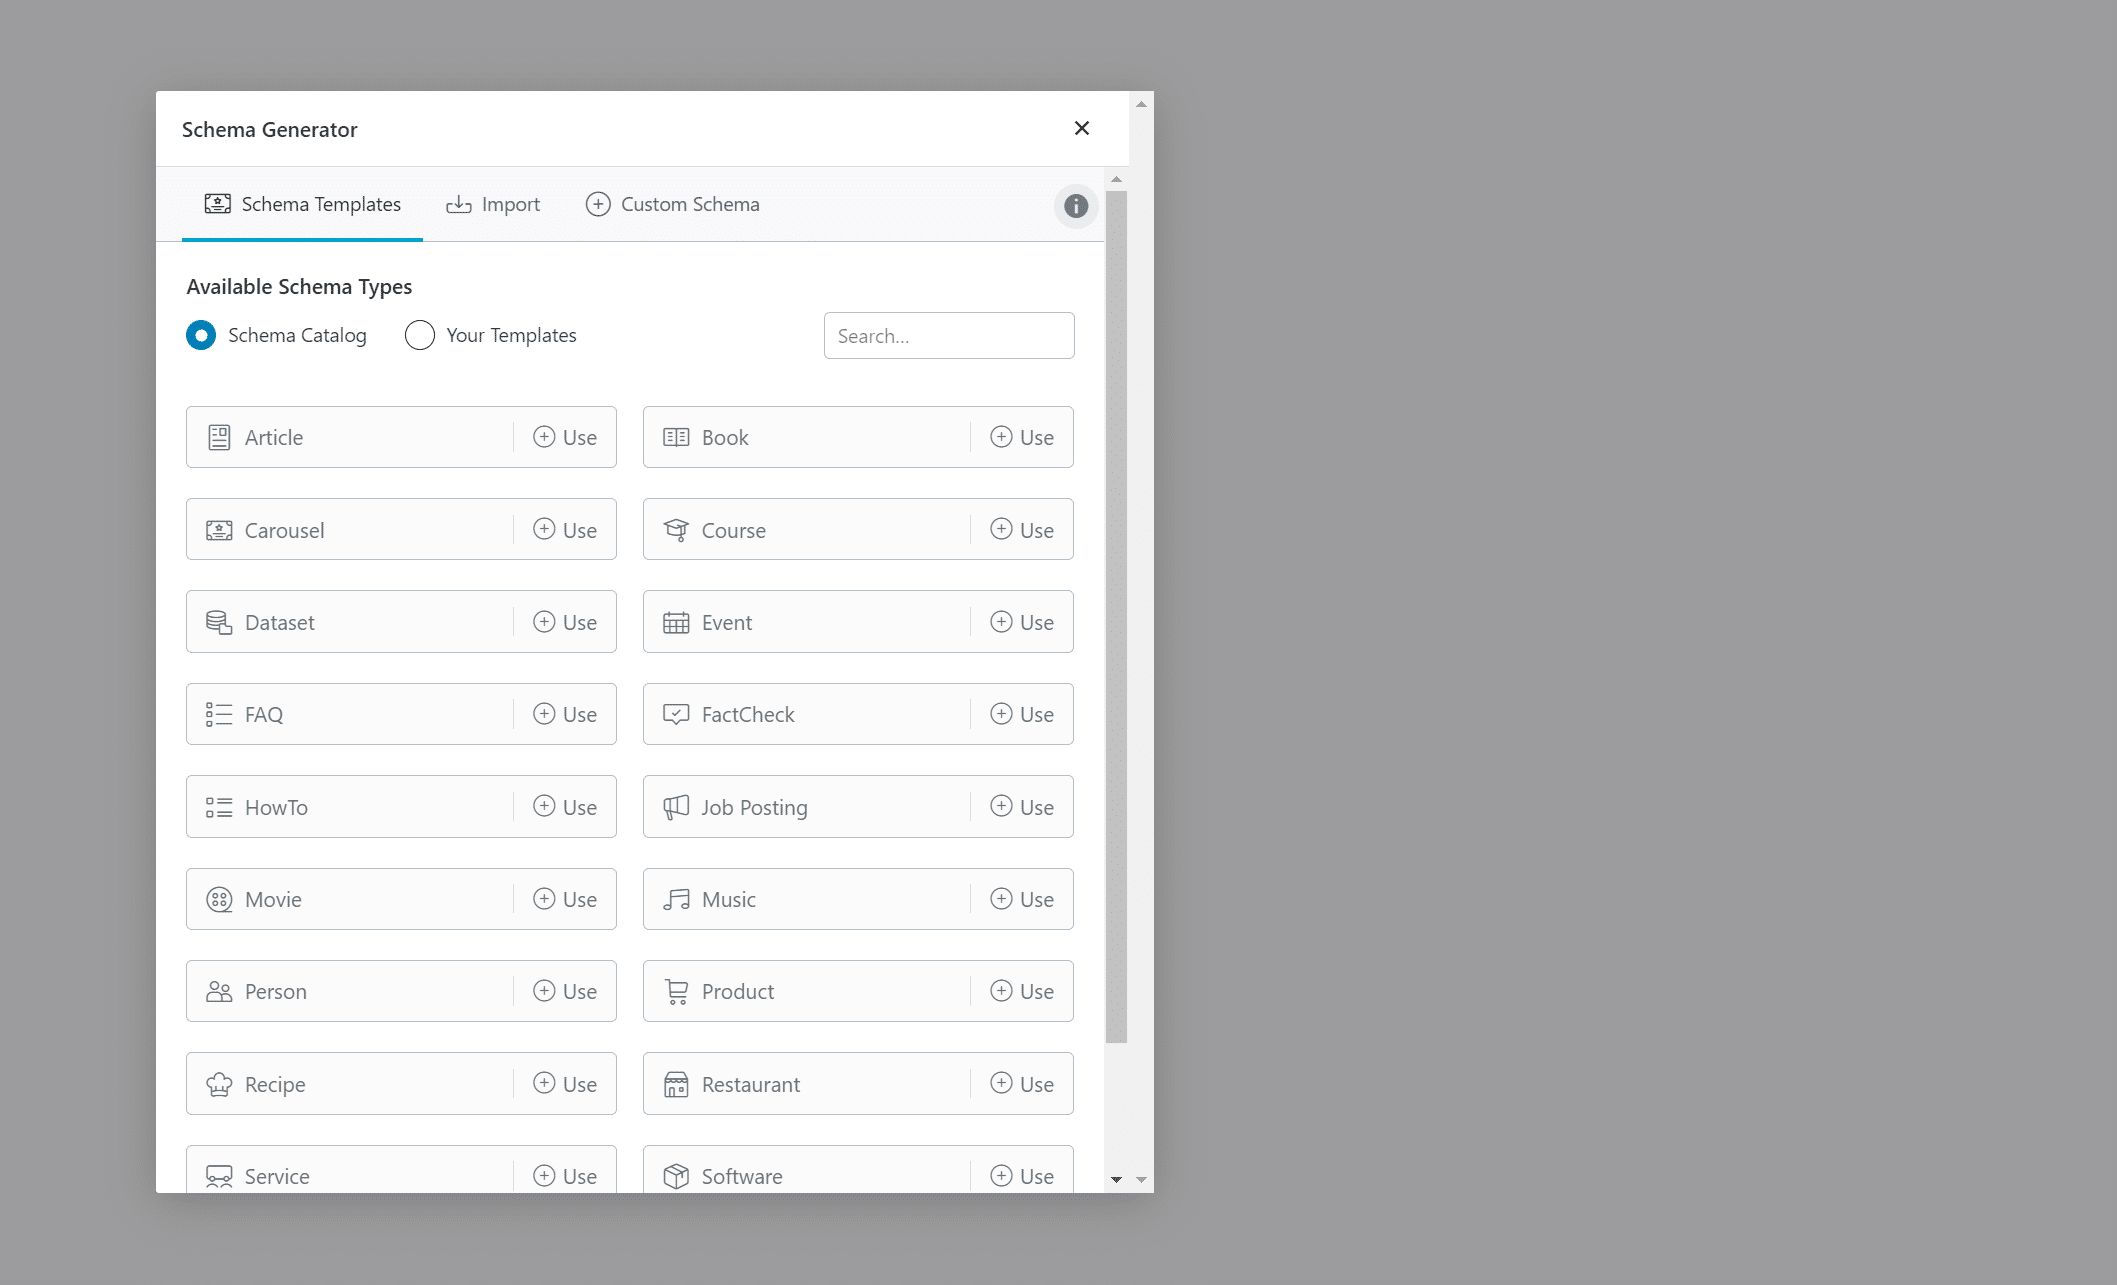
Select any, for example, “article” for our blog content;
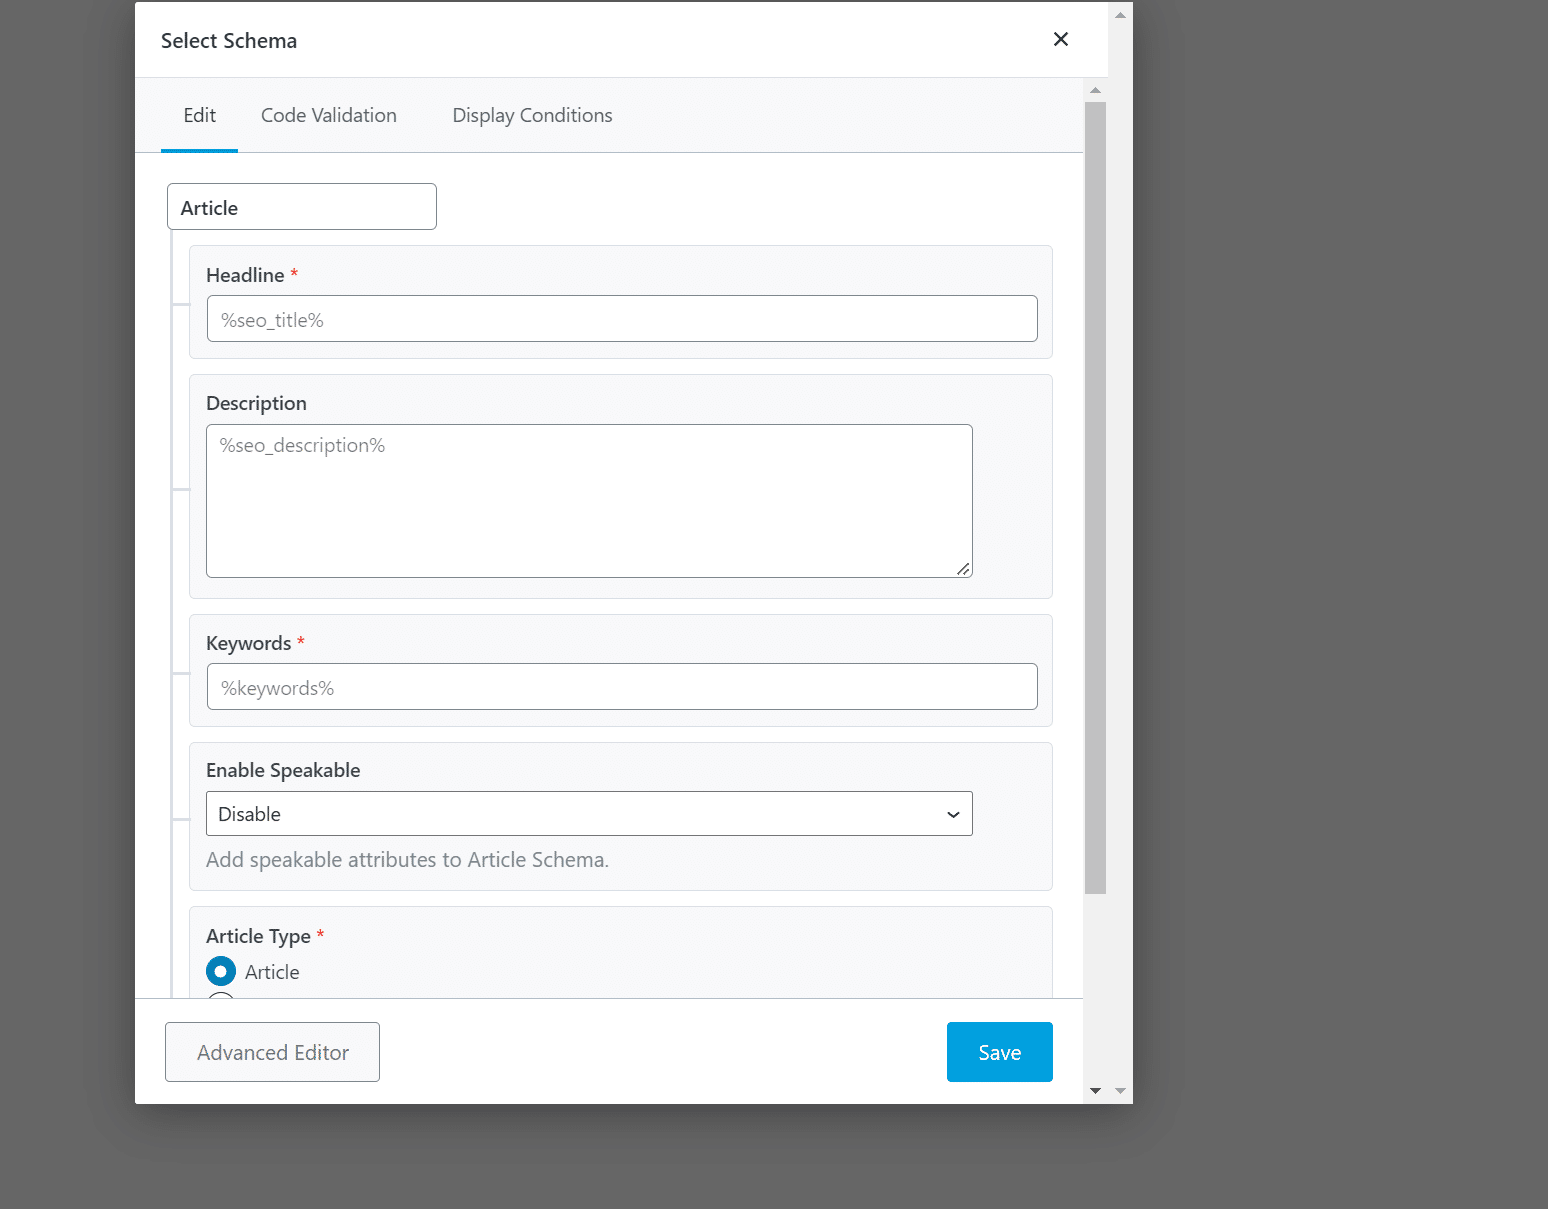
As you can see there’s shortcodes which are already added, i.e. %seo_title% for headline etc.
You can also access schema from your rankmath’s panel while writing post content by clicking on the icon below;
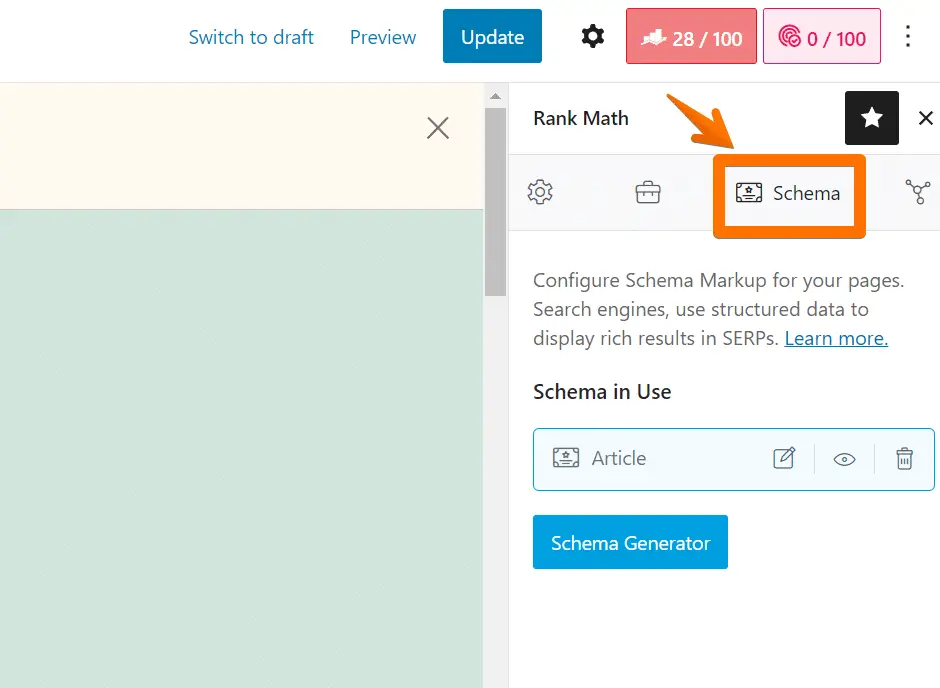
Step 3: Add more H2 to get featured in the featured snippet
To get featured in the featured snippet or People also ask section like below;
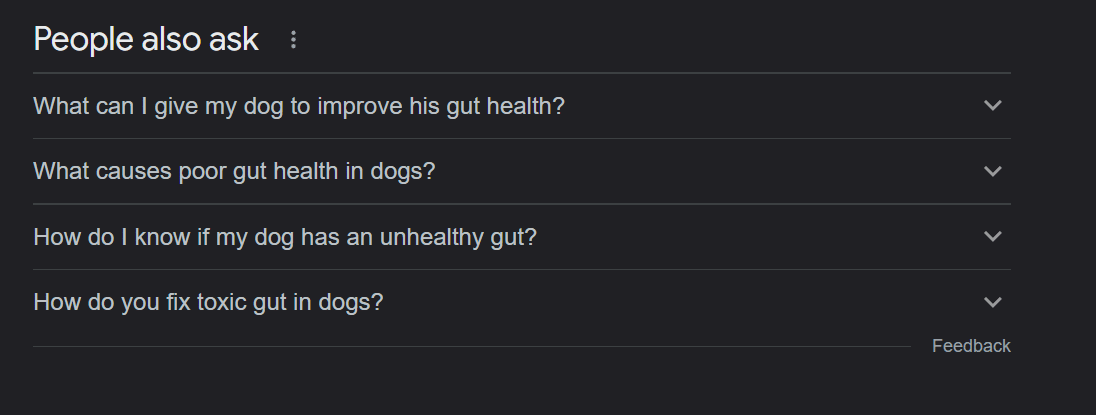
You need to add these questions above in the H2 heading format. such that google can get all the snippets from your blog and add them to their Search pages.
Make Your Blog Posts Comprehensive
Articles that go into a lot of depth on a subject are very popular with search engines. Because of this, we asked you to collect LSI keywords as part of making your content.
By looking at these similar keywords, you can get an idea of how many different ways people might search for information about that topic.
If you were to incorporate such keywords into your post, you would be able to make it more in-depth, educational, and helpful for the reader.
You need to make use of headers and subheadings to incorporate those keywords, and you need to make an effort to cover as much area as you possibly can.
In addition to using LSI keywords, another strategy that may be utilised to generate comprehensive content is to go to Google, enter your target term, and then navigate to the “Images” tab.
You will notice subject bubbles containing a wide range of different terms.
We strongly suggest you add these to your material when making it, because doing so will help you provide the complete information possible.
Optimise Older Blog Posts
Many newbies forget about their blog posts once they have published them. After your blog post is published, you haven’t finished optimising it for SEO.
Nearly half of the professionals in the industry who took part in our most recent survey said that between 61 and 80% of their organic traffic comes from “old” blog posts.
Also, some people who answered our survey said that “old” content brings in more than 90% of their leads.
Following the publication of your blog article, you must perform the following:
Readers and subscribers will appreciate your fresh and old material.
After you post something, go back to older articles that are still relevant and add a link to your new blog post. This offers your fresh content some link juice while also making it easier for users to find.
You’ve optimised an article for SEO, but how do you keep track of where it ranks in search results? We propose that you optimise previous content on a regular basis in order to maintain your rankings.
Add CTA
What use does a blog article serve if it does not include a call to action?
The call to action (CTA) that you provide in your blog should direct the visitor to the next stage of the journey that they are on via your site.
It is essential for a call to action (CTA) to be relevant to the subject of the blog post you are currently working on and to flow smoothly with the rest of the content.
If you want readers to purchase a product, sign up for your newsletter, or consume more of your material, you will need to include a compelling call to action (CTA) in each and every blog post that you write and publish.
CTAs come in a lot of different styles, so you should use your imagination and try out different ones. Buttons, links, and widgets are the most common calls to action (CTAs). However, each of these CTAs does something different.
If you want the reader to make a purchase, for instance, you need to include a call to action that is large and obvious, like a button.
On the other hand, if you provide a hyperlink to another blog post at the end of the present piece, it will be quite simple to convince the reader to go to that other blog post.
Update your External Links
Incorporating links to other websites into your text is a great way to improve its readability. This may appear paradoxical at first.
Why would you want to direct your audience to a different website? But if you give this strategy some serious thought, you can reap a number of benefits from it.
If you can back up statements, data, or quotes with an authoritative external source, people will view the information you provide as being more trustworthy and valuable.
They also provide value since they provide the viewer with a straightforward path to get further information. But you should check these regularly to make sure that you are still sending your readers to the best source.
Search engines give clear, relevant sources a lot of weight because they show that the author knows what they are talking about.
They give background information that helps strengthen the link between the content on your website about a certain subject and the content on other expert or authority websites that also cover the subject.
Focus on Quality over Quantity
To get a high ranking in Google’s search engine results, you must never copy content and always post original, relevant content.
Because of how strictly SEO is applied on this website, even a single text may not be copied. You should also ensure the content is easy to read and posted in clear language.
You should also make sure the content is original and of high quality.
You also need to make sure the content that is posted is reliable and offers something of value to the people who read it.
Identify your target audience.
No matter what industry you are trying to reach with your blog, you need to figure out who your main readers are and talk to them.
Your blog approach may be improved by first understanding your audience and the actions you would like them to take after clicking on one of your articles.
Using buyer personas is a good way to reach out to specific readers based on their demographics, psychographics, and buying habits.
If you don’t have this knowledge, you could produce content that is free of grammatical errors and factual inaccuracies, but very few people will click on it because it doesn’t resonate with them on a personal level.
Frequently Asked Questions
FAQs are a great way to help people find the answers they are looking for quickly. It also helps you create content that is up-to-date and relevant for your audience.
By following these tips, you will be able to optimise your blog posts for SEO like a pro in no time!
Why Optimise Your WordPress Blog Posts for SEO?
Optimising your blog posts for SEO allows you to consistently increase search engine traffic to your WordPress website.
Because search engines are often the most important source of website traffic, this can be extremely beneficial to your blog, online store, or small business website.
If you simply publish your blog posts without optimising them for WordPress SEO, you will limit the amount of traffic and money you can make.
Does blogging help with SEO?
It most emphatically does. Indeed, blogging is one of the most effective ways to improve your SEO. Blogging is beneficial to SEO because it aids in many important ranking factors.
A blog that is regularly updated with high-quality blog posts on topics relevant to your web pages, services, products, and audience can make a significant difference in how your entire website ranks in search engines.
Why is SEO important for blogging?
SEO is simply writing the content in such a way that Google understands that the page provides the best content on the topic.
The most important aspect is good content. However, letting search engines know that you are writing good content is also important. And you can accomplish it by having all HTML pages have certain tags called META tags that must be maintained when designing your page.
Crawlers look at these tags to understand what the content is about and store this information by ranking them in order when all of these tags are maintained.
SEO assists you in increasing the visibility of your content.
Conclusion
To wrap up our comprehensive blog post SEO checklist, we’d like to give our closing views and remind you of a few things.
First and foremost, remember to preview your blog article. After all, it’s the greatest method to ensure that when it’s live, you see it the same way everyone else does.
This also aids in identifying any mistakes that you may have missed on the back end.
Second, ask yourself if you have done all you can to give your blog article the attention it deserves.
We hope that this list will help you optimise your blog posts for search engines like a pro.
If you use these SEO strategies, you’ll quickly move up in the search rankings and get more people to visit your website.
Test your knowledge
Take a quick 5-question quiz based on this page.


