Have you ever wondered how to make your WordPress pages stand out in search engine results? Well, look no further! In this article, we will show you how to mark up your pages with schema using the Rankmath plugin.
Imagine this: you have just launched a new website for your business, and you want to make sure that it gets noticed by potential customers. By implementing schema markup, you can provide search engines with valuable information about your content, making it more likely to appear prominently in search results.
With the Rankmath plugin, adding schema markup to your WordPress pages becomes a breeze. Not only can you easily install and activate the plugin, but also configure it according to your specific needs. Whether you’re customizing schema markup for different content types or testing its impact on your website’s visibility, Rankmath has got you covered.
Previously, How To Enable Seo-Friendly Permalinks In WordPress in 2023
So let’s dive in and discover how this powerful tool can take your SEO game to new heights!
Understanding the Importance of Schema Markup

Schema markup is a type of structured data that can be added to web pages to provide search engines with more information about the content of those pages.
It allows search engines to better understand the page’s context and content and present it in a more relevant way when users query related topics. Schema markup consists of a set of tags, or microdata, that are embedded into webpages’ HTML code.
These tags provide a description of what is on the page and its various elements, such as title, author, date published, etc.
Understanding the importance of schema markup is crucial for optimizing your WordPress pages with the RankMath plugin. By implementing schema markup for local businesses, you can enhance search engine visibility and gain a competitive edge in the digital landscape.
Schema markup provides search engines with additional information about your website’s content, making it easier for them to understand and display relevant results to users.
It allows you to categorize and highlight important details like business addresses, contact information, operating hours, customer reviews, and even product prices. This structured data enables search engines to deliver more accurate and informative snippets in their search results.

If you search for any reviews, you will find these starts under each URL which tells the user directly how its being rated by the consumers around the world.
By adding schema markup using the RankMath plugin, you are providing clear signals to search engines about your website’s content and purpose, which can lead to better rankings and increased organic traffic. The plugin offers an easy-to-use interface that allows you to effortlessly add schema markup without any coding knowledge.
Installing and activating the RankMath plugin is the next step in optimizing your WordPress pages for maximum impact. With this powerful tool at your disposal, you’ll be able to take full advantage of schema markup and unlock new opportunities for growth in the online marketplace.
Installing and Activating the Rankmath Plugin
To get started, quickly install and activate the powerful Rankmath Plugin in your WordPress dashboard. With Rankmath, you can easily mark up your pages with schema to enhance the visibility of your website in search results.
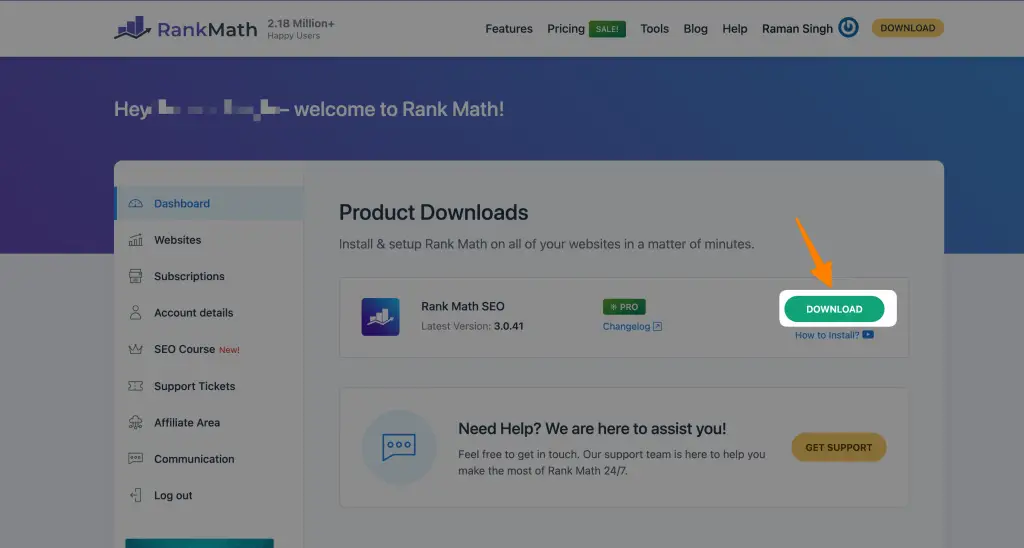
Step 1: Signup to RANKMATH and download the plugin
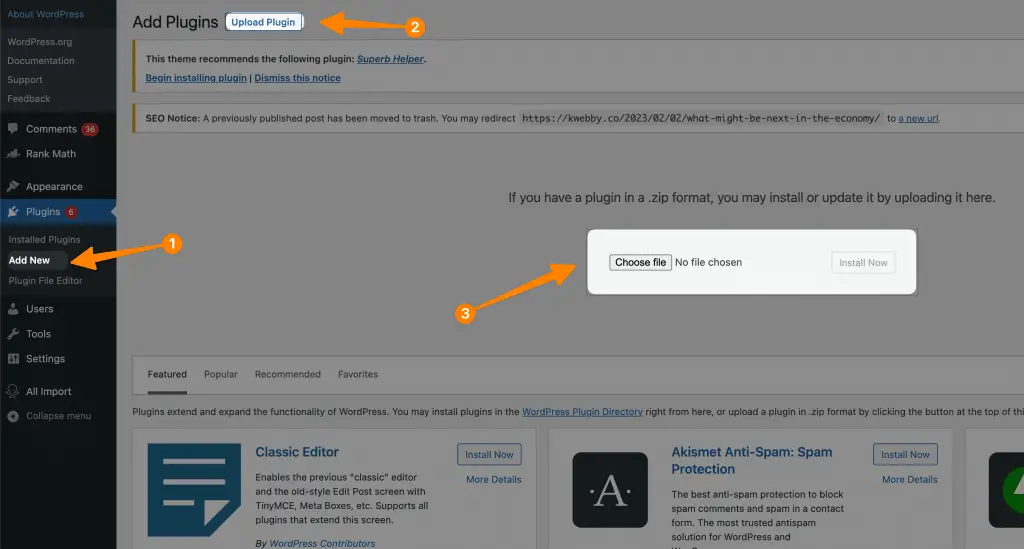
Step2: Upload the zip file to Plugins > Add New > Upload plugin
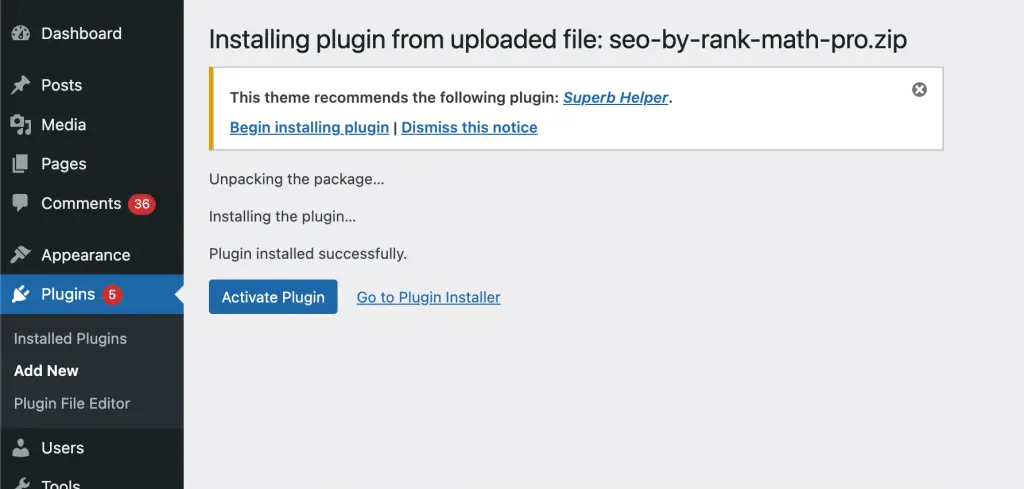
Then activate the plugin as follows;
Once you have successfully installed and activated Rankmath, it’s time to explore its advanced schema markup options. This plugin goes beyond basic structured data by providing comprehensive schema types for various content types such as articles, recipes, events, products, and more. You can customize each schema type according to your specific needs to maximize its effectiveness.
Now that we’ve covered installing and activating Rankmath without a hitch, let’s move on to configuring it for schema markup.
Configuring Rankmath for Schema Markup
Once you’ve successfully installed and activated Rankmath, it’s time to unleash its full potential by configuring it for enhanced schema markup. By following these schema markup best practices, you can optimize your website for SEO and gain an edge over your competitors.
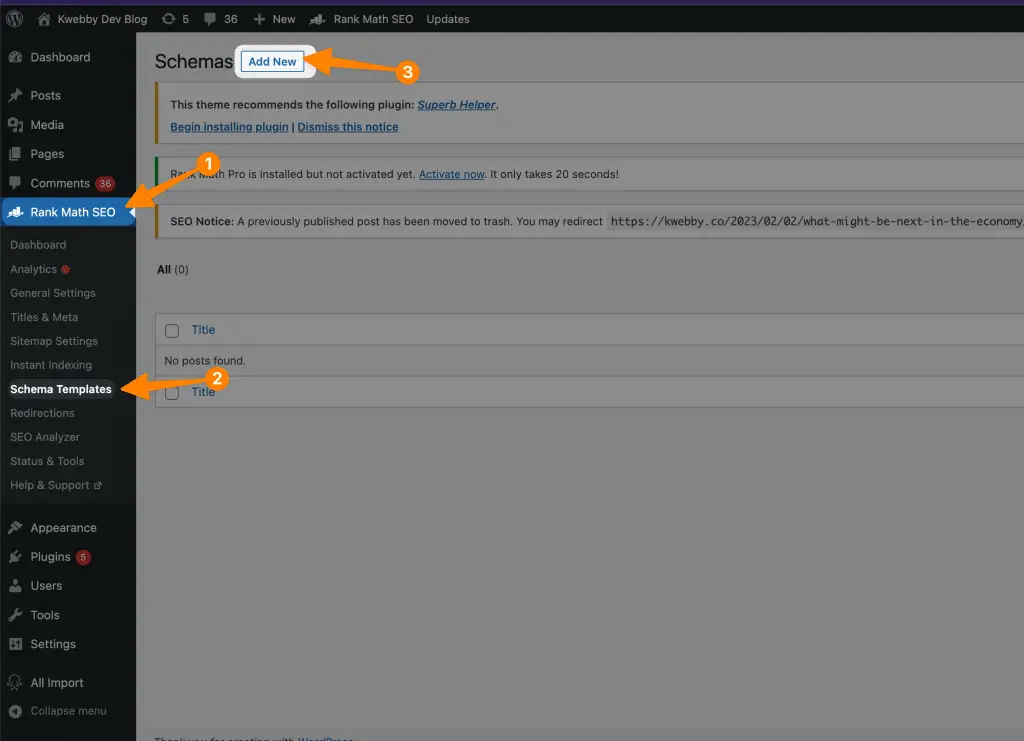
After successful activation, the “Rankmath SEO” Menu will be activated on the left side of the menu, you need to mouse over it and select schema templates and click on Add New as follows;
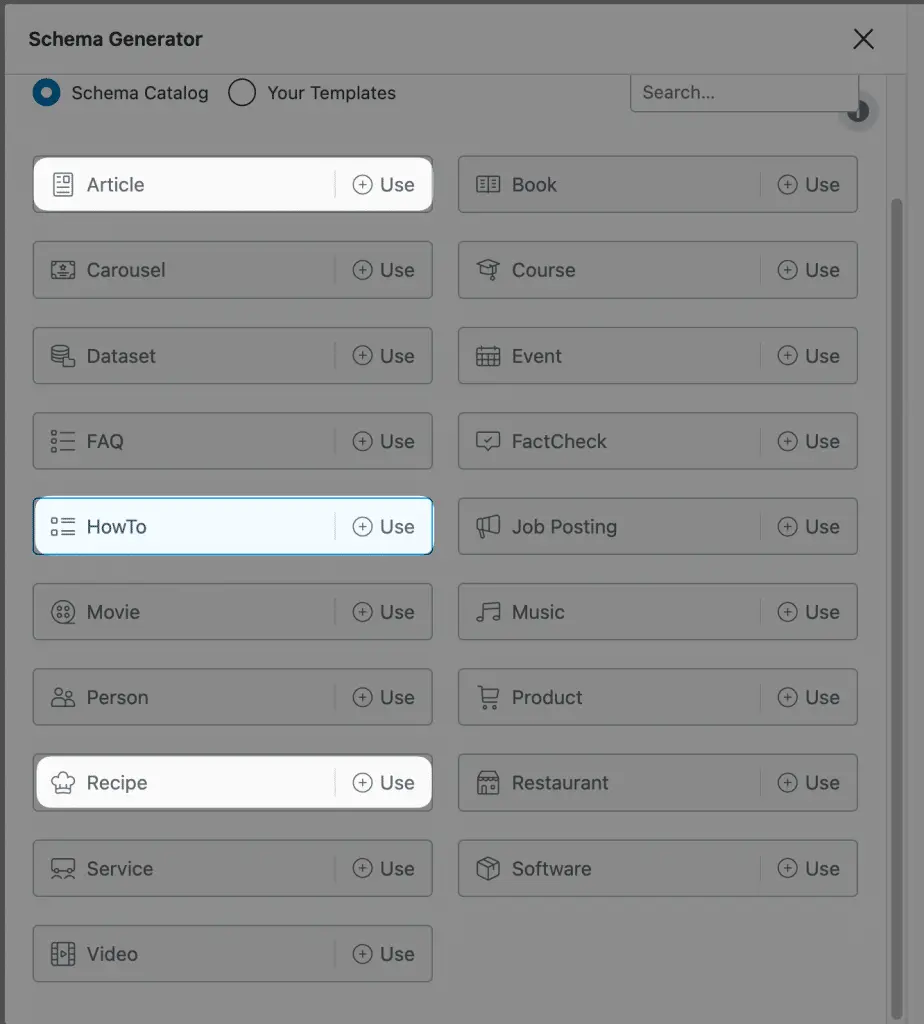
A new popup window will open and you need to select the appropriate template which reflects the nature of your website. for example, if you have a food blog, then you need to select “Recipe” Template, if you have generic articles blog then you need to select “Articles”, If you post only “Howto” articles then you need to select “Howto” templates as you can see below;
Select your desired templates, then you need to check the type of template, for example, if you are choosing articles then you need to select whether its a article , blog post or news article as follows;
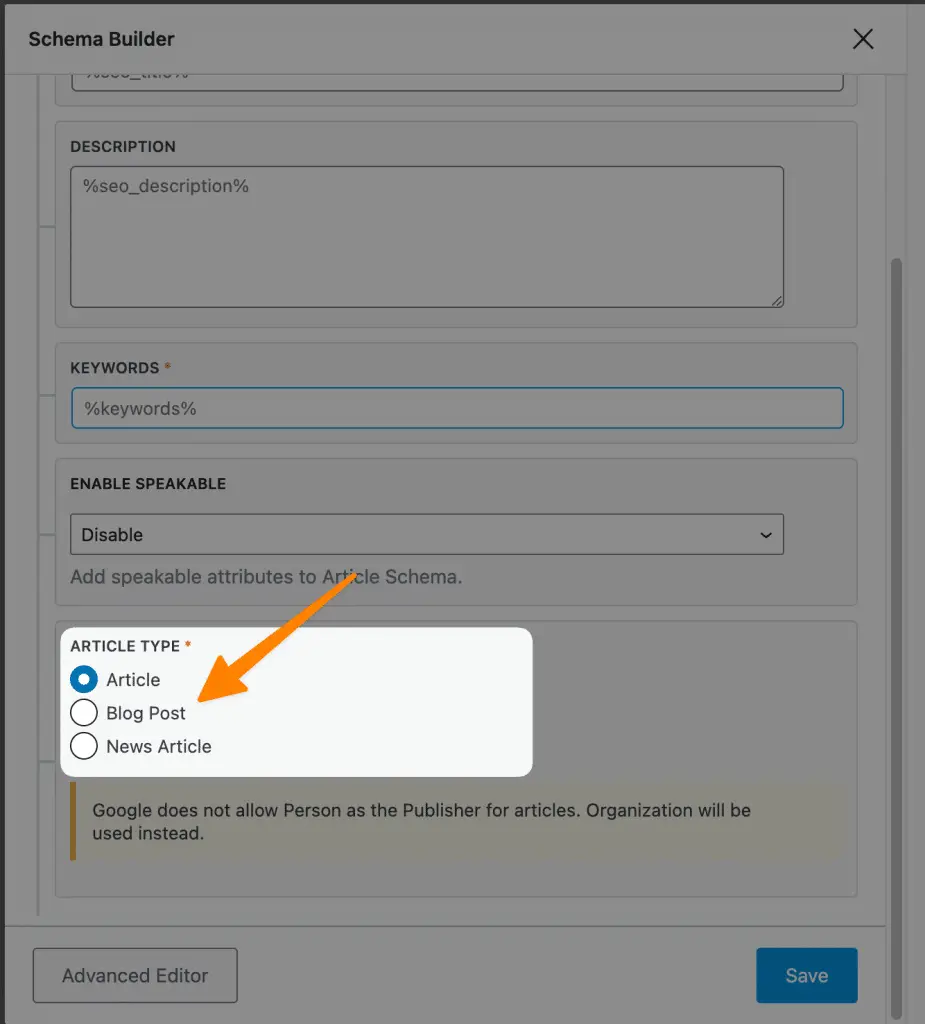
Note: Google does not allow Person as the Publisher for articles. Organization will be used instead.
You must select “Blog post” if you’re representing the person.
Next, you need to select the “Display Condition” section to select where you want to put this markup as follows;
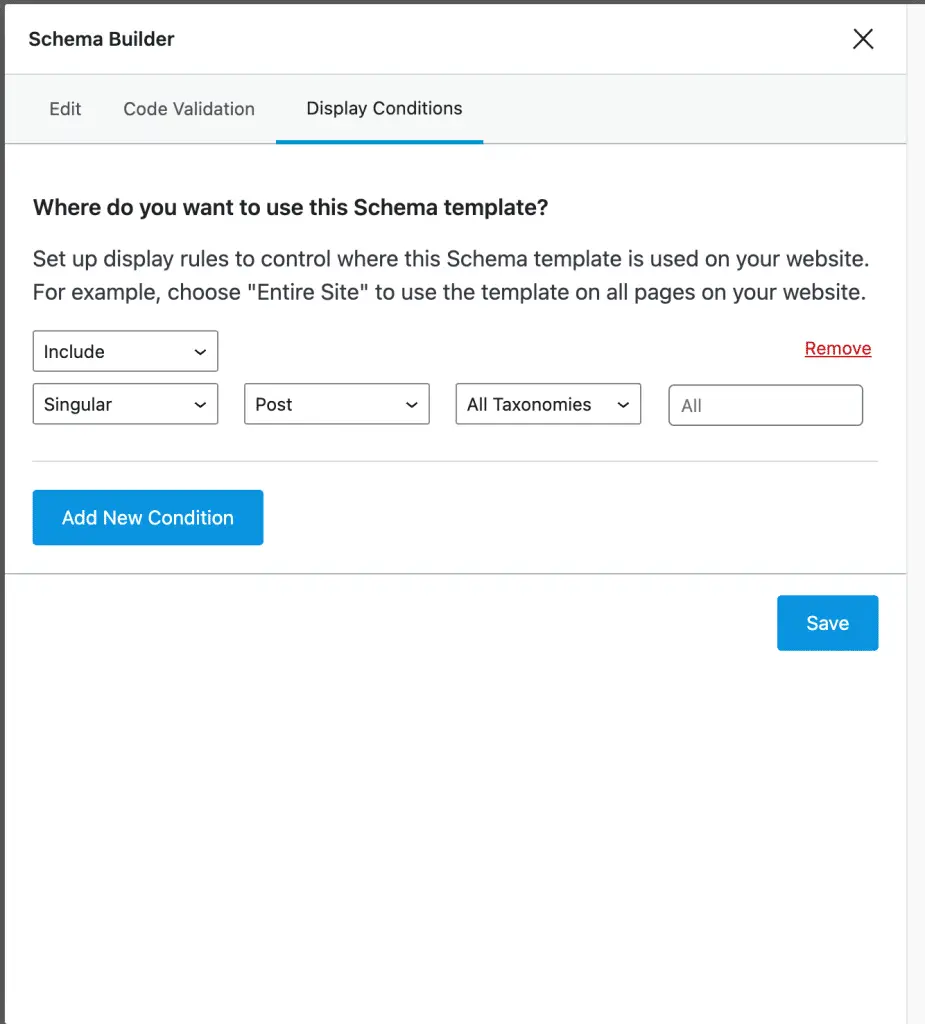
You must select “Include” and if you’re using it as blog posts then you must select the following;
- Singular > Post > All Taxonomies.
This is very important to let search engine knows which part of your website has posts or not.
Now that you’ve configured Rankmath for enhanced schema markup, let’s move on to adding schema markup to pages and posts seamlessly without disrupting the user experience.
Editing or Multiple Schema Markups On Posts
Now you have added schema markup to your posts successfully, it’s time to customize it for each post. Most of the fields of the schema are added automatically, but if you want to customize or add multiple schema markups to your posts then follow the following steps.
Step1: While you’re writing your post in the editor you have an options enabled on the right side of the panel as follows;
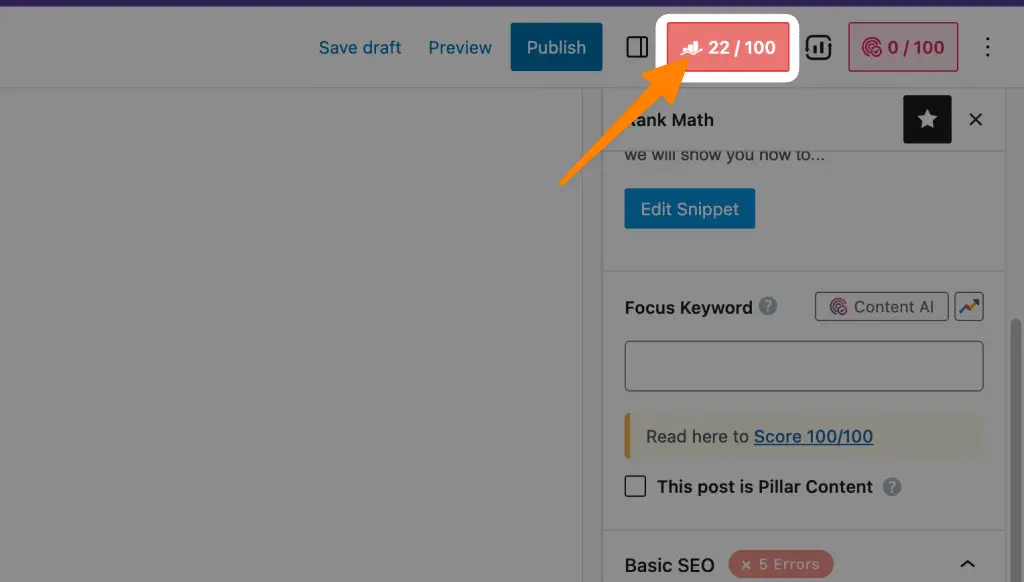
Click on it, RANKMATH Panel will open, here you need to select schema icon as follows;
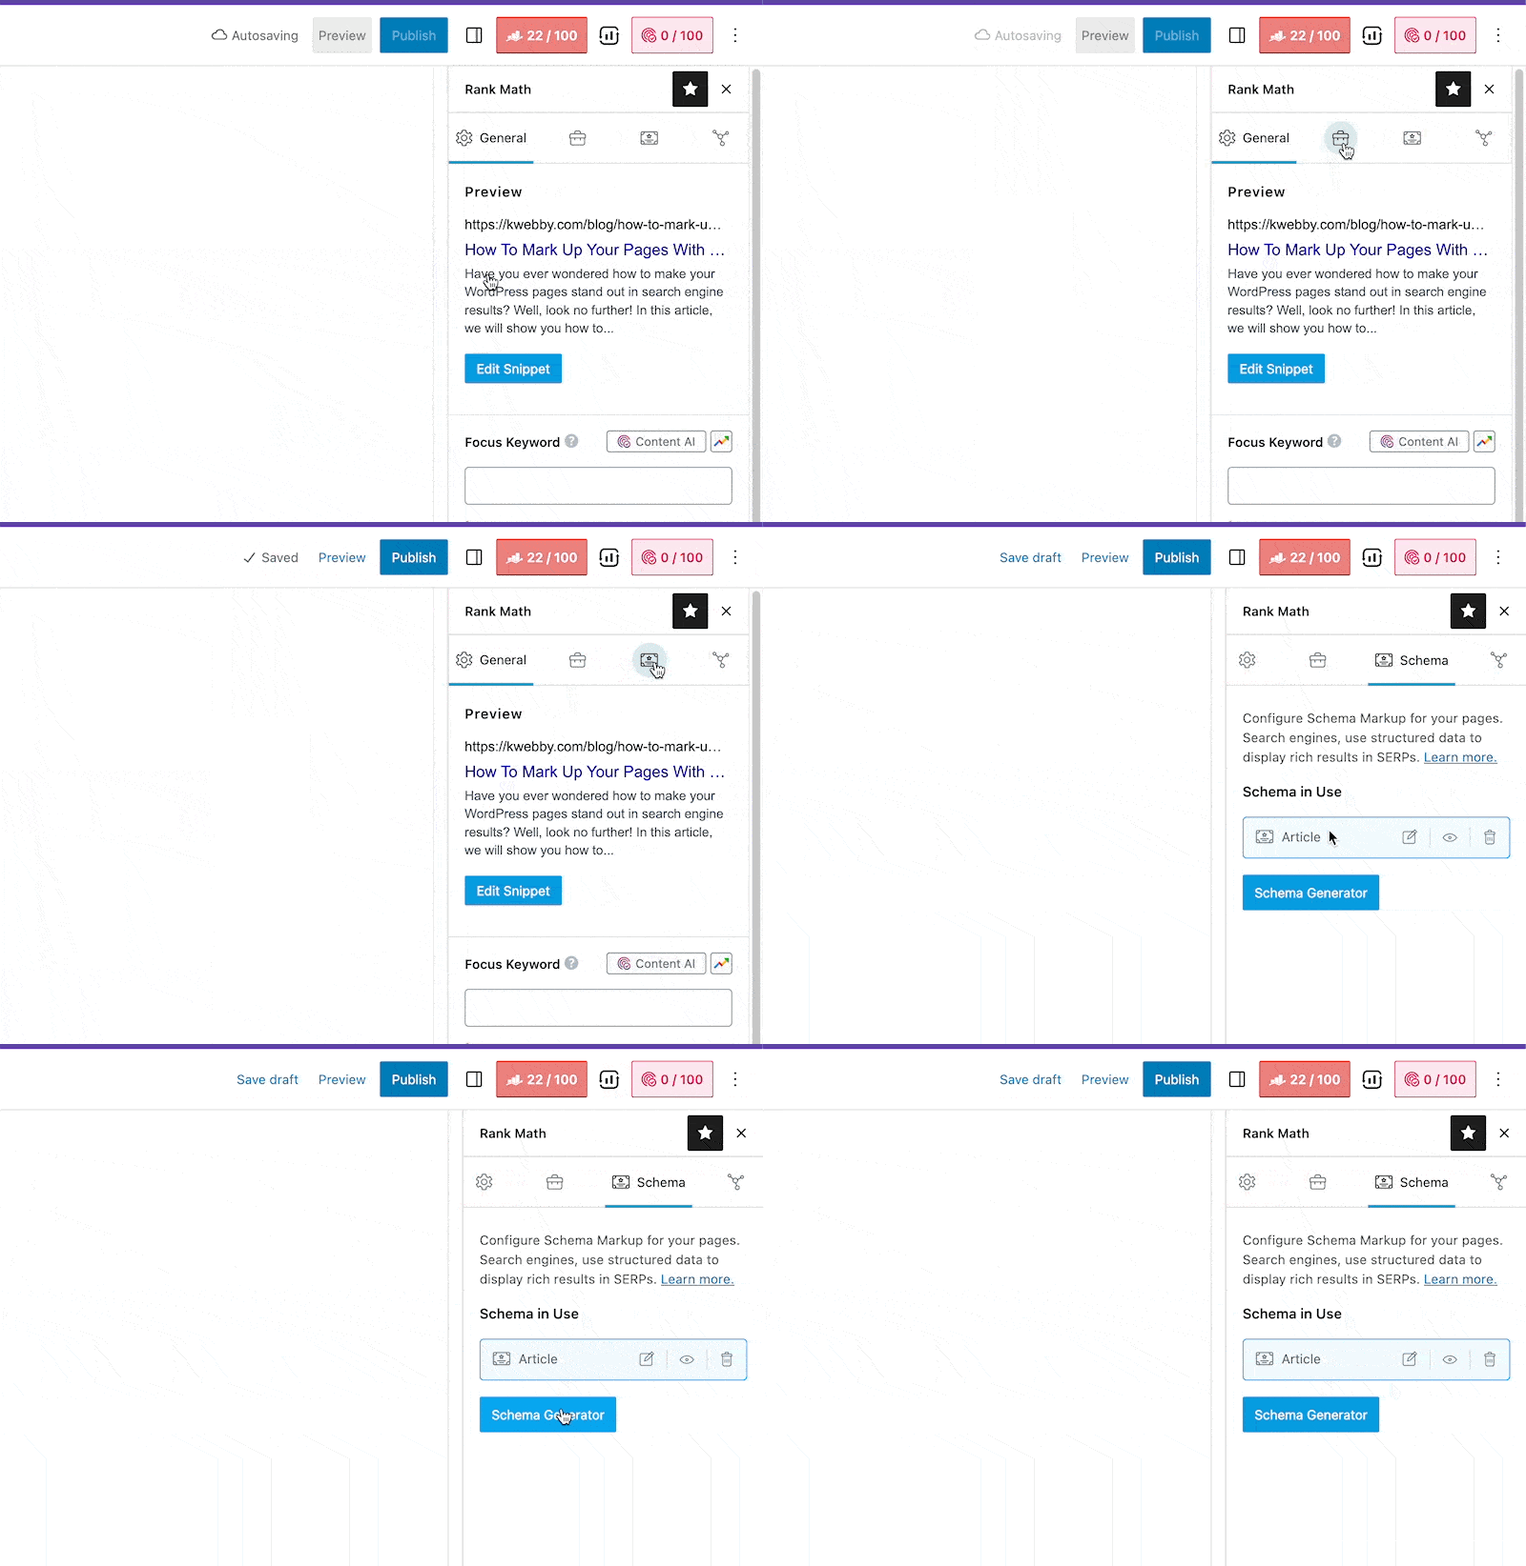
To edit the current schema just click on edit and a window will open like below;
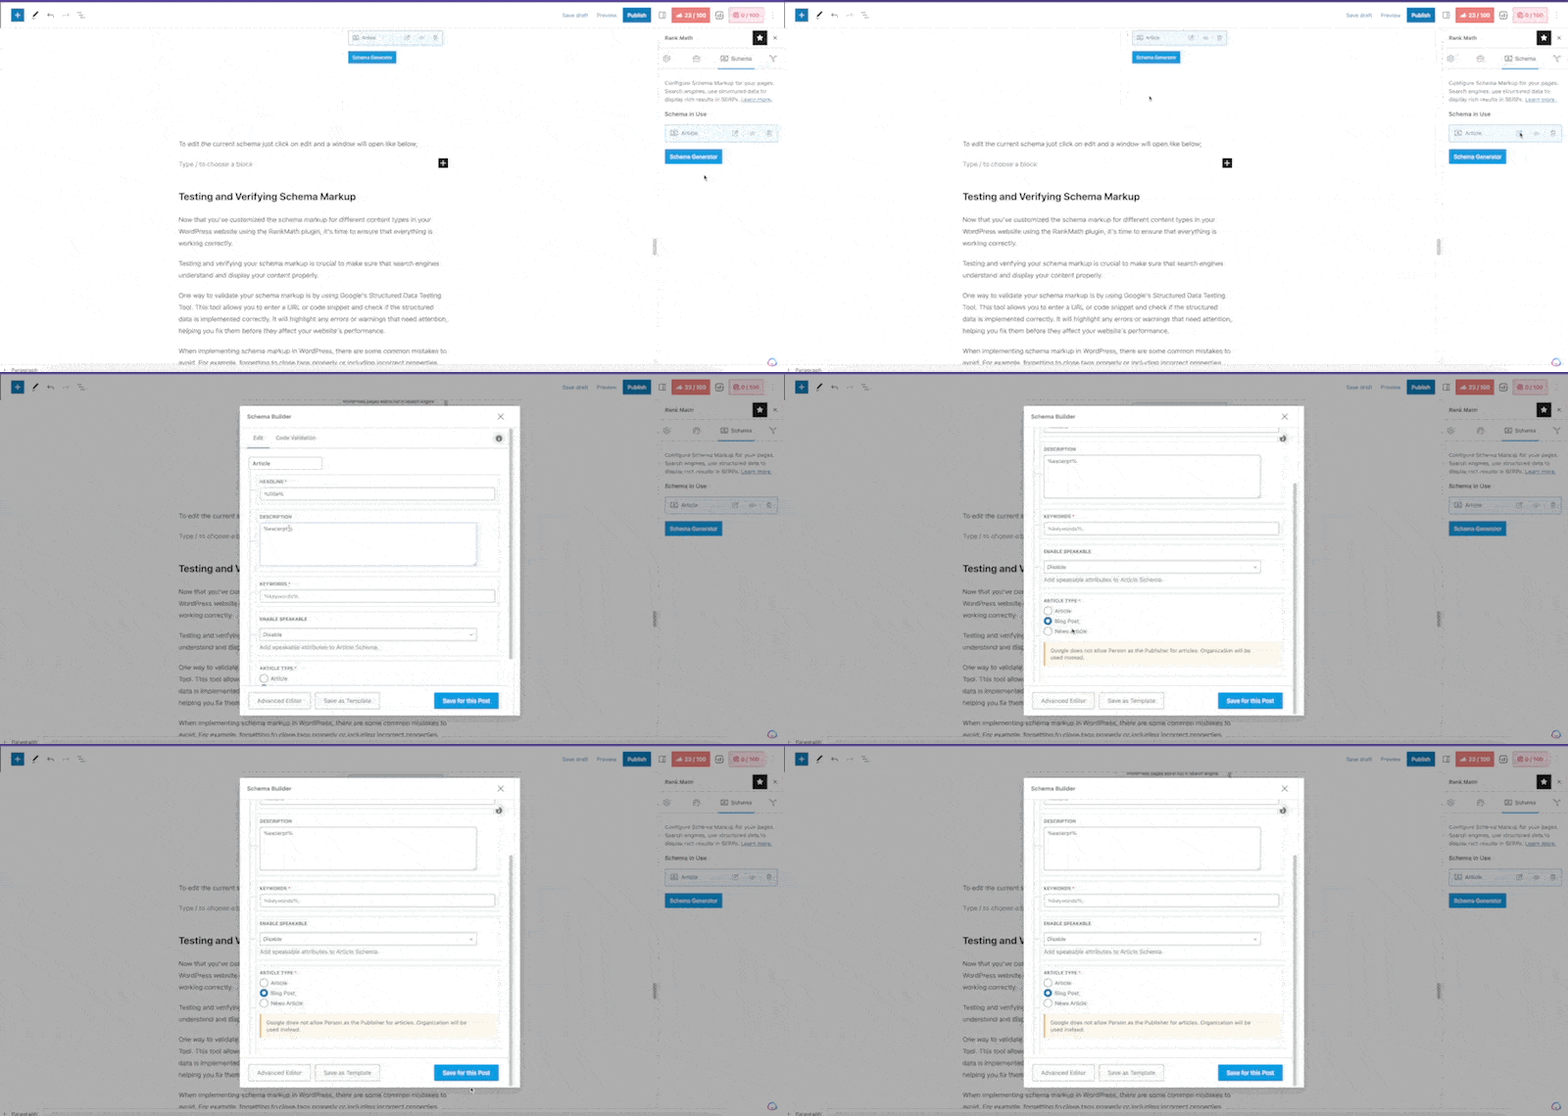
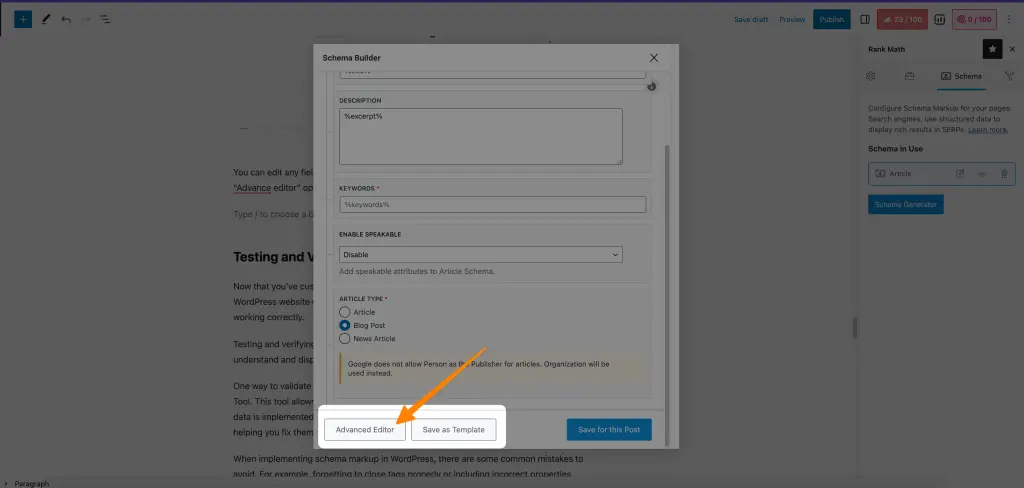
You can edit any field you want. Now, let’s explore advance editor, you need to click on the “Advanced editor” option from the popup window as follows;
Now, you will see interface like the following;
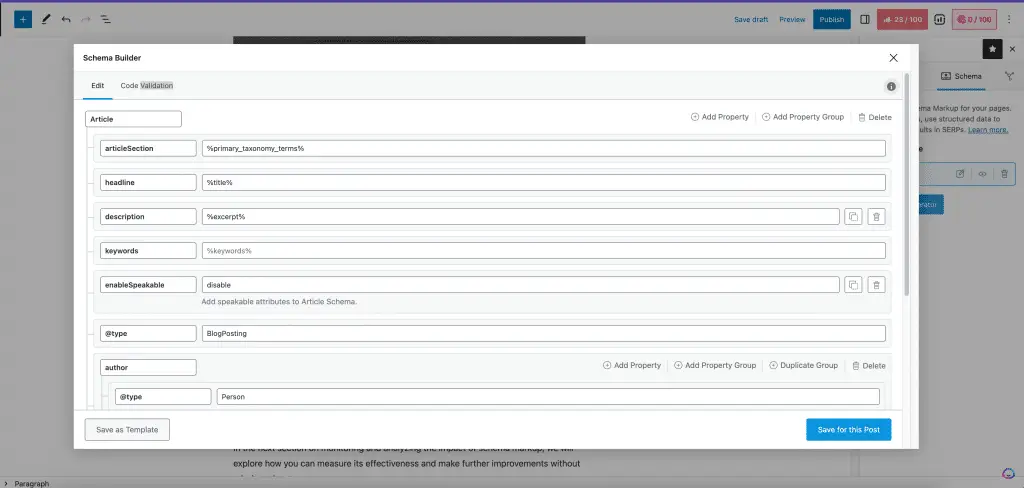
Now to add custom properties to your existing template you can by clicking on “Add Property” button;
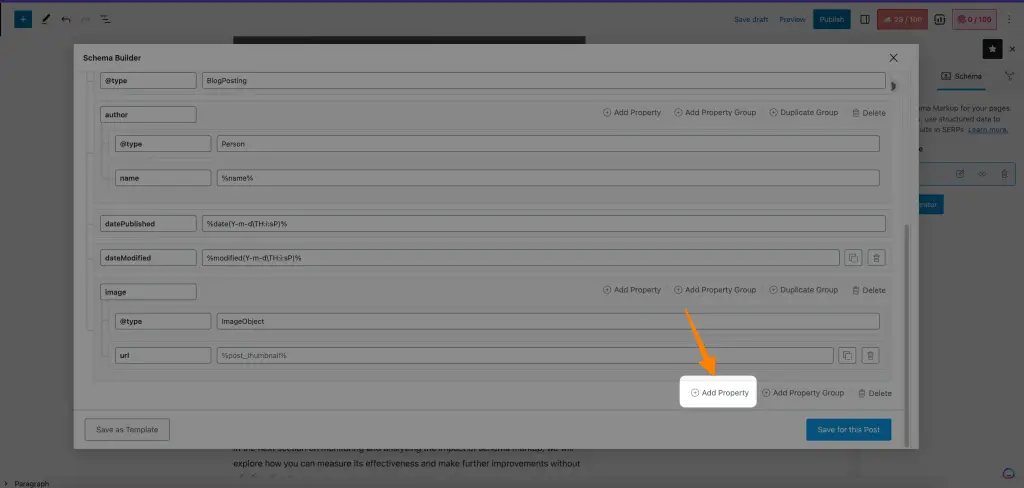
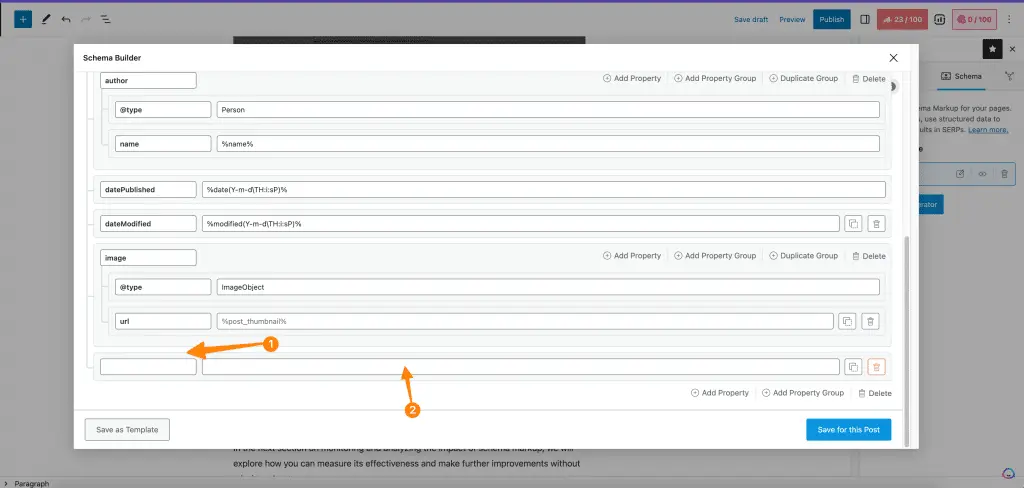
You can add the custom property fields as follows;
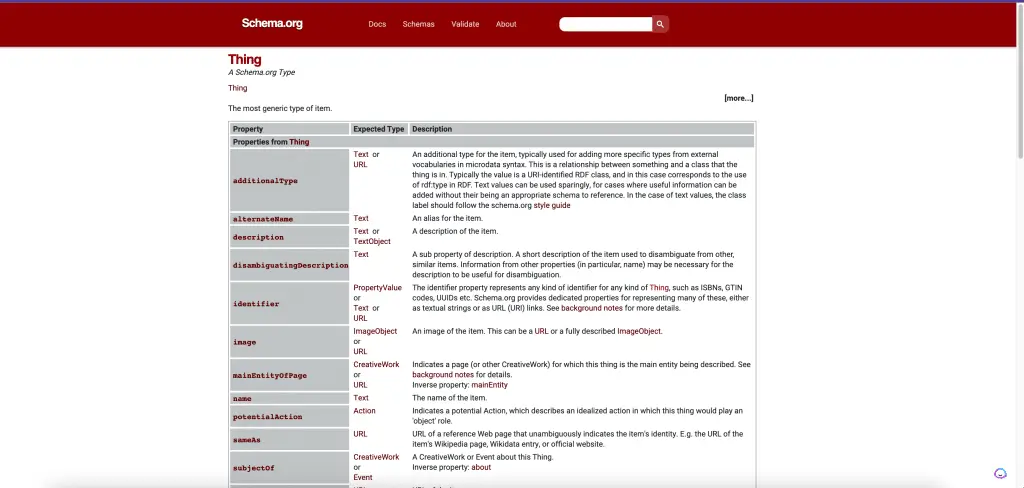
Now, You must be wondering how and what to add to custom properties. You need to go here to find all the “things” you can include in the properties themselves;
Adding Multiple Schema Markups to your Posts
Adding Multiple Schema Markups to your Posts using RANKMATH:
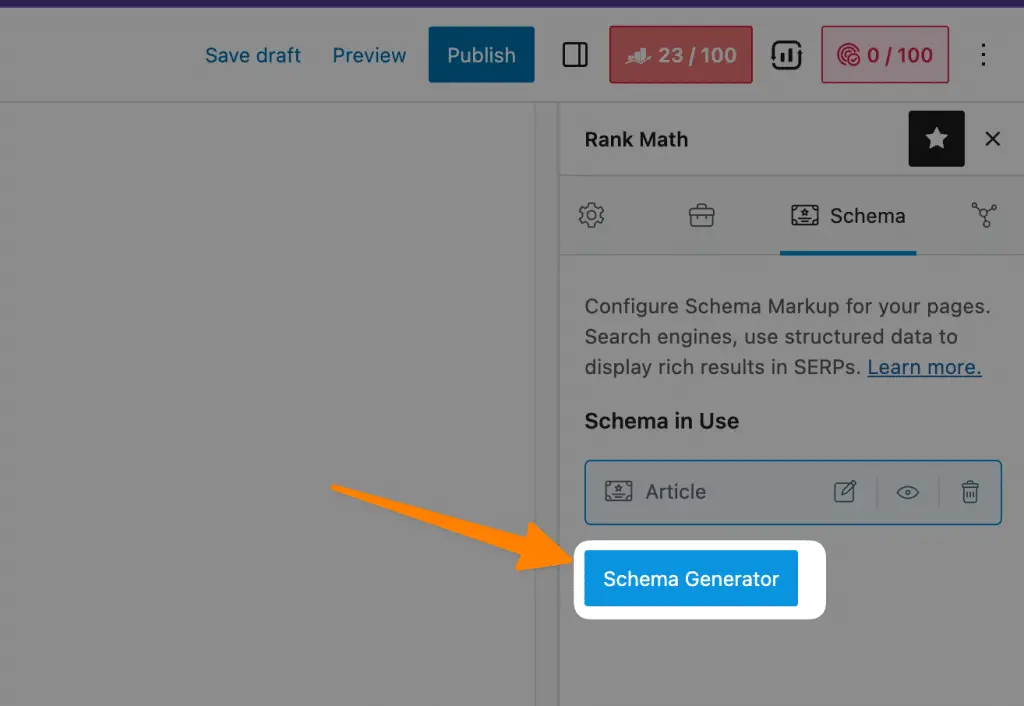
you can go to All Posts or All Pages on your WordPress editor, and select a post or page that you want to add multiple schema markup types to. In the schema tab of Rankmath Panel, select Schema Generator as follows;
Now A New popup will open, select the schema you want to add as follows;
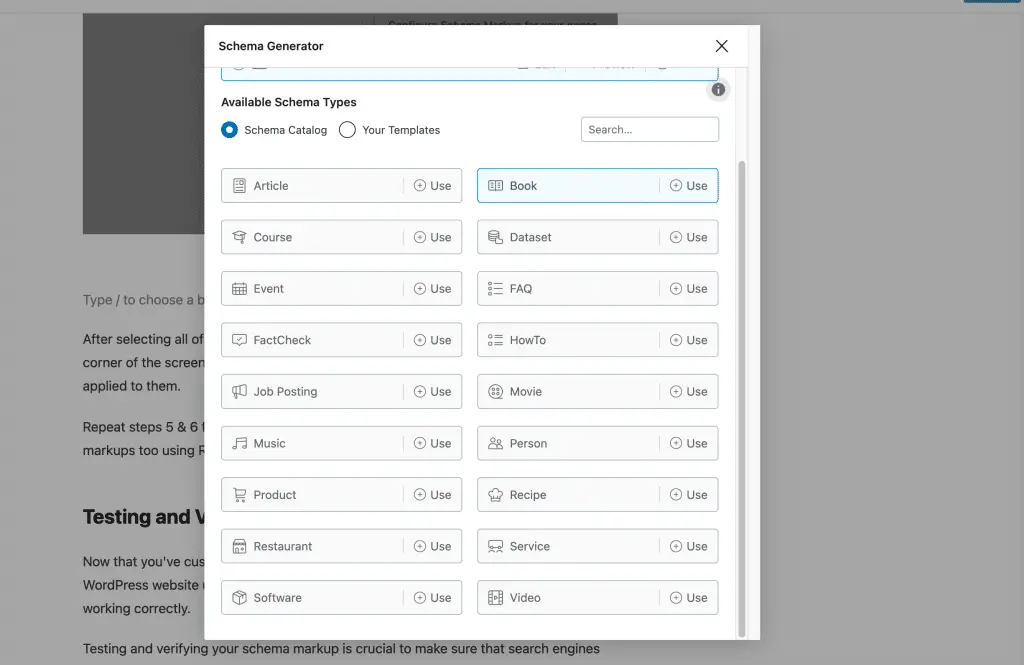
After selecting all of the schema types, click on Publish/Update button at bottom right corner of the screen to save changes made for each post/page with multiple schemas applied to them.
Pro Tip: If you’re embedding Youtube videos into your posts then you can activate the video schema automatically whenever RANKMATH detects there’s video embedded on your website.
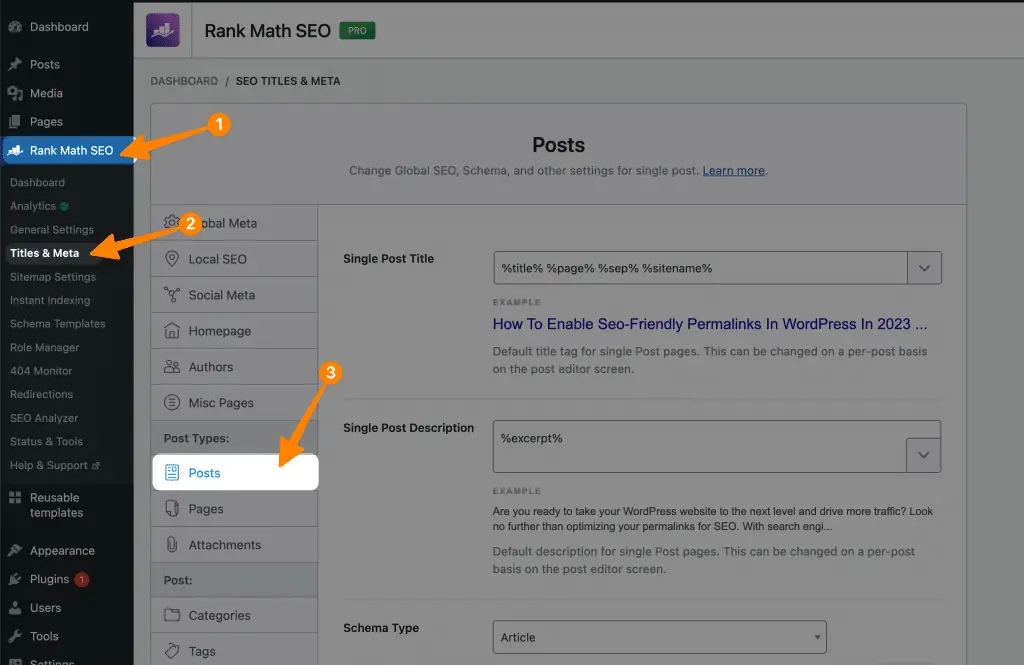
For this go to RANKMATH > Title and meta > Posts;
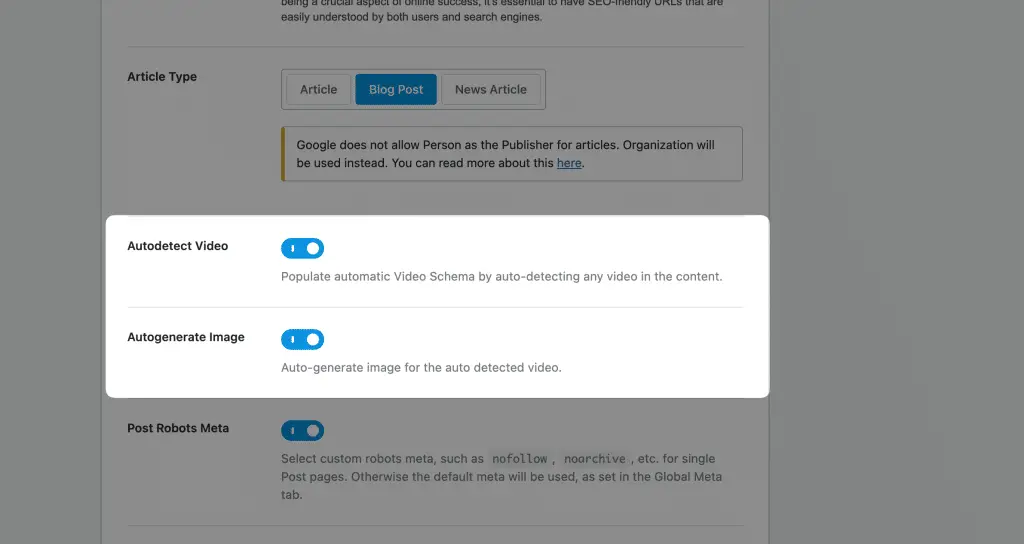
Scroll down and toggle these options as follows;
- Autodetects Video – It will add Video schema automatically whenever it detects a youtube or any other video.
- Autogenerate Image – It will also auto-generate images for video schema markup.
Testing and Validating Schema Markup
Now that you’ve customized the schema markup for different content types in your WordPress website using the RankMath plugin, it’s time to ensure that everything is working correctly.
Testing and verifying your schema markup is crucial to make sure that search engines understand and display your content properly.
One way to validate your schema markup is by using Google’s Rich Result Test Tool (Formerly Structured Data Testing Tool). This tool allows you to enter a URL or code snippet and check if the structured data is implemented correctly. It will highlight any errors or warnings that need attention, helping you fix them before they affect your website’s performance.
You can go here and add your URLs to see if you have valid schema markup;
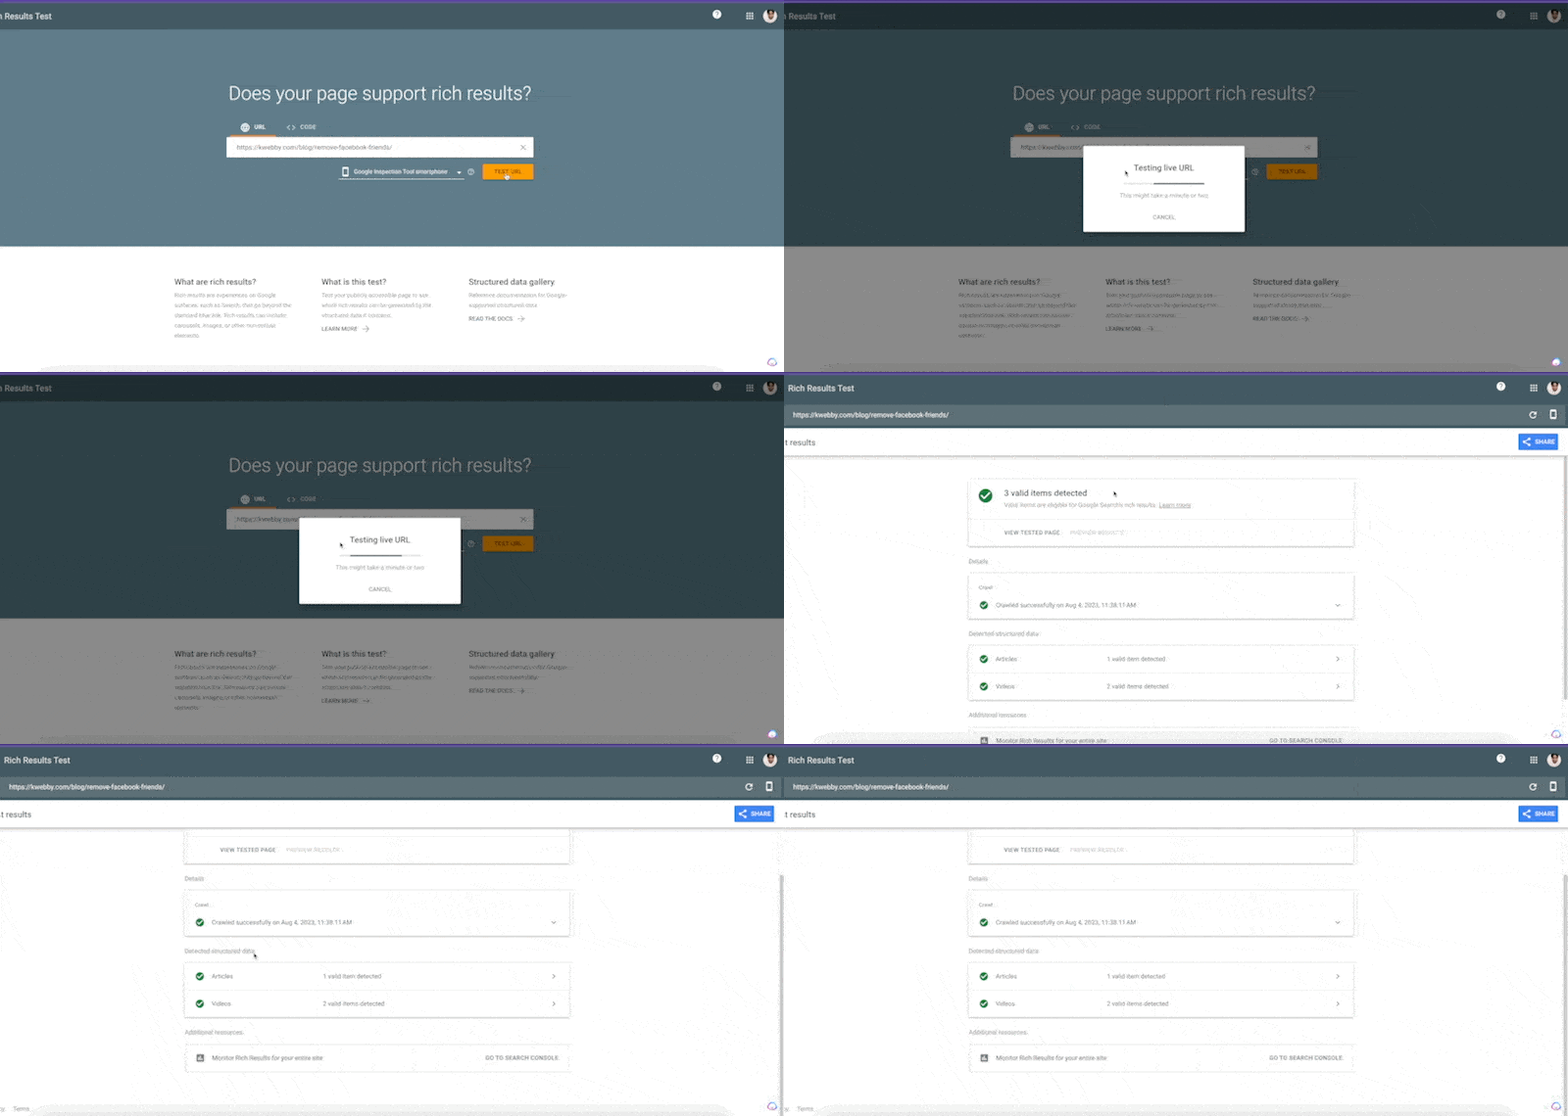
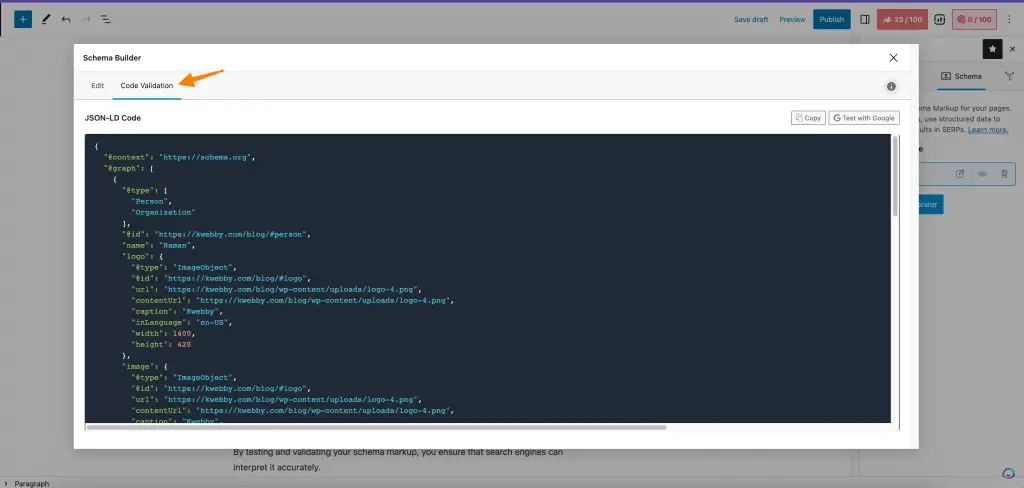
Alternatively, you can also check while writing your post from your editor, in your rank math panel’s schema tab, select your schema and click on code validation as follows;
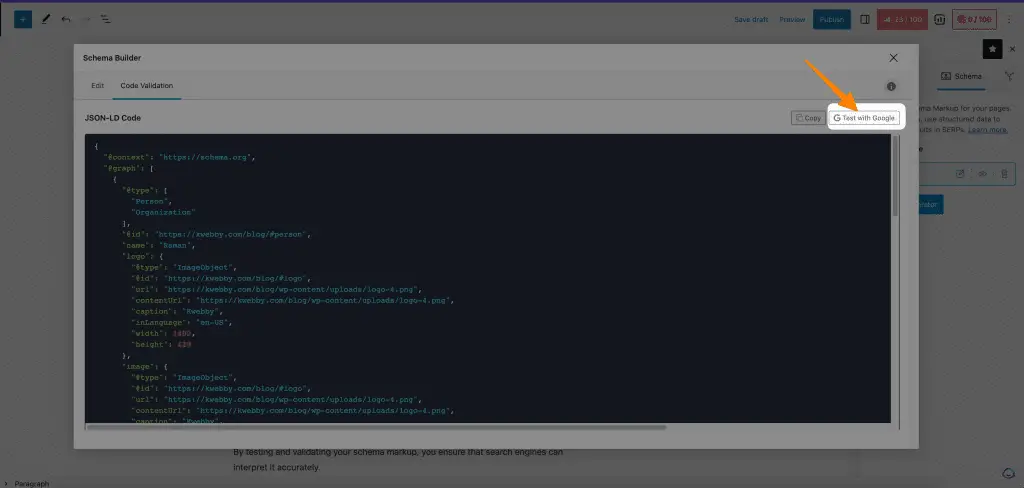
Now click on the “test with Google” button as follows;
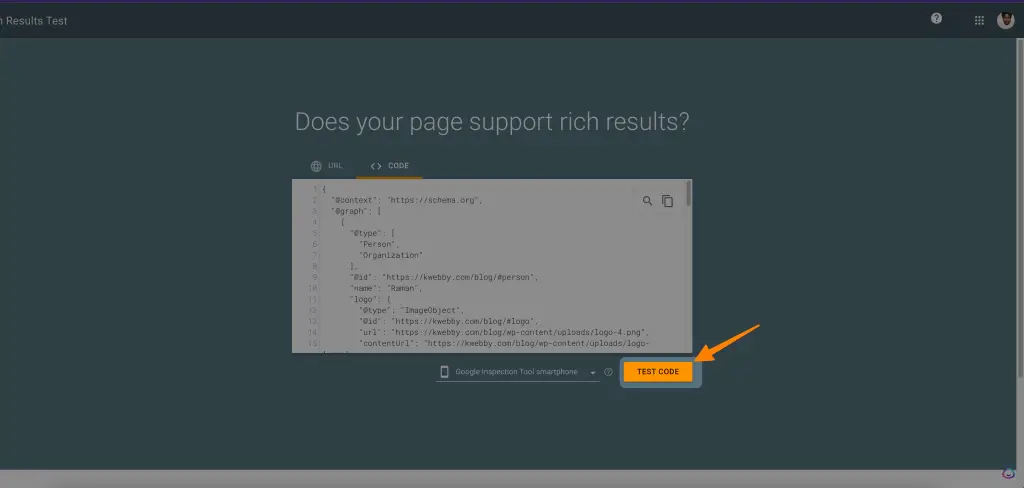
A new page will open, you need to select “Test Code” as follows to validate your markup;
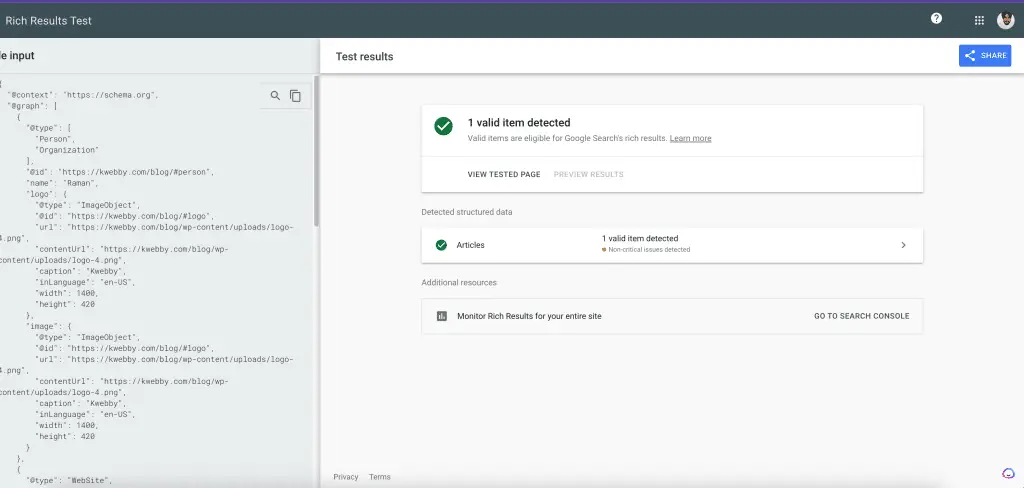
You will see the following success page;
When implementing schema markup in WordPress, there are some common mistakes to avoid. For example, forgetting to close tags properly or including incorrect properties can lead to inaccurate or incomplete structured data. It’s essential to double-check all the details and follow proper syntax guidelines.
By testing and validating your schema markup, you ensure that search engines can interpret it accurately.
In the next section on monitoring and analyzing the impact of schema markup, we will explore how you can measure its effectiveness and make further improvements without missing a beat.
How to Add Schema Markup to Your WordPress Manually (Without Plugin)
To add Schema Markup to your WordPress theme manually, you can edit the single.php file and insert the necessary HTML code for the Schema Markup. Schema Markup provides search engines with structured data to better understand the content on your website and display rich snippets in search results.
Here’s a step-by-step guide on how to manually add Schema Markup to your single.php file:
- Backup your
single.phpfile: Before making any changes, it’s always a good idea to create a backup of your originalsingle.phpfile. This way, you can revert back to the original version if something goes wrong. - Open the
single.phpfile: Use a code editor to open thesingle.phpfile in your WordPress theme. - Locate the post content section: Look for the part of the
single.phpfile where the post content is displayed. It may look something like this:
<article id="post-<?php the_ID(); ?>" <?php post_class(); ?>>
    <header class="entry-header">
        <h1 class="entry-title"><?php the_title(); ?></h1>
    </header>

    <div class="entry-content">
        <?php the_content(); ?>
    </div>

    <footer class="entry-footer">
        <!-- Add any footer content here -->
    </footer>
</article>- Add the Schema Markup: Within the
<article>tag, and add the necessary HTML for the Schema Markup. The most common Schema Markup for a single blog post is the Article schema. Here’s an example of how you can add the Article schema:
<article id="post-<?php the_ID(); ?>" <?php post_class(); ?>>
    <header class="entry-header">
        <h1 class="entry-title"><?php the_title(); ?></h1>
    </header>

    <div class="entry-content">
        <?php the_content(); ?>
    </div>

    <footer class="entry-footer">
        <!-- Add any footer content here -->
    </footer>

    <!-- Article Schema Markup -->
    <script type="application/ld+json">
        {
            "@context": "https://schema.org",
            "@type": "Article",
            "mainEntityOfPage": {
                "@type": "WebPage",
                "@id": "<?php echo esc_url(get_permalink()); ?>"
            },
            "headline": "<?php the_title(); ?>",
            "image": {
                "@type": "ImageObject",
                "url": "<?php echo esc_url(get_the_post_thumbnail_url(get_the_ID(), 'full')); ?>",
                "width": <?php echo get_the_post_thumbnail(get_the_ID(), 'full')[1]; ?>,
                "height": <?php echo get_the_post_thumbnail(get_the_ID(), 'full')[2]; ?>
            },
            "datePublished": "<?php echo get_the_date('c'); ?>",
            "dateModified": "<?php echo get_the_modified_date('c'); ?>",
            "author": {
                "@type": "Person",
                "name": "<?php the_author(); ?>"
            },
            "publisher": {
                "@type": "Organization",
                "name": "<?php bloginfo('name'); ?>",
                "logo": {
                    "@type": "ImageObject",
                    "url": "<?php echo esc_url(get_template_directory_uri()) . '/your-logo.png'; ?>",
                    "width": 600,
                    "height": 60
                }
            },
            "description": "<?php echo esc_html(get_the_excerpt()); ?>"
        }
    </script>
</article>
In this example, we’re adding a JSON-LD script within the <article> tag, which contains the Article Schema Markup. Make sure to replace your-logo.png with the URL of your website’s logo. You can customize the data in the JSON-LD script according to your needs.
- Save the
single.phpfile: After adding the Schema Markup, save the changes to thesingle.phpfile. - Test your Schema Markup: To ensure that the Schema Markup is implemented correctly, use Google’s Rich Results Test to test your post’s rich snippet data.
That’s it! By following these steps, you have manually added Schema Markup to your WordPress theme for single blog posts. Schema Markup can improve your site’s visibility in search results and provide users with more informative snippets for your content.
Frequently Asked Questions
Can I use a different SEO plugin instead of Rankmath to add schema markup to my WordPress pages?
Yes, you can use Yoast SEO instead of Rankmath for schema markup in WordPress. However, using Rankmath offers several benefits for local businesses, including improved search visibility and increased click-through rates.
Is schema markup necessary for all types of websites or only specific ones?
Schema markup is beneficial for SEO purposes as it helps search engines understand your website’s content better. To optimize schema markup for improved search engine visibility, focus on using structured data that aligns with your website’s goals and target audience.
How can I verify if my schema markup is correctly implemented on my website?
To test the accuracy of your schema markup implementation, you can use Google’s Structured Data Testing Tool. This will ensure that your website is properly structured and benefiting from improved search engine visibility and user experience.
Are there any specific guidelines or best practices to follow while customizing schema markup for different content types?
To customize schema markup for different content types, it is crucial to follow guidelines for effective optimization and SEO. Schema markup plays a vital role in improving search engine visibility and enhancing the user experience on your website.
What are some common mistakes to avoid while adding schema markup to WordPress pages and posts?
Avoid common mistakes in adding schema markup to WordPress pages and posts to maximize the importance of schema markup for SEO. By ensuring accurate and relevant schema, you can enhance search engine visibility and improve organic rankings.
Conclusion
In conclusion, implementing schema markup on your WordPress pages using the Rankmath plugin is a strategic and analytical move. It can significantly boost your website’s visibility and search engine rankings. By providing structured data to search engines, you’re effectively communicating the relevance and context of your content.
This not only helps search engines understand your pages better but also enhances the user experience. It does so by displaying rich snippets in search results. So go ahead, take advantage of this powerful tool and watch your website soar to new heights!
Test your knowledge
Take a quick 5-question quiz based on this page.


