
How to Convert PowerPoint to Video (PPT to Video)
Creating spellbinding PowerPoint presentations has become second nature for many, from seasoned lecturers to dynamic content creators. This versatile platform allows you to effortlessly articulate your insights and share your knowledge with the world.
However, the realm of digital content is constantly evolving, and static slideshows are no longer the zenith of audience engagement. Enter the game-changing capability to convert your PowerPoint into a compelling video format.
This guide is your ultimate resource for transforming your presentations into immersive videos that captivate and communicate more effectively.
Try Powerpoint tools;
How to Convert a PowerPoint Presentation to Video on Mac
Now that you’ve made sure you have everything you need, we’ll teach you how to convert your PowerPoint to video on a Mac. This process should just take a few minutes to finish. To begin, simply follow the steps we provide here.
How to Time the Slides First
Ensuring your PowerPoint presentation flows seamlessly into a video requires precise timing of each slide. This essential step makes your video professional and engaging.
Here’s how to set up the timing on your Mac, ensuring your PowerPoint to video conversion captures every detail without a hitch.
Step 1: Launch PowerPoint
On your Mac, open Microsoft PowerPoint and the presentation you wish to convert to video.
Step 2: Access the Transitions Tab
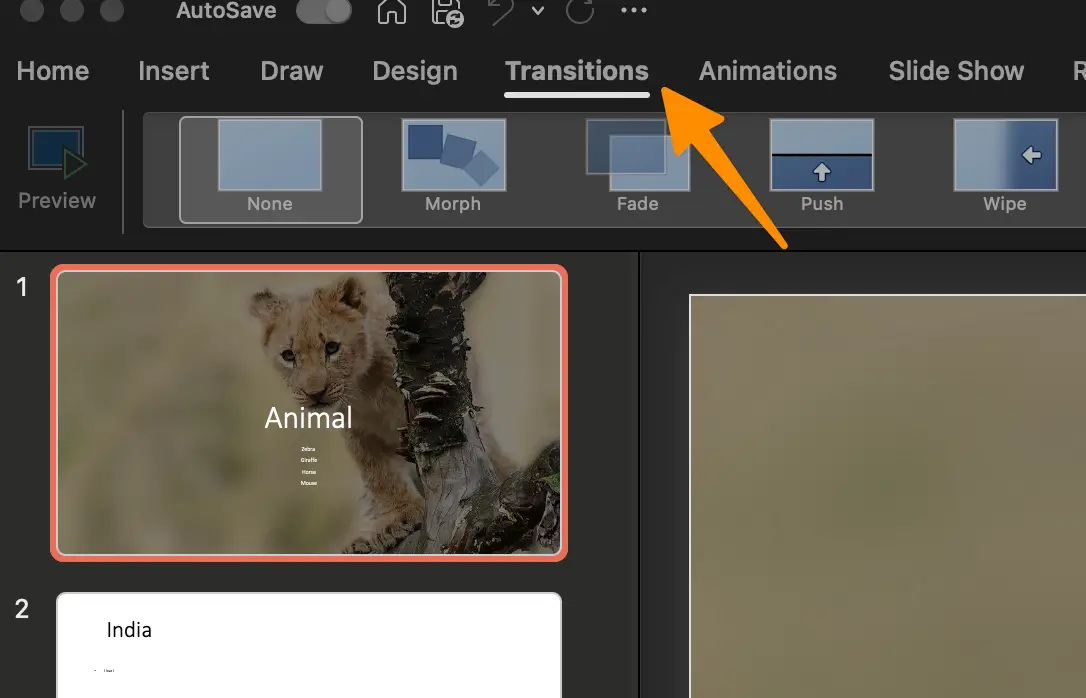
Navigate to the top menu and click on the “Transitions” tab.
Step 3: Set the “After” Checkbox
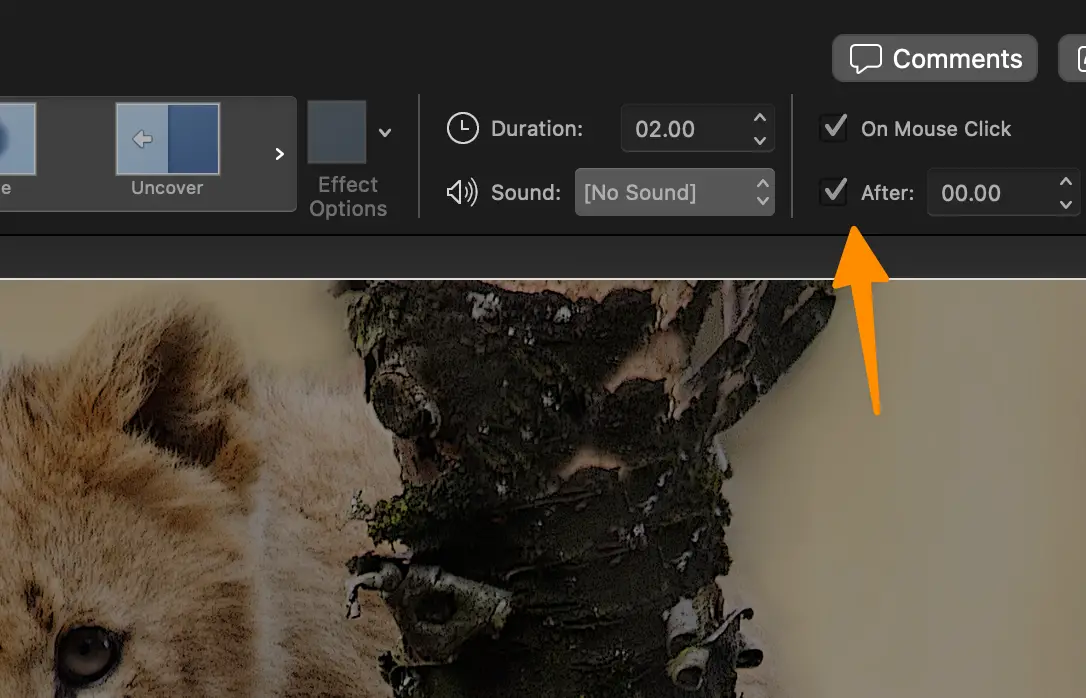
Within the “Transitions” tab, look for the “Advance Slide” section.
Check the “After” box to enable automatic transition between slides.
This action is vital as it ensures that your PowerPoint video plays smoothly.
Step 4: Enter Specific Time Length for Each Slide
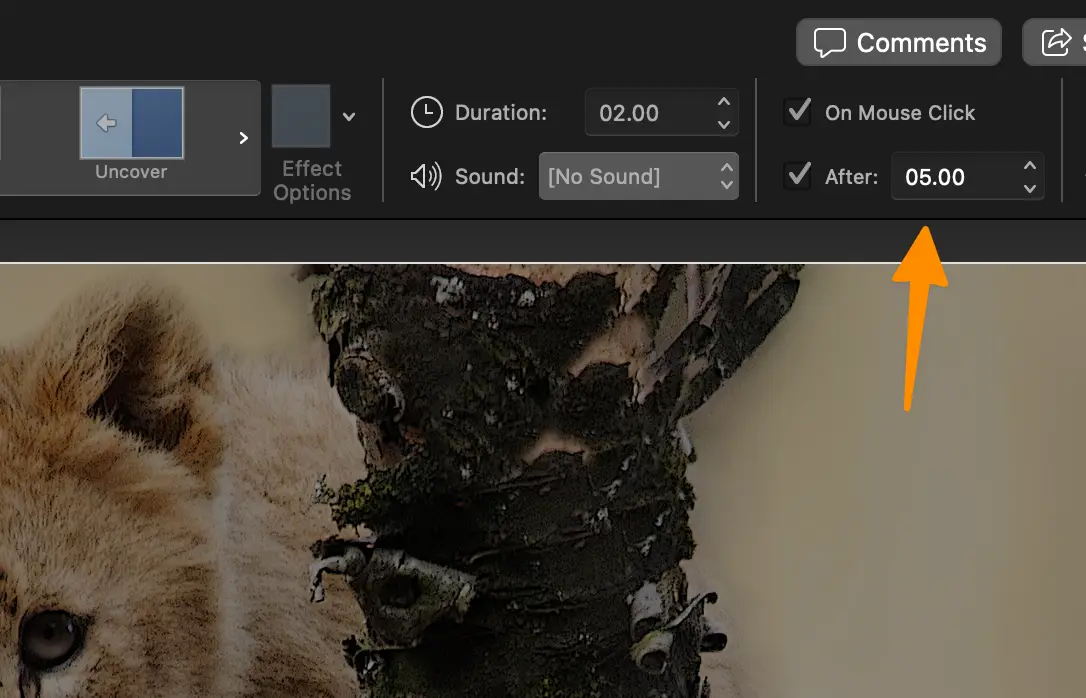
If you aim for each slide to be displayed for a set amount of time, enter your desired time in the box next to “After.”
You can set timing for each slide based on the amount of content and the desired pace for your presentation as a video.
Selecting record timings is crucial for maintaining a uniform flow, making your converted PowerPoint to video not only more professional but also more engaging for your audience.
How to Export PowerPoint to Video on Your Mac
Step 1: Navigate to PowerPoint’s “File” Menu
Begin by clicking on “File” in the top menu of Microsoft PowerPoint.
Step 2: Select “Export” or “Share”
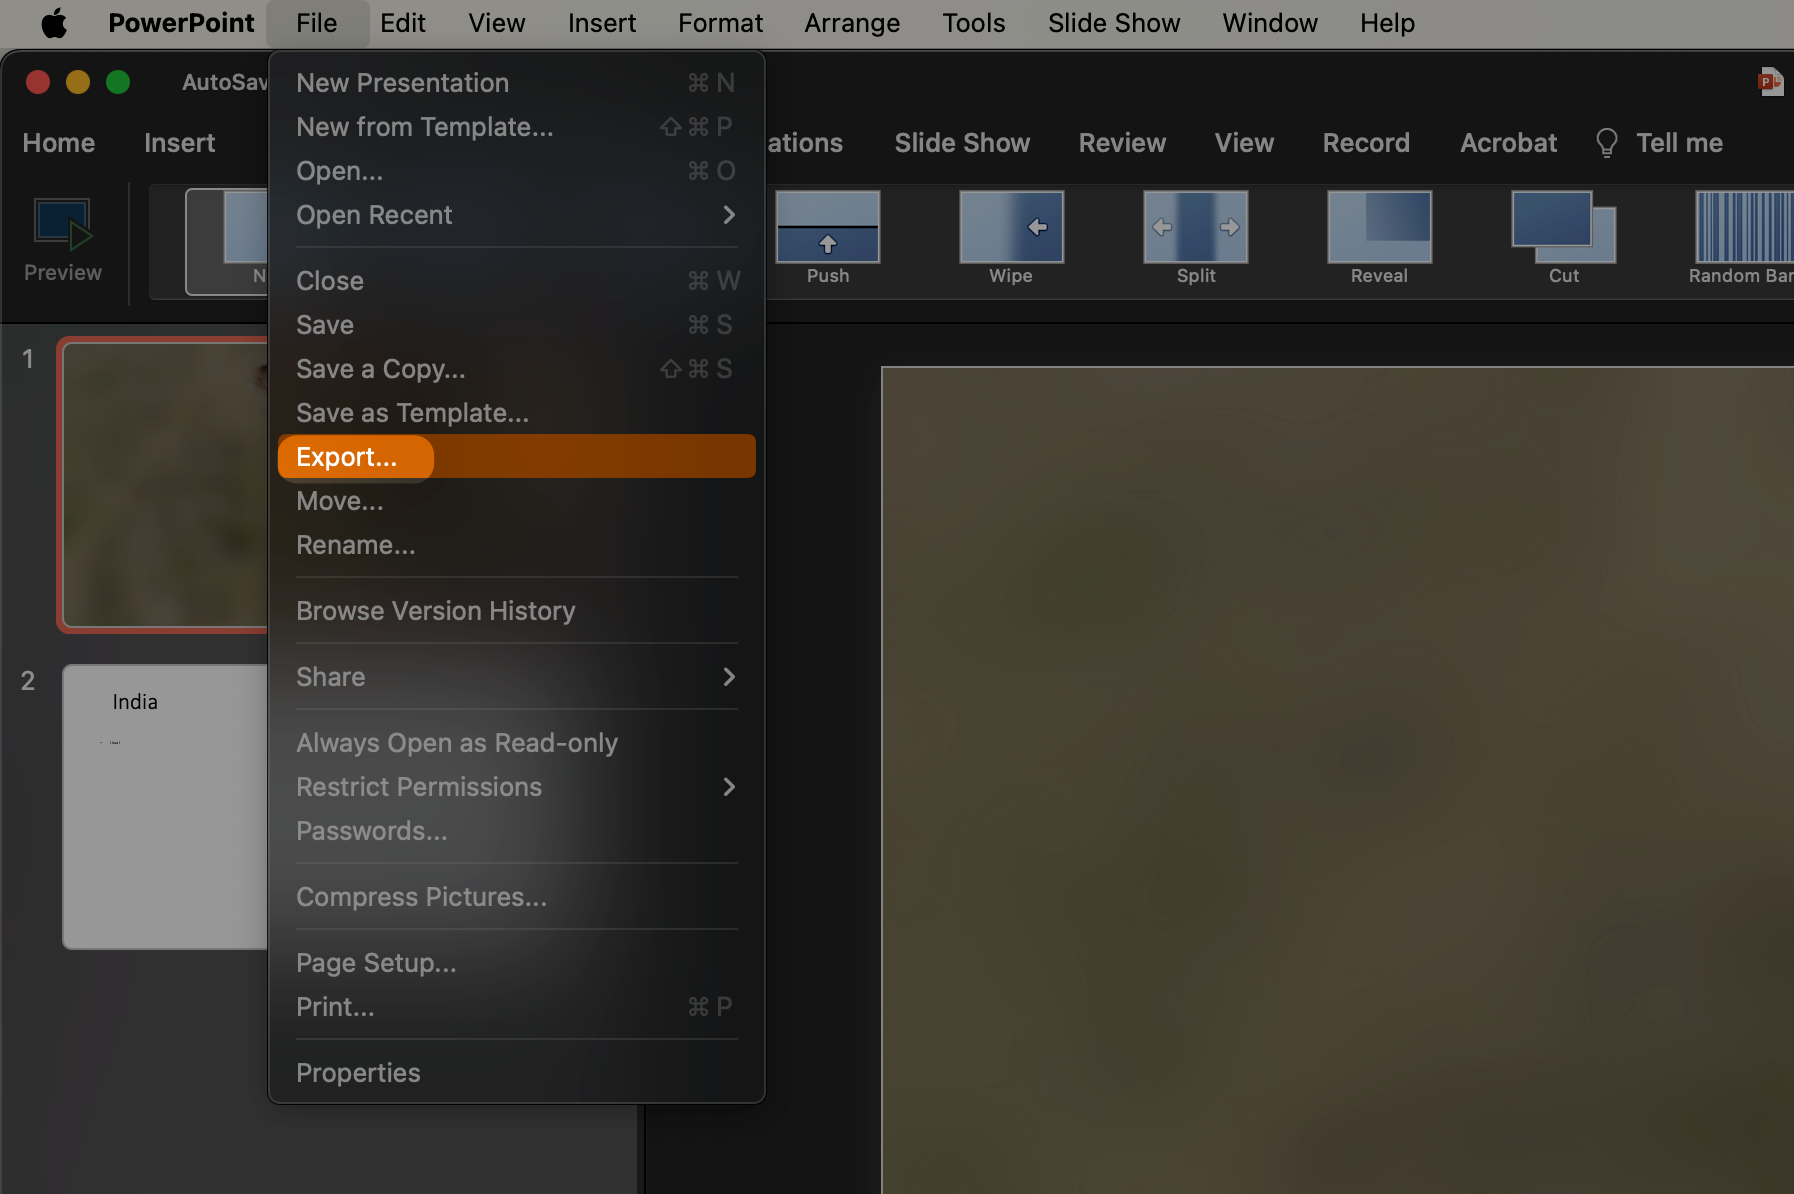
Depending on the version of PowerPoint you’re using on your Mac, choose either “Export” or “Share.” These options will guide you to the video conversion features PowerPoint offers, crucial for initiating the convert PowerPoint to video process.
Step 3: Choose Video format
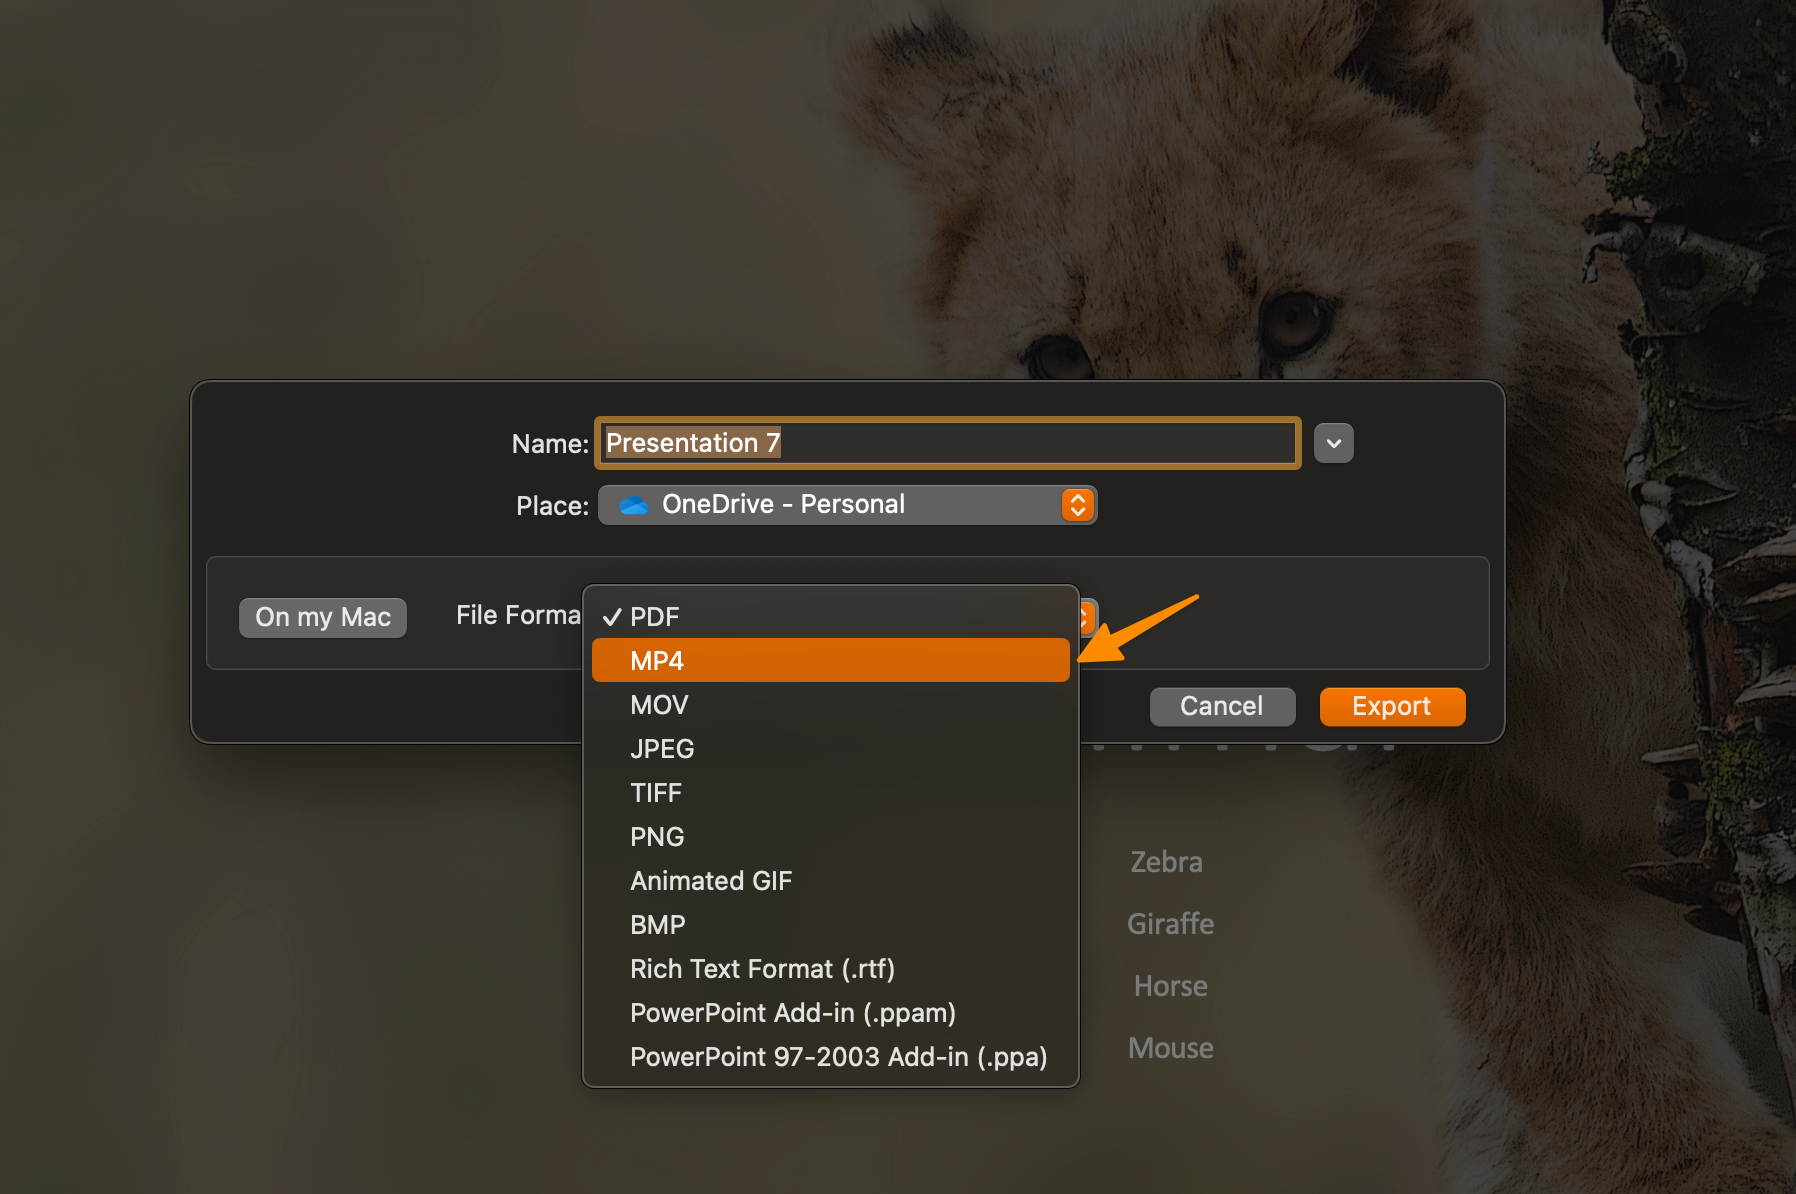
In the menu that appears after selecting “Export” or “Share,” you’ll find the option to “Create Video.” If you have a new version, you will need to select the file format.
Step 4: Choose Video Quality and Resolution
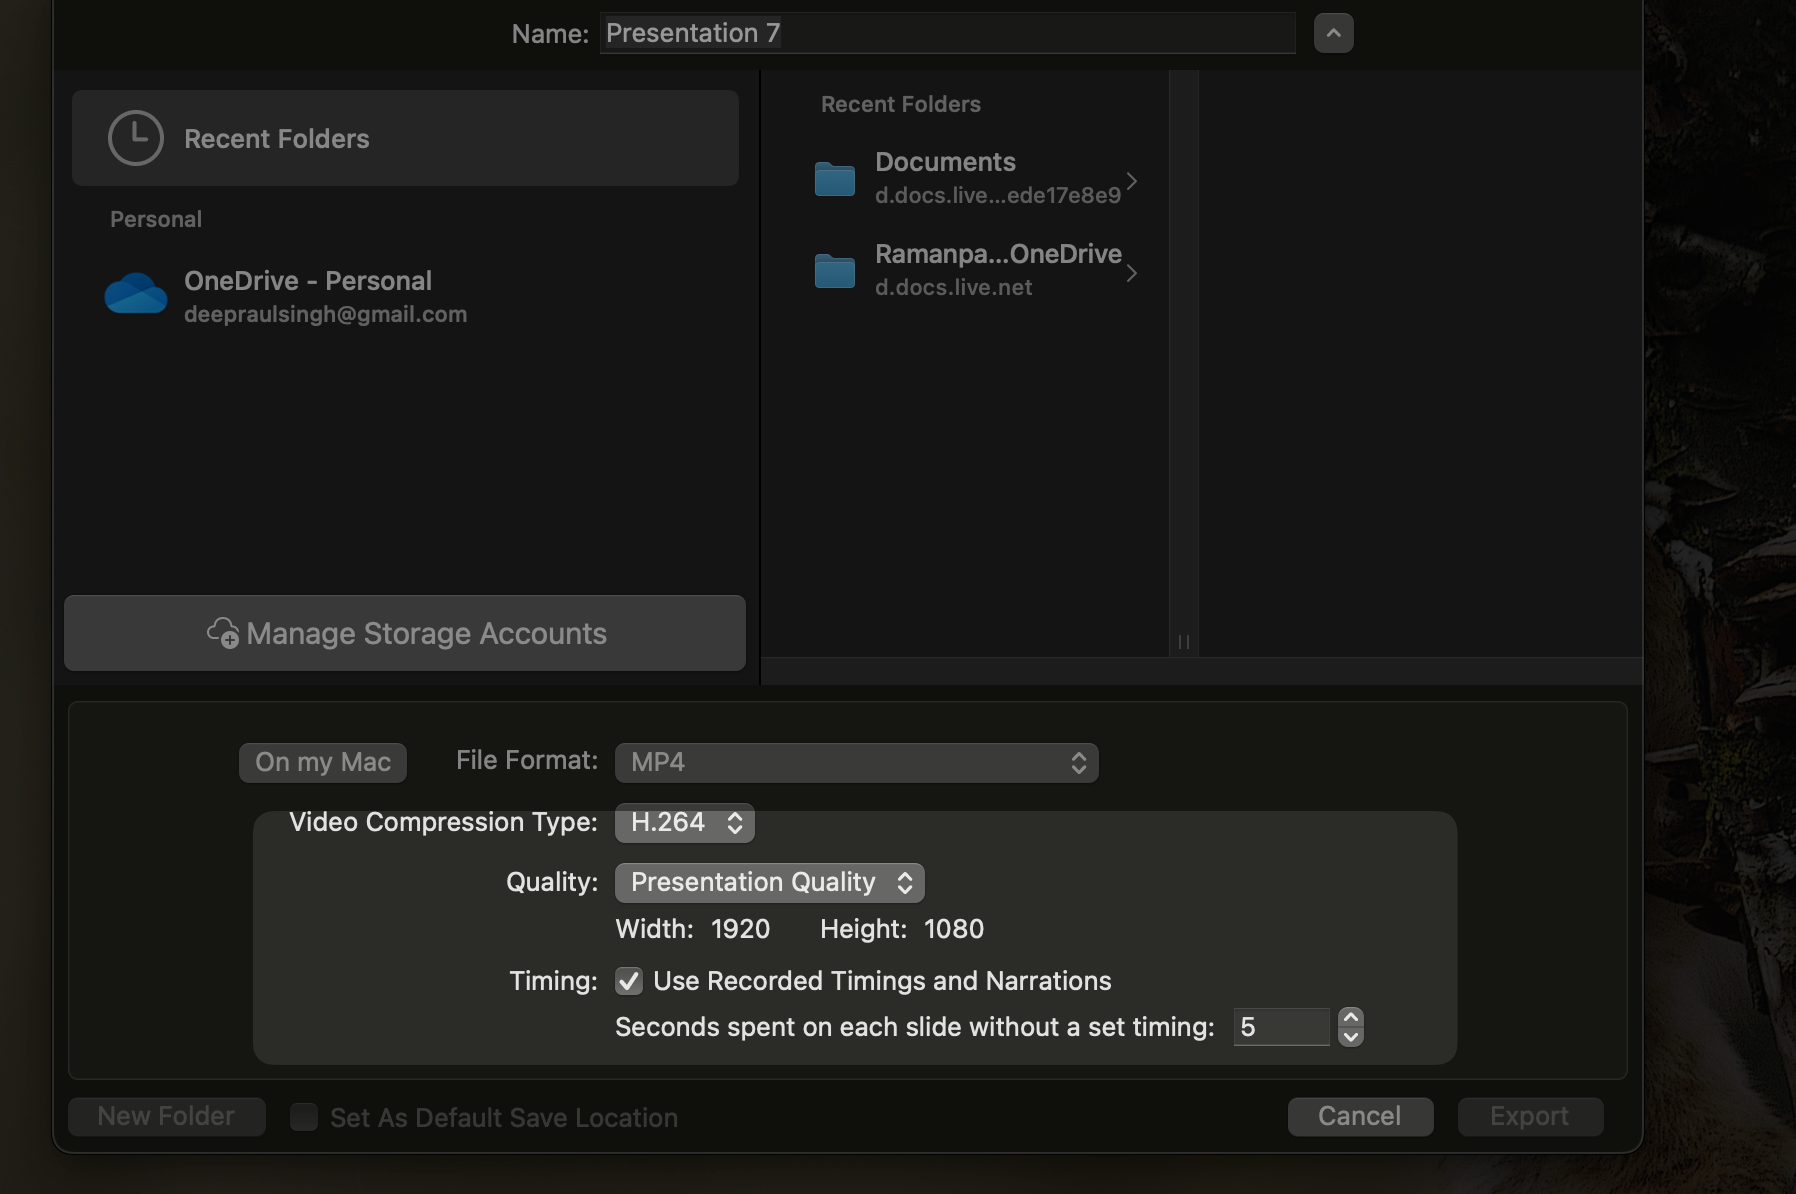
Next, select the video quality and resolution for your PowerPoint video. Higher quality and resolution are ideal for professional presentations.
Step 5: Determine File Name and Save Location
Now, you’ll need to choose a suitable file name and decide where you want to save your video file.
Step 6: Click “Save” to Start Conversion
Once you’ve configured all settings, hit the “Save” button. Microsoft PowerPoint will then begin the conversion process, turning your slides into a continuous video file.
After completing these steps, your PowerPoint presentation will have been successfully converted into a video file on your Mac. The time it takes to convert depends on factors like the length of your presentation, the selected video quality, and the complexity of animations or recorded timings and narrations included.
How to Convert a PowerPoint Presentation to Video on Windows
If you’re using a Windows device, transitioning from PowerPoint to video is as simple. The latest versions of the Windows software have a somewhat different menu. With that in mind, we’ve given the step-by-step method for each version of the product.
Option 1: Use the “Save As” Feature
For users working with older versions of PowerPoint, converting your presentation into a video might not be as straightforward as in newer versions. However, by using the “Save As” feature, you can still achieve this objective.
Here’s a straightforward guide to help you through this process, ensuring your presentations transition smoothly into a video format.
Step 1: Launch PowerPoint and Open Your Presentation
Open Microsoft PowerPoint and navigate to the powerpoint file you wish to convert into a video file, ensuring it’s ready for the conversion.
Step 2: Navigate to the “File” Tab
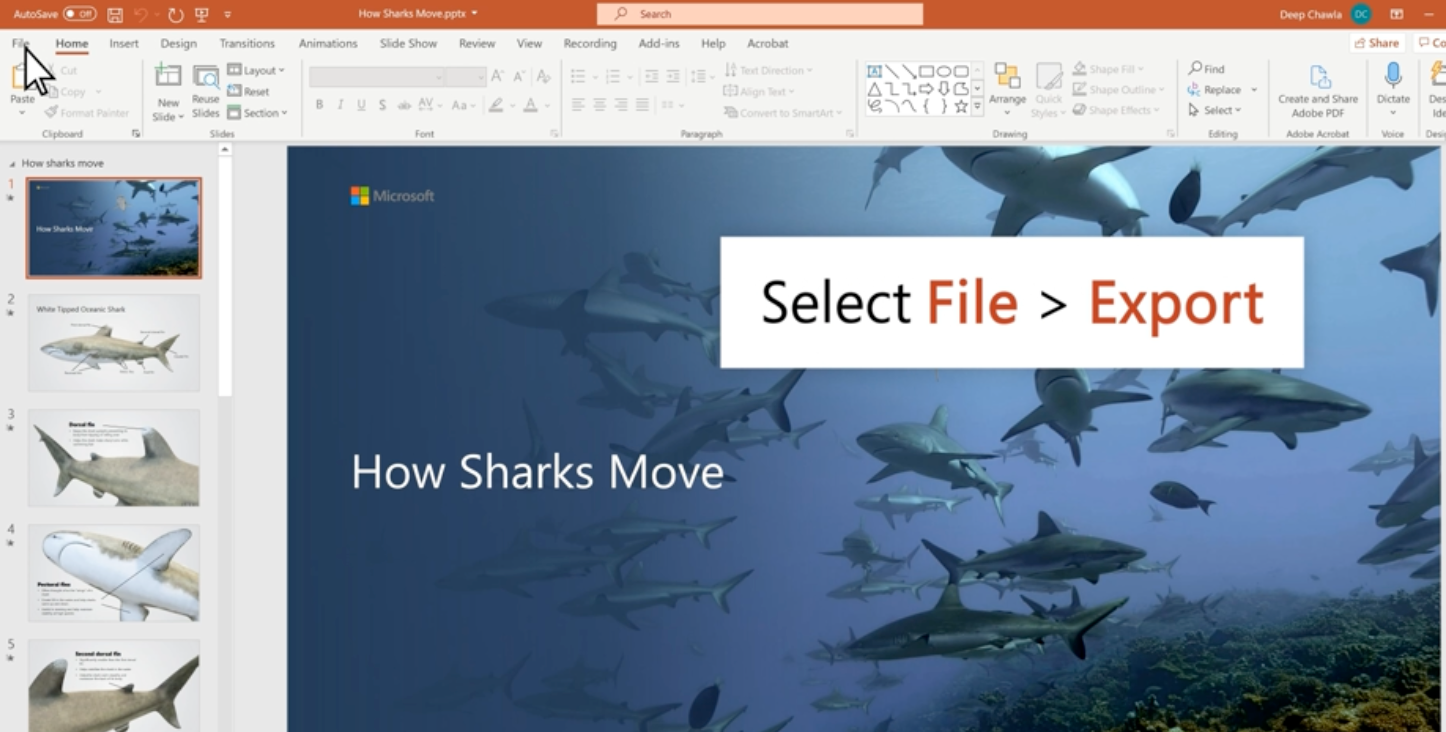
Click on the “File” tab located in the top menu.
From the drop-down menu, select “Save As.”
Step 3: Choose Save Location
Select your desired save location carefully.
Step 4: Name Your Video File
In the text box provided, type in the name you want to give your video file.
Step 5: Select File Format
Utilize the “Save as type” drop-down menu to choose your video file format.
The right file format is pivotal for ensuring your video can be viewed across various platforms and devices.
Step 6: Save and Select “Save as Clip”
Proceed to hit the “Save” button. After saving, select the option “Save as Clip” if prompted.
Step 7: Initiate Video Exporting
Finally, click on “Create a Video”.
Option 2: Use the “Export” Feature
If you’re navigating the realms of newer versions of Microsoft PowerPoint, the pathway to converting your presentation to video is streamlined thanks to the innovative “Export” feature.
Here’s how you can leverage this feature effectively:
Step 1: Launch PowerPoint and Load Your Presentation
Begin by opening Microsoft PowerPoint on your computer.
Navigate to and open the presentation you wish to convert, preparing it for the transformation ahead.
Step 2: Access ‘File’ Tab
Head to the top menu and click on the “File” tab. This is your command center for everything from saving to exporting files.
Step 3: Choose ‘Export’
From the dropdown menu under “File”, select “Export”. This option is your gateway to converting your PowerPoint into a myriad of file formats, including video.
Step 4: Select ‘Create a Video’
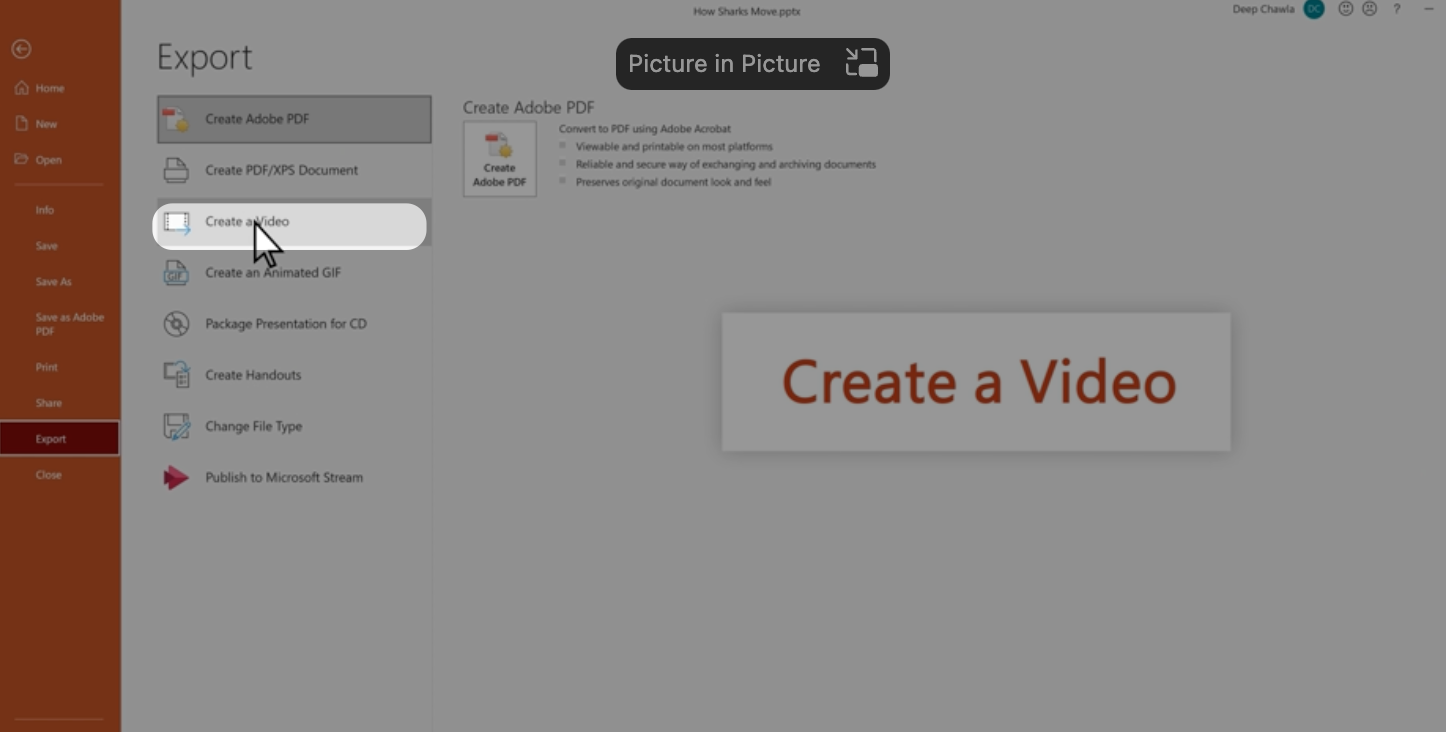
Among the list of options, choose “Create a Video”.
Step 5: Customize Video Settings
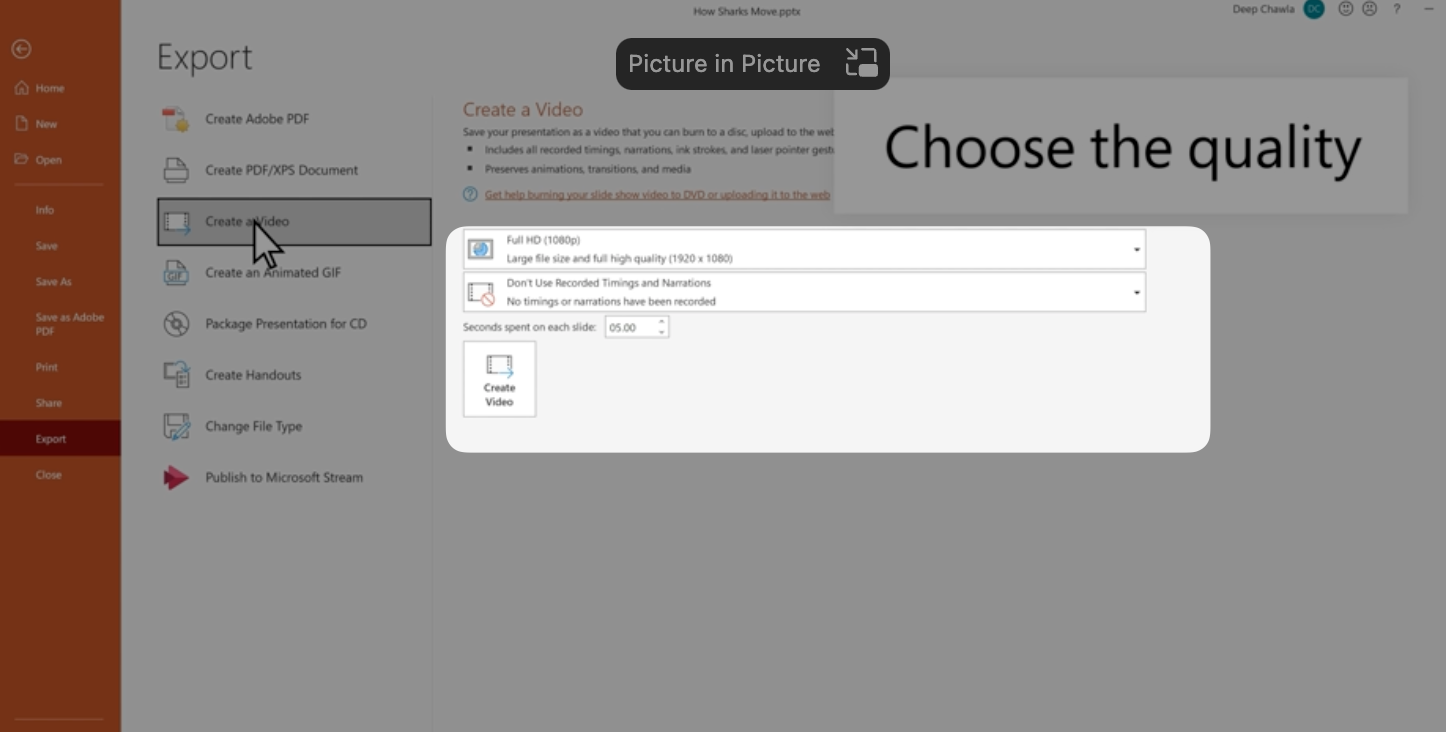
In the “Create a Video” menu, set your preferences for video standard and timing. Here, you can dictate the quality of your video and how you wish to manage slide timings and narrations.
Step 6: Determine Save Location and File Name
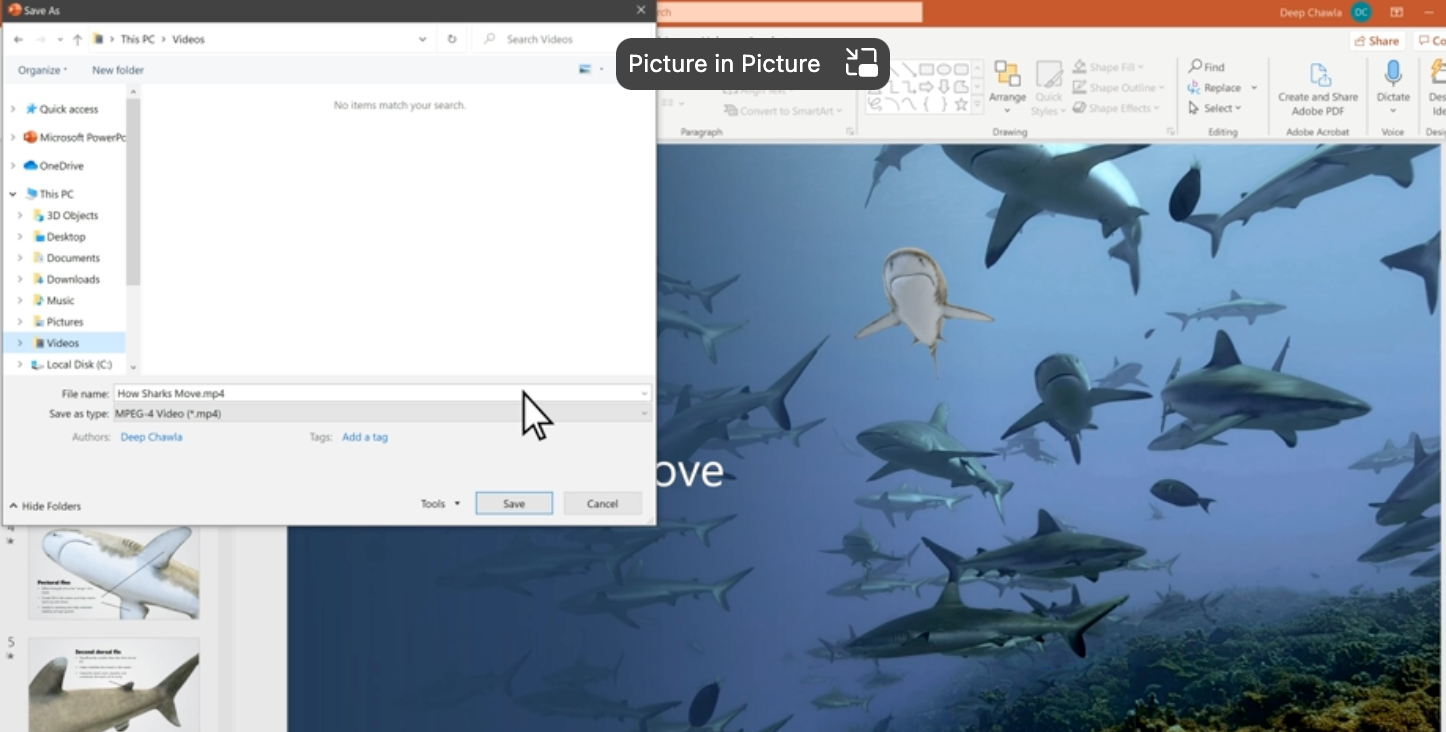
Decide where you want to save your new video file and what you wish to name it. A thoughtful name and strategic save location will make your video easy to find and share.
Step 7: Select Video Format
Use the “File Format” menu to choose the format of your video. Whether it’s MP4 or WMV. Selecting the right file format is crucial for viewer compatibility.
Step 8: Save Your Video
Click “Save” to begin the conversion process. A progress bar may appear, providing visual feedback on the conversion process. The seconds spent in converting your presentation into a video can vary based on file size, complexity, and selected video quality.
Conclusion
Mastering the art of converting PowerPoint presentations into video files is a game-changer in today’s digital landscape. Whether you’re harnessing the classic “Save As” methodology or navigating through the newer, more streamlined “Export” feature, the transition from PowerPoint to video opens a plethora of opportunities.
This process not only enhances the accessibility of your presentations across various platforms, including YouTube and Windows Media, but it also preserves the video quality, ensuring your content captures the attention it deserves.
Get ready to elevate your PowerPoint presentations into the realm of impactful videos, making every second count and every slide shine.


