Home / Blog / Tutorials / Wordpress Tutorials / How to Change Line Spacing in WordPress (Without Plugin)

How to Change Line Spacing in WordPress (Without Plugin)
Choose Your Language:
Changing line spacing in WordPress can seem a bit tricky at first, especially if you’re aiming to do it without relying on a plugin.
But don’t worry, it’s easier than it sounds, and you’ll be a pro in no time! In this guide, we’re going to walk you through the process using the Gutenberg editor‘s typography settings.
We’ll keep it simple and straightforward, so you can get your content looking just how you want.
Plus, we’ll show you how to fine-tune things a bit more with some custom CSS in the Additional CSS settings.
Ready to dive in?
Let’s get to it!
1 Method #1 – Using Gutenberg Editor (For Newer Themes Only)

To adjust the line spacing in your WordPress site using the Gutenberg editor, you’ll want to follow a few simple steps. This method works great for newer themes and gives you clear control over how your text looks on the page. Let’s break it down:
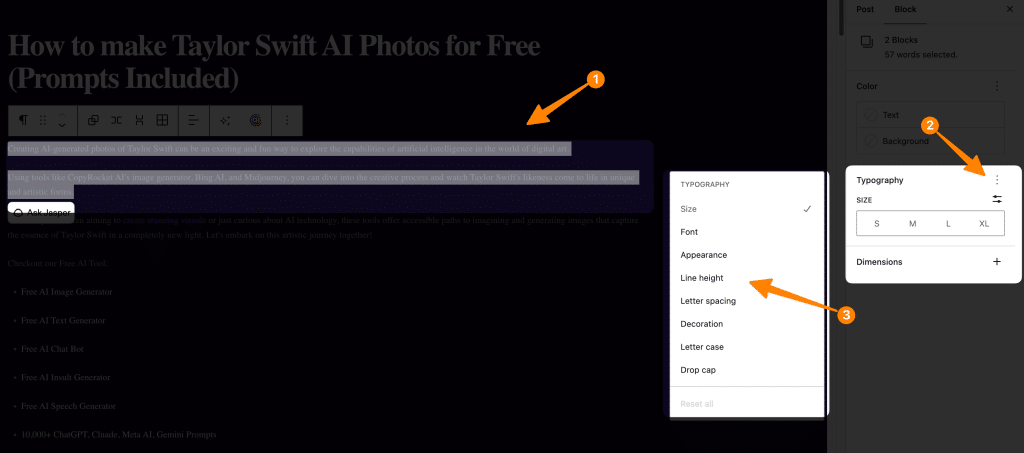
- Select the Text Block: First, navigate to the page or post where your text is located. Click on the text block that you want to modify—this will bring up the block settings on the right-hand side of your screen.
- Access Typography Settings: With your text block selected, look over to the right where the block settings are displayed. Hover your cursor over the “Typography” section, and click the three-dot icon to expand the menu.

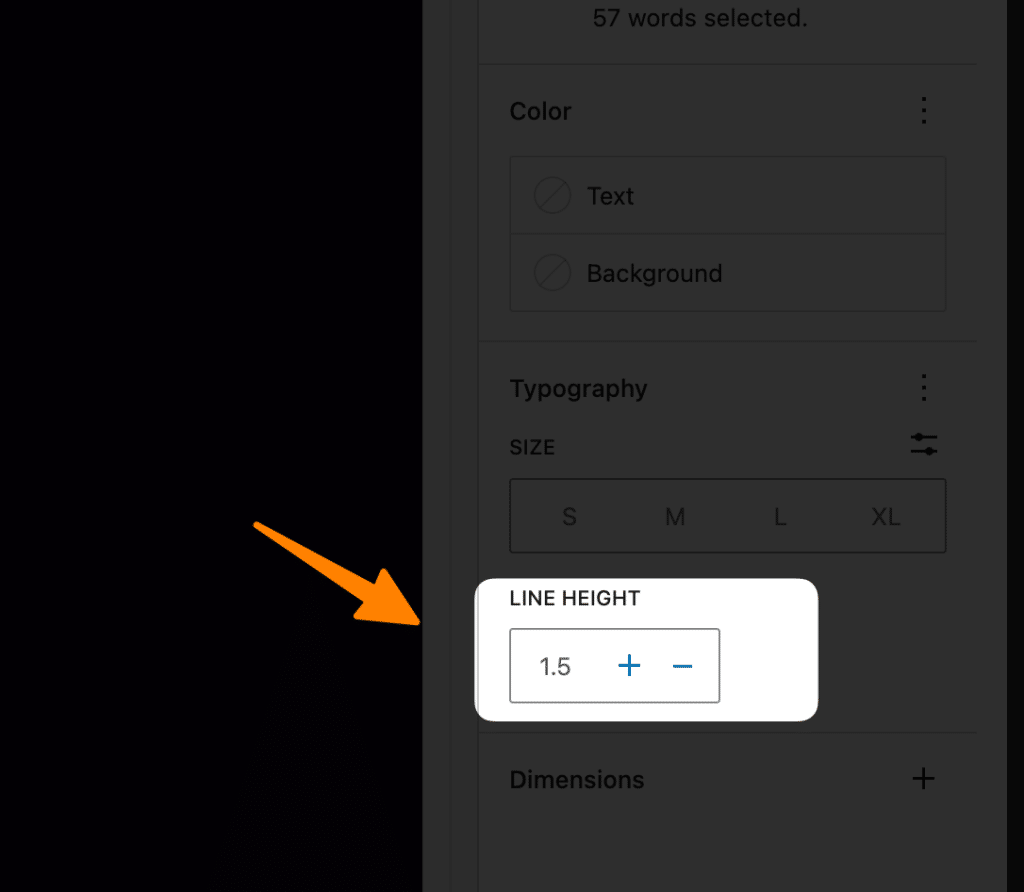
- Adjust Line Height: Within the expanded Typography settings, you’ll find the “Line Height” option. Adjust this to your liking. You can click and drag the slider, or input a specific value to get the perfect spacing for your text.
- Preview and Save: Once you’re satisfied with the changes, it’s always a good idea to preview your page to ensure everything looks just right. Don’t forget to hit “Save” or “Update” to keep your changes intact.
And there you go!
Adjusting your line spacing using Gutenberg is simple and effective for giving your WordPress site a polished, readable look.
2 Method #2 – Using Simple CSS
If you’re more comfortable with code or want a bit more flexibility for older themes, adjusting line spacing with CSS is another great option.
Here’s how to do it:
- Navigate to Customize: First, head to your WordPress dashboard. From there, go to Appearance and then select Customize. This will open the Customizer interface where you can make changes that affect your site’s appearance.
- Open Additional CSS: In the Customizer, look for the Additional CSS section. Click on it to open the area where you can input your custom CSS code.
- Add CSS Code: Now it’s time to add the CSS code to adjust your line height.
For instance, if you want to change the line spacing for posts, you would enter something like;
.post p {line-height: 2em;}If it does not change that means your article tag does not have “post” CSS selector, therefore, you can add the following;
article p {line-height: 2em;}For pages, use ;
.page p {line-height: 2em;}
You can tweak the `2em` value to make the spacing larger or smaller, depending on your preference.
- Preview and Publish: Always preview your changes first to make sure everything looks just the way you want it. If you’re happy with the result, click Publish to apply the changes to your live site.
Using CSS gives you powerful control over your site’s typography, making sure everything is as readable and visually pleasing as possible.
3 Other Tips to Add Line Spacing
Looking for more ways to tweak line spacing on your WordPress site?
Here are a few handy tips to consider:
- Use Shift+Enter for Line Breaks: Instead of creating a whole new paragraph, hit Shift+Enter to add single line breaks wherever you need them.
- Try the Spacer Block: This is a great tool for adding extra vertical space between different elements on your page, ensuring everything breathes well.
- Leverage Plugins Like Ultimate Blocks: For more customized spacing options, plugins such as Ultimate Blocks offer separator or divider blocks that you can easily incorporate.
- Explore HTML/CSS for Precision: For those who are tech-savvy, diving into HTML/CSS can provide more precise control over spacing, allowing you to really fine-tune your design.
These tips should give you even more flexibility in making your WordPress site clean and visually appealing.
4 Final Thoughts!
In conclusion, while it might initially seem daunting to customize your WordPress site’s line spacing without plugins, it’s actually quite straightforward and offers rewarding results.
By utilizing the Gutenberg editor for quick fixes and simple control over newer themes or opting for CSS adjustments for a more custom feel, you have the tools to create a visually cohesive and polished web space.
Remember, the key to great typography lies in readability and aesthetics, so take your time experimenting with spacing until you find what best suits your content and brand. With these techniques and tips, you now have the power to make your WordPress site truly your own, enhancing both functionality and style.


